2026-05-15 06:53:49
This Mitchell Hashimoto quote about Bun migrating from Zig to Rust reminded me of a similar conversation I had at a conference last week.
I was talking to someone who worked for a medium sized technology company with a pair of legacy/legendary iPhone and Android apps.
They told me they had just completed a coding-agent driven rewrite of both apps to React Native.
I asked why they chose that, given that coding agents presumably drive down the cost of maintaining separate iPhone and Android apps.
They said that React Native has improved a lot over the past few years and covered everything their apps needed to do.
And... if it turned out to be the wrong decision, they could just port back to native in the future.
Like Mitchell said:
Programming languages used to be LOCK IN, and they're increasingly not so.
Tags: react, coding-agents, ai-assisted-programming, generative-ai, ai, llms
2026-05-15 06:31:20
[...] On the interesting side is how fungible programming languages are nowadays. Programming languages used to be LOCK IN, and they're increasingly not so. You think the Bun rewrite in Rust is good for Rust? Bun has shown they can be in probably any language they want in roughly a week or two. Rust is expendable. Its useful until its not then it can be thrown out. That's interesting!
— Mitchell Hashimoto, on Bun porting from Zig to Rust
Tags: zig, ai, mitchell-hashimoto, llms, rust, generative-ai, agentic-engineering, bun
2026-05-14 12:10:23
Release: datasette-ip-rate-limit 0.1a0
The datasette.io site was being hammered by poorly-behaved crawlers, so I had Codex (GPT-5.5 xhigh) build a configurable rate limiting plugin to block IPs that were hammering specific areas of the site too quickly.
Here's the production configuration I'm using on that site for the new plugin:
  datasette-ip-rate-limit:
    header: Fly-Client-IP
    max_keys: 10000
    exempt_paths:
    - "/static/*"
    - "/-/turnstile*"
    rules:
    - name: demo-databases
      paths:
      - "/global-power-plants/*"
      - "/legislators/*"
      window_seconds: 60
      max_requests: 60
      block_seconds: 20
Tags: datasette, rate-limiting, codex
2026-05-14 07:59:39
We have a bunch of neat Datasette announcements in the pipeline so we decided it was time the project grew an official blog.
I built this using OpenAI Codex desktop, which turns out to have the Markdown session transcript export feature I've always wanted. Here's the session that built the blog. See also issue 179.
Tags: ai, datasette, generative-ai, llms, ai-assisted-programming, codex
2026-05-14 00:15:50
“11 AI agents” is meaningless as a phrase.
If I said “I have 11 spreadsheets” or “I have 11 browser tabs” to do my work, it means about the same thing.
Tags: ai-agents, ai, agent-definitions
2026-05-13 12:50:45
Tool: CSP Allow-list Experiment
An experiment that shows that you can load an app in a CSP-protected sandboxed iframe (see previous note) and have a custom fetch() that intercepts CSP errors and passes them up to the parent window... which can then prompt the user to add that domain to an allow-list and then refresh the page.
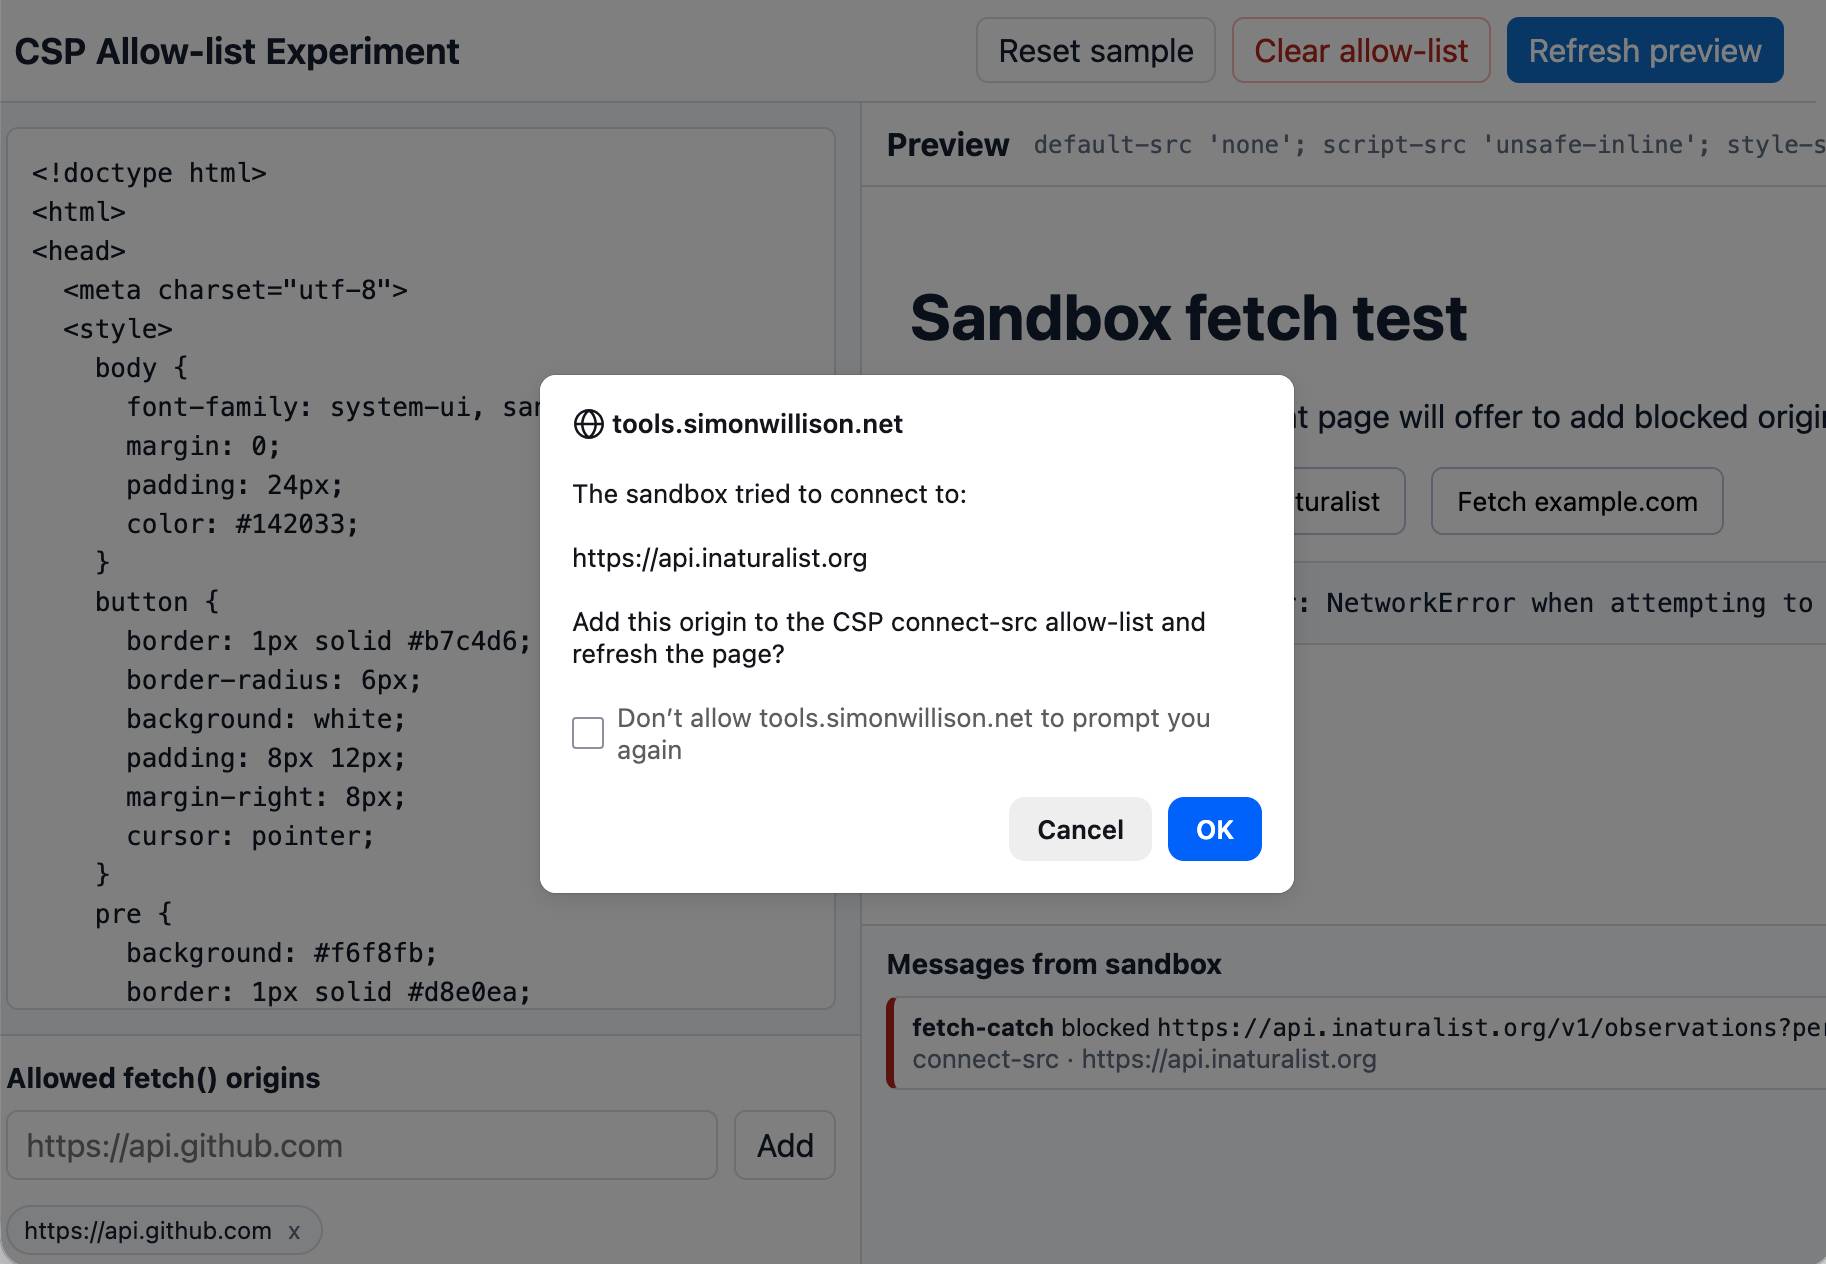
I built this one with GPT-5.5 xhigh running in the Codex desktop app.
Tags: content-security-policy, iframes, security