2025-06-11 08:00:00
My five year-old is into football. Really, really, won’t-sit-down, won’t-let-anyone-else-sit-down into football. My wife and I spend every free minute taking half-hearted shots on goal; feigning agony as a daring counterattack puts us 23-0 down; and answering quiz questions about which hospital Harry Kane was born in.
To buy us a minute to breathe and shower, I invented a game called “Dice Football”. In Dice Football you roll two 6-sided dice, add up the numbers, then consult a table to see what happens next. When the match is over you enter the results in your tournament tracker. Then you start the next match. Hopefully you don’t get bored for at least an hour. Dice Football is a single-player game, which means that no one has to win or lose, and that mummy and daddy get to do something else for a bit.
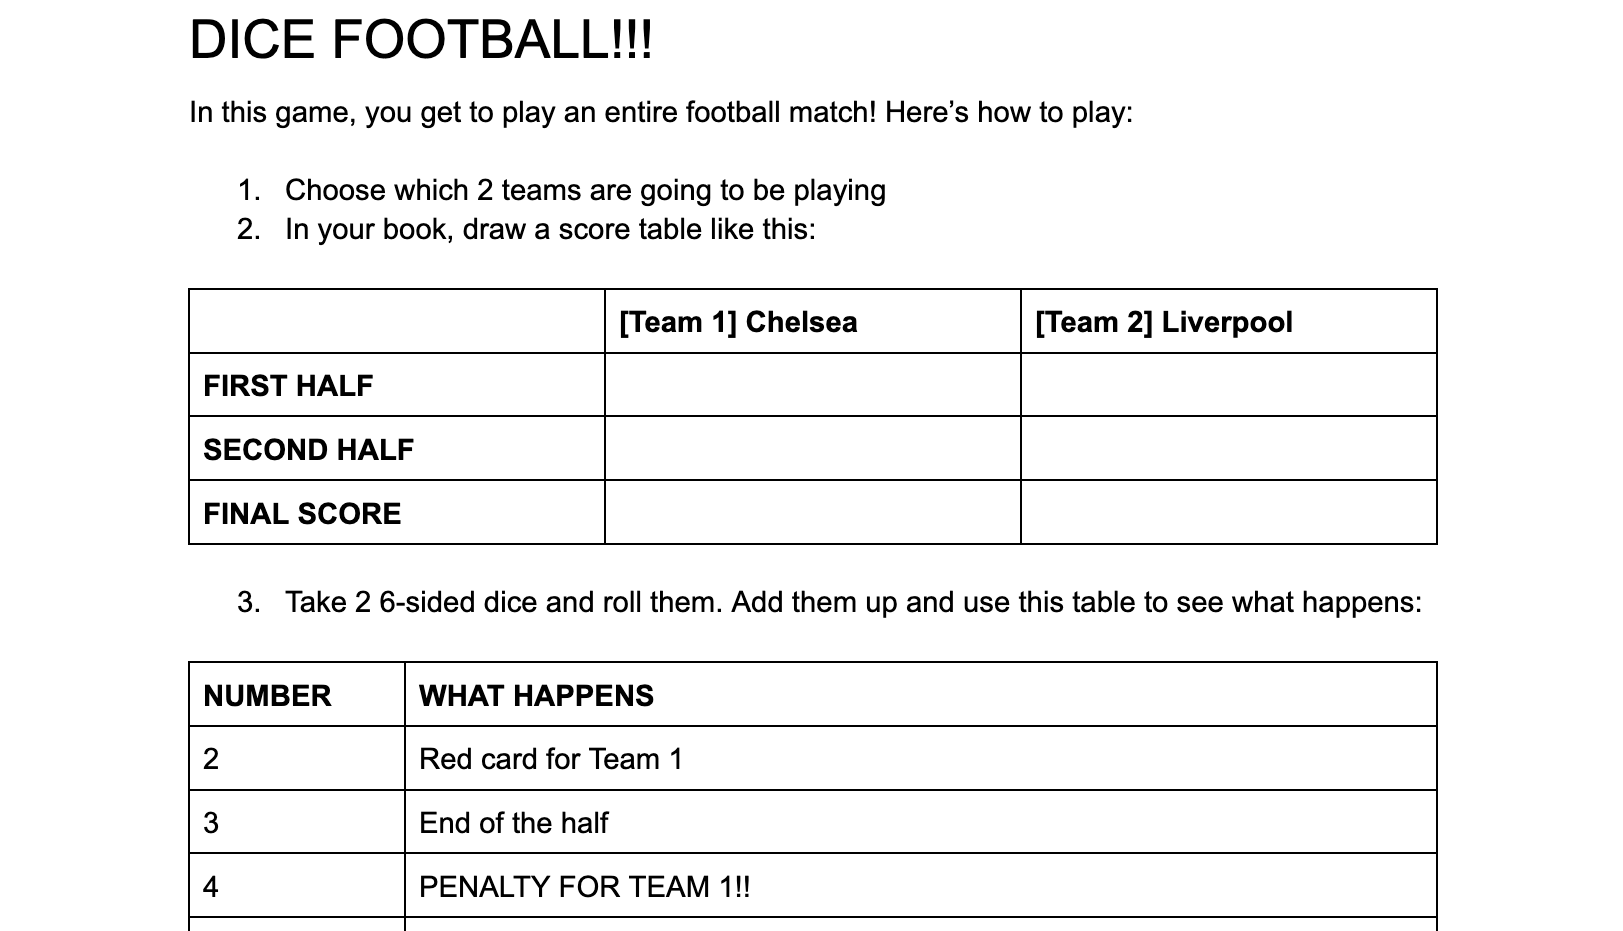
(Here’s a printable rules sheet for Dice Football, and one for the tournament tracker.)
Dice Football was a surprise, obsessive, breakout hit. As long as we kept our son fed with pens and exercise books, we could have all the showers we wanted. Dice Football was also a gateway into the world of dice-based simulation games, and over the following weeks I could barely keep up with my son’s appetite for new games. His favourite was “Dice US Federal Election,” where you roll dice to figure out which party wins each state, and when you’re finished you borrow daddy’s phone to add up the electoral college votes.
As the games kept coming, I ran out of interesting ways to generate sums with 6-sided dice. I bought some 20-siders, and these big boys kept things interesting for another week or two. But I started to chafe against the limits of any kind of simple polyhedra. I started to get ambitious.
I wanted to make games that used sums with arbitrarily customisable structure and difficulty. For example, instead of the simple A+B = ?? (where 1<=A<=6 AND 1<=B<=6) form of two 6-sided dice, I wanted sums like:
A*B + C*D = ?? (for example: 4*2 + 14*3 = ??)A*B < 20 and C*D < 50
If the answer is even then it’s a goal for Chelsea; if it’s odd then it’s a goal for Liverpool. Or whatever.
I couldn’t build these sums using dice, and I certainly wasn’t going to construct them by hand. I needed a way to generate an infinite stream of super-specific questions.
So I wrote one: diceomatic.
diceomaticdiceomatic is a Python library for building highly-customisable, infinite dice games.
For example, to generate a stream of questions using the example constraints listed above, you write:
from diceomatic import *

# Declare the variables
a, b, c, d, e = variables(["a", "b", "c", "d", "e"])
vs = [a, b, c, d, e]

# Declare the form of the equation
lhs = Add(Multiply(a, b), Multiply(c, d))
rhs = e

# Declare the constraints
constraints = [
	AdditionCrosses10Boundary(Multiply(a, b), Multiply(c, d)),
	IsLessThan(Multiply(a, b), Literal(20)),
	IsLessThan(Multiply(c, d), Literal(50)),
	Equal(lhs, rhs),
]
# Declare the domains over which to search for valid sums
domains = uniform_domains(vs, range(2, 100))

# Find variable bindings that form a valid equation
bindings = find_bindings(vs, domains, constraints, n_bindings=10)

# Print each set of bindings as an equation with a random value held out
for bnd in bindings:
	lhs_expr = expression_string(lhs, bnd, hold_out=e)
	rhs_expr = expression_string(rhs, bnd, hold_out=e)
	print(f"{lhs_expr} = {rhs_expr}")
This prints:
9 * 2 + 11 * 2 = __
4 * 2 + 10 * 4 = __
2 * 5 + 16 * 3 = __
6 * 2 + 5 * 6 = __
# ...and so on...
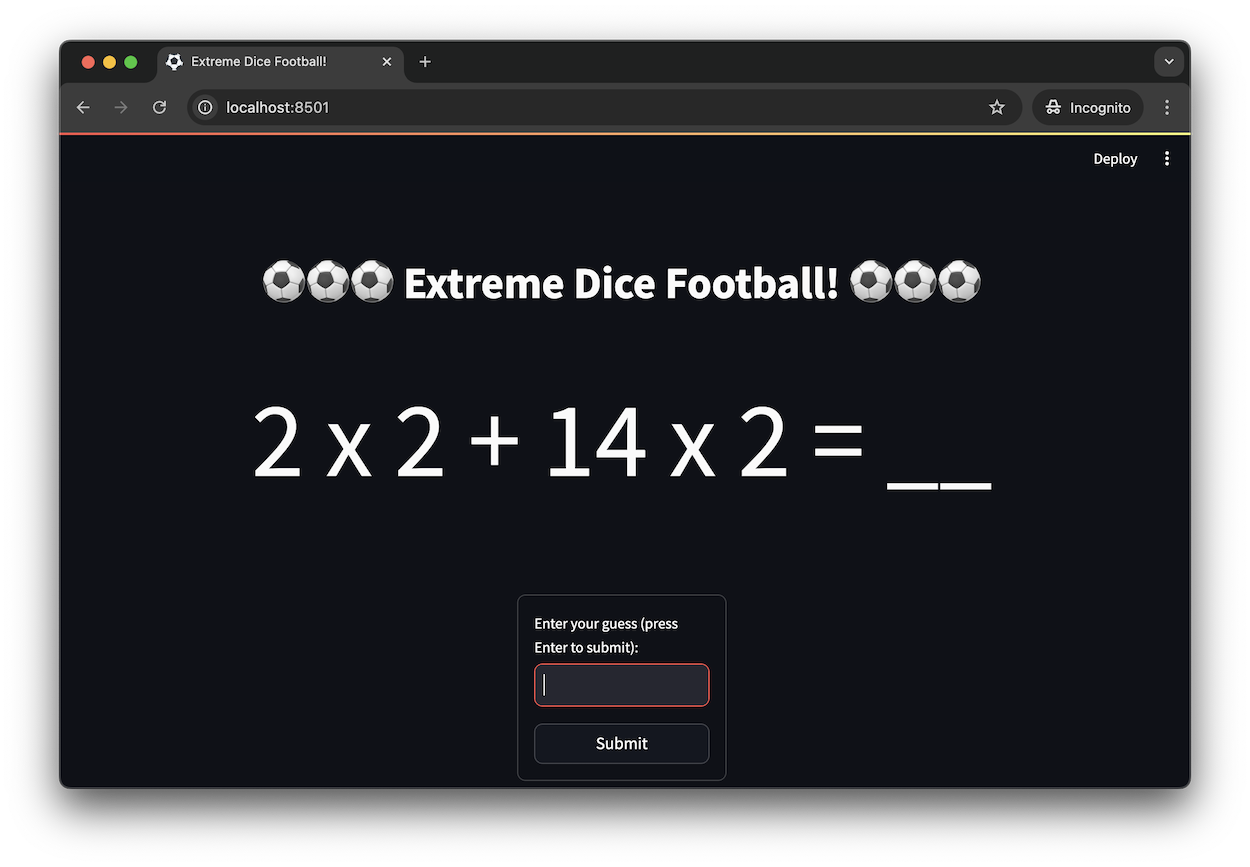
You can then save the sums as a PDF, print the PDF on a sheet of paper, and use it to power games of Extreme Dice Football.
You can do much more than print the questions though! You have programmatic access to them, which means you can do anything you want. You can put them on a website, or a game, or an app. Your code knows what the correct answer to each question is, so it can check whether the player’s answer is correct. You can even automatically adjust the difficulty of the generated questions based on how the player does.
For example, I made a Streamlit app for displaying sums and checking their answers, and I deployed it to Streamlit cloud. Now I can write a new game with new rules, program its format into into the app, hand my son an iPad, and have the iPad generate the equations of the form and difficulty needed to power the game.
Truly a stream of infinite fun.
Install diceomatic using:
pip install diceomatic
See the GitHub repo for docs and examples. PRs welcome!
2025-05-14 08:00:00
Hello! Hello! Welcome, welcome. My name is Hobert Reaton, and I’m here in this shabby motel conference room to present you with yet another once-in-a-lifetime investment opportunity.
Look at this picture. Tell me what you see:

Do you see learning? Self-improvement? The future leaders of our country?
I’ll tell you what I see: wasted computing power.
Between the ages of 5 and 18, the average child in full-time education completes about 5 maths worksheets a week. Each worksheet has 20 questions. This means that over the course of their school career, every single one of our kids performs about 80,000 calculations.
At the moment we completely waste their work. A student figures out that 5+5=10 and 7x7=49. This motivates them; they’re energised by their success. But then what do we do with the fruits of their labour? Nothing! We throw the fruit away, to rot in the void. “We knew that already,” we tell our children. “Your ideas don’t matter.” Unlike the rest of society, I believe that kids deserve to feel appreciated. I believe that their achievements are valuable.
That’s why I founded MinorMiner.
MinorMiner is a platform that allows school-age children to monetise their maths homework by using it to mine Bitcoin. Yes, you heard me. We send children their homework, they crunch through it, and then together we transform their sweat into digital gold. This isn’t some rinky-dink incentive program where we bribe children to care about multiplication. Homework is the essential raw material that feeds our machine. We need these kids. No kids; no Bitcoin.
In order to understand the innovation that makes MinorMiner possible, we first need to understand how Bitcoin is mined today. Right now, people mine Bitcoin by using computers to solve complex mathematical puzzles. The puzzles look like this:
There’s no elegant way to solve these puzzles. The only thing for Bitcoin miners to do is to guess inputs to step 2, over and over and over again, until they find one that happens to satisfy the criteria in step 4. When a miner guesses a right answer we say that they’ve “mined” a new “block”. They attach their solution to the blockchain to show that they’ve verified the transactions in the block, and they’re rewarded with new bitcoin. Their work, along with a couple of extra steps that I’ve hand-waved over, ensures that the blockchain stays safe and secure.
However, it also requires an incredible amount of electricity - around 150TWh per year, or 1% of the world’s total energy consumption. What if there was a better, more efficient way to achieve the same thing?
This is where MinorMiner and school-aged children come in. “But Bitcoin mining sounds hard!” I hear you wail. “My child has only a rudimentary grasp of basic algorithms!” True, true - but the magic is that the children on our platform don’t need to know how to mine Bitcoin, and they won’t even know that they’re doing it. Our team has converted the SHA-256 hashing algorithm used by the bitcoin blockchain into a sequence of elementary arithmetic questions that even the dullest dullard can answer. Solving a blockchain puzzle used to require understanding and executing a SHA-256 hash. Now all it takes is skipping through a few trillion simple brainteasers.
5+3=?10*5=?Is 102 bigger than 67? (y/n)The kids do these sums - we take care of the rest.
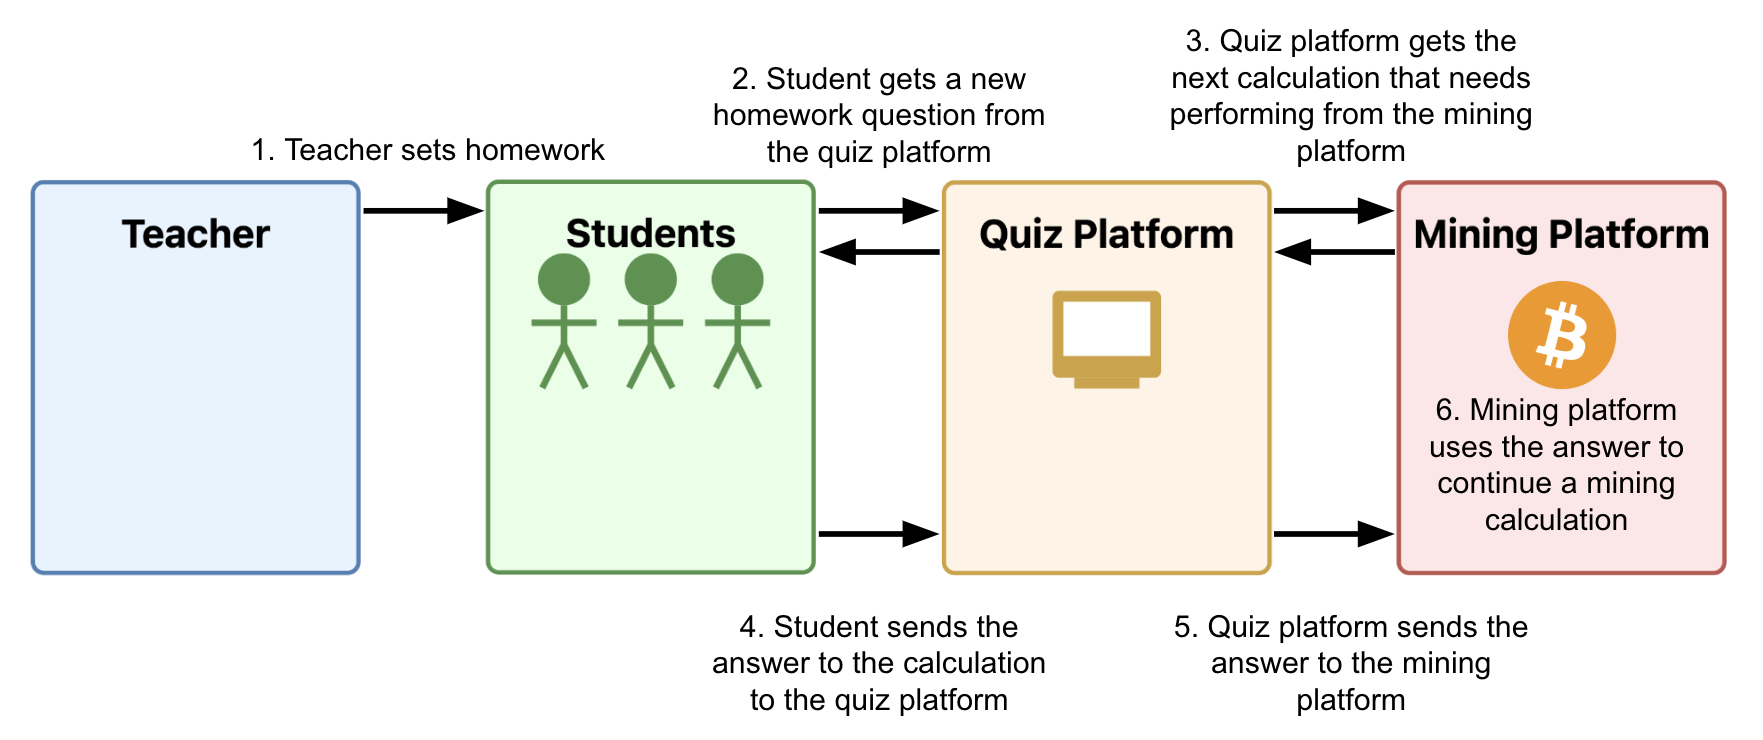
The heart of MinorMiner is a centralised system that manages our mining. The system decomposes a SHA-256 hash computation into simple arithmetic questions, and works out which of these questions need answering next. Simple enough - but how do we get the questions to the kids? Three words: online maths quizzes.
You see, MinorMiner also has a maths learning platform that we sell to schools all over the world. Our platform isn’t particularly good, but we give department heads a generous revenue share and so this tends not to matter. Once a teacher (or “distribution associate” as we like to call them) is set up on MinorMiner, they assign a quiz to their class as homework. In the evening their children (or “computation partners”) log into the MinorMiner portal and answer their quiz for the day, which consists of whatever questions our hashing system needs doing next. By way of compensation their distribution associate doesn’t give them a detention. We collect their answers and use them to continue calculating a hash. When one partner finishes their quiz, the next partner continues calculating from where they left off.
We have to be careful - a hash is a delicate thing. One tiny mistake in one tiny step and - poof! - the whole calculation is completely, irreversibly screwed. That’s why send each calculation to two separate computation partners. If their answers disagree then we escalate to a slightly older partner to adjudicate. We maintain a rating for each partner based on their accuracy. If their rating drops below 4.3 stars then they are invited to undergo additional training to help them get back to the standard expected for MinorMiner partners. If such improvement is not forthcoming then they are invited to seek maths education elsewhere.
Any questions so far? No? Then it’s time for me to show you our real technological breakthrough.
We write our mining code using a Python library called Centralized Underage Distributed Arithmetic - Automated Assignment And Group Hashing (CUDAAAAGH). CUDAAAAGH allows us to distribute any complex computation across an infinitely-scalable pool of computation partners. We’ve open-sourced it on GitHub and PyPi.
To use it, we run pip install CUDAAAAGH and then use its CUDAAAAGHInt class everywhere we would normally use Python’s standard integer type. Aside from that, we write all of our code as normal. When we execute our program, CUDAAAAGH automatically offloads any arithmetic computations to our network of computation partners, instead of burdening our own CPUs.
For example:
from CUDAAAAGH import CUDAAAAGHInt

x = CUDAAAAGHInt(5)
y = x + CUDAAAAGHInt(10)

# Behind the scenes, this sends the calculation "5+10" to a computation
# partner. Execution pauses until we receive an answer.

print(f"The answer is: {y}")
# => 15
This works for all integer operations. For complex operations like XOR, CUDAAAAGH breaks them up into simpler additions and multiplications that will be more familiar to our computation partners. It then combines their answers behind the scenes to calculate the requested XOR:
from CUDAAAAGH import CUDAAAAGHInt

x = CUDAAAAGHInt(0b010100100)
y = x ^ CUDAAAAGHInt(0b111100101)

print(y)
# => 321
And before you ask - yes you can absolutely use CUDAAAAGH to train AI models. Stick around until the end for more details.
I know what you’re thinking: this is genius, it’s revolutionary, but Bitcoin mining is a game of speed. Is CUDAAAAGH fast enough? And to you I say: hell yes it’s almost fast enough, if you go by our 5-year projections and use our heterodox assumptions about the direction of the world economy.
Hold onto your cheque books everybody.
Today, calculating a hash takes the MinorMiner platform about 7 billion operations. An off-the-shelf ten-year-old can perform one addition every 10 seconds. Including a generous sleeping allowance, this means that they can compute 1 hash every 2,000 years. On the other hand, specialized mining rigs can compute 1 hash every 0.00000000001 seconds, and new blocks are mined every 10 minutes. These numbers don’t work for MinorMiner - yet.
Fortunately MinorMiner is in a fundamentally strong position in the value chain. We’re fuelled by exhaust work that was previously completely wasted, which means that we don’t need to be uber-efficient in order to be competitive. However, we do still need to complete each hash within the time it takes for a new block to be mined. Otherwise, even if we find a successful hash that would have mined us a block and won us some Bitcoin, someone else will have mined that block already.
This is why MinorMiner’s number one focus is on turbo-charing our hashrate. Let me tell about our top three strategies: parallelisation, curriculum optimisation, and teacher incentive alignment.
First, parallelisation. Right now, a single partner works on a single hash. This means that even though adding more partners allows us to calculate more hashes at the same time, it doesn’t decrease the end-to-end time it takes to calculate a single hash.
However, we can distribute work between computation partners far more cunningly than we do today. We can split up the calculations required to compute a hash into independent chunks, and we can give the chunks to different computation partners to work on in parallel. Once all of the chunks are done, we can combine them and take a big leap forward in a single hash, instead of many small leaps in lots of different hashes. Spreading out work like this allows us to decrease the time it takes us to calculate a single hash. This will significantly increase our competitiveness.
“But Hobert, SHA-256 can’t be parallelised!” I hear you squawking. “It uses a sequential block structure, where the output of each block is the input to the next block! This means that you can’t calculate later blocks until you’ve first calculated earlier ones. This makes parallelisation impossible!”
You’re right, oddly-well-informed heckler! Most implementations of SHA-256 can’t be usefully parallelised. However, remember that CUDAAAAGH breaks bitwise operations like AND, OR, and XOR into a large number of additions and multiplications. Many of the sub-calculations inside a single XOR operation are in fact independent and don’t depend on each other. This makes them easy to parallelise and get the massive speedups I’ve been promising.
For example, here’s our current, naive implementation of XOR:
class CUDAAAAGHInt:
    def __init__(self, val: int):
        self.val = val

    def __xor__(self, other: 'CUDAAAAGHInt') -> 'CUDAAAAGHInt':
        result = CUDAAAAGHInt(0)
        # Calculate the value of each bit, and use bit-shifting to combine
        # them using standard integer arithemtic.
        for i in range(max(self.bit_length(), other.bit_length())):
            bit_self = self._ith_bit(CUDAAAAGHInt(i))
            bit_other = other._ith_bit(CUDAAAAGHInt(i))

            xor_bit = bit_self + bit_other - CUDAAAAGHInt(2) * bit_self * bit_other
            result += xor_bit << CUDAAAAGHInt(i)

        return result

    def _ith_bit(self, i: 'CUDAAAAGHInt') -> 'CUDAAAAGHInt':
        return CUDAAAAGHInt((self.val >> i.val) & 1)

    def bit_length(self) -> int:
        return self.val.bit_length()
This implementation is serial and slow - just look at that for-loop! But now look even closer. Notice how each pass through the loop is entirely independent of all others. This means that we can calculate the value of each bit separately, in parallel, then combine all the results once we’re done. We can even compute bit_x and bit_y in parallel inside each loop.
Combining these tricks gives us a parallel implementation that looks something like this:
import asyncio

class CUDAAAAGHInt:

    def __init__(self, val: int):
        self.val = val

    async def __xor__(self, other: 'CUDAAAAGHInt') -> 'CUDAAAAGHInt':
        # Calculate a single bit XOR at position i
        async def compute_bit_xor(i: int) -> 'CUDAAAAGHInt':
            bit_self_task = asyncio.create_task(self._ith_bit(CUDAAAAGHInt(i)))
            bit_other_task = asyncio.create_task(other._ith_bit(CUDAAAAGHInt(i)))

            bit_self = await bit_self_task
            bit_other = await bit_other_task

            xor_bit = bit_self + bit_other - CUDAAAAGHInt(2) * bit_self * bit_other
            return xor_bit << CUDAAAAGHInt(i)

        # Determine the number of bits to process
        max_bits = max(self.bit_length(), other.bit_length())

        # Calculate all bits concurrently
        tasks = [compute_bit_xor(i) for i in range(max_bits)]
        all_bits = await asyncio.gather(*tasks)

        # Sum the results
        result = CUDAAAAGHInt(0)
        for bit in all_bits:
            result = result + bit

        return result

    async def _ith_bit(self, i: 'CUDAAAAGHInt') -> 'CUDAAAAGHInt':
        return CUDAAAAGHInt((self.val >> i.val) & 1)

    def bit_length(self) -> int:
        return self.val.bit_length()
This will reduce the time it takes for us to calculate the XOR of two numbers M and N by a factor of about log2(max(M, N)). We’re mostly dealing with 32-bit integers, so this is a 5x speedup.
I’m sure you’ve all noticed that we could use a map-reduce approach to turbocharge that last sum as well. I’m also sure that a couple of you have noticed that we could write a monad that allows us to elegantly parallelise everything, everywhere. I’m even more sure that one of you has already emailed me an implementation of this monad, written in a Lisp dialect that you designed yourself. Fair warning to that person - I am unlikely to read it.
A 5x speedup in our xor implementation is very, very, deeply impressive, but it’s still a hack. Decomposing XOR calculations into additions and multiplications is fundamentally inefficient, and it imposes a hard ceiling on our performance. In order to achieve true speed and elegance, we need to perform the XOR directly, without splitting it up.
The reason that we don’t do this already is because most children can’t calculate even a basic 8-bit XOR. I know! I was as shocked as you when I found out. But these kids aren’t stupid; their ignorance isn’t their fault. They’re being let down by a broken system that fails to teach them the skills they need to compete in today’s highly-specialised economy.
This is why we’ve successfully lobbied to have XOR calculations added to the first grade syllabus, starting in the coming autumn term. We’ve produced a textbook containing all the important bitwise operations that every 7 year-old should know, including XOR, AND, OR, and bitshifts. This will allow us to ask our computation partners truly useful questions like What is 2136782 ^ 2136821?, instead of spoonfeeding them piles of simpler calculations. We predict that this will lead to a further hashrate speedup of approximately 100x, and we expect to start seeing results in Q1 next year, after the end-of-unit quizzes start to bite.
But why stop with XORs? Think about how legacy mining has evolved over the last decade or so. The first Bitcoins were mined on normal computers, with normal CPUs. Nowadays all bitcoins are mined using specialised computers called ASICs, hardwired to calculates hashes and nothing out. In order to compete, we have to train human ASICs.
Kids need to learn how to calculate a SHA-256 themselves, end-to-end. This is why we’re such vocal supporters of SB-1337 - “No Child Left Unmined.” SB-1337 will replace the outdated year 7 maths syllabus with an in-depth, end-to-end course on calculating SHA-256 hashes by hand. It will allow us to stop sending students trivial additions and multiplications, and send them real maths instead:
Question 1:

What is the SHA-256 hash of 01003ba3edfd7a...? (3 marks)

Question 2:

What is the SHA-256 hash of 01003ba3edfd7b...? (3 marks)
We’ll be able to turn their homework directly into bitcoins, with no intermediate calculations required. At this point all we’ll need to do is scale. Which brings me to our final speedup technique: Teacher Incentive Alignment
At first some of our new Distribution Associates (or teachers, as they’re known as in the legacy system) were…hesitant to embrace our new, hash-centric curriculum. Fortunately this changed when they learned about our Teacher Incentive Alignment program (TIA).
TIA allows us to compensate Distribution Associates for their hard work, using a sliding-scale fee for every billion hashes produced by their Computation Partners (or, “students”). With TIA, whenever we profit, they profit. The Computation Partners profit too of course, through the invaluable knowledge and practice that they get by participating in MinorMiner.
We’ve found that Distribution Associates who are in the TIA program set 1,000,000% more homework questions than those who are not. For example, one particularly keen associate set their partners the following quiz:
Question 1 of 1,471,126,723

What is the SHA-256 hash of 01003ba3edfd7a...? (0.0000000001 marks)

Question 2 of 1,471,126,723

What is the SHA-256 hash of 01003ba3edfd7b...? (0.0000000001 marks)

(and so on for 1,471,126,721 more questions)
Some Associates were initially concerned that their Computation Partners might balk at such ambitious workloads, despite all the knowledge and hands-on-experience and so on that it would give them. They worried that some Partners might cheat and use specialized mining software to do their hashing homework for them. Fortunately we were able to use spreadsheets and a lot of winking to help most of them realise that this might not actually be a problem.
MinorMiner would like to make it clear that we do not in any way condone cheating. Use of our Homework Submission APIs and their associated SDKs is strictly prohibited.
So in short - yes, we are going to be fast enough. Through parallelisation, curriculum optimisation, and teacher incentive alignment, we believe that we are extremely well-positioned to speed up and scale massively in the coming years. Then what?
After we’ve perfected the bitcoin use-case, we’ll pivot straight to AI. We’re already extending CUDAAAAGH with pytorch bindings that will allow users to run their training and inference code using our unique computing platform. Most children don’t know much matrix algebra, but matrix algebra is just addition and multiplication wrapped up in funny symbols. All we need to do is implement matrix multiplication using CUDAAAAGH and we’ll be very, very golden. And if our next legislative priority (SB-80085) passes, matrix algebra will soon be on the year eight curriculum too. It’s curriculum optimisation all over again.
def matmul(m1: CUDAAAAGHMatrix, m2: CUDAAAAGHMatrix) -> CUDAAAAGHMatrix:
  # (Implementation left as an exercise for the reader, you get
  # the joke by now)
Applying CUDAAAAGH to AI raises some delightful philosophical questions. Were you already deeply confused about whether sufficiently advanced AI models should count as conscious beings? Are we going to be morally obliged to care about their welfare? How much more confusing do these questions become if the AI models are an emergent property of billions of children doing their maths homework?
And what will we do after AI? Cloud computing, ladies and gentlemen, cloud computing. Children are commodity hardware. Our big, audacious goal is to implement an entire computer using them. Everywhere that a computer normally has an electron, we’ll replace it with a school-aged child doing their maths homework. CPUs become specialised children performing incredibly-specialised operations. Hard-drives become arrays of children remembering 1s and 0s. Motherboards become lines of children deciding what messages to send to the others. Think about the implications! Free computers for everyone!
That’s all I have to say today, thank you for listening. Believe in children! Invest in the MinorMiner pre-seed! Form an orderly line! Make your cheques payable to “Hobert Reaton.” No madam, there’s no “LLC” at the end. Just “Hobert Reaton.” I also accept cash and a wide range of memecoins. Here’s my wallet address. Thank you.
CUDAAAAGH is available on GitHub. It can also be installed from PyPi using pip install CUDAAAAGH although I can’t imagine why on earth you would do this.
2025-03-11 08:00:00
My wife and two little boys sometimes go on trips to see friends or family for whom my presence isn’t strictly required. While my wife books the flights I make a show of weighing up my options and asking if it’s really OK if I don’t come. Eventually I’m persuaded that it truly would be the best thing for all of us for me to have five to seven days to myself with no nappies and all Nintendo.
My wife hits the “Pay Now” button and when the confirmation email comes through I call my secretary and tell him to clear my calendar. When no one answers I remember that I have neither a secretary nor all that much going on, so instead I find a prestige TV series, a selection of local takeaway menus, and a short but immersive video game. This time I messaged my buddies and asked them what I should play. Steve gushed about a game called Cocoon; Morris said that he’d played it a year ago and it was “alright.” Sold.
One month later there were hugs, kisses, wave goodbye to taxi, shut the door, where’s the HDMI cable, how did it get under the sink, do I have a Nintendo Account, what’s my password, whatever I’ll make a new one, right let’s do this, estimated download time 45 minutes, start on tax returns, am I relaxed yet?
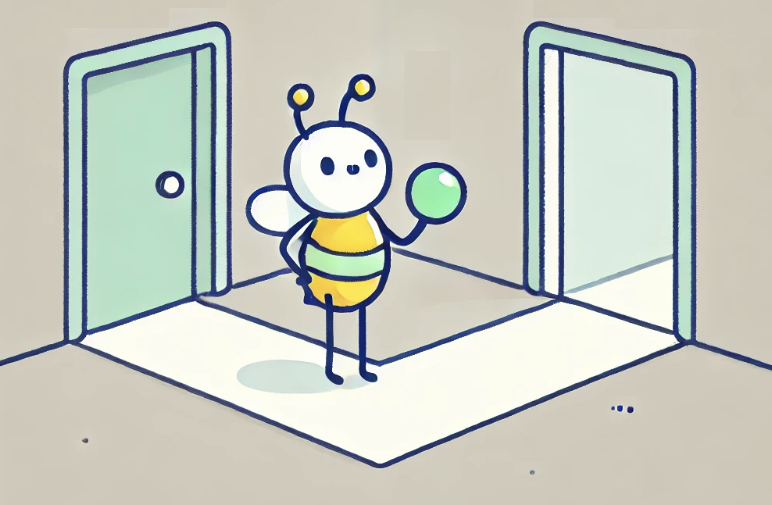
Eventually I was able to boot up Cocoon. I learned that I was going to play as a little bee guy who has to solve artsy puzzles in a lonely, abstract world for no adequately explained reason. Bee guy makes his way through the world using four glowing orbs. He can pick orbs up, carry them around, and put them back down on switches in order to open doors and unfold bridges - standard orb stuff. However, bee guy soon learns that the orbs also contain other worlds, which he can jump in and out of to help with his puzzles. If he jumps inside one orb-world whilst carrying another one then he can put orb-worlds inside each other. He can even - towards the end - put a world inside itself. Conundrums ensue.

By the end of Day 1 of my vacation I was having about three-quarters as much fun as I’d hoped. Cocoon’s atmosphere was absorbing and its puzzles made me smile; I only wish there had been a little bit of a story and not just a fuzzy metaphor for entropy and decay. Still, I kept going, trekking through crumbling ruins and overbearing symbolism. By the end of Day 2 I was 51% through the game. I started the next puzzle and got completely stuck. I was surely just tired, I thought, so I watched an episode of The Sopranos and went to bed. The next morning I got up at 6am, made some coffee, and went into my office to crack on. But I was still stuck. I spent an hour filling a bin bag with toys that I didn’t like, since no one was around to stop me. I tried again. Still stuck.
Then I realised. I didn’t know how to solve the puzzle, but I did know how to write a computer program to solve it for me. That would probably be even more fun, and I could argue that it didn’t actually count as cheating. I didn’t want the solution to reveal itself to me before I’d had a chance to systematically hunt it down, so I dived across the room to turn off the console.
I wanted to have a shower but I was worried that if I did then inspiration might strike and I might figure out the answer myself. So I ran upstairs to my office, hit my Pomodoro timer, scrolled Twitter to warm up my brain, took a break, made a JIRA board, Slacked my wife a status update, no reply, she must be out of signal. Finally I fired up my preferred assistive professional tool. Time to have a real vacation.
In order to write a Cocoon solver, I needed to:
Cocoon’s mechanics are simple but elegant. In the first level you find an orange orb sitting on a stand. You pick it up, obviously, and start to carry it around. You come to a gate with an orb-stand next to it. You put the orb down on the stand and the gate opens. You pick it up again and continue through the gate.
Eventually you come to a small reflecting pool with a special-looking orb-stand in the middle. There’s no obvious path forward, so you put your orange orb down on the stand. You stand next to it and press A, because that’s the only button in the game that does anything. You watch yourself dive into the orb, and land in another world. You’re now inside the orange orb. You start to walk, You find a new, green orb, which you use to keep solving puzzles and opening doors and moving forwards through the orange orb-world. Throughout the course of the game you find a total of four orbs, and the final puzzles require you to lug them all around and dive in and out of them in just the right order to get across the next bridge.
An example: in one puzzle you need to bring your red orb to the top of a vine so that you can use it to reveal a magic walkway to get to the next area. However, you can only climb up vines while holding your green orb, and you can only hold one orb at a time. This means that you can’t carry the red orb up the vine. The solution is therefore to pick up the red orb, dive inside the green orb, drop the red orb, jump out, use the green orb to climb the vine, dive back inside the green orb, retrieve the red orb, and jump back out.
In order for my solver to analyse Cocoon, it would need to be able to programatically manipulate a copy of it. My solver would need to know how the world was laid out, what actions were allowed, and whether it had finished solving its puzzle yet. The easiest way to do this wasn’t to have the solver interact with the real game, but to instead write a new, stripped-back copy of it that contained all its logic but none of the graphics.
This was made easier by the fact that each of the puzzles that I got stuck on could be represented as a finite state machine. A finite state machine is a system that can be in exactly one of a finite number of states at any given time. The system is able to transition between some pairs of states using a set of known rules.
Most games with a large 3-D world can’t be modelled as a FSM because they have too many possible states and too many possible transitions. The player can be in a near-infinite number of slightly different locations; so can their enemies. The player might have a huge number of items they could be carrying and past actions they could have taken, each of which could affect the world in some important way. Some parts of the game may depend on timing and agility, which are hard to represent in a FSM. In most game levels there’s too much going on for a simple model like an FSM.
However, Cocoon’s is a simple world. There are no enemies. The only items you can carry are 4 orbs. And whilst its 3-D landscape is lovely to look at, it masks a simple topology that can be modelled as a small graph - a collection of nodes (important locations like orbs and switches) and edges (pathways that connect nodes that are immediately accessible from each other). Beyond these characteristics, the exact layout of the world rarely matters.
This means that a “state” in Cocoon is easy to define and manage. A state is defined by the combination of:
Transitions between states are similarly constrained. Players can transition between game states via only a small set of actions, such as:
This means that it’s relatively simple to write a program that:
Once I’d written this program, I had a representation of the game that I could programmatically manipulate. I could tell my game to do things like “take such-and-such an action” or “tell me all the possible next actions that can be taken from the current state.” This meant that I could use my simplified game to analyse and solve the real one.
To solve a puzzle I needed to find a sequence of actions that would take me from the puzzle’s start state to its goal state (for example, opening a door). This was a job for an algorithm called Breadth-First Search (BFS).
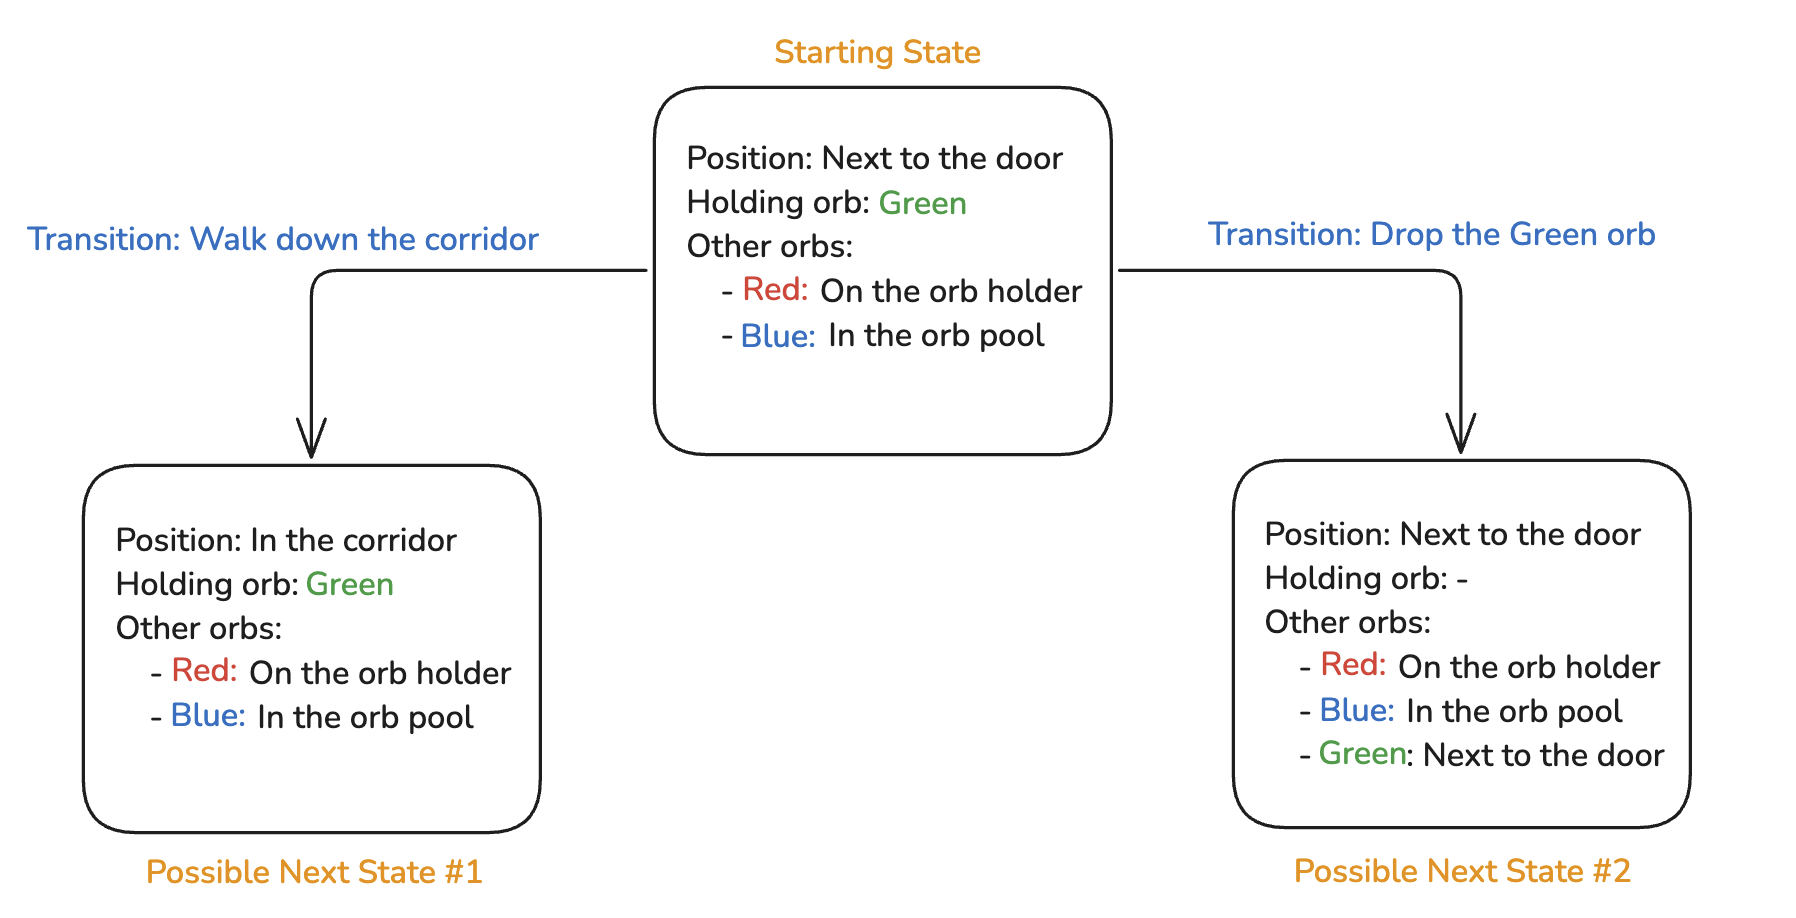
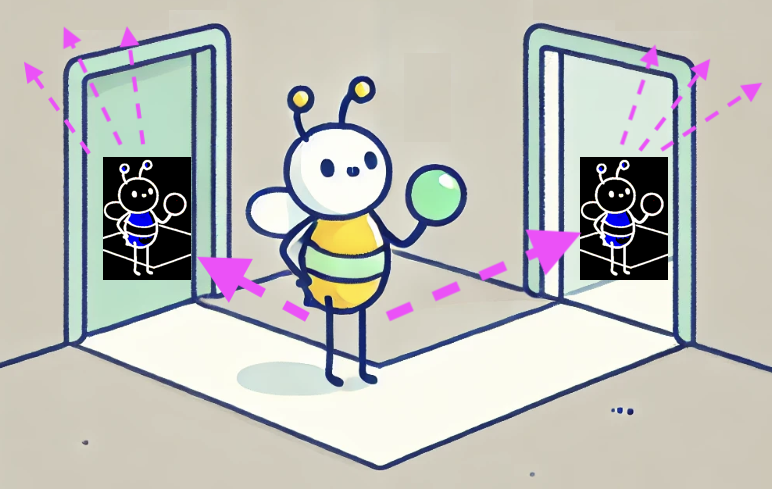
BFS starts at an initial state in an FSM and simultaneously takes a step to every new state that can be reached from it. For example, suppose that a puzzle starts with bee guy holding the green orb, next to a door and to a corridor to another section.
My solver takes steps both through the door and down the corridor, and begins keeping track of each path. From each of these new states, it takes another step to each further state that can be reached from them.
It keeps stepping and tracking the expanding number of paths that it’s exploring, until one of its paths reaches a goal state (for example, a state in which a particular orb is on a particular stand, which opens a bridge to the next area). At this point the solver stops, and returns the path that led to the goal state. Because the solver takes a single step down every possible path at once, the first path to the goal state that it finds is guaranteed to be the shortest one possible.
I can then input the sequence of actions that my solver returned into the real game (for example: pick up red orb, walk to orb holder, put down red orb, etc), and move on to the next level, without having to do any thinking whatsoever. Here’s my code.
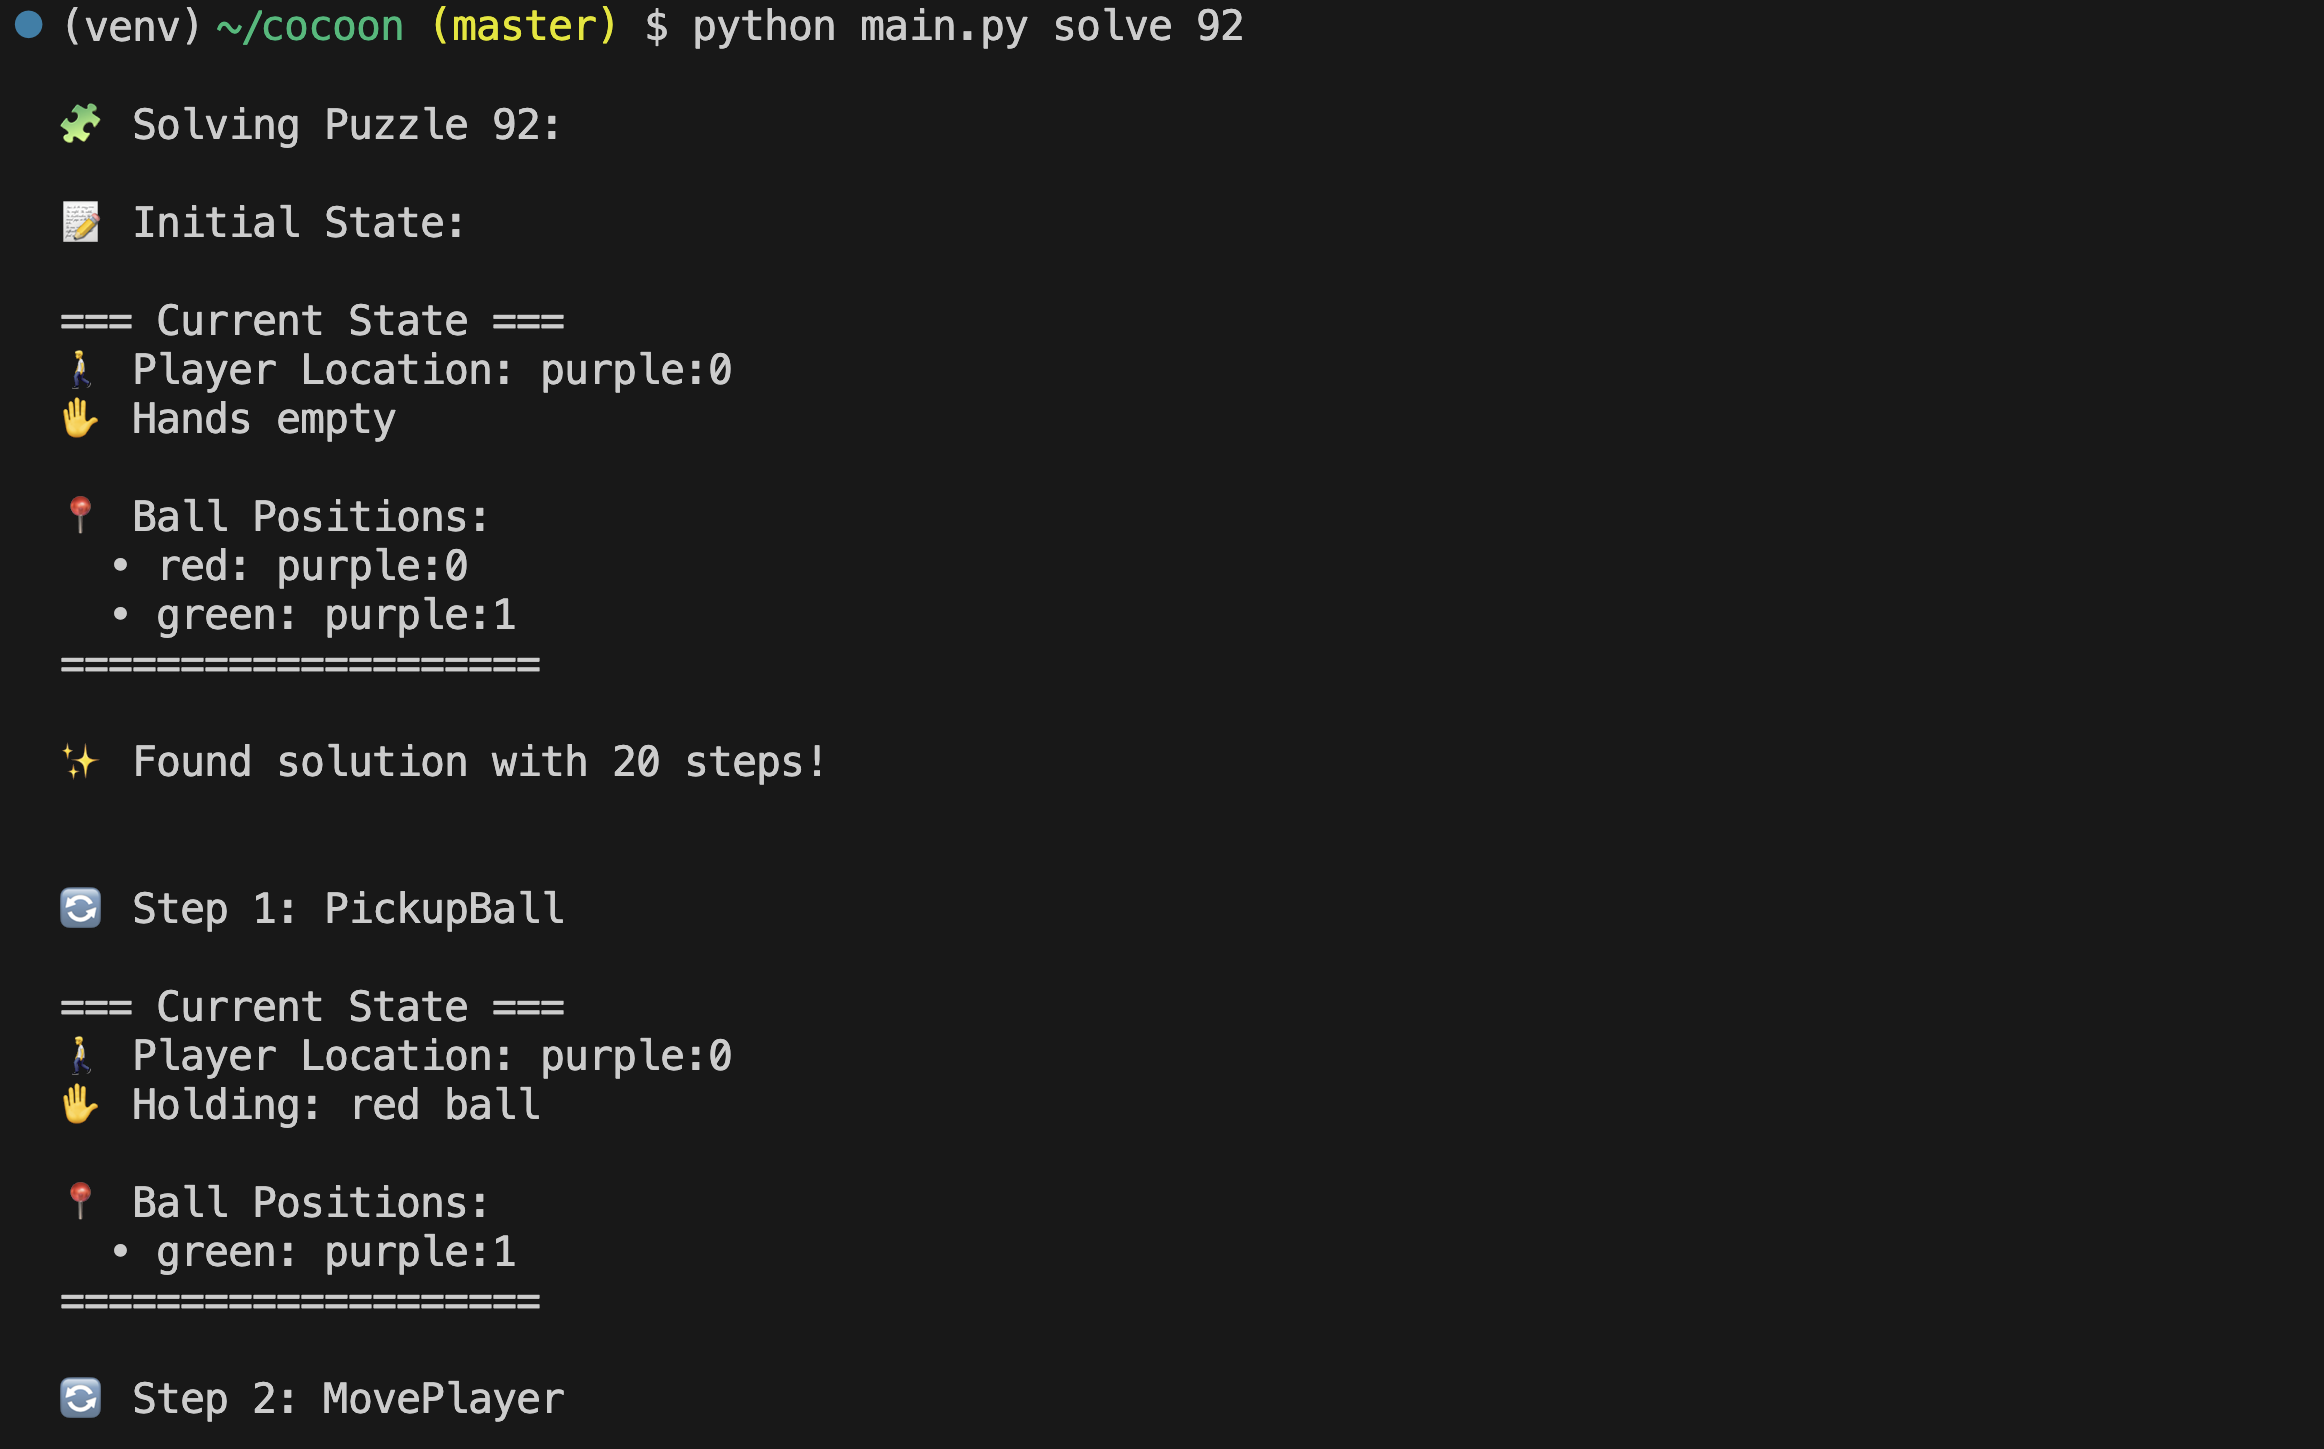
My solver stops as soon as it has reached the goal state. However, I was also interested in fully mapping out every possible sequence of actions one could take inside a puzzle. I wanted to see how big and hard the puzzles actually are.
To do this I wrote a script that explores every possible state and transition. It keeps stepping through states transitions, even after one of its paths has reached a goal state. It only stops when none of the paths it’s exploring have any available actions that lead to a new state that it hasn’t seen before.
This script generates a new graph, in which each node is a state and each edge is a transition. The graph shows every single sequence of actions that you can take inside the puzzle. For example, here’s the puzzle that I found hardest, represented as a graph of states and transitions:
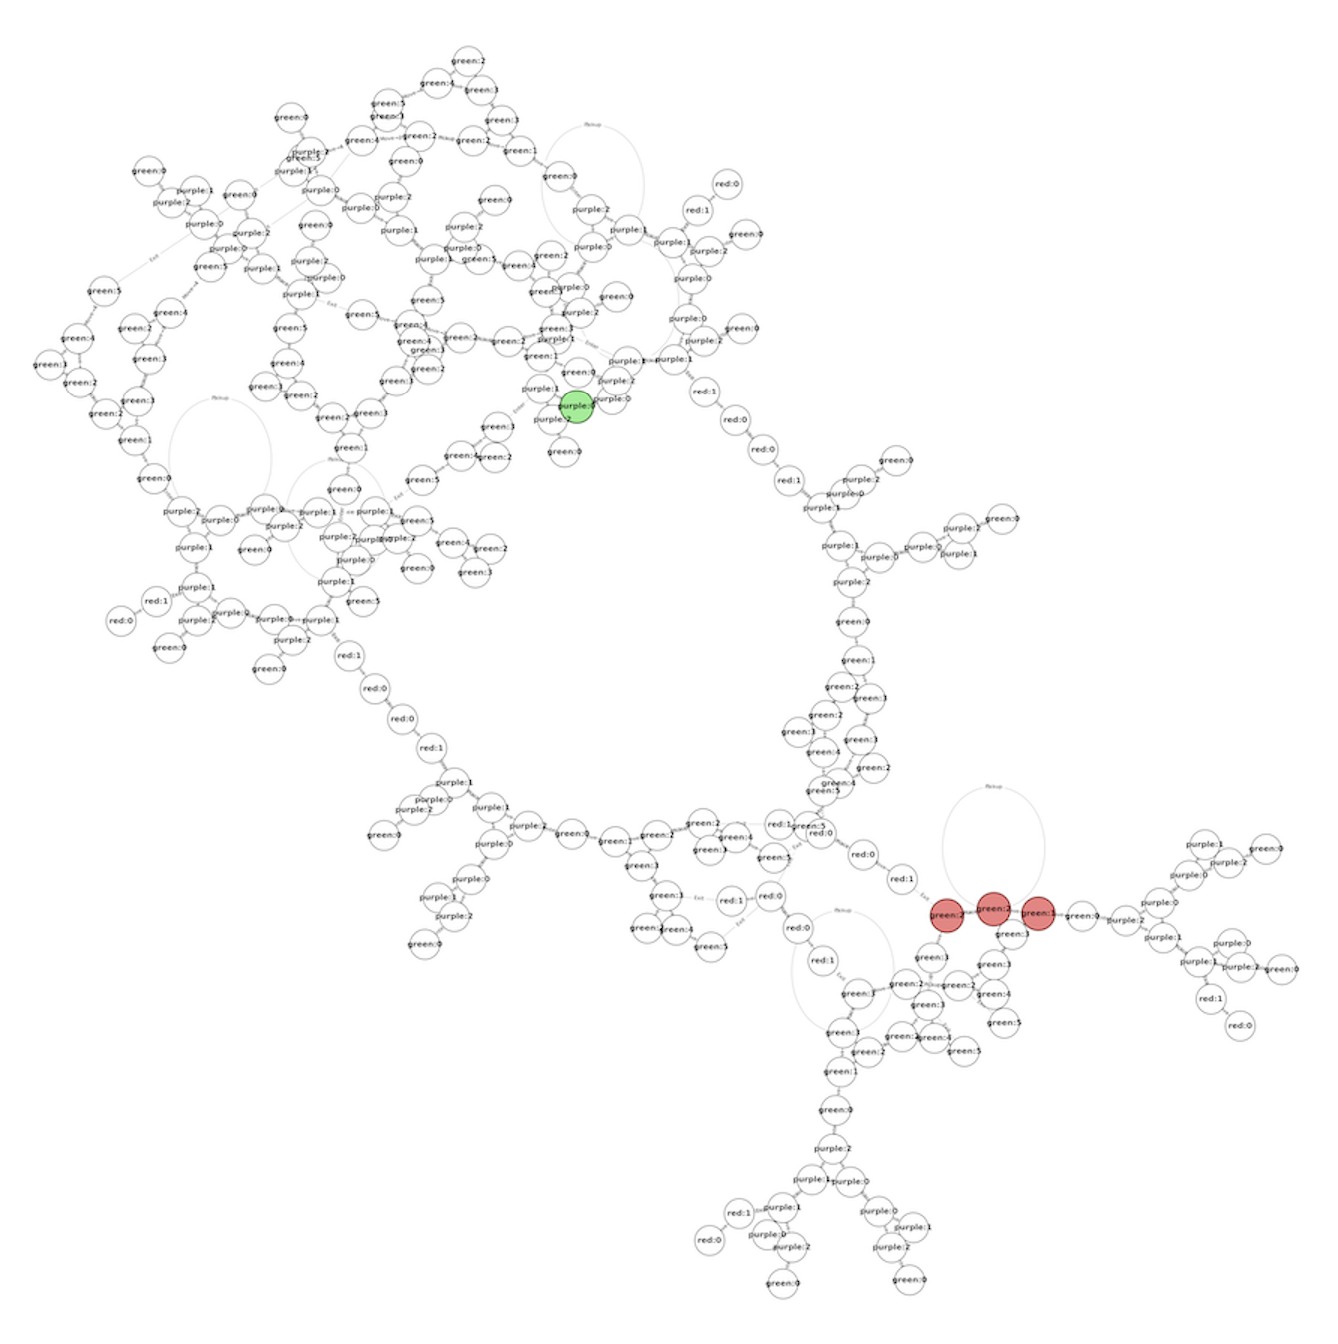
Drawing a fully-expanded FSM graph like this shows how small and simple Cocoon’s puzzles really are once you write them down. That path on the right, between the green and red nodes, requires you to put one orb inside another orb, then inside another orb, and then shuffle them around just-so. This is a counter-intuitive strategy and hard to find if you’re playing the game like a normal person.
However, writing everything down makes it obvious. Writing everything down makes all actions visible and strips away all of the misleading heuristics that make humans focus on some strategies and completely miss others. It reduces a puzzle to “find a path from the green dot to one of the red dots,” as you saw above, which can be solved by a moderately gifted two year-old. To be very facetious, Cocoon is a fluffy layer of graphics and game mechanics on top of an unbelievably simple maze.
This isn’t meant as a knock on the game. Cocoon is a tidy mind-bender that wasn’t designed to withstand exhaustive search. If you write a program to solve your Cocoon puzzles for you then you’re only cheating yourself. Or at least, you would be if writing such a program wasn’t so much fun.
Real life isn’t a finite state machine though. All my solver really proves is that small, low-dimensional problems can easily be solved using exhaustive search. By contrast, the world has an infinite number of states. It’s hard to be sure which properties are important, and the allowed transitions between states are terribly defined. No problem of any importance can be reduced to a tiny graph, which means that even the most determined two year-old won’t be able to help with any of the big challenges in your life.
However, you don’t need to fully explore all possible solutions in order to benefit from systematic search. As I’d feared, the process of writing my solver forced me to consider the game with so much rigour that I’d solved all 3 challenges that I used it for before I’d finished programming them in. When I came to encode every location and transition on the map in my program I was forced to pay attention to each of them individually for at least a few seconds, even the ones that the game had tricked me into ignoring. This helped me see that some of the nodes and actions that I’d thought were irrelevant were actually the key to the whole thing.
That evening I talked to my family on the phone. I showed them all the diagrams I’d created and all the fun I’d had. They showed me pictures of them inside St. Peter’s Basilica. My son asked if I’d beaten my game. I explained that I’d transcended it by creating a mathematical representation of its entire possibility space. He asked if that meant “no.”
Here’s the code to my solver, but you should really just play the game properly.
2025-02-03 08:00:00
I work at Anthropic on the Frontier Red Team. Our mission is to find out whether AI models possess critical, advanced capabilities, and to help the world to prepare. We’re hiring AI researchers and engineers in the US and UK, and if that describes you then we’d love to talk.
We explore questions like: can models design bioweapons, or accelerate vaccine research? Can they orchestrate massive cyberattacks, or defend our critical infrastructure? Can they self-improve, or build a business, or fly drones? Even if they can’t do these things right now, when might they be able to?
We’re a technical research team embedded inside both Anthropic’s policy and research organizations. We work with frontier models; top experts in every domain that we cover; and key national security and policy actors. This Wall Street Journal article explains a bit more.
Below are the people we need to help us go faster. If any of them sound like you then please get in touch:
We need people to design and run the evaluations for Anthropic’s Responsible Scaling Policy (RSP). These people:
I think this is a great job for anyone, and the best job in the world for generalist engineers who are also interested in AI. You get to spend half your time building bulletproof systems for novel technical problems, and the other half thinking earnestly about how many tokens it might take for an AI model to build a GPU cluster to copy itself onto. If you work in computer infrastructure anywhere else then I’m convinced that you would have more fun working here instead.
Read more and apply:
We believe that the most important capabilities that models are likely to develop are in autonomy, biosecurity, and cybersecurity. We have small sub-teams that lead research into each of these domains. People on these teams:
The people on these teams get to work on projects from reinforcement learning to understanding the biggest threats and opportunities facing society. Never a dull moment.
Read more and apply:
This is the best and weirdest job I’ve ever had. The team is full of brilliant people who care a lot about their jobs and each other. Most of the team is on the West Coast of the US, with some on the East Coast and a couple in London. I work from London and my schedule is great, even with two kids. I go into the London office once or twice a week and to SF a couple of times a year.
If you’d like to work with us then apply using the links above and below. There’s no specific deadline and we’ll keep looking until we find the right people, but we have a lot of work to do and need people to help us do it as soon as possible.
Those links again:
2024-12-04 08:00:00
“Where are we daddy?” asked my five-year-old.
“We’ll land in about an hour,” I said.
“No I mean where are we? Are we flying over Italy yet?”
I wasn’t sure. Our flight was short and cheap and the seats didn’t have TV screens in the headrests. I looked around. I noticed a sticker encouraging me to connect to the in-flight wi-fi. That would do it, I thought. A site like FlightRadar would answer my little man’s question, down to the nearest few meters.
But unfortunately for him I’m the creator of PySkyWiFi (“completely free, unbelievably stupid wi-fi on long-haul flights”). Not paying for airplane internet is kind of my signature move. We’d need a different, offline strategy.

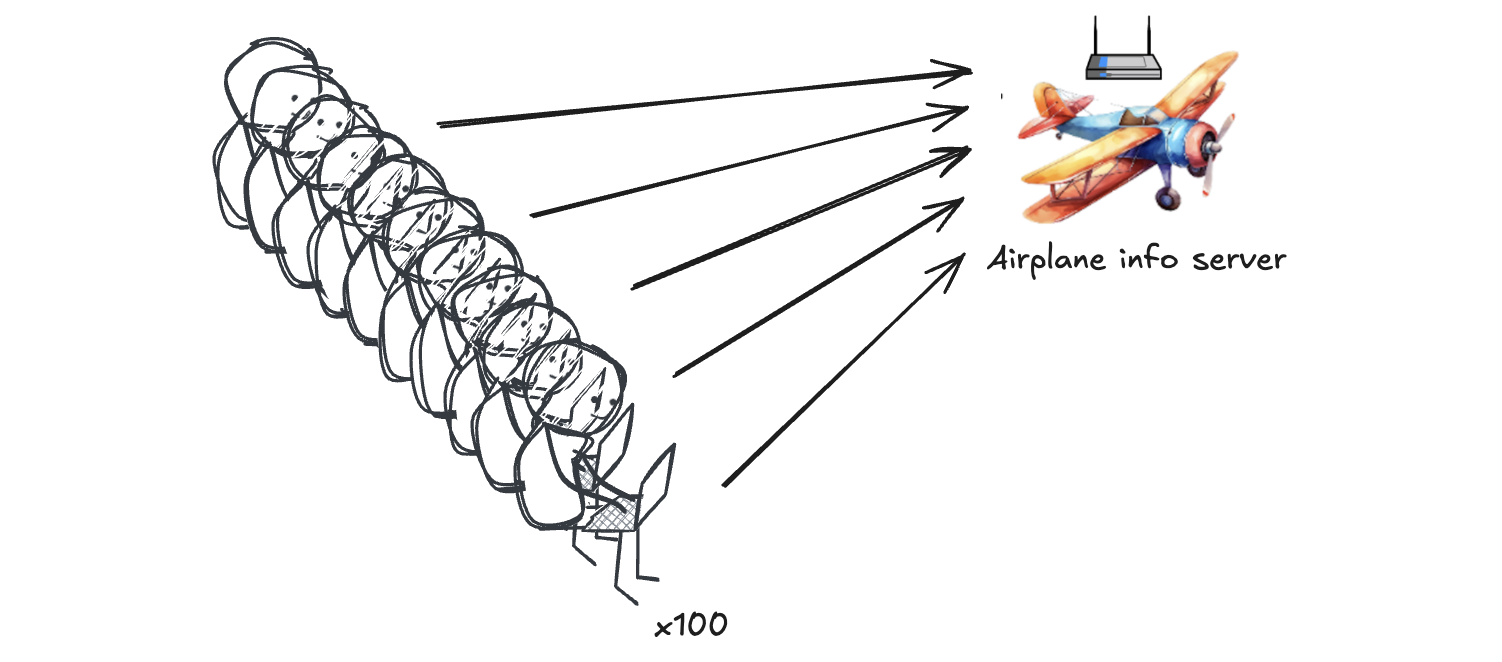
I had a think. When you connect to an airplane wi-fi network, you’re usually met with a payment page where you can purchase access to the internet. The page also usually gives you the same flight information that you’d find in the back of your headrest, like speed, direction, and estimated flight length. Perhaps it would have a map as well, I thought.
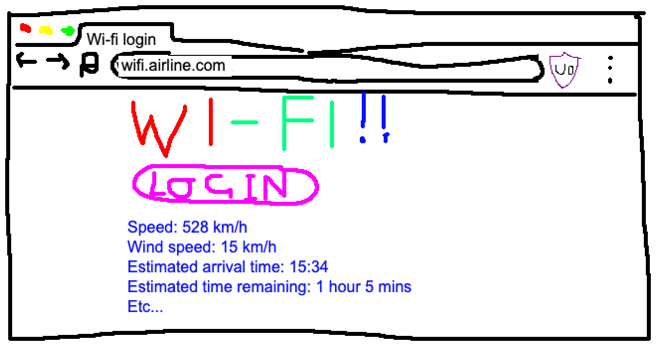
I pulled out my laptop, connected to the network, and loaded up the payment page. It did indeed show our wind speed, direction, and estimated time of arrival. But no map.
(It didn’t occur to me to screenshot the page so here’s an artist’s impression)
“Maybe the server that’s sending us this data is actually also sending us our location, but the web page isn’t displaying it,” I thought. I opened up the Chrome developer tools. I saw that my browser was making regular requests to a /info endpoint.
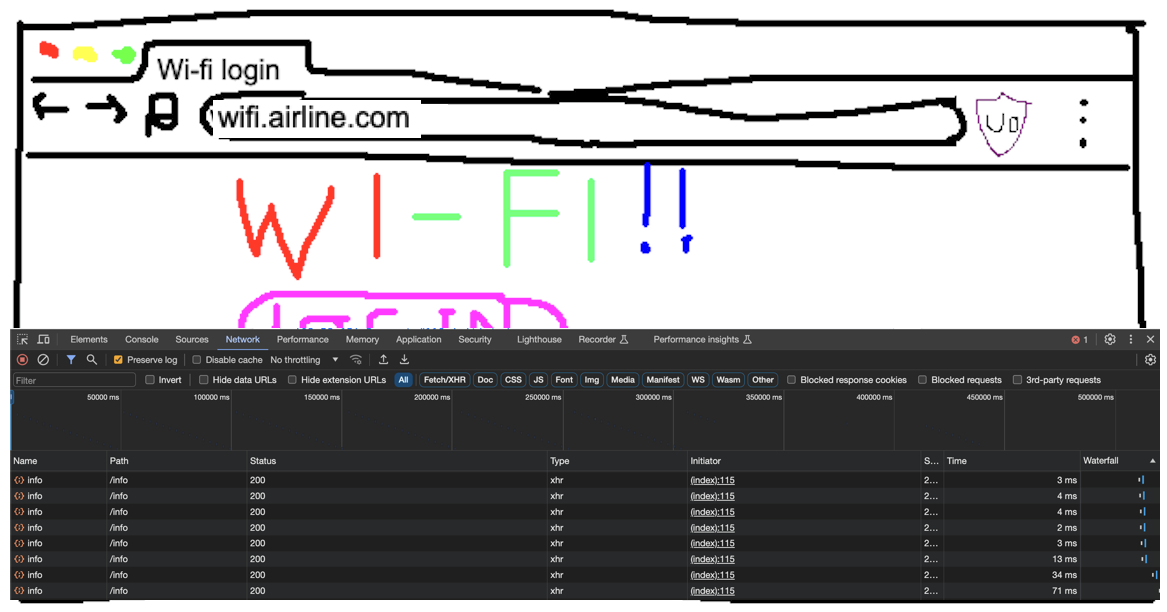
I clicked on one of the requests. This /info endpoint was indeed sending us a huge pile of data, including fields for ground_speed, wind_speed, and estimated_arrival_time. At the bottom of the response I noticed fields for latitude and longitude. My heart leapt. But then I looked closer. They were both null. Aerofoiled.
This looked like the end of the line. I was about to give up and tell my son that we were somewhere just north of Italy, probably…Europe somewhere. But then I was hit by two fantastic ideas.
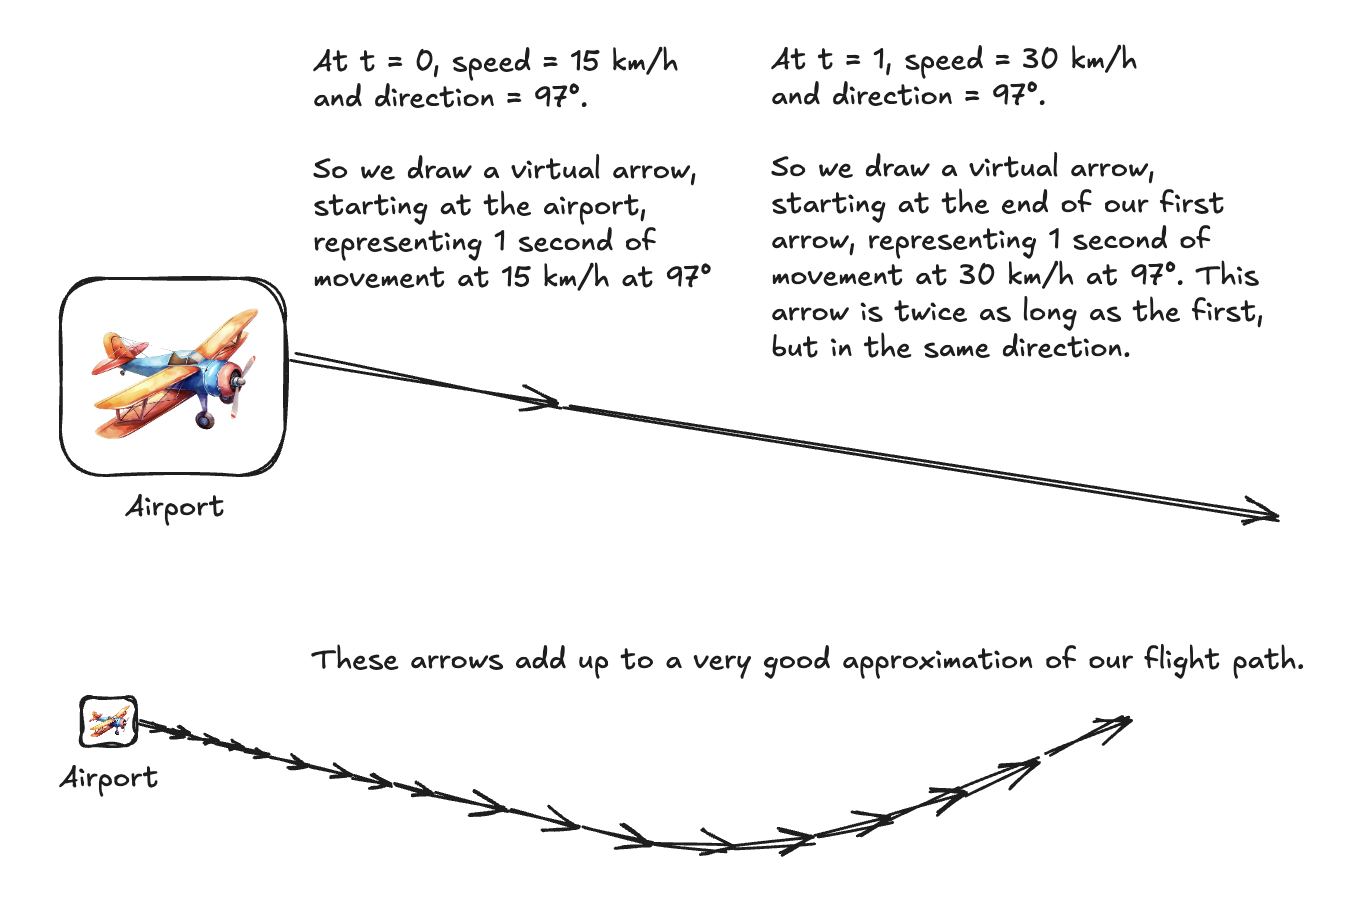
Fantastic idea number 1: the /info endpoint didn’t tell us our location, but it did tell us our precise, regularly-updated speed and direction. On our flight home I could track and save our speed and direction every second or so for the whole flight. I could use this information to estimate how far we had traveled in each second, and in which direction. I could dynamically calculate our position by starting at our airport’s co-ordinates, then adding on each second’s step.
Fantastic idea number 2: even if I had been able to find our latitude and longitude in the /info response, it wouldn’t have meant much to either me or my son. However, I could build a web app that ran on my laptop and showed us our dynamically calculated position on a map, in real time. The app could have automatically updating graphs of our ETA, wind direction, speed, altitude, and so on. Ooh and an interface for running arbitrary queries against the data. And event callbacks to allow me to programmatically trigger code based on flight info (“when our ETA is 2 hours exactly, block my access to netflix.com and open the latest draft of my unfinished novel”). My son would know where he was. I’d be a Good Dad.
I decided to call the app PyMyFlySpy in order to give it some brand association with PySkyWiFi, my airplane-related project. I couldn’t wait to get started. Unfortunately right now I was wedged in between a five-year-old and a two-year-old and we were all terrible at JavaScript. I waited, impatiently.
Eventually we landed. I built PyMyFlySpy during our holiday, over late evenings and one or two derelict afternoons while the rest of my family did normal-person fun things. I couldn’t figure out whether it was bad manners to use your laptop in artisanal Italian coffee shops, or which of them had wi-fi, so to my eternal shame I googled “starbucks near me” and planted myself in a corner with a skinny mochachino and typed away.
I finished PyMyFlySpy the day before we left. The code is available on GitHub and it’s easy to setup and run. It even has a “dummy” mode that allows you to demo it without being inside a plane, using a made-up flight.
Here’s what PyMyFlySpy can do:
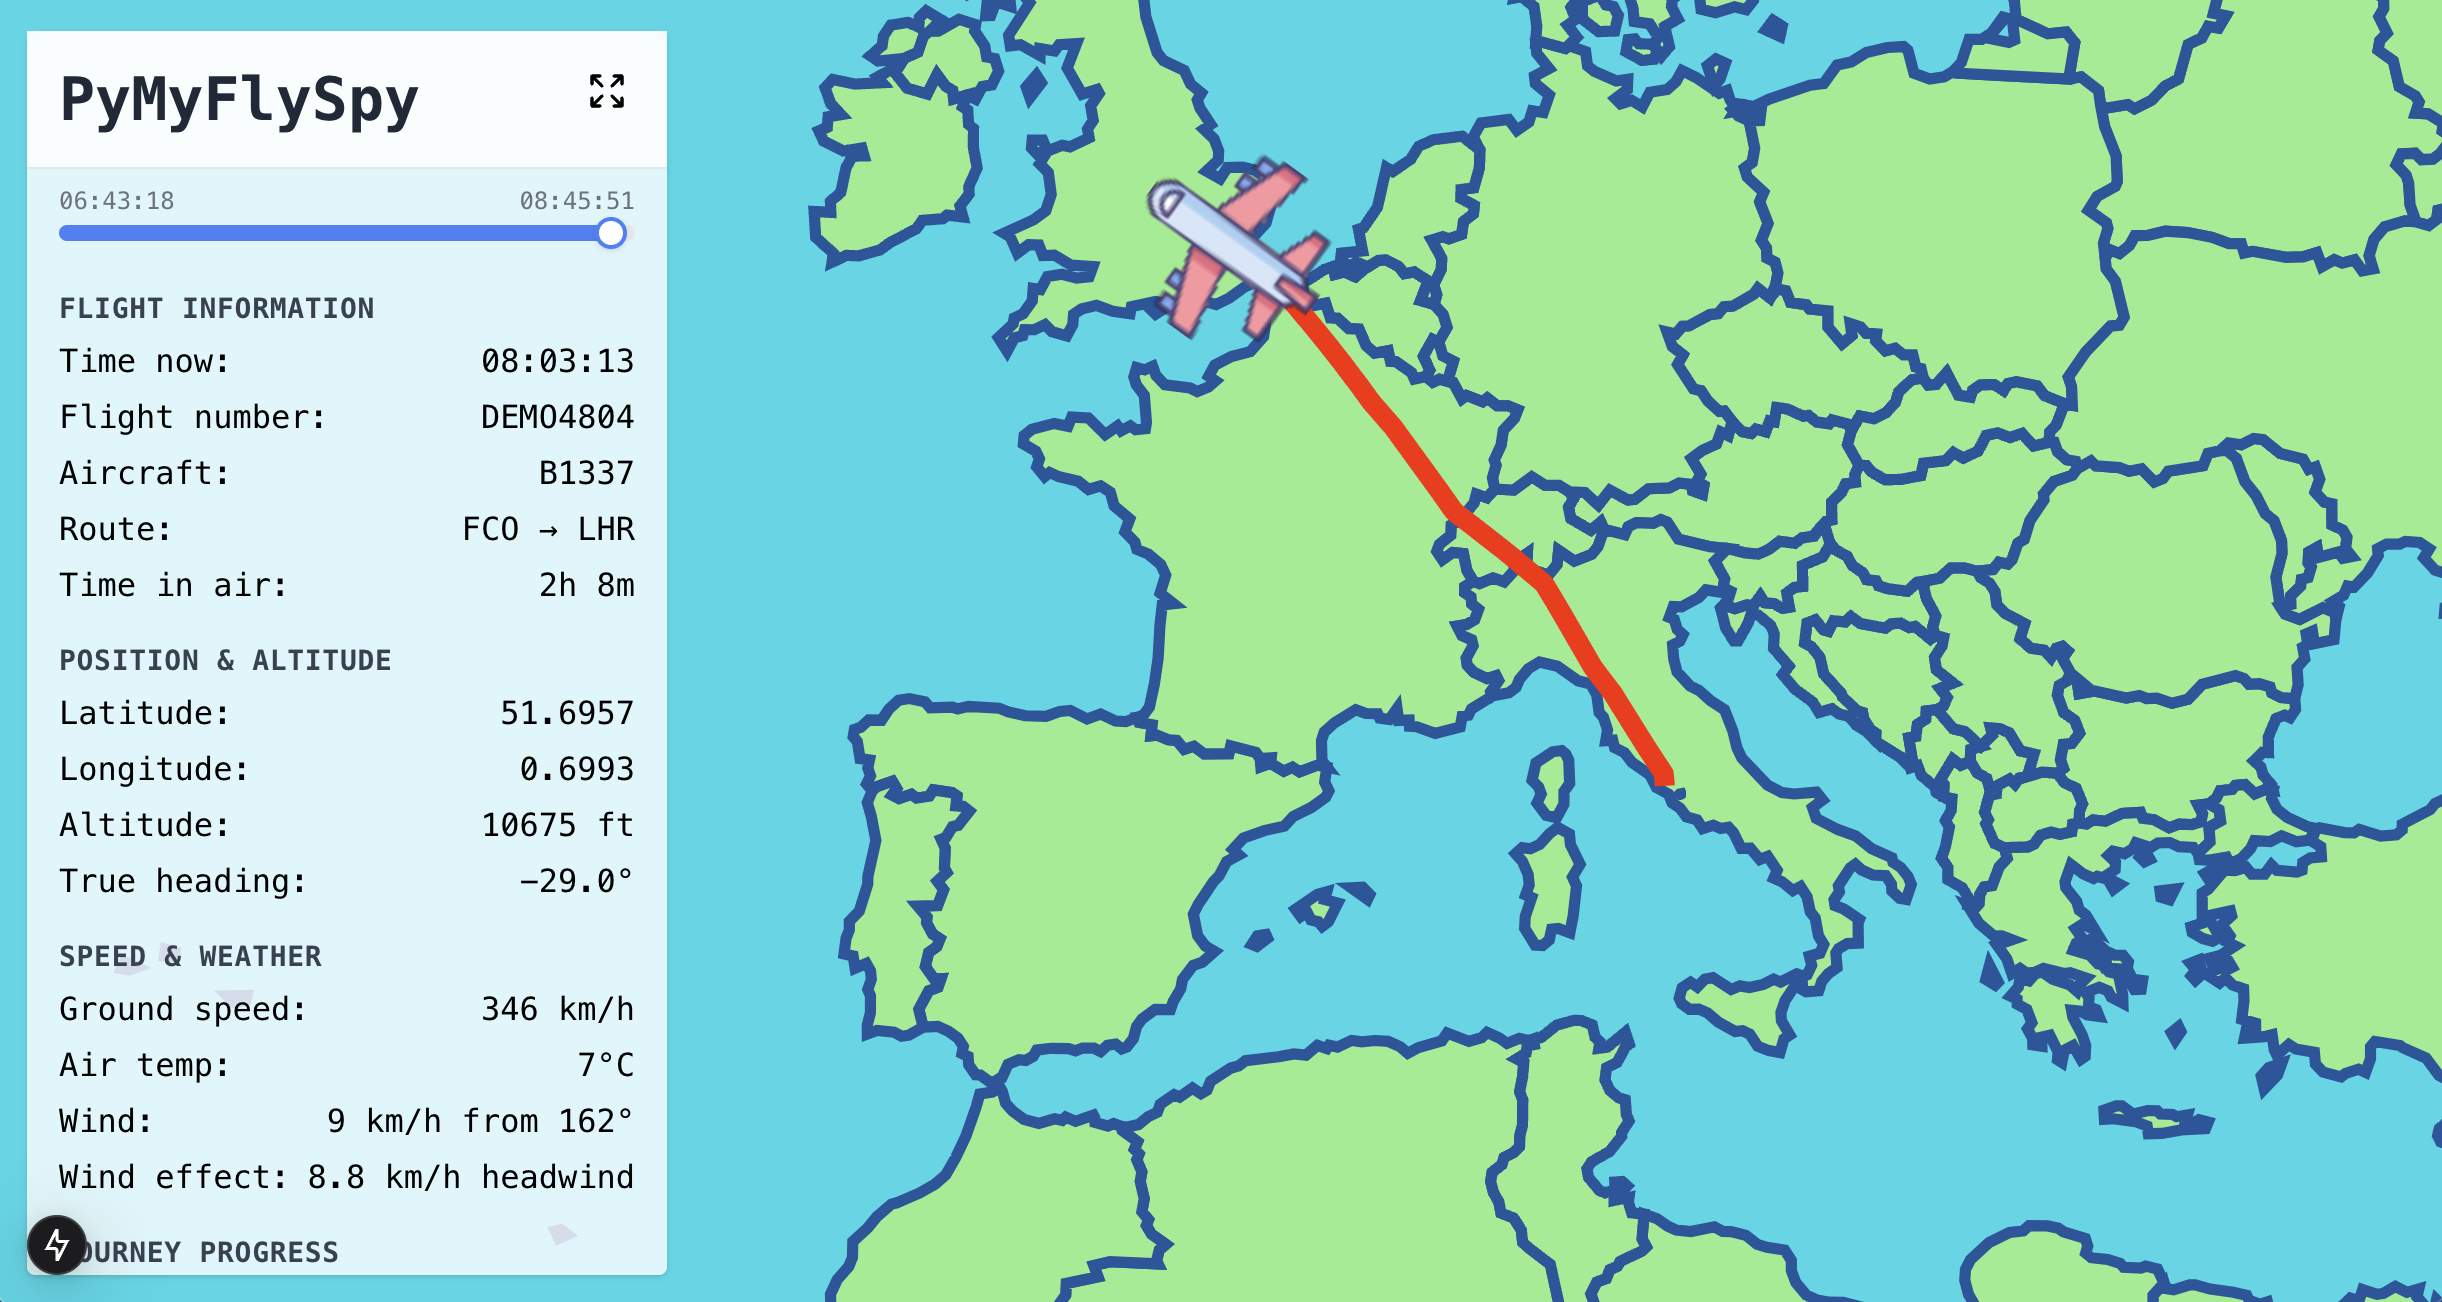
PyMySkySpy shows a map of your flightpath so far. It also shows your current flight metrics and how these metrics have changed over the course of your flight. It does this for all data available from the in-flight wi-fi, even data that isn’t usually displayed on the website or headrest screen. You can see exactly where you are and feel a bit like a pilot.

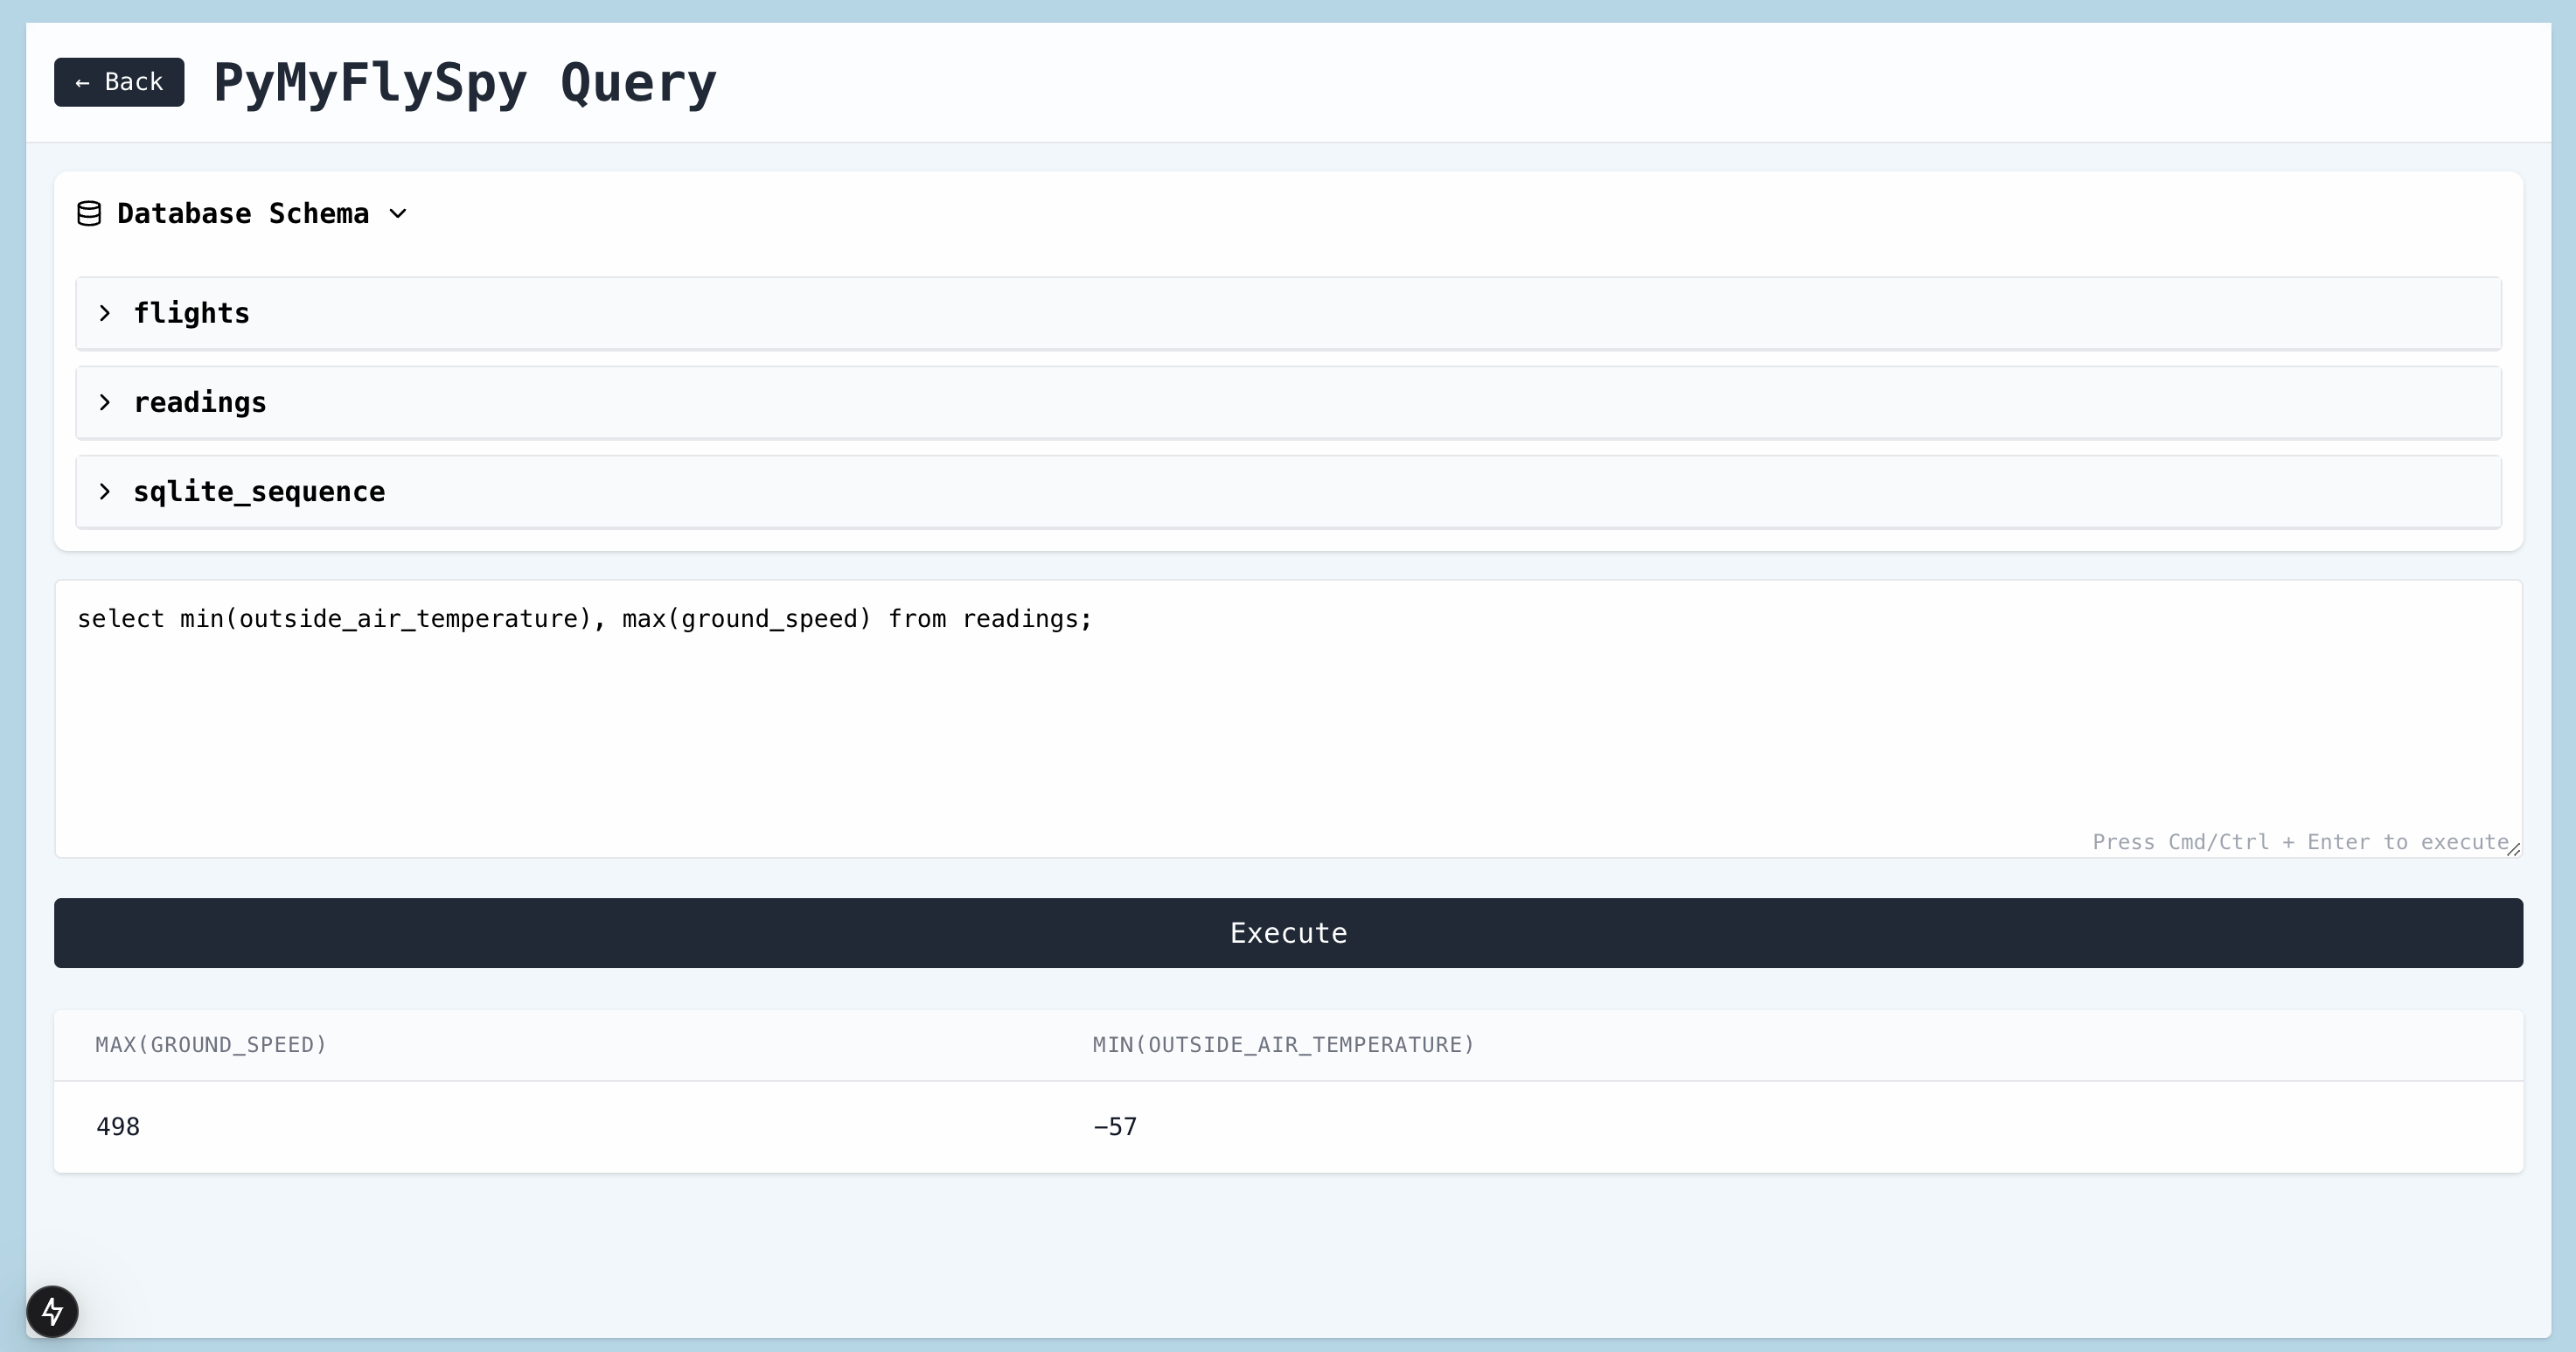
PyMySkySpy saves all the data that it records to a database. Its UI has a page that allows you to write queries against the data to answer questions like “what’s our maximum speed so far, and when did we hit it?” or “how fast was the wind during that turbulence we just went through?”
I’m not claiming that this is hugely useful, but I do think it’s cool.
Different airlines have different wi-fi systems. A recorder for a JetBlue flight won’t work on AirFrance. Fortunately, PyMySkySpy allows you to easily add and use recorders for different airlines. You just have to load up their wi-fi landing page, open your browser’s developer tools, and figure out how to parse their page’s data like I did above. Then you add your new code to the PyMySkySpy config, and tell the recorder to use it. Everything else continues to work just the same.
The system is very simple. It has 4 parts:
The one strange design choice I made was to use a Firefox Extension to read the flight data, instead of writing a scraper that makes its own data requests directly. Scraping the information like this would have been easier and more flexible, as well as completely harmless. Hundreds of people were already connected to the wifi, and the airline’s own landing page hits the /info endpoint once every couple of seconds. Adding one more request from a scraper would have been entirely safe.
However, I’m sure that airlines would rather people didn’t poke around at their onboard servers, even if those people are very careful and well-intentioned and handsome. To make sure I didn’t irritate them, I came up with an even more judicious approach.
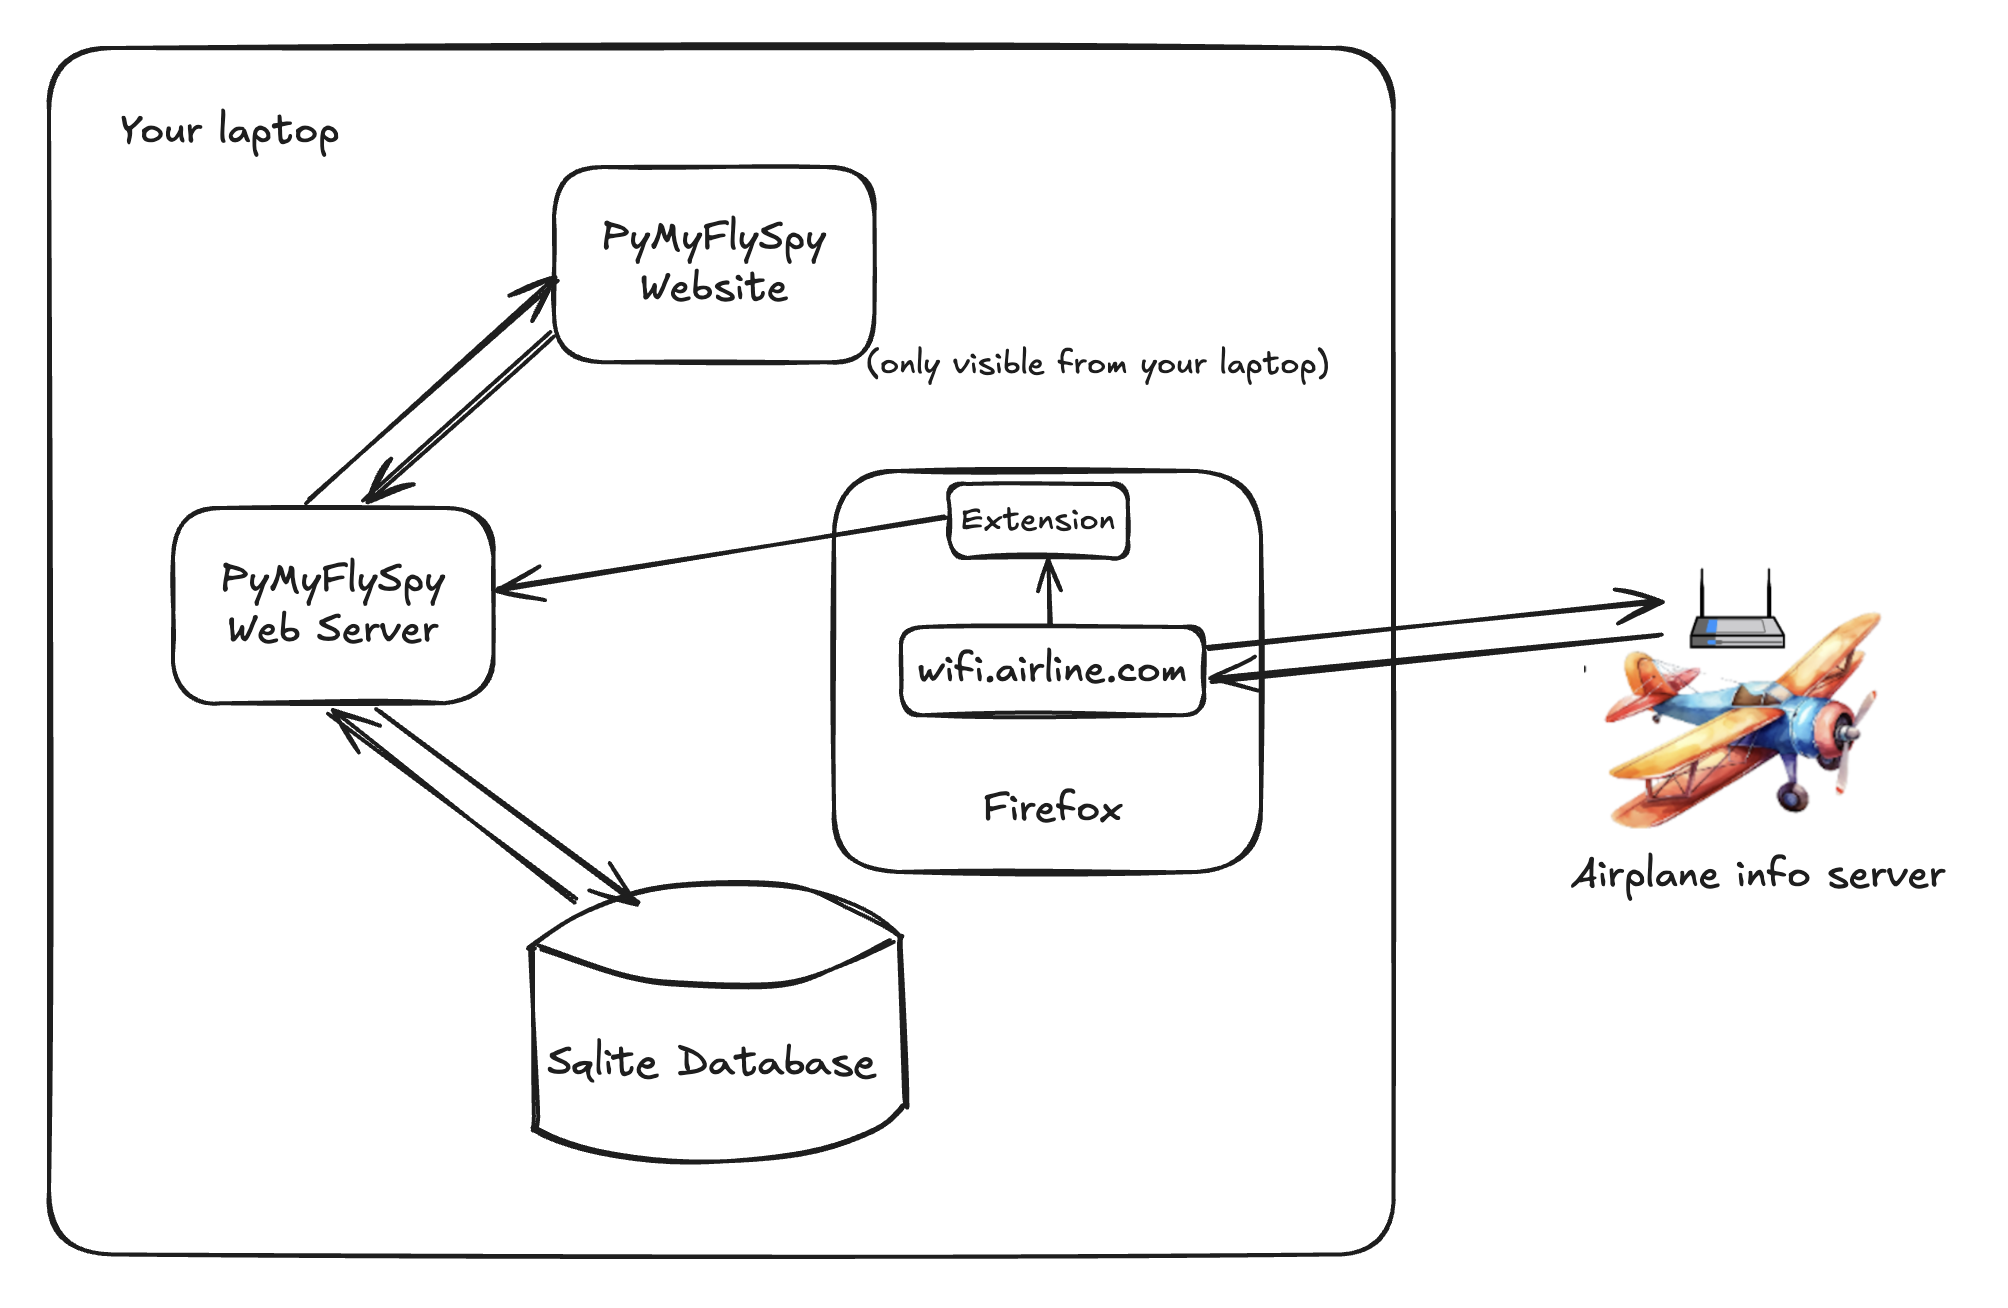
Instead of scraping the data endpoint, I wrote a Firefox Extension. The extension sits there while the airline’s wi-fi landing page requests the latest data from the /info endpoint, just like normal, every few seconds. The extension peeks at the data that’s returned; sends the data to the PyMyFlySpy web server; and finally the web server writes it to the PyMyFlySpy database, to serve to the web frontend. Using a Firefox Extension like this means that PyMyFlySpy never interacts with the plane’s info server directly. This means that PyMyFlySpy can provably never harm the server.
I had to write the extension for Firefox instead of Chrome, because Chrome is in the process of reducing extensions’ ability to interact with requests made by a website (like requests made to the /info endpoint). In particular, Chrome is going to prevent extensions from easily reading the responses to HTTP requests made by a website, which would prevent the PyMyFlySpy from reading the data returned by the /info endpoint. As far as I can tell these restrictions are half for security reasons, and half to make it harder to develop adblockers. Either way, PyMyFlySpy requires Firefox.
PyMySkySpy gives us programmatic access to data about our flight. It would be fun to use this to trigger events, like:
Next holiday, perhaps.
Our flight home was in the late afternoon. We shuffled on board and took off. I pulled out my laptop, connected to the wi-fi, and booted up PyMySkySpy. I turned to my son to show him where we were. I’d shown him the prototype every day for the last week and I though he seemed to be somewhere between “tolerant” and “mildly interested.” But he’d already fallen asleep. I took some screenshots to show him later.
I spent the next few hours monitoring and debugging the recorder to make sure that it stayed up. My two-year-old screamed the whole flight and kept trying to throw himself on the floor. I made supportive faces at my wife across the aisle and pretended to offer to take him, but she shook her head. She knew that this was important.
I watched the graphs. Temperature within normal range. Wind speed stable. Suddenly our altitude dropped by a fifty feet. I wondered if I should tell the pilots. I decided that they probably had it under control. I kept watching, just in case.
2024-09-02 08:00:00
A few weeks ago my 5-year-old and I tried playing Cat Crimes, a puzzle game in which you work out which of your cats ate your shoes. We had a wonderful time - for about 20 minutes.
In each round of Cat Crimes you get a puzzle card with a list of clues on it. You have to use the clues to figure out where in your front room each of your 6 cats were sitting. This tells you which one of them was responsible for your ruined stilettos. The game comes with 40 puzzle cards, ranging from the very easy to the mind-crushingly difficult.
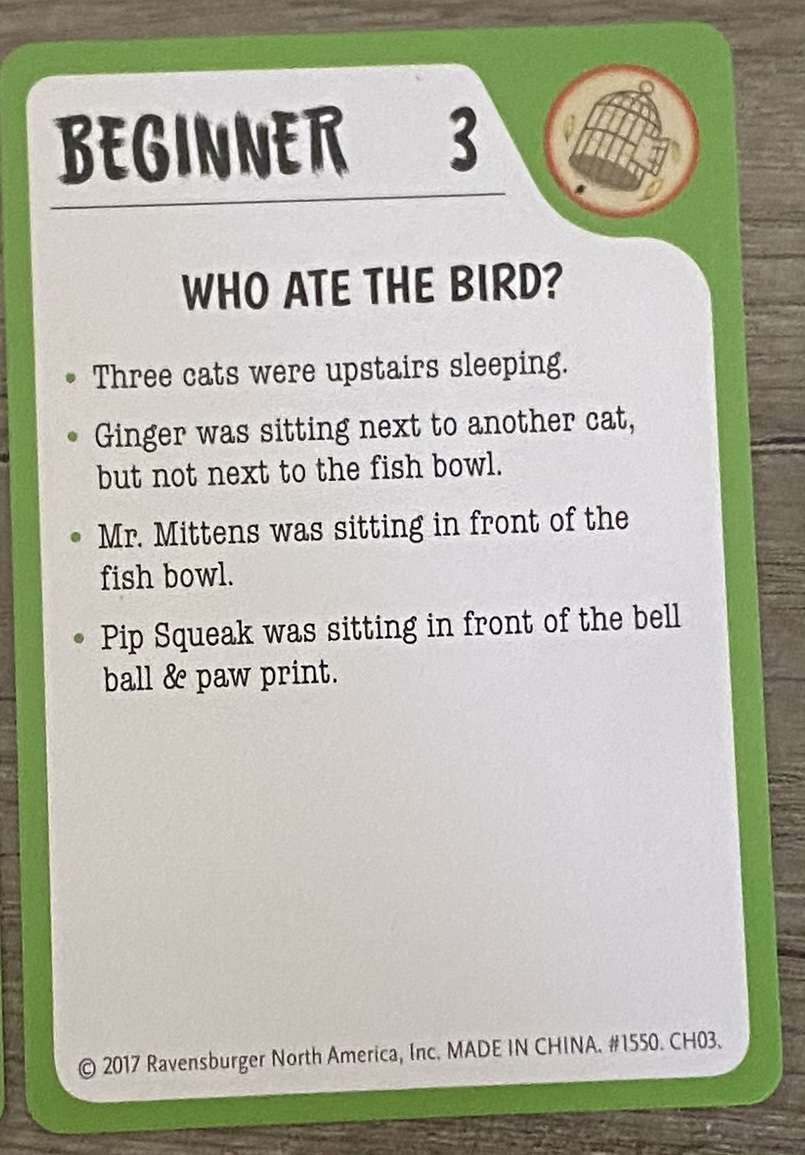
However, the problem is that “very easy” to “mind-crushingly difficult” is a lot of ground to cover in 40 puzzles, and by the fifth puzzle the clues had become too abstract and difficult for my little man. In the first few puzzles each new clue allowed us to immediately place a new cat and then forget about it. For example, a clue might have told us that Mr. Mittens was sitting opposite Pip Squeak. We already knew where Pip Squeak was sitting, so we could work out exactly where Mr. Mittens was sitting too. This is the perfect level of complexity for a small child and his aging father at 6am.
However, as the puzzles get harder the clues stopped neatly resolving like this. They still narrowed down the possible pussy permutations, but they didn’t necessarily allow us to definitively place a new cat straightway. For example, a clue might have told us that Mr Mittens was sitting next to Pip Squeak. We know that Mr Mittens must have been on either Pip Squeak’s left or right, but we couldn’t say for sure which until we’d processed more clues. We might later learn that Duchess was sitting to Pip Squeak’s left, which in turn would tell us that Mr. Mittens must be sitting to her right.
To follow this extended chain of logic you need to hold multiple simultaneous superpositions in your head. This is fun and challenging and good puzzle design, but my kid hasn’t done superpositions at school yet so he didn’t get it. I tried drawing some pictures for him, but they made no sense even to me. We got angry with each other and eventually gave up on the game altogether.
But we’d really had a great time with those first few puzzles, so that evening I wrote us a computer program that generated an infinite number of new beginner level Cat Crimes challenges. I ran it 20 times and printed out the challenges and their solutions. The next day we continued happily solving age-appropriate cat mysteries together.
You can download:
The program works by generating random challenges until it finds one that has a single unique solution and meets certain constraints. The constraints ensure that the challenges are easy but not too easy. For example, a maximum of 3 cats can be asleep (meaning that they are out of the round), and a maximum of 2 clues are allowed to tell you a cat’s exact position.
In order to play the puzzles you’ll need to buy the Cat Crimes game.
Good luck, and let me know how you get on!
At first I tried asking ChatGPT to generate puzzles for me. My puzzles are guaranteed to be solvable and probably about the right difficulty, but since they’re randomly generated their solutions don’t generally have much of a careful narrative behind them.
I thought that ChatGPT might be able to do better. “Absolutely!” it said when I asked it, but it kept giving me back puzzles that had either several different solutions or no solutions at all. No dice!
To fix this I added a ChatGPT mode to my tool. In this mode the tool gives you a prompt to paste into ChatGPT. The prompt asks ChatGPT it to give you a Cat Crimes puzzle formatted in a specific way. You paste ChatGPT’s output back into the tool, and the tool checks whether the puzzle is valid. If it is then the tool converts the puzzle into printable card; if it’s not then it prints an error message for you to give to ChatGPT to help it fix the problem. You continue this debugging loop until you have a valid (and hopefully more fun) puzzle.
I’m not associated with Cat Crimes in any way; this is a completely unofficial fan project. Cat Crimes is owned and published by Thinkfun Inc. Go and buy it from them!