2026-06-26 08:00:00

I recently got a Pebble Time 2 as it seemed like a fun smartwatch away from Google/Apple/Samsung with a good 4 weeks of battery life. One thing I wanted to do is to create a custom watchface for my specific problems.
It took more effort to design the watch than I had anticipated and there’s a deceptively large amount of thought that has gone into some of the features here, so I thought it’d be interesting to write a little about it.
It’s difficult to describe what I’ve been going through the last ~6 months. It started with a normal depression (yeah, a “normal depression” says a lot already) but it was followed by what felt like a big increase in volume; manageable issues I’ve had forever were suddenly overpowering.
I’ve always found it difficult to start chores and boring tasks, yet now it felt like trying to swim through quicksand.
At the same time I had huge problems with hyper focus. I could start working on something and the entire day would just disappear; I would sit in front of the computer for 8 hours without any break, interrupted by having to go get my kids from school and I realize that my bladder is exploding and I hadn’t eaten lunch yet. Then I would spend the rest of the day thinking about it, even having difficulty falling asleep because I’m still thinking about it.
Needless to say, my time management has gone out the window, even missing appointments for the first time ever.
Of course, a watchface won’t solve any of these but I’m desperate and nothing I’m trying is helping. Concretely I’d like the watch to help me with these things:
I was going to name the watchface “ADHD hero” but that was a little on the nose as I don’t have an ADHD diagnosis (yet… The investigation is under way but it’s not a quick process).
I like open source but I don’t have any plans of publishing the watchface. The entire point of the watchface is to remove friction in my life, not create another source of anxiety. This way I’m free to change it, rewrite it, pollute it with vibes, and I can focus on making it just good enough for me without having to worry about others.
I encourage you to steal anything you like and create your own watchface; it’s straightforward with Pebble.
I’m a big believer in being able to quickly iterate through different prototypes. I’ve had success with using Claude to generate HTML prototypes and it can spit out images like this:


Design-wise it’s hit-and-miss and Claude seems to lack creativity and taste (but sometimes it comes up with great ideas). You need to guide it properly and I’ve gotten good usage from telling it to generate dozens of variations of a concept and iterating from there. All images in this post are generated in this way at various points of the development.
It can also quickly generate interactive prototypes, like this embedded widget that simulates (almost) the entire watchface and its features:
This is super useful and I’ve used it to fine tune the wedge geometry, color scheme, a chiptune library, and more.
The design of the watchface started before I had the watch and before I wrote a line of code. Initially the feel was very different; it was a cleaner, more uniform, design without as much clutter and everything followed a consistent design language.
I just knew that it was perfect.

When the watch arrived I built it and it sucked. It was so boring…
I saw the Comic Drop watchface and its comic book panel layout is really interesting. Wouldn’t it be cool to have a similar comic book panel layout that would show the events during the day? Maybe they could be dynamic and move around during the day?

It would be really neat to have some pixel graphics of a computer during the morning when I should work, a picture of a barbell when I should exercise, etc. Unfortunately that’s beyond my skill level at the moment so I had to give up that idea.
So I went back to the original design but iterated on a “comic book” style with thicker lines, brighter colors, and more irregularities:

This is a more interesting watchface and it looks much better on the wrist than the first iteration. Not perfect of course but it catches my interest, which is the point.
I want to be able to glance at the watch to see my calendar. Watchfaces such as the Sectograph add event information inside the clock (so an event between 1 and 2 would colorize the section of the analog clock) and I wanted something similar.
Here are some prototypes to give you an idea of what I’m talking about:


This should hopefully make it easier for me to be able to plan my day a little better.
A notable omission in my design is the lack of a text description of the event. That’s nice but it also clutters the design I’m going for. The important thing for me isn’t what the event is, it’s “is there an event at all”.
My brain is very good at filtering away static and uninteresting information. For example, I’ve tried to have Calendar, Habitica, and Todoist widgets on my phone to help me keep track of my events/habits/tasks… But it didn’t take long for my brain to start completely ignoring them despite them taking up 80% of the screen. When I say ignore I mean that literally: I completely stopped noticing them.
So what I wanted to try was to spice it up a little by randomizing the event geometry. See these two examples:


To me the non-uniform prototype is more visually interesting and the changing geometry should hopefully prevent me from filtering them out.
You can argue that the rounder uniform version would look better on the Pebble Round 2, which is fair. Here’s a similar mockup but with the round’s geometry:


I still think the non-uniform variant catches the eye more and solves my specific problem a bit better but there’s no denying that a round layout on a round watch fits very well.
Another idea I had was instead of statically fixing events to their times I wanted the events to move towards “now” at 12 o’clock. So an event that renders at 3 o’clock is 3 hours away and an event that overlaps 12 is ongoing.
While this prevents me from easily looking back at my day (past events disappear) it makes it easier to feel the urgency as events draw closer. A bit weird perhaps but in practice it feels great.
Here’s the same event through its lifecycle: drifting in from 3 o’clock, ongoing as it crosses 12 (with the countdown band draining in the clock), then gone once it’s in the past.
Something like this:


This works pretty well but there’s a problem: how to differentiate between an event that will start in one minute and that has been going on for a while? Because the event gets cut off at 12 there’s no way to tell at a glance.
At first I tried to enlarge the event wedge so it touches the clock if it’s ongoing. That was a bit weird so instead I tried to colorize the clock outline with the event that’s ongoing. Then I realized, why not have the outline count down the remaining time of the event, similar to a Time Timer?
In practice this works out wonderfully well.
I quite like the completion countdown for calendar events. This kind of design is often associated with tracking tasks (such as in Pomodoro) so why not add it to the watch too?
For example, I might want to configure a stretch of 60 min work / 15 min break / 60 min work before I should stop working. Pretty standard stuff. As I’m struggling to get started I’ll add a twist: a working block should have a 5-minute warm-up period. So the timeline looks like this:
I think it makes sense to have that one count down (from filled to empty) while the working block counts up (from empty to filled), like so:
This is a post about design, not about implementation, but I still need to address how we can implement a work timer toggle.
The issue is that a Pebble watchface is a background process that cannot interact with Pebble’s physical buttons. You can bind the buttons to quick launch Pebble apps but not watchfaces. A watchface can detect steps and taps on the watch but it cannot communicate with other apps.
There’s a few ways to get around this:
Toggle using taps only.
Implement it as a Pebble app, not a watchface.
Add a new Pebble app (tied to a button) that round trips commands via the companion app back to the watchface.
digraph
rankdir=TB
button
app
phone
face
button -> app
app -> phone
phone -> face
app -> face
}
I first tried to implement toggling using taps but it was too unreliable. If I went the app route I’d have to relaunch it all the time, which represents unacceptable friction. What’s left is the janky phone round trip solution.
I already need a companion app for the calendar sync but it still makes me queasy.
I’ve tried alarms, Pomodoro, and similar before but they all share the same failure mode: I simply ignore the alarm and continue with what I was doing.
A Pomodoro can’t be interrupted; it marks 25 minutes of pure work.
I don’t know, it could be 2 minutes just as likely as 200 minutes.
So I figured I’ll try to force myself to take breaks by making it annoying to clear (a bit like the Hand Grenade Alarm clock but in wrist form). The watchface can vibrate, play sound, react to steps, and detect taps and this is the flow I came up with:
The alarm transforms the screen and vibrates and plays a tune until it’s dismissed (repeats every 30 seconds).
Visually the required steps are drawn at the border (no events are shown during an alarm) and the alarm is drawn as a comic-style blast (tapping it shrinks the blast). Like this:
It’s a pretty cool setup and it is helping but it still fails quite often.
Most of the time I forget to start the work timer and other times I’m able to add enough steps by waving my hand around like a crazy person, and then continue working. (If I raise the step count then it gets annoying to dismiss when I’m actually walking.)
Could be tuned better I suppose.


Visually there are some distinct alarms I use:
I’ve separated them visually and they each use unique vibrations and tunes.
I’ve previously used watchfaces overloaded with all kinds of information and graphs that were cool for a few minutes and then I never looked at them again. But there are some things I regularly glance at such as the date or if the watch has lost its phone connection.
Here are some prototypes for dates that I liked but ultimately discarded:


The difficulty is to not crowd the watchface too much with the date and the other elements I’ll get to later.
In the end I ended up with a simple 31/10 label and a small weekly text without background as I don’t look at the week number that often:

I’m not completely sold on the week number display (yellow labels were a lot more fun) but it’s good enough I guess.
It was really difficult for me to find a step counter design I liked. Everything I tried just felt off. Here are three of my attempts:


I used to track steps at the edges for most of the design (you can see the step elements in many of the prototype images in this post) but in the end it introduced a bit too much clutter for my taste. While the other two attempts above are crude and could be polished more I didn’t see potential in them. (Examining and cutting away branches is important during design I think.)
And then the revelation: I don’t care about the exact step count. The only purpose of showing steps is to help me keep the step count up, so I’m not sitting in front of the computer all day, and having badges for tiers solves that problem even better.
Here are the badges I use:


Bronze is achieved at 33% of my daily goal, silver at 66%, gold at 100%, and diamond is for over-achieving with 150%. I feel that having an easy to reach tier helps me do something on the lazy days and the hard-to-reach tier helps give me an extra kick the days I’m out and about.
Yes, not knowing exactly how much is left to the next tier is slightly annoying, but for those cases opening up the Health app on the watch to view the step count is good enough.
High after the rush of figuring out how to display steps let’s use the same approach for battery warnings:


Yes, I probably should make the little battery interactive or something but this is a 80:20 situation: I get 80% of the benefit from 20% of the effort. It’s good enough.
More badges!


Pebble has a “Quiet Time” mode that silences notifications. This is a separate thing from Android’s sleep mode or do-not-disturb mode. As I have a companion app I can detect the Android state and the watchface combines the two (and silences task alarms for instance) while also showing a “sleep” bubble so I can see these invisible states.
I’m a big fan of some of the ideas of Getting Things Done such as the idea of the “next task”: the one actionable thing that you should do next.
I’ve used the Todoist Android widget on my phone to display my tasks but I wanted to incorporate it into my watch too. The idea is to only display the next task, something like this:


While I think all three prototypes above are visually pleasing I went with the wider display that takes up less vertical space:

As a bonus I don’t have to mess around with rendering angled text.
It works fairly well but there’s a wrinkle: when I’ve done the task or realize I can’t do it now I have to pull up my phone and that’s annoying so in practice I’m leaving a stale task alone forever, priming my brain to ignore it.
I’ve tried the Todoist Mini app on the Pebble but there’s so many clicks to find the task and complete or reschedule it.
What I did was add it to the app I’m already using to toggle the work timer and give it a menu of options:
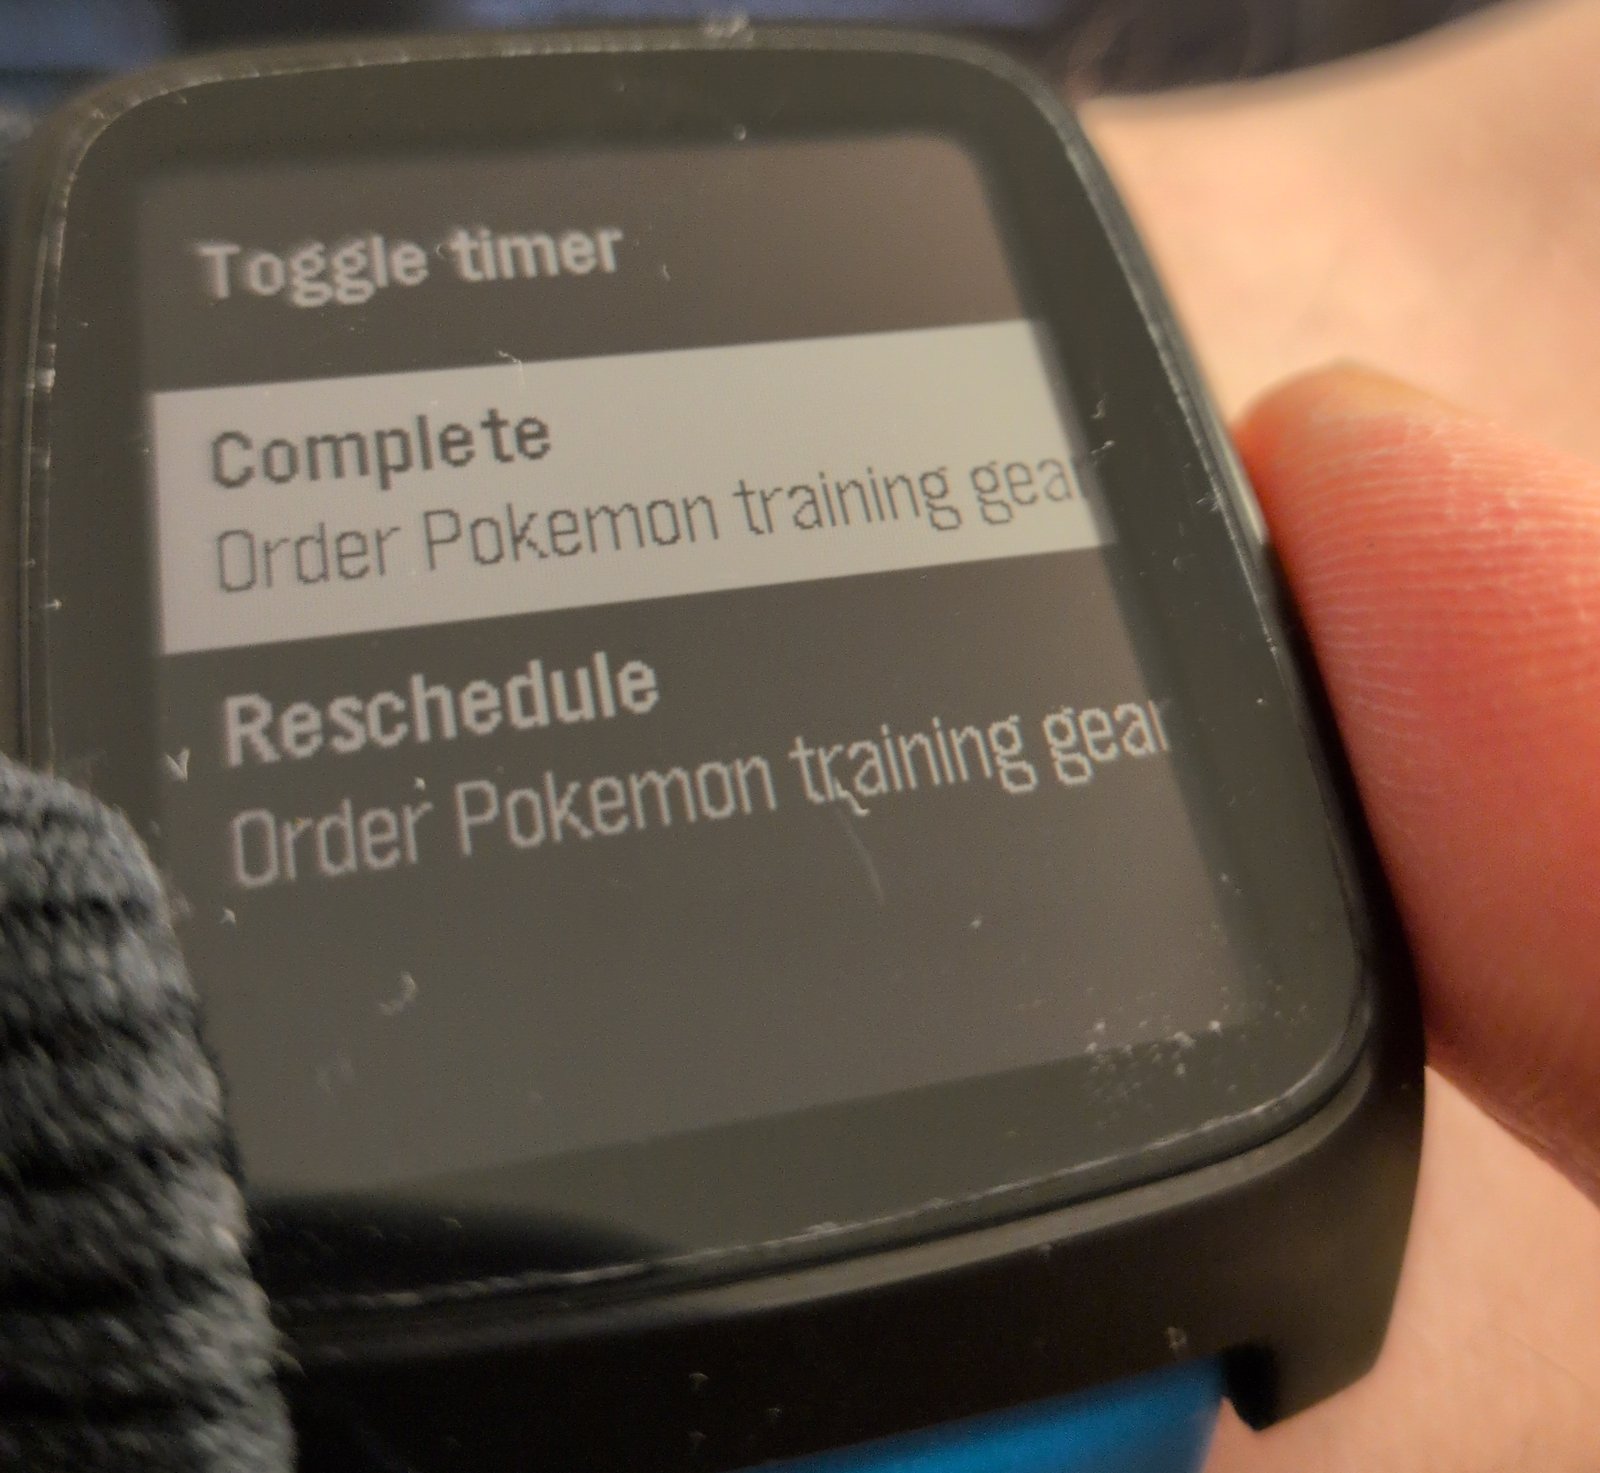
I can still toggle the work timer, complete the next task, or reschedule the task (it’s rescheduled for tomorrow).
I’ve bound it to the UP button via “quick launch”. To keep toggling the work timer as simple as possible pressing UP again toggles the timer (so double clicking UP when the watchface is visible toggles the timer). Otherwise it uses the standard Pebble control scheme (UP/DOWN to select and SEL to execute) and the app closes and returns to the watch when an item is selected.
So far it’s been working really well but as has always been the case before with these productivity “fixes”; I always tire of them eventually.
As a little extra I added some markers to track other types of things along the edges:
The colored dots  for calendar events are genuinely useful as many events require some preparation/travel time.
In these cases I add a reminder for the event at, say, 15 minutes before.
With the dots this preparation time can now also be seen by glancing at the watch
(Pebble natively shows reminder alerts anyway.)
for calendar events are genuinely useful as many events require some preparation/travel time.
In these cases I add a reminder for the event at, say, 15 minutes before.
With the dots this preparation time can now also be seen by glancing at the watch
(Pebble natively shows reminder alerts anyway.)
The end of day marker  is also useful for when I’m planning my working day but sunrise
 / sunset
  is mostly a gimmick, and I don’t use the manual alarms
  .
.

At the end I got an interesting watchface I think looks fun and that helps me go about my day. It’s pretty easy to make one, and if you don’t know where to begin LLMs can shorten the time to get up and running.
2026-05-31 08:00:00
When I’ve read other series about Kubernetes and reach the secrets section my eyes glaze over. I can’t help myself; I want to read about the fun stuff. Secrets are necessary to be sure, but it’s a little boring…
But if I want to do proper GitOps I need to manage secrets (and to document the process). The sooner I set it up the better.
Kubernetes has different solutions for secrets management. Of particular note is Sealed Secrets which creates files that are safe to commit to git and Kubernetes decrypts them in-cluster.
This is pretty great but has one big drawback: it can only manage secrets inside Kubernetes.
It cannot be used to encrypt things like the talosconfig or the Proxmox password Terraform uses.
That’s why I’ll also use SOPS + Age, which allows us to encrypt whatever file we want. The idea is to use SOPS + Age to manage the bootstrapping secrets and let Sealed Secrets take over when ArgoCD is up. This way there’s only one private key I need to manage and the rest is available from the git repo.
First, we need to install sops and age locally (I found them in my package manager).
Then we can generate our private key:
mkdir -p ~/.config/sops/age


age-keygen -o ~/.config/sops/age/keys.txt
You don’t want to lose this key, store it somewhere safe. I stored it in Bitwarden (although I’m migrating to Vaultwarden hosted in-cluster, which is a bit weird as keeping the key there risks a lock-out).
You then need a .sops.yaml that describes the files to encrypt/decrypt.
For example, this is an entry for talosconfig.yaml:
creation_rules:

  - path_regex: infrastructure/talosconfig(\.encrypted)?.yaml$

    age: age1rrkgd5yza053qk9m8lp0ww39apdarz7w0rjyq85493g8l9gufgnq9cehzx

    encrypted_regex: '^(ca|crt|key)$'
(age contains the public key, safe to share.)
With encrypted_regex you can limit encryption to certain fields; if you leave it out you’ll encrypt the entire file.
Then to encrypt and decrypt talosconfig.yaml we generated in a previous post:
sops --encrypt talosconfig.yaml > talosconfig.encrypted.yaml


sops --decrypt talosconfig.encrypted.yaml > talosconfig.yaml
talosconfig.encrypted.yaml is safe to commit to git but the cleartext file talosconfig.yaml should be added to .gitignore.
It won’t take long for me to forget these commands so I’ll add them to Just.
These recipes will take care of the secrets we’ve handled so far and the cleartext files (talosconfig, kubeconfig, secrets.auto.tfvars, terraform.tfstate) should allow us to regain cluster control, or to bootstrap the cluster anew from the git repo and the sops key.
[doc("Decrypt required files committed to git")]


decrypt_required:

    just secrets decrypt_cluster_config

    just secrets decrypt_terraform_secrets

    just secrets decrypt_terraform_state


[doc("Encrypt talosconfig and kubeconfig")]


[working-directory('../infrastructure')]


encrypt_cluster_config:

    sops --encrypt kubeconfig.yaml > kubeconfig.encrypted.yaml

    sops --encrypt talosconfig.yaml > talosconfig.encrypted.yaml


[doc("Decrypt talosconfig and kubeconfig")]


[working-directory('../infrastructure')]


decrypt_cluster_config:

    sops --decrypt talosconfig.encrypted.yaml > talosconfig.yaml

    sops --decrypt kubeconfig.encrypted.yaml > kubeconfig.yaml

    chmod 600 talosconfig.yaml kubeconfig.yaml


[doc("Encrypt secrets.auto.tfvars")]


[working-directory('../infrastructure')]


encrypt_terraform_secrets:

    sops --encrypt secrets.auto.tfvars > secrets.auto.encrypted.tfvars


[doc("Decrypt secrets.auto.tfvars")]


[working-directory('../infrastructure')]


decrypt_terraform_secrets:

    sops --decrypt secrets.auto.encrypted.tfvars > secrets.auto.tfvars

    chmod 600 secrets.auto.tfvars


[doc("Encrypt terraform.tfstate")]


[working-directory('../infrastructure')]


encrypt_terraform_state:

    sops --encrypt --input-type json --output-type json terraform.tfstate > terraform.encrypted.tfstate


[doc("Decrypt terraform.tfstate")]


[working-directory('../infrastructure')]


decrypt_terraform_state:

    # If the encrypted state doesn't exist yet (fresh repo), skip silently.

    test -f terraform.encrypted.tfstate || exit 0

    sops --decrypt --input-type json --output-type json terraform.encrypted.tfstate > terraform.tfstate

    chmod 600 terraform.tfstate
I also added encryption to create_cluster_config bootstrap command, to make
it harder for me to forget to add them to the repo:
[doc("Create talosconfig and kubeconfig")]


[working-directory('../infrastructure')]


create_cluster_config:

    terraform output -raw talosconfig > talosconfig.yaml

    terraform output -raw kubeconfig > kubeconfig.yaml

    just secrets::encrypt_cluster_config
And for the terraform state too (run with just tf::apply instead of a plain terraform apply):
[doc("terraform apply, then re-encrypt state (encrypts even on failure)")]


[working-directory('../infrastructure')]


apply *args:

    #!/usr/bin/env bash

    set -e

    trap 'just secrets::encrypt_terraform_state' EXIT

    terraform apply {{args}}


[doc("terraform destroy, then re-encrypt state (encrypts even on failure)")]


[working-directory('../infrastructure')]


destroy *args:

    #!/usr/bin/env bash

    set -e

    trap 'just secrets::encrypt_terraform_state' EXIT

    terraform destroy {{args}}
Let’s move on to sealed secrets. There are more setup steps than with SOPS + Age but it’s not that bad.
I’ll install the sealed secrets controller using helm:
helm install sealed-secrets \


    --repo https://bitnami-labs.github.io/sealed-secrets \


    sealed-secrets \


    --version 2.16.2 \


    --namespace sealed-secrets \


    --create-namespace \


    --set fullnameOverride=sealed-secrets-controller


# Wait for it to deploy


kubectl rollout status deployment/sealed-secrets-controller -n sealed-secrets
To create secrets on the client we also need the kubeseal command.
It wasn’t available on the Void Linux package manager, so let’s do the hard way:
set -x KUBESEAL_VERSION '0.36.1'


curl -OL "https://github.com/bitnami-labs/sealed-secrets/releases/download/v$KUBESEAL_VERSION/kubeseal-$KUBESEAL_VERSION-linux-amd64.tar.gz"


tar -xvzf kubeseal-$KUBESEAL_VERSION-linux-amd64.tar.gz kubeseal


sudo install -m 755 kubeseal /usr/local/bin/kubeseal


rm kubeseal-$KUBESEAL_VERSION-linux-amd64.tar.gz
To create a secret we can either use the cluster (needs an active connection) or offline via a certificate.
I prefer the certificate simply because you need to pass fewer arguments (--cert vs --controller-name and --controller-namespace).
Here’s how to fetch the certificate:
kubeseal --fetch-cert \


         --controller-name=sealed-secrets-controller \


         --controller-namespace=sealed-secrets \


    > infrastructure/sealed-secrets-cert.pem
(It’s a public key, safe to commit to git.)
And this is how we can use it to generate a secret my-secret with the two fields username and password:
kubectl create secret generic my-secret \


  --namespace some-namespace \


  --from-literal=username="user" \


  --from-literal=password="password1" \


  --dry-run=client -o yaml \


  | kubeseal --cert infrastructure/sealed-secrets-cert.pem \


             --format yaml \


  > gitops/apps/myapp/my-secret.yaml
(There might be other ways to do this. You can generate json files for example, but this works and I don’t care to do research.)
It will be stored in gitops/apps/myapp/my-secret.yaml that we can apply:
kubectl apply -f gitops/apps/myapp/my-secret.yaml
In the future when we get our GitOps setup up the process is the same except we don’t apply the secret; just create, commit, and push and it’ll get applied automatically.
It may feel like a lot of effort, but it’s quite nice to work with in day-to-day operations.
The process to update a secret is exactly the same; update the file with new contents and reapply.
Check that the secret has been applied:
kubectl get secret my-secret -n some-namespace -o yaml
The data fields username and password shown above will be base64 encoded.
Here’s how to print out the password in cleartext:
kubectl get secret my-secret -n some-namespace -o jsonpath='{.data.password}' | base64 -d
Or you can view the secrets in a dashboard such as Headlamp, which is arguably easier.
There’s one gotcha to sealed secrets: when the controller is installed it will generate a new public/private key pair so all existing sealed secrets are invalidated. We’d have to reseal all secrets after we reset the cluster, which is highly annoying.
We can circumvent this by exporting the private key, encrypt it with SOPS + Age, and store it in git. Then during the bootstrap process we can import the private key to the controller, allowing it to reuse all existing sealed secrets.
First export the key and encrypt it so we can keep it in git (gitignore sealed-secrets-key.yaml):
kubectl get secret -n sealed-secrets \


  -l sealedsecrets.bitnami.com/sealed-secrets-key=active -o yaml \


     > sealed-secrets-key.yaml


sops --encrypt sealed-secrets-key.yaml > sealed-secrets-key.encrypted.yaml
This needs a .sops.yaml rule:
creation_rules:

  - path_regex: infrastructure/sealed-secrets-key(\.encrypted)?.yaml$

    age: age1rrkgd5yza053qk9m8lp0ww39apdarz7w0rjyq85493g8l9gufgnq9cehzx
Then to import it we simply apply it:
kubectl apply -f sealed-secrets-key.yaml
We’ve added a few steps to the bootstrap process to setup the sealed secrets controller:
[doc("Bootstrap everything from zero")]


full:

    just bootstrap::cluster

    just bootstrap::cilium

    just secrets::restore_sealed_secrets_private_key

    just bootstrap::sealed_secrets
[doc("Restore sealed-secrets-key.yaml")]


[working-directory('../infrastructure')]


restore_sealed_secrets_private_key:

    # If the encrypted private key doesn't exist, skip the whole recipe.

    test -f sealed-secrets-key.encrypted.yaml || exit 0

    just secrets::decrypt_sealed_secrets_private_key

    # Don't exit if namespace already exists.

    kubectl create namespace sealed-secrets || true

    # Restore the private key.

    kubectl apply -f sealed-secrets-key.yaml

    rm sealed-secrets-key.yaml

    # We may need to restart the controller, but it may not exist, which is fine.

    kubectl rollout restart deployment/sealed-secrets-controller -n sealed-secrets || true
I’ve tried to safeguard the recipe to not crash if we haven’t created a key or bootstrapped the controller yet.
[doc("Install sealed secrets controller")]


sealed_secrets:

    helm install sealed-secrets \

        --repo https://bitnami-labs.github.io/sealed-secrets \

        sealed-secrets \

        --version 2.16.2 \

        --namespace sealed-secrets \

        --create-namespace \

        --set fullnameOverride=sealed-secrets-controller

    # Wait for it to deploy

    kubectl rollout status deployment/sealed-secrets-controller -n sealed-secrets
And some extra management recipes:
[doc("Fetch sealed-secrets-cert.pem, necessary to encrypt secrets offline")]


[working-directory('../infrastructure')]


fetch_sealed_secrets_cert:

    kubeseal --fetch-cert \

             --controller-name=sealed-secrets-controller \

             --controller-namespace=sealed-secrets \

        > sealed-secrets-cert.pem


[doc("Fetch sealed-secrets-key.yaml")]


[working-directory('../infrastructure')]


fetch_sealed_secrets_private_key:

    kubectl get secret -n sealed-secrets -l sealedsecrets.bitnami.com/sealed-secrets-key=active -o yaml > sealed-secrets-key.yaml

    just secrets::encrypt_sealed_secrets_private_key

    rm sealed-secrets-key.yaml


[doc("Encrypt sealed-secrets-key.yaml")]


[working-directory('../infrastructure')]


encrypt_sealed_secrets_private_key:

    sops --encrypt sealed-secrets-key.yaml > sealed-secrets-key.encrypted.yaml


[doc("Decrypt sealed-secrets-key.yaml")]


[working-directory('../infrastructure')]


decrypt_sealed_secrets_private_key:

    sops --decrypt sealed-secrets-key.encrypted.yaml > sealed-secrets-key.yaml
With this we’re prepared to setup GitOps with ArgoCD in the next post.
2026-05-28 08:00:00
I wanted the bootstrap process to be simple; ideally a single command and it would be up and running. But that’s not what we have right now; just look at this monstrosity from the previous post:
helm install cilium cilium/cilium \


  --namespace kube-system \


  --version 1.19.2 \


  --set kubeProxyReplacement=true \


  --set k8sServiceHost=10.1.4.10 \


  --set k8sServicePort=6443 \


  --set l2announcements.enabled=true \


  --set externalIPs.enabled=true \


  --set gatewayAPI.enabled=true \


  --set ipam.mode=kubernetes \


  --set operator.replicas=1 \


  --set securityContext.privileged=true
Yuck.
I could place this in a README file, put it in a shell script, a Makefile, Task, or many other tools but I chose Just. Just has some small quality of life features and it doesn’t make me want to hurt myself when I look at it.
If all I wanted was a simple bootstrap script I wouldn’t bother writing a separate post about it, but I realized that Just is an excellent way to add some sorely needed documentation as well.
For example, in the future I’ll probably forget how the bootstrap process looks like.
Fire up just:
$ just

just -l

Available recipes:

    argocd ...

    arr ...

    bootstrap ...

    cluster ...

    deps ...

    garage ...

    jellyfin ...

    proxmox ...

    repos ...

    router ...

    secrets ...

    tf ...

    util ...
(Don’t worry, I won’t bore you with the details of everything here.)
Let’s drill into the bootstrap:
$ just bootstrap

just -l bootstrap

Available recipes:

    argocd                # Bootstrap ArgoCD

    cilium                # Bootstrap Cilium

    cluster               # Bootstrap VMs and talos cluster

    create_cluster_config # Create talasconfig and kubeconfig

    forgejo               # Install and configure Forgejo inside the LXC created by Terraform

    full                  # Bootstrap everything from zero

    link_cluster_config   # Initialize ~/.talos/config and ~/.kube/config

    pbs                   # Install and configure PBS inside the LXC created by Terraform

    sealed_secrets        # Install sealed secrets controller
It seems just bootstrap full would try to bootstrap everything. Sounds scary, so let’s look at the code:
[doc("Bootstrap everything from zero")]


full:

    just bootstrap::cluster

    just bootstrap::cilium

    # We'll revisit these in the future (I hope)

    just secrets::restore_sealed_secrets_private_key

    just bootstrap::sealed_secrets

    just bootstrap::argocd

    # I manage some other Proxmox related things too,

    # but they're out of scope for this series

    just bootstrap::pbs

    just bootstrap::forgejo
Where the cluster is bootstrapped like this:
[doc("Bootstrap VMs and talos cluster")]


[working-directory('../infrastructure')]


cluster:

    just tf::init

    just tf::apply -auto-approve

    just bootstrap::create_cluster_config


[doc("Create talasconfig and kubeconfig")]


[working-directory('../infrastructure')]


create_cluster_config:

    terraform output -raw talosconfig > talosconfig.yaml

    terraform output -raw kubeconfig > kubeconfig.yaml

    # We'll look at this in the next post

    just secrets::encrypt_cluster_config
And Cilium like so:
[doc("Bootstrap Cilium")]


[working-directory('../gitops')]


cilium: wait_for_api

    kubectl apply -f https://github.com/kubernetes-sigs/gateway-api/releases/download/v1.2.1/standard-install.yaml

    helm install cilium \

        --repo https://helm.cilium.io/ \

        cilium \

        --namespace kube-system \

        --version 1.19.2 \

        --set kubeProxyReplacement=true \

        --set k8sServiceHost=10.1.4.100 \

        --set k8sServicePort=6443 \

        --set l2announcements.enabled=true \

        --set externalIPs.enabled=true \

        --set gatewayAPI.enabled=true \

        --set ipam.mode=kubernetes \

        --set operator.replicas=1 \

        --set securityContext.privileged=true

    kubectl rollout status daemonset/cilium -n kube-system

    kubectl apply -f bootstrap/cilium_config.yaml

    talosctl health -n 10.1.4.10 --wait-timeout 10m
Here I’ve added the bootstrap commands from the last post together with some waits to make the process work in script form.
There are some other features and gotchas with Just I’d like to mention.
Note the dependency wait_for_api above in the line cilium: wait_for_api.
This means wait_for_api will run before cilium, which waits until the Kubernetes nodes are ready (albeit not necessarily healthy according to talosctl health):
[private]


wait_for_api:

    until kubectl get nodes 2>/dev/null | grep -q "NotReady\|Ready"; do sleep 5; done
You can call just bootstrap::wait_for_api inside scripts too, which would give you more control over ordering.
Dependencies on the other hand are deduplicated and always run before the recipe.
I wanted to organize the recipes a little and group them (just tf::init instead of just tf_init).
For that we use modules:
mod argocd 'just/argocd.just'


mod bootstrap 'just/bootstrap.just'


mod secrets 'just/secrets.just'


# etc...


# With this `just` will give you a list of the modules.


[private]


default:

    just -l
Organized like this in the repository:
home-ops/

├── justfile          # `just` entrypoint, loads `just/*`

├── just/

│   ├── bootstrap.just

│   ├── secrets.just

│   ├── cluster.just

│   └── ...

├── infrastructure/   # Terraform, setup in the previous post

└── gitops/           # GitOps using ArgoCD, setup in the future
Another nice feature is to be able to set the working directory:
[doc("terraform init")]


[working-directory('../infrastructure')]


init *args:

    terraform init {{args}}
This means I can run just tf::init from anywhere in the entire repo, and it will just work.
export KUBECONFIG := justfile_directory() / "infrastructure/kubeconfig.yaml"


export TALOSCONFIG := justfile_directory() / "infrastructure/talosconfig.yaml"
Every kubectl/talosctl command in any just file now targets the cluster, no matter what directory they’re run from.
By default each line runs in its own shell.
A #!/usr/bin/env bash at the top converts a recipe into one script, which allows you to define functions, run for loops, or set traps for cleanup.
For example, this recipe runs terraform apply and then encrypts the terraform state even on failure:
[doc("terraform apply, then re-encrypt state (encrypts even on failure)")]


[working-directory('../infrastructure')]


apply *args:

    #!/usr/bin/env bash

    set -e

    trap 'just secrets::encrypt_terraform_state' EXIT

    terraform apply {{args}}
(I encrypt the state so I can safely commit it to git, meaning I can manage terraform from multiple computers, since you need the up-to-date state.)
just bootstrap full
I wanted to have a single command to bootstrap and I think I’m pretty close. In practice it’s not quite that simple; for example secret management may need some extra setup first, which we’ll revisit in the next post.
2026-05-22 08:00:00

It’s time to get the VMs rolling.
As stated in the intro I’m going to use Terraform to provision VMs and to configure Talos Linux. We’ll end up with this simple interface:
# Create VMs and configure Talos nodes


terraform apply


# Destroy and reset all


terraform destroy
I run these commands manually on my machine. It’s possible to add these to a CI but I like the faster feedback of running them directly.
There will also be some extra complexity and bootstrap commands as I want to use Cilium for service routing, the Container Network Interface (CNI), and in the future for the Gateway API. (Is it worth it? I don’t know, but I’m too committed to the setup to change it now.)
A quick note about the file structure I’ll use. I’ll separate the repository in two folders: one for infrastructure related files (what we’ll be doing in this post) and one for GitOps (apps and Kubernetes manifests).
├── infrastructure    # All Terraform files here

│   ├── variables.auto.tfvars

│   └── talos.tf

└── gitops            # GitOps using ArgoCD, setup in the future
You can split up Terraform files and terraform will automatically source all .tf files, so you can organize it however you like.
I like to separate the variable assignments into its own file (terraform sources all *.auto.tfvars files) but it’s not necessary either.
To use Terraform we need to add providers. I used the bpg/proxmox and siderolabs/talos for Proxmox and Talos Linux support:
terraform {

  required_providers {

    proxmox = {

      source  = "bpg/proxmox"

      version = "0.95.0"

    }

    talos = {

      source  = "siderolabs/talos"

      version = "0.10.1"

    }

  }


}
We also need to configure the Proxmox provider:
provider "proxmox" {

  insecure  = true

  endpoint  = "https://10.1.3.1:8006"

  username = "root@pam"

  password = "..."


}
You can (and maybe should) use an API token instead of username/password but I didn’t bother.
Either way it’s not good to commit credentials to git, so let’s move them to secret.auto.tfvars (add the file to .gitignore):
username = "root@pam"


password = "..."
This will get loaded automatically but we need variable blocks and reference them using var:
variable "username" {

  type      = string


}


variable "password" {

  type      = string

  sensitive = true


}


provider "proxmox" {

  username = var.username

  password = var.password


}
I’d like to validate that the Proxmox connection works but Terraform seems to recognize that it’s not used yet, so it won’t try to connect yet. Let’s continue.
Talos Linux has an image factory where you can find images to download. It’s a helpful tool as there are many parameters you can tweak to get the image you want.
The settings I chose are:
qemu-guest-agent System extension (important for Proxmox)
(Note that iscsi-tools and util-linux-tools are also required for Longhorn.)
You’ll receive an image schematic ID, for example: ce4c980550dd2ab1b17bbf2b08801c7eb59418eafe8f279833297925d67c7515.
You can download this to Proxmox manually but Terraform can automate that.
To make it easier to update I broke it out to variables:
talos_version          = "1.12.6"


talos_image_factory_id = "ce4c980550dd2ab1b17bbf2b08801c7eb59418eafe8f279833297925d67c7515"
And then reconstruct the download url and tell Proxmox to download it like so:
resource "proxmox_virtual_environment_download_file" "talos_image" {

  content_type            = "iso"

  datastore_id            = "local"

  node_name               = "dorne"

  url                     = "https://factory.talos.dev/image/${var.talos_image_factory_id}/v${var.talos_version}/nocloud-amd64.raw.xz"

  decompression_algorithm = "zst"

  file_name               = "talos-v${var.talos_version}-nocloud-amd64.img"

  overwrite               = false


}
Note that datastore_id should match Proxmox storage that can contain images and node_name should match the name of the Proxmox node (Proxmox can manage multiple machines/nodes, this one is called dorne).
Now we can test that our Proxmox provider is wired correctly:
terraform init


terraform plan
If everything is okay Terraform should tell you that it wants to create a resource. Let’s execute the download:
terraform apply
And it should show up in the Proxmox GUI.
Creating a VM is straightforward but there are a few settings we need to get right. Here’s a Terraform resource that will create a Talos Linux VM:
resource "proxmox_virtual_environment_vm" "talos" {

  name            = "talos-cp1"

  tags            = ["terraform", "talos"]

  node_name       = "dorne"

  on_boot         = true

  stop_on_destroy = true


  agent {

    enabled = true

  }

  disk {

    datastore_id = "local-lvm"

    file_id      = proxmox_virtual_environment_download_file.talos_image.id

    interface    = "virtio0"

    iothread     = true

    discard      = "on"

    size         = 20

  }

  initialization {

    datastore_id = "local-lvm"

    ip_config {

      ipv4 {

        address = "10.1.4.10/8"

        gateway = "10.0.0.1"

      }

    }

  }

  cpu {

    cores = 4

    type  = "x86-64-v2-AES"

  }

  memory {

    dedicated = 4 * 1024

    floating  = 4 * 1024

  }

  network_device {

    bridge = "vmbr0"

  }

  operating_system {

    type = "l26"

  }


}
The VM in Proxmox will be called talos-cp1 on the dorne Proxmox node (like before).
It’s important to enable the QEMU guest agent (which we also enabled in the image factory).
Using a raw image (instead of an .iso) avoids the installation process as it directly boots from the image.
The raw image also enables cloud-init configuration (the initialization block), which allows us to set a fixed IP (10.1.4.10) and set the gateway (my router, at 10.0.0.1).
I create it with 4 CPU cores, 4GB of memory, and an OS disk size of 20 GB.
This is fine to start with but you may run out of RAM or disk size when you start adding applications (like I did). Bumping up to something like 8 GB RAM and 40 GB storage is probably a good idea.
There are some extra settings there like the cpu and operating system type that I had to have but I can’t explain why.
The above will create a single VM but for fun I wanted more.
Let’s go with 3 VMs and let’s break it out in a variable:
nodes = [

  {

    hostname = "talos-cp1"

    ip       = "10.1.4.10"

    cores    = 4

    memory   = 4 * 1024,

  },

  {

    hostname = "talos-cp2"

    ip       = "10.1.4.11"

    cores    = 4

    memory   = 4 * 1024,

  },

  {

    hostname = "talos-cp3"

    ip       = "10.1.4.12"

    cores    = 4

    memory   = 4 * 1024,

  }


]
The declaration looks like this:
variable "nodes" {

  description = "List of nodes and their configurations."

  type = list(object({

    hostname = string

    ip       = string

    cores    = number

    memory   = number

  }))


}
Looping in Terraform feels a bit weird to me as the syntax doesn’t wrap the whole resource, but it’s just a field that creates an each variable you can reference.
Something like this (leaving out unchanged fields):
resource "proxmox_virtual_environment_vm" "talos" {

  for_each        = { for node in var.nodes : node.hostname => node }

  name            = each.key

  cpu {

    cores = each.value.cores

    type  = "x86-64-v2-AES"

  }

  memory {

    dedicated = each.value.memory

    floating  = each.value.memory

  }

  initialization {

    datastore_id = "local-lvm"

    ip_config {

      ipv4 {

        address = "${each.value.ip}/8"

        gateway = "10.0.0.1"

      }

    }

  }

  # ...


}
This should now create 3 VMs, with different hostnames and IPs.
Now we need to configure Talos Linux.
We’ll essentially try to replicate the talosctl apply-config commands from the documentation via Terraform.
First some variables to make life a little easier:
talos_version      = "1.12.6"


kubernetes_version = "1.35.2"


cluster_name       = "talos-cluster"
Then we’ll need three configurations: machine secrets, client config, and the control machine config. The three nodes will be control nodes but if you want to create worker nodes you need a specific config for those, but I’ll skip that in this post.
resource "talos_machine_secrets" "machine_secrets" {

  talos_version = "v${var.talos_version}"


}


data "talos_client_configuration" "client_config" {

  cluster_name         = var.cluster_name

  client_configuration = talos_machine_secrets.machine_secrets.client_configuration

  endpoints            = local.node_ips

  nodes                = local.node_ips


}
The client config references the machine secrets and needs to list the IP addresses for all nodes and its endpoints (the control nodes, for me that’s all the nodes).
I use a local to collect those:
locals {

  node_ips = [for node in var.nodes : node.ip]


}
The control machine config follows a similar pattern:
data "talos_machine_configuration" "control_machine_config" {

  cluster_name       = var.cluster_name

  cluster_endpoint   = local.cluster_endpoint

  machine_type       = "controlplane"

  machine_secrets    = talos_machine_secrets.machine_secrets.machine_secrets

  kubernetes_version = "v${var.kubernetes_version}"

  talos_version      = "v${var.talos_version}"


  config_patches = []


}
Of note here is cluster_endpoint which for us will be the first control node IP. We’ll change it later to a Virtual IP (VIP) to avoid a single point of failure, but for now:
locals {

  node_ips                = [for node in var.nodes : node.ip]

  primary_control_node_ip = local.node_ips[0]


}
What about config_patches?
They correspond to the patches you apply with talosctl patch and we need to use it for a few things.
One thing is to specify the install image so Talos pulls from the image factory during upgrades:
locals {

  install_image = "factory.talos.dev/installer/${var.talos_image_factory_id}:v${var.talos_version}"


}


data "talos_machine_configuration" "control_machine_config" {

  config_patches = [

    yamlencode({

      machine = {

        install = {

          disk  = "/dev/vda" # virtio0 disk

          image = local.install_image

        }

      }

    })

  ]


}
Talos will boot fine without it but if I understand things correctly during updates it’ll then use the official upstream image and will remove any extensions (such as the QEMU agent we need).
Another thing we need to patch is to allow our control nodes to schedule workloads because we don’t have any worker nodes:
data "talos_machine_configuration" "control_machine_config" {

  config_patches = [

    yamlencode({

      cluster = {

        allowSchedulingOnControlPlanes = true

      }

    })

    # Other patches here...

  ]


}
Then we’ll need to apply the configurations to our nodes:
resource "talos_machine_configuration_apply" "control_machine_config_apply" {

  for_each                    = { for node in var.nodes : node.hostname => node }

  depends_on                  = [proxmox_virtual_environment_vm.talos]

  client_configuration        = talos_machine_secrets.machine_secrets.client_configuration

  machine_configuration_input = data.talos_machine_configuration.control_machine_config.machine_configuration

  node                        = each.value.ip


}
Note how we loop through the nodes and target them individually using their IPs, and that we added a dependency to proxmox_virtual_environment_vm.talos to ensure that the VMs are created before we try to apply the configuration.
If you terraform apply this then the VMs will spin up and the nodes will leave Maintenance mode but get stuck in Booting and will print something like:
etcd is waiting to join the cluster, if this node is the first node of the cluster,

please run `talosctl bootstrap` against one of the following IPs:

[10.1.4.10]

(a bunch of other warnings and errors)
With Terraform, bootstrapping is done like this:
resource "talos_machine_bootstrap" "bootstrap" {

  depends_on           = [talos_machine_configuration_apply.control_machine_config_apply]

  client_configuration = talos_machine_secrets.machine_secrets.client_configuration

  node                 = local.primary_control_node_ip

  endpoint             = local.primary_control_node_ip


}
The nodes seem to be running fine and they all signal a Healthy Running state in the Proxmox console. But how do we access them?
We need the Talos and Kubernetes configuration files:
resource "talos_cluster_kubeconfig" "kubeconfig" {

  depends_on           = [talos_machine_bootstrap.bootstrap]

  client_configuration = talos_machine_secrets.machine_secrets.client_configuration

  node                 = local.primary_control_node_ip


}


output "talosconfig" {

  value     = data.talos_client_configuration.client_config.talos_config

  sensitive = true


}


output "kubeconfig" {

  value     = resource.talos_cluster_kubeconfig.kubeconfig.kubeconfig_raw

  sensitive = true


}
And generate them like so:
terraform output -raw talosconfig > talosconfig.yaml


terraform output -raw kubeconfig > kubeconfig.yaml
# Should be ok


talosctl --talosconfig ./talosconfig.yaml health -n 10.1.4.10


# Look at pods


kubectl --kubeconfig ./kubeconfig.yaml get pods -A
You can move them to ~/.talos/config and ~/.kube/config, or set TALOSCONFIG and KUBECONFIG to avoid specifying them all the time.
At this point we have a functional cluster but first I want to change a few things.
Networking, the thing that keeps your average homelabber awake at night. As if that’s not enough, in true homelabber fashion we’ll create some extra problems for ourselves just because.
I wanted to use Cilium for proxying and as the Container Network Interface (CNI) which means we have to disable them on the Talos nodes. New config_patches:
data "talos_machine_configuration" "control_machine_config" {

  config_patches = [

    # Disables the Flannel, the default CNI for Talos

    yamlencode({

      cluster = {

        network = {

          cni = {

            name = "none"

          }

        }

      }

    }),

    # Disables kube-proxy, the default proxy service

    yamlencode({

      cluster = {

        proxy = {

          disabled = true

        }

      }

    })

    # ...

  ]


}
If we rebuild the nodes we’ll see that talosctl health will stop at not ready:
waiting for all k8s nodes to report ready: some nodes are not ready: [talos-cp1-tmp talos-cp2-tmp talos-cp3-tmp]
This is to be expected as we haven’t installed Cilium yet. First we need to manually install the Gateway CRDs as they need to exist before we install cilium (because we want to use it for Gateway management later as well):
kubectl apply -f https://github.com/kubernetes-sigs/gateway-api/releases/download/v1.2.1/standard-install.yaml
Then we’ll install Cilium using Helm:
helm repo add cilium https://helm.cilium.io/


helm repo update


helm install cilium cilium/cilium \


  --namespace kube-system \


  --version 1.19.2 \


  --set kubeProxyReplacement=true \


  --set k8sServiceHost=10.1.4.10 \


  --set k8sServicePort=6443 \


  --set l2announcements.enabled=true \


  --set externalIPs.enabled=true \


  --set gatewayAPI.enabled=true \


  --set ipam.mode=kubernetes \


  --set operator.replicas=1 \


  --set securityContext.privileged=true
There are a bunch of options here, the most notable:
kubeProxyReplacement=true use it as a kube-proxy replacement.
k8sServiceHost=10.1.4.10 target the first control node.
l2announcements.enabled=true use L2 announcements to give out IP addresses.
externalIPs.enabled=true allow us to set fixed IPs manually.
gatewayAPI.enabled=true enable the Gateway API that we’ll use in later posts.
securityContext.privileged=true needed to work with Talos.
With this installed talosctl health should after a while return all OK again.
Let’s try out a good old classic to see if it works: the nginx test.
We’ll use LoadBalancer to get an external IP:
kubectl run nginx --image=nginx --port=80


kubectl expose pod nginx --type=LoadBalancer --port=80
Get the IP:
$ kubectl get svc nginx

NAME    TYPE           CLUSTER-IP       EXTERNAL-IP   PORT(S)        AGE

nginx   LoadBalancer   10.107.132.202   <pending>     80:30952/TCP   2s
Oh right, we haven’t configured load balancing for Cilium yet. Time for our first Kubernetes manifest!
apiVersion: "cilium.io/v2"


kind: CiliumLoadBalancerIPPool


metadata:

  name: first-pool


spec:

  blocks:

    - start: 10.1.4.101

      stop: 10.1.4.255


---


apiVersion: "cilium.io/v2alpha1"


kind: CiliumL2AnnouncementPolicy


metadata:

  name: l2-announcement


spec:

  interfaces:

    - eth0

  loadBalancerIPs: true
This tells Cilium to assign load balancing IPs in the range 10.1.4.101–10.1.4.255.
Apply:
kubectl apply -f cilium_config.yaml
After a while (yes, I hate waiting) kubectl get svc nginx should show an external IP that we can visit in the browser to verify that yes, we have a running app!
Mother always nagged me to clean up after myself:
kubectl delete pod nginx


kubectl delete svc nginx
Kubernetes is supposed to be a resilient thing but we’ve introduced a central point of failure by using the first control node as the endpoint. If that one node goes down then the entire cluster is now unreachable.
We’ll fix that with a Virtual IP, where all control nodes will share a single IP. If one of them goes down then one of the others will take over. (How? Must be magic!)
Anyway, let’s designate a VIP:
cluster_vip = "10.1.4.100"
Use it for the cluster endpoint:
locals {

  cluster_endpoint = "https://${var.cluster_vip}:6443"


}
And we’ll also need to patch the nodes to tell them to use the VIP:
data "talos_machine_configuration" "control_machine_config" {

  config_patches = [

    yamlencode({

      machine = {

        network = {

          interfaces = [{

            interface = "eth0"

            vip = {

              ip = var.cluster_vip

            }

          }]

        }

      }

    })

  ]


}
For it to work we also need to specify an interface.
eth0 happened to work for me (verify with talosctl get links).
We also need to update the Cilium install parameters to target the VIP:
--set k8sServiceHost=10.1.4.100
To see that it gets assigned we can use talosctl get addresses; one of the nodes should be assigned the VIP.
If we regenerate kubeconfig it should also contain the VIP and not the node IPs, so if kubectl can reach the cluster then all is good.
One last thing I’d like to mention is how to add your own nameserver.
I’ve got my DNS overrides on my router at 10.0.0.1 that I’d like the nodes to pickup.
Here’s how to patch it, with a fallback to 1.1.1.1:
data "talos_machine_configuration" "control_machine_config" {

  config_patches = [

    yamlencode({

      machine = {

        network = {

          nameservers = ["10.0.0.1", "1.1.1.1"]

        }

      }

    })

  ]


}
And with that we have a functional Kubernetes cluster that we can easily tear down and rebuild.
2026-05-05 08:00:00
If I’d have to describe my homelab setup via analogy I guess it would be similar to me on a unicycle carrying plates with both of my hands, or maybe a leaking barrel with water that I try to patch up with silver tape.
I’ve also been Kubernetes-curious so I decided to completely redesign my homelab, centered around Kubernetes. It was a bit painful but at least it fulfilled my need for procrastination very well.
I’ve got three goals with the setup:
Declarative, reproducible, and automated
The big goal is to have everything declarative in a single git repository and to easily be able to bootstrap from nothing to a fully working setup.
I want to use Infrastructure as Code to create the Kubernetes cluster and GitOps to populate it with all my services automatically from the repo.
It should be really easy to make a change; I want to move away from having to ssh into the correct repo and manually do stuff.
Backups, backups, backups
While a proper GitOps setup means that infrastructure and configuration files are inherently backed up, a proper backup setup is still crucial.
Ask me how I know.
No, please don’t.
I haven’t had a proper (as in working) backup solution for years and this time I should have it from the start.
Documentation
What if I could document my setup, so future me has a chance to understand what’s happening? Writing documentation is boring, so I’ll write some blog posts instead.
I’m a bit skeptical that I can fulfill all three goals, but if I manage 2/3 or even 1/3 it’s still a big win compared to my old setup.
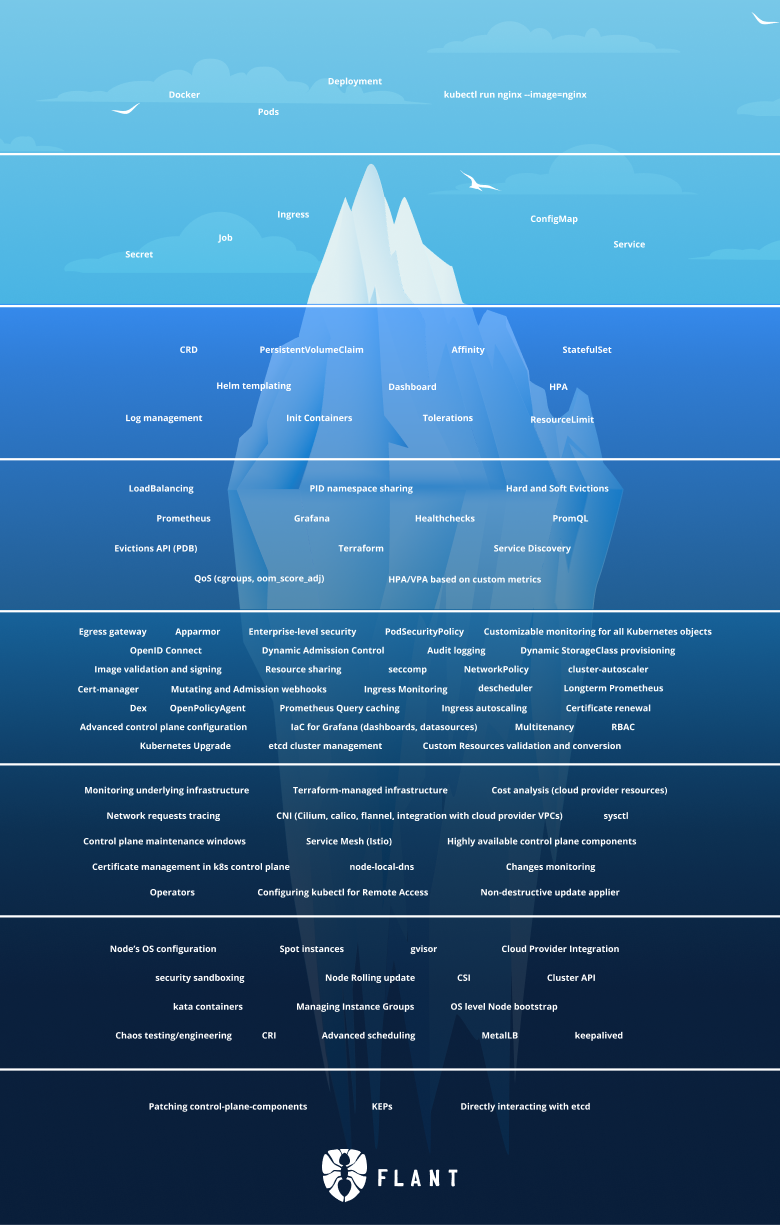
It’s a fair question and the most common critique towards Kubernetes is that’s just too complicated (especially for a homelab). Discussions online are filled with comments such as:
Kubernetes has to be most complex software I’ve ever tried to learn. I eventually gave up and decided to stick with simple single machine docker-compose deployments.
“Let’s use Kubernetes!”
Now you have 8 problems
So why would I choose Kubernetes?
Because, for whatever reason, Kubernetes is very popular and for every comment complaining about complexity you have comments extolling it’s virtues:
I was skeptical about Kubernetes but I now understand why it’s popular. The alternatives are all based on kludgy shell/Python scripts or proprietary cloud products.
Kubernetes is the biggest quality-of-life improvement I’ve experienced in my career
Having experienced the single machine docker-compose deployments, kludgy shell scripts, and proprietary cloud products; I think I need to use Kubernetes myself to be able to form an opinion on it.
And in some ways, isn’t experimentation a core part homelabbing?
There are many valid tech choices for this kind of setup and many of them are reasonable. I don’t know if my choices are reasonable—most were chosen because they sounded cool, others because I just picked one.
Here’s list of some of the choices I made, which we’ll setup in this series:
Talos Linux for Kubernetes nodes.
The coolest way to run Kubernetes. Lightweight and secure, what’s not to like?
Terraform to provision VMs on Proxmox and to initialize Talos Linux.
Cilium for proxying, CNI, load balancer, and Gateway API provider.
I opted for Cilium as it’s one dependency replacing several alternatives (such as kube-proxy, Metallb, and Traefik, which I was leaning towards at first). Gateway API is the new thing you “should” use instead of ingress, and I wanted to try it out.
ArgoCD for GitOps.
If it was purely for myself FluxCD might have been the better, simpler, choice but we might use ArgoCD at work and I don’t want to deal with two separate systems at the moment.
Renovate to keep dependencies up-to-date.
CloudNativePG for Postgres on Kubernetes.
I’ll also setup timescaledb, although we won’t use it in this series. It’s just to prepare for the future migration of long-term statistics from Home Assistant.
Longhorn on NVMEs for persistent storage.
Sanoid, Syncoid and Kopia for backup archive management.
Backups are snapshotted and stored in ZFS, which are also encrypted and shipped off-site to Backblaze for storage in the cloud. Backups from Longhorn and Postgres arrives to ZFS via Garage, a self-hosted S3 service.
Authentik as an identity provider and single-sign-on platform.
It’s nice to not have to login manually everywhere.
Huh. Displayed like this it looks like a lot, but fear not! It’ll be worth it in the end.
In the next part we’ll start by creating VMs and getting a Kubernetes cluster up and running.
2026-04-28 08:00:00
Respect your users and their confidence in you, “Microsoft” GitHub.
After years of waffling around I finally bit the bullet and migrated away from GitHub onto Codeberg and a private Forgejo instance. If Codeberg is good enough for Gentoo then it’s good enough for me.
One part of my GitHub aversion is me being anti the big American tech corporations for ideological reasons. I’d like to reduce my usage and dependence of Google/Facebook/Apple/Microsoft/Amazon etc where I can and moving away from GitHub fits that goal nicely.
The other reason is GitHub’s enshittification. GitHub has been slow and slightly buggy for years and it’s not getting better. They push out badly planned features while shipping this kind of code in GitHub actions runner:
#!/bin/bash
SECONDS=0
while ; do
done
(This apparently broke Zig and caused them to leave for Codeberg.)
You may not like it but this is what peak vibe coding looks like
I know it’s a snarky comment, but with a CEO that says “embrace AI or get out” then it’s hard to resist.
There’s empirical data to back up GitHub’s unreliability; just check out these uptime logs (taken 2026-04-27 from third party sites since the official status page predictably lies):
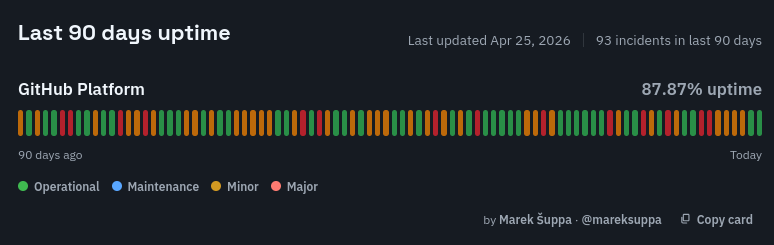
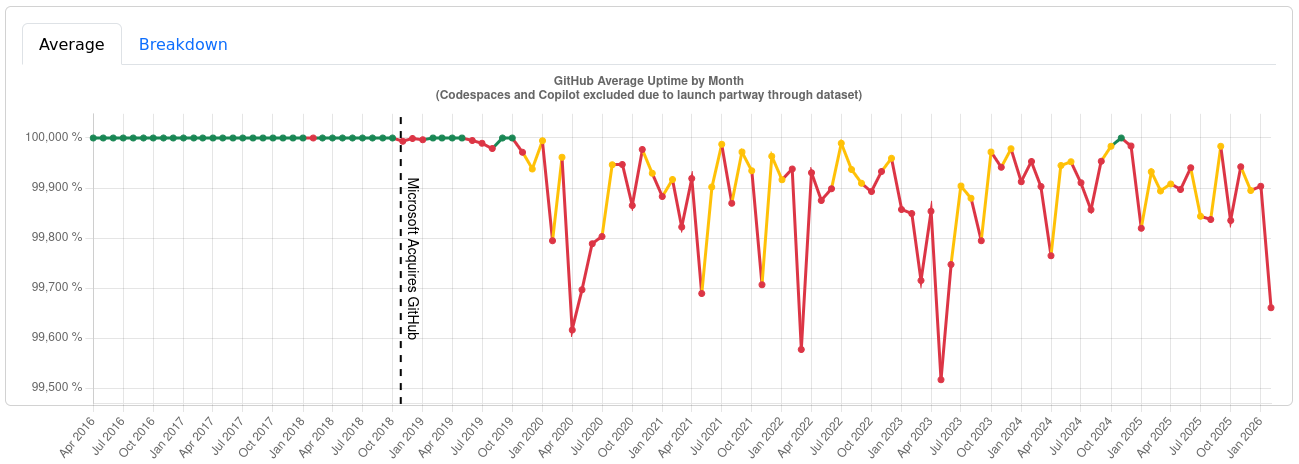
They don’t call it “Microslop” for nothing.
Codeberg is based on Forgejo, which is great to self-host. I’ve had it running a few weeks when I’ve been playing with my homelab and it feels exceptionally fast. The web UI is super responsive and I frequently have to double-check that I pushed as it finished so quickly.
I would love to have the speed and privacy for all my repositories but I’ve got some that I want to be public (the source for this site for example). I considered a few different setups:
Sync back changes to GitHub via Forgejo’s built-in GitHub sync?
(Keeping GitHub active would defeat the point a little though.)
Sync changes from my Forgejo instance to Codeberg?
(Maybe annoying to manage multiple repos?)
Only use Codeberg?
(I’d lose speed and privacy for my private repos.)
Expose my Forgejo instance running in my homelab?
(The internet is a scary place.)
Setup a public Forgejo on my Hetzner VPS?
(I’d still have to protect it and manage traffic.)
In the end I decided to use Codeberg as for my public-facing repositories and Forgejo as my main interface (for both public and private repos).
Some of my public repos are close to read-only (this site’s source for instance) so I’ve setup a mirror where Forgejo will push changes to Codeberg automatically. However, it’s weird to also pull changes from Codeberg to Forgejo. I guess I could setup a script to do it, but pull requests from others are rare enough that I can do it manually. Other repos (such as tree-sitter-djot) are left alone as they’re more collaborative in nature and I can’t be bothered to keep two sources in sync.
Yes, both Codeberg and Forgejo are very good.
They are snappy and speedy and there are no features I miss from either GitHub or GitLab (and plenty I’m glad to avoid—getting AI shoved into every crevice for instance).
(Yes, I used an em-dash on purpose.)
At the moment Codeberg is admittedly having periods with pretty bad performance issues. This is because they’ve been under a DDOS attack for quite some time, which has been frustrating.
The migration wasn’t difficult, just a bit repetitive.
For private repositories I just deleted them from GitHub and pushed them to Forgejo.
Public repositories had a few more steps: