


2026-10-02 08:00:00
A good metric for ergonomic systems design is how much of a program you have to keep in your head at once to know what’s going on. It’s empowering if you can understand a function by its type signature and get immediate feedback on whether you used it correctly. Other times, it feels like you’re a code archaeologist: Was this value validated before? Is it safe to retry this call? Can this panic? Bad APIs make local reasoning hard.
“Local reasoning” here means being able to understand a piece of code from a limited amount of surrounding context and the contracts of the APIs it uses. The main point is that you can rely on those contracts without additional knowledge of the implementation.
What makes Rust feel different from other languages is the ability to encode invariants in the type system and do so at zero cost. The combination of both properties is rare.
Once you notice this “local reasoning principle”, you’ll see it everywhere in Rust’s standard library: through the use of Result and Option, borrows marked with &, enums to represent a closed set of possibilities, or explicit unsafe blocks.
This information is always visible in every function signature.
A simple way to apply this mindset yourself is to check if your function signatures communicate as much information as possible to the caller. Maybe show the signature to a friend or colleague and ask them to explain what it does. It can be eye-opening.
Let’s look at a few examples.
Consider this function signature:
fn first_line(text: &str) -> Option<&str>Before even looking at the implementation, we already know that the function takes a borrowed input and may have no output.
(Or, rather, it may return None.)
Actually, if you know Rust’s lifetime elision rules, you know that the real signature is:
fn first_line<'text>(text: &'text str) -> Option<&'text str>The input is tied to the output.
That implies that the caller can’t keep using the returned string after the borrow of text has ended.
And by extension, the function can’t return a temporary string either.
The function is not making any long-lived allocations.
That’s a lot of useful information for just one function header!
All of that is great, but equally important, there are a few “implicit” assumptions that the signature does not guarantee. Take the function name: it suggests that the function returns “the first line of something.” However, the type system does not enforce that. It could return the last line for all we know, and the signature would be identical.
The function header also won’t tell us whether anything is logged, how it performs, or whether it panics.
Rust is often described as an explicit language. Yet it also uses type inference, lifetime elision, automatic borrowing of method receivers, and implicit coercions. That’s because writing everything out would make many programs harder to read. What you should make explicit depends on your context.
A good rule of thumb when designing an API is to look for relationships that callers would otherwise have to keep in their heads.
Does your function really take any &str, or does it expect a string that has been validated in some way?
For example, is an empty string valid input?
What does None mean in the return value?
Should it be treated as an error, or is it a valid case?
Should it be a Result instead?
Good function signatures tell a story about the relationships between inputs and outputs.
Consider these two calls, where text is a String:
inspect(&text);
consume(text);
The first call borrows text while the second one moves it.
Now let’s look at the context of the borrowed call:
fn inspect(text: &str) {
    println!("{text}");
}

let text = String::from("hello");
inspect(&text);
The compiler applies a deref coercion automatically. I think that’s a good compromise: the ownership decision is still visible, but the compiler handles the bookkeeping.
Some people argue that we could go one step further.
Why not automatically borrow an owned argument in an ordinary function call?
We could then write inspect(text) instead of inspect(&text), which seems convenient.
But, as always, there’s a cost to convenience.
Saving the & would remove information readers currently get from the expression itself: that the value does not move.[1]
Convenience does not always mean better ergonomics.
This gives us a way to judge our own conveniences, too.
Implementing Deref for a wrapper makes its target’s methods available implicitly.
That’s convenient.
But it’s a slippery slope.
It can lead to leaky abstractions, where a wrapper type is treated as if it were the underlying type, but is not quite the same.
Suppose a UserId stores a String.
You might consider implementing Deref<Target = str> for it, so that callers can use it as if it were a &str.
Now you expose the whole string interface through Deref.
You implicitly allow callers to treat the identifier as text, sidestepping all type invariants.
Instead, an explicit as_str() leaves a visible point where the identifier is treated as text.
It also lets your UserId newtype have an API of its own.
Interaction with user IDs becomes more deliberate.
Use Deref only when the wrapper transparently behaves like its target and dereferencing is cheap and unsurprising.
The standard library agrees.
Take a look at this function signature:
fn visit<F: FnMut(&str)>(callback: F)Here, we introduce a name, F, give it a bound of FnMut(&str), and then use it exactly once for callback.
I think that signature would be clearer if we put the requirement right next to where it’s used:
fn visit(callback: impl FnMut(&str))Now you can read the signature from left to right.
This saves you from jumping back and forth just to figure out what F means.
One less thing to keep in your head while reading.[2]
Now, I’m not saying that version two is always better. For example, it can be helpful to keep generics separate from the rest of the signature when the generic type is used in multiple places:
fn choose<T>(first: T, second: T, take_first: bool) -> T {
    if take_first { first } else { second }
}
Here, T tells us that both arguments as well as the return value have the same type.
The same thinking applies to return types:
fn nonempty(lines: &[String]) -> impl Iterator<Item = &str> {
    lines.iter().map(String::as_str).filter(|s| !s.is_empty())
}
impl Iterator<Item = &str> tells the caller what they can do with the result, namely iterate over borrowed strings.
(Besides, if you tried writing out the concrete return type of that function, it would be unnecessarily long and complicated.)
Ask yourself: does naming this type help the caller understand something?
We usually learn about ownership in the context of memory. But the same rules apply in other situations.
Take file descriptors, for example. On Unix, a raw file descriptor is just an integer. That integer doesn’t tell you whether the descriptor is still open, or who’s responsible for closing it. Worse, once it’s closed, the operating system can reuse the number for something else.
Consider these two signatures, using types from std::os::fd:
fn inspect(fd: RawFd) -> std::io::Result<()>fn inspect(fd: BorrowedFd<'_>) -> std::io::Result<()>The first signature only gives us an integer.
RawFd is literally just an alias for c_int.
But that descriptor might already be closed.
Those “time-of-check to time-of-use” bugs are a common pitfall of safe Rust.
The second guarantees that the descriptor remains open for the duration of the borrow.[3]
The caller keeps its owner alive, and Rust checks that relationship when we borrow from a File:
use std::fs::File;
use std::os::fd::AsFd;

let file = File::open("notes.txt")?;
inspect(file.as_fd())?;
Now the compiler can help!
You can’t drop file and then keep using the descriptor borrowed from it in safe Rust.
You no longer need to search through the code to check whether someone closed it earlier.
But what if our function should really take ownership of the file descriptor?
Use OwnedFd instead.
When the OwnedFd is dropped, the descriptor is closed automatically, so the caller doesn’t have to remember to do it.
In a sense, memory and file descriptors share a similar set of types with different guarantees:
| Memory | File descriptors | Use Case |
|---|---|---|
Box<T> |
OwnedFd |
“I want to own this resource and close it when I’m done.” |
&T |
BorrowedFd<'a> |
“I want to borrow this resource for a limited time.” |
| Raw pointer | RawFd |
“I want to use this resource, but I don’t know who owns it or how long it will live.” |
Lock guards are another example.
{
    let _guard = lock.lock();
    // do cool things with lock
}
// We no longer have access to the lock here, because `_guard` was dropped.
If you can access the data, you hold the lock.
You don’t have to “trace the program back” to an earlier lock() call and check every path for an unlock.
In C, that’s very much the case and easy to get wrong.
Of course, these types only guarantee what they encode.
A BorrowedFd keeps track of one borrow, but it doesn’t guarantee exclusivity over the underlying resource.
That means another process might still be writing to the same file.
But in general, you can stop relying on callers to remember the provenance of a resource. That’s a much stronger guarantee than simply saying “keep this open until you’re done” in your API documentation.
Raw handles are still necessary at a low-level boundary, but you don’t have to pass them through your entire application.
The lesson is that you can encapsulate ownership information in your own types and provide a safe wrapper around an unsafe API.
Sometimes things are truly outside of Rust’s control. In that case, the safety responsibility shifts to the user. We use unsafe APIs to make that inversion of responsibility explicit.
In Rust, there are two different responsibilities, which share the same keyword:
unsafe fn says: “Before you call me, you MUST establish these conditions. This is your responsibility.”unsafe block means you’re responsible for satisfying the conditions of the unsafe operations inside the block.[4]
The difference is that an unsafe fn sets safety conditions that its caller must meet, while an unsafe block marks where the person writing the code claims that each unsafe operation’s safety conditions have been met.
In both cases, it is good practice to add safety comments to make readers aware of these conditions. Here’s how that could look in practice:
/// # Safety
/// `index` must be less than `values.len()`.
unsafe fn element_unchecked(values: &[u8], index: usize) -> u8 {
    // SAFETY: The caller guarantees that `index` is in bounds.
    unsafe { *values.get_unchecked(index) }
}
In general, you should use get(index) instead to handle the None case, but this example illustrates how to document safety obligations.
Since the type system can’t check the safety conditions, it’s your obligation to keep the documentation up to date.
Suppose someone adds another unsafe operation to this function later.
Does knowing that index is in bounds make that operation safe, too?
Maybe.
You have to check and potentially update your docs.
Quick tip: when you write a safety comment, explain why the operation is safe. “This is safe” doesn’t help the next person, but “The caller guarantees that the index is in bounds” gives them something they can check.
Another tip: in Rust 2024, unsafe operations inside unsafe functions warn by default unless you put them in an explicit unsafe block.
You can enforce that with #![deny(unsafe_op_in_unsafe_fn)].
You’ve probably heard the advice to panic for programmer errors and return Result for recoverable failures.
That’s reasonable, but who decides what counts as a programmer error?
You do, when you design the API.[5]
Consider the difference between indexing and get:
let item = items[index];let item = items.get(index);If you use indexing, you need to know that the index is valid to avoid a panic.
With get, you can try the lookup and handle None if it fails.
Remember that both are safe Rust: an invalid index doesn’t cause undefined behavior in either case.
Now suppose the index comes from user input. Is an out-of-bounds index really a bug in your program? Or is it something you should expect and handle?
One escape hatch is to make every caller check the index before calling your function.
A strict precondition might make your work simpler, but think about your users.
Before you document another thing the caller “must” do, ask whether your API could handle it instead.
For example, you could return an Option and let callers decide what to do next.
That doesn’t mean you should avoid indexing altogether. If an index is indeed valid by construction, indexing can express that assumption directly. A panic then means there’s a bug in your API. It’s probably fine to panic in that case, instead of introducing undefined behavior.
And often it’s possible to sidestep these issues entirely. For example, if you need to visit each element of a collection, use an iterator. This way, you don’t have to worry about indices at all.
Another mental model for building great APIs is to think about what you want to guarantee to your users. Remember Hyrum’s Law:
With a sufficient number of users of an API, it does not matter what you promise in the contract: all observable behaviors of your system will be depended on by somebody.
With that in mind, think about what happens when you try to change your API.
For example, users can match on every variant of your public enum. They can’t forget a case, because the compiler will warn them about it. That’s local reasoning at work, which is great. But on the flip side, it also means that you can’t add a variant without breaking their code. You’ve broken a guarantee they depended on.
To prevent that, mark your enum as #[non_exhaustive] so you can add variants later:
#[non_exhaustive]
pub enum ServiceError {
    Unavailable,
    Rejected,
}
In that case, users have to include a fallback when matching the enum.[6] You’ve pushed the responsibility to the call site, which is likely the better place to decide what to do with an unexpected variant. Exhaustive matching keeps working inside your own crate.
Should you add #[non_exhaustive] to every public enum just in case?
No.
If the set of possibilities really is closed, exhaustive matching gives users a useful guarantee.
Don’t take it away without a reason.
Examples of closed sets include days of the week, months of the year, or the suits of a deck of cards:
pub enum Suit {
    Hearts,
    Diamonds,
    Clubs,
    Spades,
}
If you make this enum non-exhaustive, users can’t use your crate to implement a card game without having to handle an impossible case.
The awkward middle ground is a set that looks closed but really isn’t.
HTTP status codes are a good example: mapping all the standard codes doesn’t mean you’re safe from a vendor inventing their own codes.
This caused a real problem in http-types: a user reported that constructing a response with Cloudflare’s custom status codes panicked because the library’s StatusCode enum couldn’t represent them.
#[non_exhaustive] doesn’t solve that problem by itself.
It lets you add additional variants in the future, but it doesn’t allow users to represent unknown codes today.
How about we add Unregistered(u16)?
#[non_exhaustive]
pub enum Status {
    Ok,
    NotFound,
    // Other known status codes we can't name yet...
    Unregistered(u16),
}
Now users can handle codes which don’t have a name yet:
fn is_early_hints(status: Status) -> bool {
    match status {
        Status::Unregistered(103) => true,
        _ => false,
    }
}
But that introduces another compatibility trap.
Suppose a later release adds an EarlyHints variant and starts returning it for code 103.
The function now returns false for the same HTTP status code.
The code still compiles, but its behavior has changed.
I recommend reading “Pattern Matching and Backwards Compatibility”
by Sean McArthur, the author of the http crate, about how even an enum with a catch-all variant can make promises you didn’t intend.
The escape hatch for the http crate was to make StatusCode an opaque struct with associated constants for the known codes like StatusCode::OK.
Users can then construct values from numeric codes, even when the library doesn’t have a name for them:
use http::StatusCode;

let status = StatusCode::from_u16(599).unwrap();
assert_eq!(status.as_u16(), 599);
They can still match on familiar codes, but they have to include a fallback. And they can handle an unnamed code by inspecting its numeric value:
use http::StatusCode;

fn describe(status: StatusCode) -> &'static str {
    match status {
        StatusCode::OK => "success",
        code if code.as_u16() == 103 => "early hints",
        _ => "some other status",
    }
}
That’s pretty clever, because adding a new constant like StatusCode::EARLY_HINTS assigns a name to a value without changing the underlying representation, and numeric checks continue to work.
So before making something public, ask yourself: am I willing to uphold this guarantee forever? This applies to your entire public API, including enums and public fields inside structs.
Changing things later can break user code. From their perspective, it was part of the API all along.
I suggest you put that advice into practice. Pick a function in your codebase and look at it from the caller’s perspective. What do you have to know to use it correctly? Can you get that information from the signature, or do you have to read the implementation first?
Look for instructions in the documentation that the compiler could help enforce. Instead of writing “keep this resource alive”, maybe you can return a borrowed type. “Only pass validated text” might become a newtype with some validation in the constructor.
You don’t have to follow every single suggestion in this article, either. The goal is to make your API easier to understand and harder to misuse.
RFC 241: Deref coercions discusses why automatically borrowing arguments would make local reasoning harder. ↩
RFC 1951: Expand impl Trait explains ergonomics in terms of how much you have to keep in your head, and discusses who chooses the concrete type. ↩
RFC 3128: I/O safety explains the analogy between raw handles and raw pointers, and introduces owned and borrowed handle types. ↩
RFC 2585: Unsafe blocks in unsafe functions separates defining safety obligations from satisfying them. The Rust 2024 edition guide covers the lint’s current default. ↩
RFC 236: Error conventions recommends expressing contracts through types where possible, and using Result or Option when a stricter contract is hard to justify.
The discussion of task failure predates Rust 1.0; the advice about API contracts is the relevant part here. ↩
RFC 2008: Non-exhaustive enums and structs discusses exhaustive matching and the freedom to add new variants. ↩
2026-10-01 08:00:00
Planning your Rust conference trips for 2027? Here are the events with confirmed dates so far. We’ll add more conferences, ticket prices, and call for proposals (CFP) deadlines as organizers announce them.
Come say hi if you see us at any of these events! (We’ll bring Rust in Production stickers.) For this year’s events, see Rust Conferences 2026.

Rust Nation returns to London with a one-day, three-track conference at a new venue in the City of London. A separate workshop day is being planned for February 17, but is not yet confirmed.

After its first edition in 2026, TokioConf returns to Portland. It’s a conference for developers working with Tokio, async Rust, and high-performance network applications.

RustWeek brings the Rust community together in Utrecht for talks, workshops, a hackathon, and social activities. The week also includes the invitation-only Rust Project All Hands.

Hosted by the Rust Foundation, RustConf heads to Vancouver in 2027, with online participation available too. More details about the program are still to come.
We haven’t found official 2027 dates for the following conferences yet. These are events to keep an eye on, not confirmed 2027 editions:
Browse our dedicated Rust conference recordings page where you can filter by year, topic, and conference!

Missing an event? Spot an error? Feel free to edit this list directly or let us know.
Check the organizers’ websites for the latest details before booking travel. See you at the next conference! 🦀
2026-09-24 08:00:00
Steve Klabnik recently wrote about named arguments, optional arguments, default arguments, function overloading, and why most of that design space has historically made him nervous in Rust.
I agree with Steve. In fact, I think I agree slightly more strongly than Steve does. :)
I actually think we can get most of what we want without adding any new language features. Instead, we can lean into what Rust already provides.
None of these is an exact substitute for what you get in Python, Ruby, C++, or Kotlin, but that’s sort of the point. Instead, you can get 80% of the ergonomics without adding any magic to function calls at all.
The recurring pattern is that Rust takes something another language puts into function-call semantics and represents it as a normal part of its type system, elegantly sidestepping the mentioned design problems.
Let’s revisit Steve’s example from the image crate:
pub fn crop_imm<I: GenericImageView>(
    image: &I,
    x: u32,
    y: u32,
    width: u32,
    height: u32,
) -> SubImage<&I> {
    // ...
}

let cropped = image::imageops::crop_imm(&img, 10, 20, 200, 100);
The obvious problem is that four consecutive u32s are not a great API that you can reliably use without reading the docs.
Let’s assume for a moment that we had named arguments:
let cropped = image::imageops::crop_imm(
    image: &img,
    x: 10,
    y: 20,
    width: 200,
    height: 100,
);
That’s clearly better, but stable Rust has another syntax in its place: structs.
struct Crop {
    x: u32,
    y: u32,
    width: u32,
    height: u32,
}

fn crop_imm<I: GenericImageView>(
    image: &I,
    crop: Crop,
) -> SubImage<&I> {
    // ...
}

let cropped = image::imageops::crop_imm(
    &img,
    Crop {
        x: 10,
        y: 20,
        width: 200,
        height: 100,
    },
);
A struct is a named argument with one extra type name. On top of that, we also get arbitrary field order:
Crop {
    width: 200,
    height: 100,
    x: 10,
    y: 20,
}
We also get typo checking, autocomplete, and per-field documentation for free! And we can put invariants on the type and pass the arguments around as values.
And, perhaps most importantly, the names belong to the type, rather than becoming part of every function’s calling convention.
That last property neatly avoids several problems with actual named arguments. Consider function pointers:
fn resize(width: u32, height: u32) {}
fn offset(dx: u32, dy: u32) {}

let f: fn(u32, u32) = if resizing { resize } else { offset };
What would the parameter names of f be?
With an argument struct, the question simply wouldn’t come up:
struct Size {
    width: u32,
    height: u32,
}

fn resize(size: Size) {}

// No more arguing about arguments
let f: fn(Size) = resize;
If names are semantically important, give the names a type. If they aren’t, then… don’t.
There is another delightful benefit here. Steve brings up evaluation order:
consume(length: data.len(), data: data);I.e., should arguments be evaluated in the order they appear at the call site, or in the order the parameters appear in the declaration?
Here, does that mean computing data.len() before moving data or after?
Rust already answered this question for structs:
let args = Args {
    length: data.len(),
    data,
};
Expressions are evaluated where you wrote them. No new rules required.
This feels extremely idiomatic to me: rather than teaching function calls a second field-like syntax with subtly different semantics, just use the field syntax that already exists.
Of course, declaring a bespoke argument type for every two-argument function would be ridiculous. I would not write:
struct PushArgs<T> {
    value: T,
}

vec.push(PushArgs { value: 42 });
That would be silly. The trick is to notice that named arguments are most useful exactly where an argument bundle becomes conceptually meaningful, which is the same point at which you reach for a struct anyway.
These are bad:
draw(x1, y1, x2, y2, width, opacity);
connect(host, port, timeout, retries, tls);
And these are often better APIs anyway:
draw(Line {
    start: Point { x: x1, y: y1 },
    end: Point { x: x2, y: y2 },
    width,
    opacity,
});

connect(ConnectionOptions {
    host,
    port,
    timeout,
    retries,
    tls,
});
The design pressure forced us to uncover missing domain concepts.
An optional argument is, to some extent, an argument which may or may not exist. Rust has a type for that.
fn connect(url: &str, timeout: Option<Duration>) {
    // ...
}

connect("https://example.com", None);

connect(
    "https://example.com",
    Some(Duration::from_secs(5)),
);
This is not as pleasant as:
connect("https://example.com")
connect("https://example.com", timeout: 5s)
But it has a useful property: the optionality appears in the function’s type.
There isn’t a hidden second calling convention for connect.
There is but one function:
fn(&str, Option<Duration>)and every caller supplies both arguments.
This is obviously not what you want once you have six optional arguments:
request(
    url,
    None,
    None,
    Some(timeout),
    None,
    None,
    None,
);
I’ve personally been found guilty of this pattern in the past. The problem is that the arguments have stopped being a parameter list and started being configuration. So:
struct RequestOptions {
    timeout: Option<Duration>,
    proxy: Option<Proxy>,
    redirect: Option<RedirectPolicy>,
    // ...
}

request(
    url,
    RequestOptions {
        timeout: Some(Duration::from_secs(5)),
        proxy: None,
        redirect: None,
    },
);
Instead of optional arguments, we deal with data. And that adds a nice property: there is no special distinction between “arguments supplied syntactically to this invocation” and “options I calculated elsewhere.”
let options = RequestOptions {
    timeout: config.request_timeout,
    proxy: detect_proxy(),
    redirect: None,
};

request(url, options);
It composes nicely because it’s just a value.
Now the obvious objection: writing all those Nones is terrible.
Correct. So don’t.
That’s why we have Default and struct update syntax:
#[derive(Default)]
struct RequestOptions {
    timeout: Option<Duration>,
    proxy: Option<Proxy>,
    follow_redirects: bool,
}

request(
    url,
    RequestOptions {
        timeout: Some(Duration::from_secs(5)),
        ..Default::default()
    },
);
That is getting awfully close to:
request(url, timeout: 5s)with one minor wrinkle:
RequestOptions {
    ...
    ..Default::default()
}
That is not nothing. But look at what we didn’t have to add: rules for which arguments may be omitted, how positional and named arguments interact, or whether you can omit something in the middle.
There’s no special syntax for declaring parameter defaults, no question about whether default expressions run at declaration time or invocation time, and no special representation in fn types.
Default is just a trait, and function calls remain untouched.
Defaults are now usable independently of the function:
let defaults = RequestOptions::default();That is frequently useful in its own right. For library APIs, I often like being slightly more explicit:
struct RequestOptions {
    timeout: Duration,
    follow_redirects: bool,
}

impl Default for RequestOptions {
    fn default() -> Self {
        Self {
            timeout: Duration::from_secs(30),
            follow_redirects: true,
        }
    }
}
Then:
request(
    url,
    RequestOptions {
        timeout: Duration::from_secs(5),
        ..Default::default()
    },
);
I think this gets most of the important bits right.
Sometimes even the options struct is too noisy, often when construction requires validation or conversion.
Then, yes, there is the builder:
let request = Request::builder(url)
    .timeout(Duration::from_secs(5))
    .follow_redirects(false)
    .build()?;
Steve is right that builders should not be the default. They can become their own tiny programming language. But a small builder has a very useful property: each “argument” is an ordinary method call. That means we can do things like:
let mut request = Request::builder(url);

if let Some(timeout) = config.timeout {
    request = request.timeout(timeout);
}

let request = request.build()?;
Doing that with language-level keyword arguments generally requires constructing a map, splatting things, or some other mechanism.
In Rust, it’s method calls. I personally find this very pleasing to read.
In Java, you can write:
void connect(String url, int timeout) { ... }
void connect(String url) { ... }
Rust doesn’t let you define both:
fn connect(url: &str) {}
fn connect(url: &str, timeout: Duration) {}
I am very happy about this. But there are several different things people mean when they say they want overloading, and Rust already covers most of them separately.
Give them different names:
fn connect(url: &str) {
    connect_with_timeout(url, DEFAULT_TIMEOUT)
}

fn connect_with_timeout(url: &str, timeout: Duration) {
    // ...
}
The standard library does this often.
See Vec::new() and Vec::with_capacity(), for example.
This costs the library author one additional name (often just with_...) and saves every user from doing overload resolution in their head.
Use a trait.
The standard library does this all the time with traits like Into, AsRef, and Borrow.
For example:
fn greet(name: impl AsRef<str>) {
    println!("Hello, {}", name.as_ref());
}

greet("Ferris");
greet(String::from("Ferris"));
This gives us another useful part of overload-like behavior: one API can accept different input types.
For owned conversion:
fn set_name(name: impl Into<String>) {
    let name = name.into();
    // ...
}
That’s just a single function with one parameter list and trait dispatch. And unlike unrestricted overloading, the relationship between accepted types is explicit: they work as long as they satisfy the bound.
That’s a trait, too:
trait Render {
    fn render(self, out: &mut Output);
}

impl Render for &str {
    fn render(self, out: &mut Output) {
        // ...
    }
}

impl Render for Image {
    fn render(self, out: &mut Output) {
        // ...
    }
}

fn render(value: impl Render, out: &mut Output) {
    value.render(out);
}
That’s polymorphism; we just put it in the trait system instead of in name resolution.
Steve’s Ruby example has this equally lovely and terrifying quality:
redirect_to "http://www.rubyonrails.org"
redirect_to @post
redirect_to action: "show", id: 5
These calls look like they’re invoking one conceptual operation, but they mean wildly different things.
In Rust, we can model that directly:
enum Redirect {
    Url(Url),
    Post(Post),
    Action {
        action: String,
        id: u64,
    },
}

fn redirect_to(target: Redirect) {
    // ...
}
Then:
redirect_to(Redirect::Url(url));

redirect_to(Redirect::Post(post));

redirect_to(Redirect::Action {
    action: "show".into(),
    id: 5,
});
That’s more verbose, but in a good way.
And I can ask, “Hey editor, what can I redirect to?” and the editor replies with the variants of Redirect.
That’s more helpful than “read the docs and discover which keys and values this hash accepts.”
If we really cared about smoothing down the edges, we could add From conversions:
impl From<Url> for Redirect {
    fn from(url: Url) -> Self {
        Self::Url(url)
    }
}

impl From<Post> for Redirect {
    fn from(post: Post) -> Self {
        Self::Post(post)
    }
}

fn redirect_to(target: impl Into<Redirect>) {
    let target = target.into();
    // ...
}
Now:
redirect_to(url);
redirect_to(post);
And for the structurally interesting case:
redirect_to(Redirect::Action {
    action: "show".into(),
    id: 5,
});
Remember that this has no runtime cost and is fully type-safe. Not bad for a compiled language.
An “options hash” is basically a dynamically typed anonymous struct. So the extremely boring Rust translation is: use a statically typed, named struct.
Ruby:
redirect_to post_url(@post),
  status: 301,
  flash: { updated_post_id: @post.id }
Rust:
redirect_to(
    post_url(&post),
    RedirectOptions {
        status: StatusCode::MOVED_PERMANENTLY,
        flash: Some(Flash {
            updated_post_id: Some(post.id),
            ..Default::default()
        }),
        ..Default::default()
    },
);
Yes, the Rust version is noisier, but it also detects when we misspell status.
It’s impossible to pass a string where the status code goes, and it’s straightforward to list every supported option.
I don’t think Rust should optimize for making the syntax as dense as possible. Instead, if a set of options is common enough to deserve convenient syntax, it is probably common enough to justify a type.
fn redirect_to(target: Url, options: RedirectOptions)Now, options have a name and the fields can be documented in one place.
Rust does not have general-purpose variadic Rust functions. But once again, it already has several ways of expressing the same concept.
If all arguments have the same type, take a slice:
fn sum(values: &[i32]) -> i32 {
    values.iter().sum()
}

sum(&[1, 2, 3, 4]);
Or accept an iterator:
fn sum(values: impl IntoIterator<Item = i32>) -> i32 {
    values.into_iter().sum()
}

sum([1, 2, 3, 4]);
sum(vec![1, 2, 3, 4]);
That is arguably more composable than:
sum(1, 2, 3, 4)because the caller can naturally pass an existing collection. (All type-safe, of course, and with zero indirection at runtime.)
If the arguments are heterogeneous, the last resort is to write a custom macro. To be clear, I would not use macros just to fake variadic functions, but I do like how macros can be used in stable Rust, and how the exclamation mark stands out from normal function calls.
There is one tiny affordance in all of these examples that I think deserves more credit: field-init shorthand.
Rust lets you turn this:
let options = RequestOptions {
    timeout: timeout,
    proxy: proxy,
    retries: retries,
};
into this:
let options = RequestOptions {
    timeout,
    proxy,
    retries,
};
This directly addresses one of Steve’s complaints about keyword arguments:
response_model=response_model,
status_code=status_code,
tags=tags,
dependencies=dependencies,
Rust’s answer is effectively:
Options {
    response_model,
    status_code,
    tags,
    dependencies,
}
In my opinion, that’s even better than keyword arguments. That’s because the labels are still present, the duplication disappears, and nothing needs to change in how we call functions.
The thing I like the most about Rust is how each concept nicely interacts with the others. That is not an easy task, and Rust deserves a lot of credit for that.
For example, suppose we want a complex HTTP request API with:
We could imagine a pile of language features that lets us write:
request(
    "/hello",
    timeout: 5s,
    redirects: false,
    headers: [
        ("Accept", "application/json"),
        ("X-Foo", "bar"),
    ],
)
Now wouldn’t that be nice? However, we can already do this in stable Rust with a combination of already existing, composable features:
request(
    "/hello",
    RequestOptions {
        timeout: Some(Duration::from_secs(5)),
        redirects: false,
        headers: vec![
            Header::new("Accept", "application/json"),
            Header::new("X-Foo", "bar"),
        ],
    },
)?;
And all we had to do was write the code we’d likely write anyway:
#[derive(Default)]
struct RequestOptions {
    timeout: Option<Duration>,
    redirects: bool,
    headers: Vec<Header>,
}

fn request(
    url: impl Into<Url>,
    options: RequestOptions,
) -> Result<Response> {
    // ...
}
Or maybe you prefer a builder?
Request::new("/hello")
    .timeout(Duration::from_secs(5))
    .redirects(false)
    .header("Accept", "application/json")
    .header("X-Foo", "bar")
    .send()?;
We combined standard Rust concepts: structs, enums, Option, Default, struct update syntax, field-init shorthand, traits, generics, iterators, and methods.
Those mechanisms are all useful far beyond argument passing.
Basic Rust syntax is all the machinery required to build ergonomic APIs. Keeping things simple doesn’t mean worse ergonomics.
The obvious response to everything above is:
Come on. These aren’t actually named/default/overloaded/variadic arguments. They’re workarounds.
Correct.
crop_imm(&img, 10, 20, 200, 100) into:crop_imm(
image: &img,
x: 10,
y: 20,
width: 200,
height: 100,
);request(url, timeout: timeout); instead of introducing RequestOptions.with_timeout.All of the above might be useful, though localized, syntax improvements. But the hidden tax is that the language becomes more complex, for arguably little gain.
Friction in APIs often pushes us toward solutions that turn out to be useful beyond the original problem:
Rect.RequestOptions.In a sense, the concrete issue points to a broader design problem, and resolving it opens up completely new ways to solve similar problems. That’s great systems design.
I think there’s a broader design principle behind all of this.
A common design philosophy in dynamic languages is to make familiar constructs more powerful by overloading them with additional semantics. After all, that is one affordance which dynamic typing allows: the ability to decide the meaning of an object at runtime.
foo(x)
foo(x, y)
foo(x, timeout: 3)
foo(path: x, timeout: 3)
foo(x, **options)
foo(*args, **options)
Rust, however, tends to move complexity outward and let the type system do all the work.
foo(FooOptions { ... })One might ask: “In the age of agentic development, doesn’t verbosity become cheaper while redundant labels may make a call easier to understand locally?”
I agree with the premise. I’m less sure it changes the conclusion.
An agent looking at:
crop_imm(
    &img,
    Crop {
        x: 10,
        y: 20,
        width: 200,
        height: 100,
    },
);
gets essentially the same local information.
Arguably it gets more: Crop gives the bundle a semantic identity which the function parameter list alone does not.
Similarly:
request(
    url,
    RequestOptions {
        timeout,
        ..Default::default()
    },
);
says something useful to both humans and agents.
timeout is not merely an optional syntactic argument to this particular invocation; it is a way to configure a request.
And if agents really do make typing cost increasingly irrelevant, then the principal downside of these slightly-more-verbose Rust idioms gets cheaper too.
The robots can type RequestOptions for me.
I’m not opposed to Rust ever gaining named arguments. There may be a proposal that finds a tiny, coherent design which handles patterns, function pointers, traits, evaluation order, compatibility, and all the other sharp edges described. But I don’t feel much urgency.
Stable Rust already gives me structs for named options, Option and Default for optional values and defaults, traits and enums for varied inputs, and slices and iterators for repeated arguments.
Collectively, they cover a lot of ground. And they do it by reusing features Rust already needs. And I think that’s a core part of Rust’s design philosophy: finding the smallest, composable, orthogonal set of abstractions, which, when combined, can solve many problems in elegant ways. The whole is greater than the sum of its parts.
2026-07-30 08:00:00
Welcome to the final episode of this season of Rust in Production. My guest is Orhun Parmaksız from JetBrains, and we talk about building developer tools with Rust.
JetBrains is best known for IntelliJ IDEA, Kotlin, and a long line of IDEs for professional software teams. In the Rust world, that now includes RustRover: a commercial IDE built on the IntelliJ platform, with deep Rust support for navigation, refactoring, debugging, testing, and large codebases.
This episode is about where Rust fits into that world. We talk about why JetBrains does not plan to rewrite the IntelliJ platform in Rust, why Fleet used Rust for its File System Daemon, how Air builds on parts of Fleet’s architecture, and why JetBrains prefers out-of-process Rust helpers over JNI inside the JVM. We also get into RustRover’s internals: PSI, THIR, MIR-based expression evaluation in the debugger, procedural macro sandboxing, library stubs, parser regression testing, cargo-nextest support, and the practical trade-offs between JetBrains’ indexing model and rust-analyzer’s Salsa-based approach.
Proudly Supported by Svix
Svix makes it easy to send webhooks reliably at any scale. It handles retries, secure signatures, monitoring, replay, and endpoint management so you can focus on your product.
Svix is powered by Rust. Learn more about Svix.
cargo test
2026-07-29 08:00:00
In Rust, some traits can’t be used as trait objects with dyn Trait.
When a trait can’t be used with dynamic dispatch, we say it’s “not dyn compatible.” [1] This has an impact on how you can use these traits in your code.
I think that’s one area where the Rust compiler could print a more helpful error message.
Fixing the issue is mostly about tradeoffs between compile-time generics and runtime polymorphism and learning when each one fits. Once you understand the concept, you’ll know how to get around the issues by choosing a better design for your trait.
Quick Help
If the compiler told you a trait is “not dyn compatible”, your trait can’t be used as dyn Trait because it has a method that can’t go through dynamic dispatch, usually one that returns Self, takes no self, or is generic.
To fix it, pick one:
where Self: Sized to the offending methodBox<dyn Trait> instead of Self
&dyn Trait
Continue reading to understand the tradeoffs between each approach.
Here’s an example with code that won’t compile.
Say you have a trait Widget that has a method returning a copy of itself:
trait Widget {
    fn draw(&self);
    fn duplicate(&self) -> Self;  // Returns a copy of itself
}
…and there’s a button, which implements Widget:
struct Button {
    label: String,
}

impl Widget for Button {
    fn draw(&self) {
        // ...
    }

    fn duplicate(&self) -> Self {
        Button { label: self.label.clone() }
    }
}

fn show_widget(widget: &dyn Widget) {
    // This works
    widget.draw();

    // This produces an error because duplicate returns `Self`
    let copy = widget.duplicate();
    copy.draw();
}
If you tried to compile this code, you’d get an error like this:
error[E0038]: the trait `Widget` is not dyn compatible
  --> src/main.rs:20:25
   |
20 | fn show_widget(widget: &dyn Widget) {
   |                         ^^^^^^^^^^ `Widget` is not dyn compatible
   |
note: for a trait to be dyn compatible it needs to allow building a vtable
      for more information, visit <https://doc.rust-lang.org/reference/items/traits.html#dyn-compatibility>
  --> src/main.rs:3:28
   |
 1 | trait Widget {
   |       ------ this trait is not dyn compatible...
 2 |     fn draw(&self);
 3 |     fn duplicate(&self) -> Self;  // Returns a copy of itself
   |                            ^^^^ ...because method `duplicate` references the `Self` type in its return type
   = help: consider moving `duplicate` to another trait
   = help: only type `Button` implements `Widget`; consider using it directly instead.
That all sounds pretty confusing.
dyn part take care of it?Self?When you use &dyn Trait, Rust creates a trait object.
Trait objects use dynamic dispatch to call methods at runtime.
Dynamic dispatch just means that the exact method to call is determined at runtime based on the actual type of the object.
For dynamic dispatch to work, the trait’s dispatchable API must follow certain rules.
Self.&self, &mut self, Box<Self>, and a few related pointer forms). Plain static methods don’t have one.These are simplifications: each method-level rule is really “…unless that method opts out with where Self: Sized”, which we’ll see in a moment. Traits also have a few item-level restrictions, such as no associated constants; we’ll summarize the fuller list later. For now, the rough version is enough to build intuition.
In our example, we violate the first rule: the duplicate method returns Self, which means “the same type as the implementor of the trait”.
When you use &dyn Widget, the concrete implementor is hidden behind the trait-object interface.
The vtable still points to the right concrete implementation, but the call site has no single concrete return type it can name for duplicate.
That’s a problem, because the compiler needs to know the size of the return value at compile time, and Self could be any size.
It needs to know the size, because the returned value has to live somewhere: the caller sets aside exactly the right amount of space (usually on the stack) before the call even happens. With a &dyn Widget, the concrete type is erased from the caller’s static type, so there’s no single size the compiler could reserve for it.
It will become clearer once we look at some fixes.
Don’t worry, we won’t have to refactor all our code!
All fixes use the same Widget trait example.
There are multiple ways to make it dyn compatible.
We have a bunch of options:
where Self: Sized
Self
Each approach comes with different tradeoffs. Depending on the kind of dyn-compatibility issue, one might fit better than the others, or you might combine a few. Let’s look at each of these in detail.
One common way to fix the problem is to use generics instead of trait objects.
Generics resolve to concrete types at compile time, so the compiler knows the size of Self.
The compiler generates a separate copy of the function for each concrete type that implements the trait.
Then, at runtime, you no longer need to worry about any dynamic dispatch (which means “figuring out the type at runtime”).
The compiler always knows which type it is dealing with, so it can pick the right method to call.
Our trait stays the same:
trait Widget {
    fn draw(&self);
    fn duplicate(&self) -> Self;
}
But now we change the function which uses the trait to use generics instead of dyn:
// Instead of: fn show_widget(widget: &dyn Widget)
// use generics:
fn show_widget<W: Widget>(widget: &W) {
    widget.draw();
    let copy = widget.duplicate();
    copy.draw();
}
Note how we changed the function signature to use a generic type parameter W that implements the Widget trait.
Here we tell Rust: “I have some type W that implements Widget, and I want to use it.” Rust then generates the necessary code for each type used.
That’s close to using &dyn Widget, but not quite the same.
The difference is that with generics, the compiler knows the concrete type at compile time, so it can handle Self correctly.
For instance, we might know that W is Button in this case, so duplicate returns a Button.
Now the confusion about what Self means is gone!
The downside is that you can’t fully lean on dynamic dispatch anymore, and you might have to refactor a lot of code if you were using trait objects extensively before. Your binary size might also grow because of all the copies of the function that the compiler generates for each concrete type.
What’s the benefit of fully leaning on dynamic dispatch?
Fair question! Dynamic dispatch has a bunch of really nice properties:
Drawable trait.
Using dynamic dispatch, you can store them all in a single collection and call draw(). If you were to try the same with generics, you’d end up with a lot of boilerplate code to handle each shape type separately.where Self: SizedAnother option is to keep using trait objects but change the problematic method to only work with concrete types.
trait Widget {
    fn draw(&self);

    // Only available when the concrete type is known
    fn duplicate(&self) -> Self
    where
        Self: Sized;
}
This means “this method can only be called when Self has a known size at compile time”, which is true for concrete types but not for trait objects.
It’s more explicit, since you control how the trait can be used.
The catch is that it limits the trait further down the line: some methods won’t be callable on every trait object, and changing the trait later becomes a breaking change.
You won’t be able to call duplicate on &dyn Widget, but you can still call it on concrete types like Button.
fn main() {
    let button = Button { label: "Click me".to_string() };

    // Can use as trait object now!
    let widget: &dyn Widget = &button;
    widget.draw();  // ✅ Works

    // ❌ Can't call this on trait objects
    // widget.duplicate();

    // ✅ But duplicate still works on concrete types:
    let button2 = button.duplicate();
}
So you keep most of the flexibility of trait objects (unlike with generics), as long as you remember that some methods won’t be available through dyn Trait.
SelfWe can change the return type of the problematic method to return a boxed trait object instead of Self.
This works because Box<dyn Widget> has a known size at compile time. It’s a pointer to an object on the heap. It’s actually a fat pointer: two words wide, or 16 bytes on a 64-bit system, because it also stores a pointer to the vtable; more on that later. What matters is that this size is fixed and known at compile time, unlike Self, which varies based on the concrete type.
trait Widget {
    fn draw(&self);
    fn duplicate(&self) -> Box<dyn Widget>;  // Returns trait object instead of Self
}
struct Button {
label: String,
}
impl Widget for Button {
fn draw(&self) {
println!("Button: {}", self.label);
}
fn duplicate(&self) -> Box<dyn Widget> {
Box::new(Button { label: self.label.clone() })
}
}
fn main() {
// Now we can use trait objects!
let widgets: Vec<Box<dyn Widget>> = vec![
Box::new(Button { label: "Click me".to_string() }),
Box::new(Button { label: "Submit".to_string() }),
];
for widget in &widgets {
widget.draw();
let copy = widget.duplicate();
copy.draw();
}
}The downside is that Box<dyn> tends to be viral in your codebase. You’ll end up writing Box<dyn Widget> more often than you’d like, which gets noisy.
On top of that, this fix only works for methods that return Self.
If your trait also has static methods or generic methods, you’ll need to combine this approach with one of the other fixes.
Sometimes the best solution is to separate the dyn-compatible methods from the problematic ones into different traits.
Maybe your code is silently trying to tell you that you are mixing up two different responsibilities and that they should be untangled.
In general, prefer smaller, focused traits over large, monolithic ones. Traits are not interfaces! Instead, we lean on composition and focus on behavior rather than mangling multiple ideas into a single trait.
Here’s a more realistic example: separating rendering from widget creation. Factory methods are often static (no self parameter), which makes them incompatible with dyn. So we split them off into a separate trait.
// This trait can be used with dyn
trait Widget {
    fn draw(&self);
}

// Separate trait for creating widgets. Can't be used with `dyn`
trait WidgetFactory {
    fn create(label: String) -> Self;  // No self parameter!
}

struct Button {
    label: String,
}

impl Widget for Button {
    fn draw(&self) {
        println!("Button: {}", self.label);
    }
}

impl WidgetFactory for Button {
    fn create(label: String) -> Self {
        Button { label }
    }
}

fn main() {
    // Use the factory to create widgets
    let button = Button::create("Click me".to_string());

    // Use as trait object for drawing
    let widget: &dyn Widget = &button;
    widget.draw();  // ✅ Works

    // Can't do this: let factory: &dyn WidgetFactory = ...
    // But that's fine - factories work at compile time
}When you write &dyn Trait, you’re creating a trait object.
It’s a special kind of value that consists of two pointers (a “fat pointer”):
┌─────────────────┐
│  Data Pointer   │ --> points to actual data (String, i32, etc.)
├─────────────────┤
│ VTable Pointer  │ --> points to virtual method table
└─────────────────┘
As you can see, a trait object has:
The vtable is created at compile time and contains pointers to the methods for the specific type. It is common in many programming languages that support dynamic dispatch, such as C++, C#, or D. When you call a method on a trait object, Rust uses the vtable to look up the correct function to call based on the actual type of the data.
For dynamic dispatch to be sound, the vtable-facing methods need stable, concrete function signatures:
Self
If a trait has dispatchable methods that return Self or have generic parameters, there is no single vtable entry with one concrete signature that can represent all possible calls.
That is the root cause of dyn compatibility issues.
A trait is dyn compatible if it follows a list of rules.
| Rule | Why? |
|---|---|
| All supertraits must also be dyn compatible | A dyn Subtrait also exposes the supertrait API, so those inherited methods must be dispatchable too |
No Self: Sized supertrait |
The trait object type dyn Trait is unsized, so the trait itself must not require Self: Sized
|
| No associated constants | Associated constants are not entries in the method vtable |
| No generic associated types | The Reference currently forbids associated types with generics on dyn-compatible traits |
| Dispatchable methods must have an allowed receiver | Methods need a receiver: &self, &mut self, or pointer receivers like Box<Self>, Rc<Self>, Arc<Self>, or Pin<P> where P is one of those pointer forms. Static methods (no receiver) can’t be dispatched through a trait object |
| No generic type parameters on dispatchable methods | The vtable is a finite structure created at compile time. Generic methods are monomorphized at compile time (one copy per concrete instantiation), but a trait object erases the concrete receiver type |
No Self in dispatchable method parameters except the receiver |
other: &Self means “the same concrete type as self”, but with trait objects we only know both are dyn Comparable; they could hide different underlying types |
No Self return type on dispatchable methods |
The caller needs to know the return value’s size and type, but Self could be any implementor |
| No opaque return type on dispatchable methods |
async fn and return-position impl Trait hide a concrete return type that must be known statically |
| Non-dispatchable methods must opt out | A method that violates the dispatch rules can still live on the trait if it has where Self: Sized, making it unavailable through dyn Trait
|
The rules boil down to the same core issue:
the dyn Trait interface must have a finite, statically-known shape even though the concrete implementor behind it is hidden.
A Modern Gotcha: async fn in Traits
Since Rust 1.75, you can write async fn directly in a trait.
But there’s a catch: a trait with an async fn is not dyn compatible.
An async fn desugars to a regular method that returns impl Future<...>, a hidden return-position impl Trait.
The type is called “opaque”, because we don’t know what it is, and the compiler doesn’t expose it to us.
Opaque return types aren’t dispatchable (which means we can’t put them in a vtable of functions), so the trait can’t be used behind dyn.
If you need dynamic dispatch with async methods today, you have a few options:
Pin<Box<dyn Future<Output = ...>>>.async-trait crate, which does that boxing for you.dynosaur crate, which generates a dyn-compatible wrapper for traits with async fn.Dyn compatibility determines if a trait can be used with dyn Trait. The rules exist because:
If your trait is not dyn compatible, don’t worry! Many standard library traits (Clone, Default, etc.) are also not dyn compatible.
As we’ve seen, there are ways to work around these limitations with type erasure, generics, or more fine-grained traits.
Which fix to reach for depends on what your trait needs and what you’re willing to give up:
| Fix | Reach for it when… | The tradeoff |
|---|---|---|
#1 Generics (<W: Widget>) |
You don’t actually need trait objects (the concrete type is known at each call site) and you won’t mix different types in one collection | Static dispatch only; monomorphization can grow code size and compile times and generic parameters need to be passed around in your API |
#2 where Self: Sized |
You want to keep using dyn Widget, and the problematic method only ever needs to be called on concrete types |
That method isn’t callable through dyn; tightening the bound later is a breaking change |
#3 Return Box<dyn Widget> |
The method returns Self and you really need it through a trait object (e.g. a heterogeneous Vec<Box<dyn Widget>>) |
A heap allocation per call, and Box<dyn> tends to spread through your API |
| #4 Split into two traits | The trait mixes dispatchable behavior with non-dispatchable bits, like static factory methods | More traits to keep track of, though that separation often helps |
async-trait / dynosaur |
Your trait has async fns and you need to call them through dyn
|
Wrapper types and usually boxed futures/extra indirection until native dyn async improves |
In practice you’ll often combine these. For example, splitting a trait and boxing a return value.
I find it interesting to see how dyn compatibility evolved over time in Rust. If you do, too, here are some resources to dig deeper:
Sized bound on traitswhere Self: Sized
async fn and return-position impl Trait in traits (though such traits still aren’t dyn compatible)The lang team also wants a “practical path” to call async fns through dyn Trait natively. It’s on the 2026 project goals, so the async gotcha above should ease over time.
The concept used to be called “object safety” until Rust 1.84.0. If you’re reading older resources, they mean the same thing. The name got changed because it was confusing.
“Object safety” suggests that Rust has “objects” in the traditional OOP sense and that the term is about “safety”, which is misleading.
The new term “dyn compatibility” does a better job of saying that it’s about whether a trait can be used with dyn Trait for dynamic dispatch. I still don’t love either term, but I also can’t think of a better name that is both short and accurate. ↩
2026-07-23 08:00:00
We talked about patterns for defensive programming in Rust before, in which implicit invariants that aren’t enforced by the compiler lead to utter misery. But being careful isn’t enough! Even valid code can fail at runtime in ways that are hard to predict and control. That’s what we’re covering next.
This article is for you if you want to…
What happens when a Rust program panics?
There is no single correct answer because panic! is not a “single behavior.”
For starters, there’s a difference between unwind and abort.
catch_unwind invokes a closure, which captures the cause of an unwinding panic.
let result = panic::catch_unwind(|| {
    panic!("oh no!");
});
But the Rustonomicon has the following to say about unwinding panics:
We would encourage you to only do this sparingly. In particular, Rust’s current unwinding implementation is heavily optimized for the “doesn’t unwind” case. If a program doesn’t unwind, there should be no runtime cost for the program being ready to unwind.
The alternative to unwinding is aborting the entire process. That does what it says on the tin: the program immediately terminates without unwinding the stack or running destructors. Halt and catch fire. Weirdly enough, that’s often the safer choice, especially when dealing with FFI boundaries or performance-critical code. That’s because unwinding across FFI boundaries is undefined behavior, and unwinding can be expensive in performance-sensitive code.
To enable aborting on panic, add the following to your Cargo.toml:
[profile.release]
panic = "abort"
And even if you did not explicitly configure this, catastrophic panics like stack overflows and out-of-memory errors always abort the process. That’s because unwinding in these situations is unsafe and can lead to undefined behavior.
In practice, this shows up in two places:
malloc fails, it aborts the process. If that’s a problem, you need to proactively check for allocation sizes before allocating or avoid heap allocations altogether.These failures are fundamentally different from ordinary panics in that they cannot be caught or recovered from.
To handle them gracefully, you need to know exactly how and where your program will run, and design accordingly.
For example, in the case of malloc, avoid unbounded user input that could lead to excessive allocations.
Another difference is between thread-level failures and process-level crashes.
A common misunderstanding is that panic terminates the entire program, but in a multi-threaded application, that is not necessarily the case.
For example, a background worker thread can panic while the main thread continues running.
What sounds like a benefit can leave the system in a partially degraded state.
This distinction becomes especially important in long-running systems (servers, workers, async runtimes, …). A panic in a request-handling thread might only abort that one request, while the rest of the service remains available. Here’s a small example using scoped threads (Playground):
use std::{thread, time::Duration};

fn handle_request(id: u32) {
    println!("request {id}: started");

    if id == 2 {
        panic!("request {id}: handler panicked");
    }

    thread::sleep(Duration::from_millis(100));
    println!("request {id}: finished");
}

fn main() {
    thread::scope(|s| {
        let requests: Vec<_> = (1..=3)
            .map(|id| (id, s.spawn(move || handle_request(id))))
            .collect();

        for (id, request) in requests {
            match request.join() {
                Ok(()) => println!("main: request {id} completed"),
                Err(_) => println!("main: request {id} failed, but the process is still alive"),
            }
        }
    });

    println!("main: service keeps running");
}
The interesting part of the output is this:
request 1: finished
main: request 1 completed
main: request 2 failed, but the process is still alive
request 3: finished
main: request 3 completed
main: service keeps running
Request 2 panics, but requests 1 and 3 still finish. The panic belongs to the worker thread. The main thread gets notified on join() but keeps running. [1]
Whether this is acceptable depends on the system’s invariants. If a panic indicates a violated assumption confined to a small scope, like a single request, letting the process continue may be reasonable. But if it signals a global invariant violation, continuing execution can be outright dangerous.
Panic behavior is part of your system’s failure model. Treating all panics as equivalent hides important distinctions and leads to fragile assumptions. Be explicit about whether a failure may take down a single task, a single thread, or the entire process.
Never panic in an uncontrolled manner.
If you maintain a library, you have less control over where your code runs and what a panic can take down. Consider enabling stricter Clippy lints such as indexing_slicing and arithmetic_side_effects to catch common panic sources before they become part of your public API. Those lints can be noisy in applications, but they are often useful when panic freedom matters more than convenience.
Now that you understand how panics work, let’s talk about operational hardening.
When things go wrong, you want to know about it.
But by default, Rust panics just print to stderr and disappear into the void.
In production systems, that’s not so great.
You might prefer crash reporting or centralized failure handling, and that’s where panic hooks come in. A panic hook is a function that gets called whenever a panic occurs, giving you a chance to record the failure before the program terminates or unwinds. It will not make an invalid state safe again. Its job is to capture enough context to debug the failure, alert someone, and shut down cleanly when possible.
Here’s a simple example of setting a panic hook:
use std::panic;

fn main() {
    panic::set_hook(Box::new(|panic_info| {
        eprintln!("Panic occurred: {panic_info}");
        // Log to your monitoring system
        // Send crash reports
        // Clean up resources
    }));

    panic!("Something went wrong!");
}
And here’s a panic hook that sends structured JSON data to a crash reporting service:
panic::set_hook(Box::new(|panic_info| {
    let panic_data = serde_json::json!({
        "message": panic_info.to_string(),
        "location": panic_info.location().map(|l| format!("{}:{}:{}", l.file(), l.line(), l.column())),
        "timestamp": chrono::Utc::now().to_rfc3339(),
        "version": env!("CARGO_PKG_VERSION"),
    });

    // Send to your crash reporting service
    crash_reporter::report(panic_data);
}));
What’s Inside PanicInfo?
The PanicInfo struct contains the panic message (via .payload()) and the source location where the panic occurred (via .location()). Be aware that both can leak sensitive information: file paths may reveal internal directory structure, and panic messages might contain interpolated user data.
And finally, here’s Sentry’s panic hook handler, which is even more sophisticated:
fn setup(&self, _cfg: &mut ClientOptions) {
    INIT.call_once(|| {
        let next = panic::take_hook();
        panic::set_hook(Box::new(move |info| {
            panic_handler(info);
            next(info);
        }));
    });
}
Sentry’s panic hook:
next(info)
INIT.call_once
There’s a lot to learn from these few lines of code!
Panic hooks are also your final opportunity to prevent information leaks.
The sensitive data can come from two places: the panic payload and the panic location. The payload is whatever your code passed to panic!, unwrap, expect, or an assertion. That means it can contain interpolated user input, internal state from Debug output, request headers, tokens, email addresses, IP addresses, customer IDs, or other identifiers. The location can expose source file paths, workspace names, or CI/build machine directory layouts.
A well-designed panic hook sanitizes these messages before they reach logs or crash reports. Better yet, avoid putting secrets or raw user data into panic messages in the first place. Prefer stable error codes, request IDs, or redacted domain types. Regexes can catch obvious patterns like email addresses and bearer tokens. UUIDs and IP addresses can also identify users. Treat those checks as your final fallback.
panic::set_hook(Box::new(|panic_info| {
    let sanitized_message = sanitize_panic_message(panic_info.to_string());
    log::error!("Application panic: {sanitized_message}");
}));
You can look into crates like expunge or veil to automatically redact sensitive information from structs:
use veil::Redact;

#[derive(Redact)]
pub struct Customer {
    id: u64,

    #[redact(partial)]
    first_name: String,

    #[redact(partial)]
    last_name: String,

    #[redact]
    email: Option<String>,

    #[redact(fixed = 2)]
    age: u32,

    #[redact(with = "[REDACTED]")]
    address: String,
}Before the process terminates, you might want to flush logs, close network connections, or notify other systems that this instance is going down. Setting a hook is a great way to perform such cleanup operations.
Panic Hooks Run in a Compromised Environment
Be careful: one of the subsystems you want to interact with might be the cause of the panic you’re handling! For example, if your database connection pool panicked, trying to flush pending writes to that same pool will likely fail or hang. Keep cleanup operations fault-tolerant and avoid anything that can panic, block indefinitely, or depend on the subsystem that just failed.
Panic hooks only run for unwinding panics. If your program aborts on panic, or if the panic is caused by a stack overflow or out-of-memory condition, your hook won’t execute.
Never rely on panic hooks for correctness.
They’re purely for observability and graceful degradation; don’t try to recover from logic errors as it is very hard to rely on a system’s fragile underpinnings at this stage.
Okay, you handle errors gracefully and you know how your system behaves on panic. Panic behavior isn’t the only runtime failure mode you need to worry about.
Here’s some simple recursive code. What is wrong with it?
fn factorial(n: u64) -> u64 {
    if n == 0 {
        1
    } else {
        n * factorial(n - 1)
    }
}
The problem is that recursion can quickly exhaust stack space.
If you allow users to call this function with large inputs, it might crash your program. Rust does not guarantee tail-call optimization on stable Rust. Some compilers and languages can turn certain tail-recursive functions into loops, but you should not rely on that transformation in Rust. If recursion depth depends on user input or external data, rewrite the algorithm iteratively or put an explicit bound on the depth.
It takes some experience, but for recursive algorithms where you’re not in control of the input size, it’s often safer to use an iterative approach:
fn factorial(n: u64) -> u64 {
    let mut result = 1;
    for i in 1..=n {
        result *= i;
    }
    result
}One of the most dangerous assumptions in Rust development is that debug and release builds are functionally equivalent. They’re not. In many ways, you’re shipping a different program than the one you tested.
The most obvious difference is integer overflow behavior. Debug builds panic on overflow, while release builds silently wrap around. We covered that in Pitfalls of Safe Rust.
But the differences run deeper than arithmetic.
Release builds remove debug_assert! checks, enable optimizations, and may exercise different code paths behind cfg(debug_assertions). Unsafe code and FFI boundaries are especially sensitive to this: undefined behavior can appear harmless in debug mode and break only once the optimizer starts relying on Rust’s aliasing and validity rules.
Here is a trivial example:
fn apply_discount(price: u32, percent: u32) -> u32 {
    debug_assert!(percent <= 100);
    price - (price * percent / 100)
}
In a debug build, apply_discount(100, 150) trips the debug_assert!.
In a release build, the assertion is gone. The subtraction can underflow and wrap around, turning an invalid discount into a huge number.
If the check protects a real runtime invariant, use assert! or return a Result instead of relying on debug_assert!.
The fact that tests pass in debug mode does not prove that production behavior is correct. Run normal debug tests as the fast default, and add release-mode tests for critical integration tests, arithmetic-heavy code, unsafe or FFI-heavy code, and anything whose behavior depends on optimization or release-only configuration.
# Add this to your CI pipeline alongside regular `cargo test`
cargo test --releaseYour code is only as safe as your dependencies.
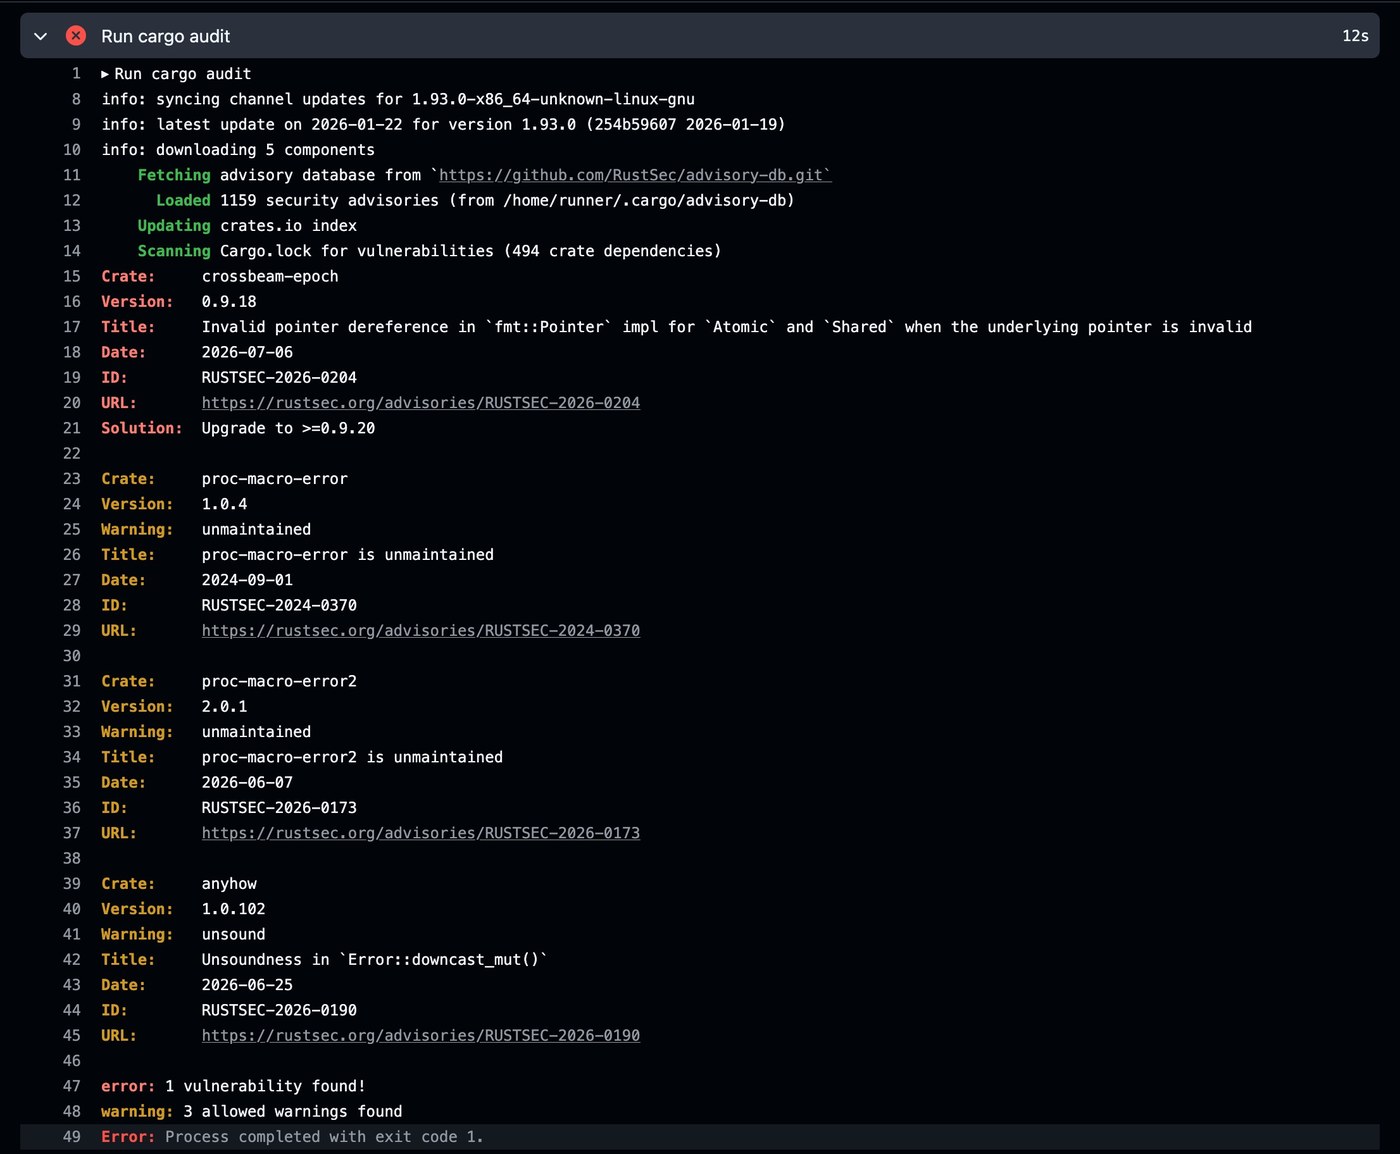
You should regularly audit your dependencies for known vulnerabilities.
Two helpful tools for that are cargo-audit and cargo-deny.
It’s recommended to run those as part of CI.
mimalloc is a drop-in global allocator built by Microsoft. What’s special about it is that it also has a secure mode, which adds mitigations like guard pages, randomized allocation, and encrypted free lists to make some heap-corruption bugs harder to exploit. [2]
Safe Rust already prevents most use-after-free and buffer-overflow bugs, and a secure allocator does not magically make memory-unsafe code safe. This is mostly defense-in-depth for programs with unsafe code, custom allocators, C/C++ dependencies, or FFI-heavy boundaries.
To enable secure mode, put this in Cargo.toml:
[dependencies]
mimalloc = { version = "0.1", features = ["secure"] }
Then use it as your global allocator:
use mimalloc::MiMalloc;

#[global_allocator]
static GLOBAL: MiMalloc = MiMalloc;
Now, all heap allocations in your Rust program will use mimalloc’s secure allocator. Measure the performance impact on your workload before rolling this out broadly; allocator choice can matter a lot for latency-sensitive services, games, packet processing, and other allocation-heavy programs.
Even well-written Rust code can be compromised through its dependencies, environment, or C FFI boundaries. The idea is to reduce your blast radius. Now, how you do that depends on your deployment environment, but generally people use Docker and Linux, so I thought I’d share some techniques for those; specifically, how to build minimal container images and filesystem sandboxing.
A minimal production image contains exactly what you put in it. Even if your service is compromised, the attacker has very limited tools at their disposal to do further damage.
My recommendation is Google’s distroless images, but please do your own research[3] as I’m not an expert on this.
Distroless images are minimal Debian-based images stripped of everything unnecessary, while still including TLS certificates and a non-root user.
For a typical Rust web service, start with gcr.io/distroless/cc-debian13:nonroot: it includes the C runtime libraries that a normal Debian-built Rust binary may dynamically link against, but no shell or package manager.
(Check the latest version in the distroless README.)
Here is an example Dockerfile using cargo-chef for dependency caching:
# syntax=docker/dockerfile:1

ARG RUST_VERSION=1.92

FROM rust:${RUST_VERSION}-trixie AS chef
RUN cargo install cargo-chef --locked
WORKDIR /app

FROM chef AS planner
COPY . .
RUN cargo chef prepare --recipe-path recipe.json

FROM chef AS builder
COPY --from=planner /app/recipe.json recipe.json
RUN cargo chef cook --release --recipe-path recipe.json

COPY . .
RUN cargo build --locked --release --bin myapp

FROM gcr.io/distroless/cc-debian13:nonroot AS runtime
COPY --from=builder /app/target/release/myapp /bin/myapp
ENTRYPOINT ["/bin/myapp"]
Take this Dockerfile as a starting point, but please adapt it to your own project requirements.
cargo-chef keeps dependency builds in a separate Docker layer, so changing your application code does not force all dependencies to rebuild. The important details are: use the same Rust version in all build stages, build with --locked, scope workspace builds with --bin when appropriate, and keep target/, .git/, and editor files out of the build context via .dockerignore. For a deep dive on Docker images and build-time optimization, see Tips For Faster CI Builds.
Keep the Debian suffix explicit instead of using the unversioned tag, and pin by digest if reproducible deploys matter to you.
If you deliberately build a fully static musl binary, then gcr.io/distroless/static-debian13:nonroot or even scratch can be a better fit. But don’t mix the two approaches: a glibc-linked binary needs a runtime image that provides the libraries it links against.
A Note On Alpine Base Images
Alpine base images are a well-known alternative, but they use musl instead of glibc. That can expose differences in DNS resolution, TLS/native dependencies, allocator behavior, and crates that assume a glibc-like environment. (1 2 3)
That doesn’t mean Alpine or musl are wrong; just treat them as a deliberate target and test them like one. If you build on Debian and want a small runtime image, distroless cc is usually the less surprising default.
Even inside a minimal container, your process still has access to any file the container mounts. Landlock is a Linux security module that lets a process restrict its own filesystem access. If your service is ever exploited, the attacker can only reach the files you explicitly allowed. [4]
Landlock Is Deployment-Specific
Landlock is Linux-only and requires kernel support. It landed in Linux 5.13, but older enterprise kernels, custom cloud images, or container hosts may not enable it. Check your actual deployment target.
Also apply the sandbox only after you know which files your process needs. If your service executes helper binaries from /usr/bin, reads timezone data from /usr/share/zoneinfo, loads certificates, opens SQLite files, reads config from /etc, or writes uploads to /var/data, those paths must be allowed explicitly. On non-Linux targets, look for equivalent sandboxing mechanisms instead of copying this exact snippet.
use landlock::{
    Access, AccessFs, PathBeneath, PathFd, Ruleset, RulesetAttr,
    RulesetCreatedAttr, ABI,
};

fn sandbox() -> Result<(), Box<dyn std::error::Error>> {
    let abi = ABI::V3;

    Ruleset::default()
        .handle_access(AccessFs::from_read(abi))?
        .create()?
        // Allow read-only access to /etc for config files
        .add_rule(PathBeneath::new(PathFd::new("/etc")?, AccessFs::from_read(abi)))?
        // Allow read+write access to /var/data for your app's data
        .add_rule(PathBeneath::new(
            PathFd::new("/var/data")?,
            AccessFs::from_all(abi),
        ))?
        .restrict_self()?;

    Ok(())
}

fn main() {
    sandbox().expect("failed to apply landlock sandbox");

    // Your service starts here.
    // The service is now restricted to /etc (read) and /var/data (read/write)
    // Any attempt to open /tmp, /home, /proc etc. will be denied!
}
Call sandbox() as early as possible in main, before spawning threads or accepting connections.
The restrictions apply to the entire process from that point forward.
The two approaches really go hand in hand:
Don’t run as root in production, even inside a container.
That’s one reason distroless images provide a nonroot user and why the example above uses the :nonroot tag.
If your service only needs to listen for HTTP traffic, prefer a high port like 8080 over running as root just to bind to port 80.
Linux capabilities are another useful lever.
Instead of giving a process full root privileges, grant only the specific capability it needs, such as CAP_NET_BIND_SERVICE for binding to low ports.
If a process needs elevated privileges only during startup, drop them before accepting requests.
The details vary by platform and orchestrator, so treat Linux containers as one concrete setup. For systemd services, Kubernetes, FreeBSD jails, macOS sandboxing, or Windows services, look up the equivalent least-privilege and sandboxing features for that environment.
The big picture is that security hardening is about reducing the surface of things that can go wrong. Every capability your process holds unnecessarily is a liability and everything your code manages that could be delegated to the OS, init system, or container runtime probably should be.
Miri is an interpreter for Rust’s mid-level intermediate representation (MIR) that can detect undefined behavior at runtime.
It works by executing your Rust code in a special environment that tracks memory accesses, pointer validity, and other low-level details to catch issues that the compiler can’t statically guarantee against.
More people should know about Miri, because it is really helpful for hard-to-detect race conditions in multi-threaded or async code; but it can do way more than that, of course. It has already detected a lot of real-world bugs, even in the standard library.
Using it is as simple as running:
rustup +nightly component add miri
cargo +nightly miri test
This will run your tests under Miri’s interpreter.
The docs also describe how to add miri to CI:
  miri:
    name: "Miri"
    runs-on: ubuntu-latest
    steps:
      - uses: actions/checkout@v4
      - name: Install Miri
        run: |
          rustup toolchain install nightly --component miri
          rustup override set nightly
          cargo miri setup
      - name: Test with Miri
        run: cargo miri test
(Make sure to check the latest instructions in the Miri repo, as the setup process may change over time.)
If you’d like to learn more about Miri, there is a research paper from 2026 that goes into the design and implementation details: Miri: Practical Undefined Behavior Detection for Rust.
A hardened service doesn’t just crash. Instead, it shuts down gracefully when asked.
Aim to finish in-flight requests, flush your buffers, and release resources cleanly before you exit. The pattern is: listen for shutdown signals, stop accepting new work, drain existing work, then exit.
Frameworks like Axum have built-in support for graceful shutdown. Use it!
The key is handling signals like SIGTERM (sent by Kubernetes, systemd, or docker stop) and SIGINT (Ctrl+C).
Here’s a minimal example using tokio-graceful-shutdown, which is a crate that provides good signal handling without much boilerplate.
It introduces a concept of “subsystems” that can run concurrently and listen for shutdown requests.
use tokio_graceful_shutdown::{SubsystemHandle, Toplevel};

async fn subsys1(subsys: &mut SubsystemHandle) -> Result<()>
{
    log::info!("Subsystem1 started.");
    subsys.on_shutdown_requested().await;
    log::info!("Subsystem1 stopped.");
    Ok(())
}

#[tokio::main]
async fn main() -> Result<()> {
    Toplevel::new(async |s: &mut SubsystemHandle| {
        s.start(SubsystemBuilder::new("Subsys1", subsys1))
    })
    .catch_signals()
    .handle_shutdown_requests(Duration::from_millis(1000))
    .await
    .map_err(Into::into)
}When an external service (database, API, cache) starts failing, you don’t want to keep hammering it with requests. A circuit breaker tracks failures and “trips” when a threshold is reached.
For production use, consider crates like failsafe
or the more actively maintained recloser, which is based on failsafe.
Unbounded resources are a common source of runtime failures. Everybody who was on call for a production service will tell you this.
Set explicit limits on everything. SREs will thank you for it! Limits make your service more predictable, and they make misconfigurations obvious sooner.
Common things you should limit include:
Here are some examples of how to do this in practice:
let app = Router::new()
    .route("/", post(|request: Request| async {}))
.layer(DefaultBodyLimit::max(1024));Bound the number of items in every queue or channel in your system.
use tokio::sync::mpsc;
let (tx, rx) = mpsc::channel::<Job>(1000); // bounded channel, max 1000 pendinglet client = reqwest::Client::builder()
.connect_timeout(Duration::from_secs(5))
.timeout(Duration::from_secs(30))
.build()?;Every unbounded resource is a potential DoS vector. Explicit limits turn those catastrophic failures into (annoying but harmless) graceful rejections.
Ideally, your system should be able to recover from transient failures without human intervention. Health checks let load balancers and orchestrators know when something is wrong, so they can react.
A typical setup has two endpoints, a liveness probe and a readiness probe. The liveness probe checks if the process is alive at all, while the readiness probe checks if the process is healthy enough to handle traffic.
This could honestly be an entire article on its own, but here’s a quick example using Axum to illustrate the concept:
use axum::{routing::get, Router, Json};
use serde::Serialize;

/// Status can be "healthy", "degraded", or "unhealthy"
#[derive(Serialize)]
enum Status {
    // Everything is good, all dependencies are healthy
    Healthy,
    // Some dependencies are degraded,
    // but the service can still handle requests
    Degraded,
    // Critical dependencies are down
    // Don't send any traffic
    Unhealthy,
}

/// This is our health status struct,
/// which we will return as JSON from
/// the readiness probe
#[derive(Serialize)]
struct HealthResponse {
    // Health status of the service
    status: Status,
    // Is the database connection healthy?
    database: bool,
    // Is the cache connection healthy?
    cache: bool,
    // What version of the service is running?
    // (Useful for debugging and monitoring.)
    version: &'static str,
}

// Liveness: "Is the process alive?"
// Should always return 200 if the server can respond at all
async fn liveness() -> &'static str {
    "OK"
}

// Readiness: "Can you handle traffic?"
// Check dependencies before saying yes
async fn readiness(
    db: Extension<DbPool>,
    cache: Extension<CachePool>,
) -> Json<HealthResponse> {
    let db_ok = db.ping().await.is_ok();
    let cache_ok = cache.ping().await.is_ok();

    let status = match (db_ok, cache_ok) {
        (true, true) => Status::Healthy,
        (false, false) => Status::Unhealthy,
        _ => Status::Degraded,
    };

    Json(HealthResponse {
        status,
        database: db_ok,
        cache: cache_ok,
        version: env!("CARGO_PKG_VERSION"),
    })
}

let app = Router::new()
    .route("/health/live", get(liveness))
    .route("/health/ready", get(readiness));
What’s neat about it is that this maps directly to Kubernetes’ health check system:
livenessProbe:
  httpGet:
    path: /health/live
    port: 8080
  initialDelaySeconds: 5
  periodSeconds: 10

readinessProbe:
  httpGet:
    path: /health/ready
    port: 8080
  initialDelaySeconds: 5
  periodSeconds: 5
Do we really need both probes? Yes, because they serve different purposes:
Finally, here are some more tools that help you catch problems before they hit production:
cargo-fuzz – fuzz testing for Rust codehonggfuzz – another fuzzer with Rust supportcargo-geiger – detects usage of unsafe codecargo-valgrind – runs Valgrind on Rust code to find memory errorscargo-llvm-cov – code coverage via rustc/LLVM source-based instrumentation (-C instrument-coverage). It reports line and region coverage, works with cargo test and cargo nextest, and is a good default for new projects.cargo-tarpaulin – an older Rust coverage tool with strong Cargo and CI ergonomics. On Linux it defaults to a ptrace backend (x86_64 only); LLVM coverage is available through --engine llvm and is the default on macOS and Windows. Useful if its reports fit your workflow, but expect different platform and test-runner edge cases than cargo-llvm-cov.The tools above help catch undefined behavior, memory safety issues, code coverage gaps, and performance bottlenecks. They are dynamic analysis tools that complement Rust’s static guarantees.
This only holds for unwinding panics. If you compile with panic = "abort", or hit a stack overflow or out-of-memory failure, the whole process exits and join() never gets a chance to return Err. ↩
https://docs.rs/mimalloc-safe/latest/mimalloc_safe/ ↩
Data sources I found useful for this topic include this post and this comparison. ↩
This approach would have prevented a vulnerability in Meta’s below crate, a tool for recording and displaying system data like hardware utilization and cgroup information on Linux. ↩