2026-02-05 00:00:00
原计划是从深圳自驾往返西双版纳,把沿途的一些城市和景点顺路串起来,玩一圈。
我不喜欢寒冷,所以春节这个时间点,海南和西双版纳天气差不多,只是西双版纳早晚比较冷,中午比较热,海南则是一整天都比较合适,这两个地方都可以选择去自驾一下。
自驾最大的麻烦,就是所有路线、节奏、景点都要自己规划。想着能不能偷个懒,就去翻了一圈市面上的自驾类 APP,看能不能直接「抄作业」——要么自动规划,要么用别人现成的路书。
这类 APP 里,比较常见的就是「趣兜风」「趣自驾」「xx路书」。趣兜风 算是功能相对完整的:可以用 AI 生成路线,也可以配置一些偏好,选项稍微多一点。不过这类功能基本都要会员,好在会员也不用正价买,咸鱼上搞个一周的就行。
实际试下来,生成的路书和可调的选项还是太少。自动规划的深圳→西双版纳路线,一上来就给了一个 11 天 的方案,直接离谱。更别说后面还要返程。有些景点更是「默认必带」,不管你选不选,几乎每条路线都带着,给人的感觉就是:商家交了保护费,APP 这边就死命往你路线上塞。
AI 生成的途经点看着很「智能」,比如你删掉了一整天,它会帮你重新算一条路。但这只是表面上的,实际上你删掉的那个点,在线路上还是会经过,该走的路一米不少,体验挺离谱的。
如果你删掉的是「当天的结束点」,第二天的起点依然是那个被删掉的结束点,完全没有「自动补齐」的能力,只能自己手动挪,很无语。
至于其他人发布的路书,想找到和自己起点、终点都匹配的那条,基本是碰运气。搜索功能也非常难用,没办法按「起点 + 目的地」来筛选,大多数时候都只是看个热闹。
看上去 APP 里有个「社区」,但点开一看,很多路线和自己的需求都对不上;不少内容看起来像是 AI 挤出来的:景点描述、游玩内容来来回回就那几句。社区里的 Top 帖子大多是三四年前的老内容,也没什么持续运营的感觉。
路线之外,还有一个「伴游」功能,类似语音导游。声音听起来像是提前录好的,不像是现编的,这部分倒是挺有意思的,适合「走到哪听到哪」。只是有些讲解内容本身和时效性强相关,现在再听已经有点过期了。
大致设想是分段推进,沿途顺路逛几处城市和景点:
按天粗略拆开,大概是这样的节奏:
中间视路况和实际体力,还有些机动空间,可以留给补觉或者临时插入小景点。
这个计划里基本没有大堵车的场景,如果春节大堵车估计就不够用了
地图上顺手又挑了一些看起来不错的点,但综合距离、内容重复度之后,暂时放弃了:
这些地方要么有点绕远,要么和已有景点类型上高度重合,就先从本次规划里剔除了,留着以后单独规划一条线再去。
返程这段,本来是想「补课」一下几个听说过很多次,但一直没去的海边城市:
如果按照去程 + 返程的完整方案来走,保守估计得 11–12 天 才能比较从容地跑完,春节这种高峰期基本就是硬刚人流量了。
既然西双版纳比三亚人还多,那我就顺手看了一下同一时期海南自驾的情况,发现「上岛容易,下岛很难」——上岛时间相对宽裕,但回程下岛的车票基本要提前很久抢,不然就会卡在岛上。
从深圳开车去海南,大致是两种思路:
但从实际船期来看,回程基本还是 优先从徐闻走,北海似乎没有返程的车票。
订票渠道主要是几个小程序:
网上有些指南会提到「封关后,内地车辆需要办理 海南省自驾游车辆临时通行证」,但实际查下来:
所以基本可以认为那类「临时通行证」是谣传或者过时信息,不用太在意。
路线、时间、备选方案都大致规划完之后,又去翻了一下去年春节的实况:
想了想,春节这种时间点开长途自驾,虽然风景肯定不错,但光是堵车、人挤人,就足够把体验打到及格线以下了。
所以这次还是先按下不表,等以后挑个淡季,再慢慢把这条线补上,可能更适合。
https://baa.yiche.com/haiou/thread-49189440.html
https://mbd.baidu.com/newspage/data/dtlandingsuper?nid=dt_4518015290943294545&sourceFrom=search_a
https://www.bilibili.com/video/BV1NJw5e5E5U/
https://mbd.baidu.com/newspage/data/dtlandingsuper?nid=dt_5368825321327812859&sourceFrom=search_a
2026-01-28 00:00:00
又到了一年一度短评环节
Steam 自建的 2025 年游戏回顾
https://s.team/y25/kwqdrkq?l=schinese
今年一共玩了 30 款游戏,比去年还少一些,七成都是新游戏。今年还是太忙了,加上练车、弄一些其他的事,游戏时间就偏少了。

这游戏刚出时就遇到更换发行商,导致一直跳票,本来是和大侠同时期的游戏,一直拖到了大侠都出DLC了,这游戏才出正式版。
整体不错,没想到 24 年竟然有人做出来当年金庸群侠传的感觉,味道比神仙醋做的更正宗,文本确实可以,不过也有点可惜,游戏本可以做得更好的,运营宣发经历了很多变数导致游戏实际销量不行。有些设定过于 old school 了,如果可以重新稍微改变一下数值,升级困难、刷级也很麻烦,新一代稍微降低一点点数值的膨胀,应该是非常不错的。

当时玩的时候刚好是鸭科夫出 Demo,鸭科夫和零希沃特二选一,我选了零希沃特。像素风,但是硬核,搜打撤,游戏确实做得不错,作为独立游戏挺好的。可惜开发时间太长,又过于硬核,劝退了很多人,有点可惜。对比之下,鸭科夫能爆火,而同类型的它只能默默无闻。

一直等不到正式版,但是也直接玩了,游戏有点缝合,但是本质上还是不错的,地图超级大,肝度拉满,联机版塞尔达。虽然没正式版,但是最终 boss 基本有了,勉强打过了,游戏里还有好几块未开发完成的区域。槽点就是小副本简直恶心人,各种绕路、各种解密,又臭又长,如果他解谜水平有塞尔达 5% 我估计就很好了,全都是要跳跃,反复跑趟子,考验视力的解密,搞多了真的难受。

25 年爆火的游戏,Demo 时就已经非常火爆了,口碑爆棚。正式版游戏品质还不错,兼顾了搜打撤和画质,同时游戏难度又处于老少皆宜、随时可调的状态,内容里还有一些梗和有意思的小点,很快就出圈了。地图不算多,剧情也不长,配合一些 mod 以后,甚至可以 mod 联机,很有意思。
如果日后再出一个官方联机版,那就完美了,mod级的东西,可用性还是太差了。

第一次玩蜡笔小新,发现是个收集、跑圈子的游戏,看来只适合小孩子玩

类吸血鬼幸存者,但是可以刷装备,词缀又类似暗黑,以为很好玩,其实一般般,数值设计有问题,局外成长吓死人。

我以为等了一年多能咋样,现在看还是一坨。
bug太多了,数值不合理的地方也太多了,主线引导一坨,莫名其妙的问题,内置帮助里也是一堆错误的地方或者是描述根本对不上的,如果不去群里问,根本不知道下一步咋弄。
我感觉制作组自己都没玩过,我都不知道这是咋开发出来的,建议别买
游戏有一些亮点,但是不多,可玩性还是太差了,缝了一堆乱七八糟的东西,东拼西凑的,对整体可玩性的帮助太少了,建议重做,好好梳理一下
卡死的 NPC 很多,好几个 NPC 莫名其妙站在那里,动也不动,死也不会死,不知道在干啥,反正就是风雨无阻我就站着。
数值上的问题就更多了,王八拳秒天下,其他武功烂的一比,好歹平衡一下啥都能玩啊。
一旦被通缉,要去大内消罪恶,然后进入死循环,一堆人绑上你,蜘蛛人啊,战斗打到没完没了。
如果你招募了NPC,他如果还是剧情npc,触发剧情直接复刻一个一模一样的
类似的细节问题真的太多了,不像是一个开发了一年的作品
剧情也短的不行,大部分奇遇也找不到攻略或者说明,真的有点难受,网上过期的内容比比皆是
各种莫名其妙的按钮,开启势力,根npc对话修复奇遇,这得是多偷懒才能把这种东西写到和npc互动的对话里啊,你加个事件检测不行嘛?再差加个定时检测不行嘛,代入感奇差
看他的功能设计,就和新手不负责的产品一样,只做制作人提到的点,多一点思考都没有,很多设定比demo还demo。

今年练车的时候玩了好久,配合 CM 使用,总体体验还是非常不错的,画面够看,老机器运行也没啥问题,不得不说经典还是经典。

怪猎荒野试玩时就卡卡的,各种三角形,硬是顶着老机器打通了,体验极差。后面换了新机器,发现还是一样,破游戏就是不能优化了呗,有点无语,这代荒野没有肝的动力了,内容过少,每次更新玩个一两天就弃坑了

桌面养动物游戏,可玩点略少,挂机也就那样,不如其他游戏

像素风的Roguelite游戏,游戏难度比较高,也是背包管理类型,格子各种搭配可以组合出来一些特效,手感也不错。
后期难度极高,打了好多次,还是靠轮椅勉强过的,各种攻略视频很多,总体很不错。

多人乘船,后坐力会互相影响,要有人要控船,有人要打怪,还有各种机制,挺欢乐的小游戏,掌握技巧以后就是流程有点短了,没玩够的感觉

攀岩游戏,但是把,感觉合作性还是有点低,没有队友也能攀,不用机制也能玩,只要你愿意绕路就行,给玩家的引导或者攀爬的动力有点不足,爬完一个又一个,问题是啥也没得到,奖励机制太弱了。

梦之形,总算出了,期待了一年,一经发售就小火了一下,正式版中套路更多了,难度也更高一些,玩了好久总算把所有人的成就都解锁了。角色还是有点不太平衡,游戏内关卡还是少了一点,后续每次都是重复内容了。

幸存者版的搜打撤结合了一下加拿大的死亡之路的意思,无脑,简单,就是内容还是少了点,后期爽度拉满,boss太弱了,只要遇到基本秒死。

高清版幸存者,游戏还行,玩多了这个类型,稍微有点腻了,没有做出什么新东西

鼠托邦,横板类缺氧、环世界的游戏,生存压力啥的都还好,一开始不知道机制重开了好几把,后续会了以后就不难了。
可以控制女王做一些类似泰拉瑞亚的冒险,就是这部分内容稍微有点少,而且也比较简单,如果再完善完善可能比较有意思。

森林之子,森林一直都没玩,直接玩森林之子,难度就还好,四个人随便群殴,很少团灭,带个NPC很弱智,也很脆,动不动就死了还得用代码复活,指挥NPC干活也有点鸡肋,好多事情都干不了
地图超级大,很多物品都隐藏在各个洞穴里,洞穴冒险超级掉san值,滑翔伞以后,总算是可以快速移动了,一直到通关才会传送,问题是这会已经要退游了,传送还有啥用。
森林系列特色估计就是这个洞穴冒险了,其他游戏很少有这样的。

这是我玩的最难受的模拟经营游戏了,这个游戏数值不知道是不是有啥大病,把经济系统设计得非常脆弱,普通模拟经营就是面多了加水,水多了加面就行了,很少会崩溃。但是它不行,就算是低难度,这个平衡只要被破坏了,你还没及时发现,那就无力回天,直接进入恶循环,再也爬不出来了。至于后续更新的一些官职挑战,还是一个问题,这个数值设计有大问题,几年内就要上交一个特别不合理的数值的财政收入,你这当的是官嘛,一切要为这个财政收入努力,也太离谱了。
唯一有点意思的就是画风了,古建筑风格,很独特,很中国。

战地 6 免费体验的时候玩了几天,还行,挂没太注意到。好久不玩 FPS,枪法太烂了,对枪经常打不过,只能靠一些小众点位去偷鸡。

抄袭传奇,素材、音效、数值
抄你好歹改改传奇的一些垃圾设定啊,好家伙全部照搬
道士招了狗不能招骷髅,必须要退游戏才能召骷髅;进洞视野一个大黑圈,有毛病嘛?想增加代入感,你都选卡牌了,还代入感个毛线啊;蜡烛毛用没有,并不能点亮洞穴,设定完全是怕脑袋乱来,内测测了个毛线
打boss,就是拼血药,血药不能停,有血药你就能耗死boss,纯弱智设定
槽点实在太多了,说不完,只能说一个人做的游戏,连基础游戏的体验和玩法乐趣都没搞明白就做了
这个游戏群就是一群舔狗,还都是老登;作者直言不卖3w份,不更新游戏,是玩家该了你的
狗屎,爆率低到离谱,开了加速 = 我的游戏时间 *10,你都打不全你要的套装;新开的暗殿也是一坨狗屎;
作者套皮传奇的数据、模型、音效等等内容,奇葩言论实在是太多了。
游戏模型人物是个卡牌在城镇里走路,很奇怪,但是游戏还是有一点小火的。
这么多年传奇的受众一直都在,他们从未被满足,也不会被满足,所以他刚好切中了这个小小的赛道,做的几个游戏都是传奇套皮,而玩他游戏的也一直都是这么群人。
往好里说这个游戏也确实是保持了当年的味道,传奇不就是一个你愿意付出时间去打怪,不断的刷,就能看到你人物的成长嘛,只要你努力,付出就会有汇报,只是比较慢而已,对比抽卡等等这种完全靠运气的东西,这种机制是稳定的,符合人性的。

模拟酒馆的游戏,不过内容还是太少了,没啥难度

游戏有点意思,但是节奏有点太快了,割草是爽,但是超级割草就有点不爽了。然后游戏内很多机制都是有bug或者是不生效的,游戏引导又没有,剧情也基本没有,玩起来怪怪的。
他想做类似POE的游戏,只是画面、手感等等入门门槛都没弄好,成长曲线也是,刷起来没快感,只是无尽的通关通关。数值设定上也有些不合理的地方,竟然有指数级计算的效果,那其他东西基本都成了摆设。
有意思的地方在于你可以无缝切换机体,就是切换角色,build,但是,但是这个游戏完全没有利用这个机制的意思,是完全没有,这种特性很不一样,但是没抓住。

前几年刚出Demo的时候玩了一下,那会一堆bug,现在还没做完,但是很接近1.0版本了。又尝试了一下,发现现在的失落城堡,已经很像2D平面版得怪猎了,武器模仿的像,甚至有些小机制也是怪猎系列的东西。
通关还是可以的,曲线也平滑,局外成长很快就能刷满了,最高难度也能消化得了。

RV there yet,这个英文名起的超级好,还是个双关谐音梗。游戏就是大家合作开着房车翻山越岭,到达一个又一个检查点,房车视野很差,还是手动挡,各种牵引过关,还是很有意思的。

万万没想到,有人做了45度俯视角下的老头环,关键他还能4人联机,还能刷装备、素材,这就有意思了。游戏是开放世界,地图做的挺不错的,就是这个45度俯视角经常遮挡关键地方或者误判角度,导致跳跃失误。
能刷怪、能组build、还有小副本,整体成长很线性,就是限制进入世界的4个人,必须锁死这个坑位,每次换人都得踢掉一个加一个,这个有点过度设计了,就变成一个房间可以最多4个人加入就好了,不锁坑位就行了。
而且其实这个游戏更多人应该也是可以一起玩的,没必要强行限定4人。
游戏剧情也挺长的,开放世界,一个地图无缝接着另一个地图,游戏内武器超级丰富,想玩啥都可以,问题修复的很快,基本一天一个版本,持续在修,只是游戏在刚开始阶段没设计好,有很多差评,但是现在接近1.0版本了,基本都是好评

本来要联机的,但是无主4自己作死,不支持3080以下的显卡,不给优化,属实离谱,欠骂。日后有空了再玩吧

近年崛起的Esports游戏,很接近正规的现实赛车,据说手感、拟真程度都比AC好,但是竟然2025年还有游戏是订阅制,而且游戏内还得内购各种车或者赛道,挺离谱的。
主要是一些Demo游戏的游玩体验,感觉不错

Rogue的自走棋,比我以前玩过的稍微好一点,看后续正式版怎么样,距离发售没几天了

又是一个锁链游戏,但是这次是四个人随机链接在一起,角斗场里RogueLite,坚持到最后,Demo体验还可以,稍微简单了一些,看看正式版是否还会丰富一下内容。

单人角斗场RogueLite,要build,但是Demo还是内容少了点,手感也有点差,看正式版吧

之前一直说试玩版不能联机,缺了点东西。这次可以联机了,但是限制2人,还是不错的,玩起来挺有意思的
就是Demo版本数值设计上还是有点问题,这个人走出家没几分钟就要吃要喝,简直是个饭桶。

罗马时代的模拟经营游戏,难度也不高,有意思的点在于可以引水,可以造水坝,主动控水,人工建湖

测试内容太少了,走到安全区域就不知道干啥了,其他的搜、打僵尸就还行吧

绝命毒师电子模拟版,就是没中文,玩起来稍微有点难受

土豆兄弟联机版,网络太差了,联机体验一坨,其他的大差不差、

类失落城堡1的游戏,手感真好,Demo的流程也非常长,局外成长比较少,曲线平滑,玩了还想玩那种,期待正式版

Demo有点无聊,就是卖东西,配装,打怪,卖东西全自动,没啥操作感,和你是不似乎店主一点关系都没有。
配装也很无聊,就那么几个东西可以来回倒腾一下,打怪也是全自动,让你选个门,门都是一样的选他干啥?

类似RV there yet,但这次是越野车

禁闭求生出2了,可惜还是EA,游戏还是半成品,刚出就被骂惨了,等他1.0完善再体验吧

看起来像塞尔达的联机版,画风也比较像,期待正式版,目前已经EA可玩了

流放之路,放置版,等个Demo看看水平吧

有点当年剑侠情缘的感觉,但是暖雪版

这作来到了日本,东京,算是JDM朝圣了,非常期待,五月份就能玩了

类似房车旅行,但是能自己改造房车,探索世界

还有一个太吾绘卷也要正式版了,距离他第一次发售已经要8年了,这八年真是不容易啊,把一个游戏做到极致。
从一个人做到一个团队,经历了风风雨雨,团队算是组好了,后面再研发新的游戏估计思路就好多了,开发也更平顺了。
今年的游戏体验整体,玩得不多但挑得更狠,真正合我胃口的,还是那些有自己味道、能长期刷、肯用心打磨细节的小而精作品;大作和套皮作品,只要在优化或数值上稍有不慎,就会被毫不留情地拉黑。
期待26年的新游戏,独立游戏也越来越好了,很小众的赛道只要找对了,就是有人买单的
2026-01-23 00:00:00
最近 Skills 稍微有点火,哪哪都是在讨论。这里我也结合一下日常工作的实际场景来实践一下,看看 Agent Skills 能干些啥,以及它和之前说过的 MCP 有什么区别。
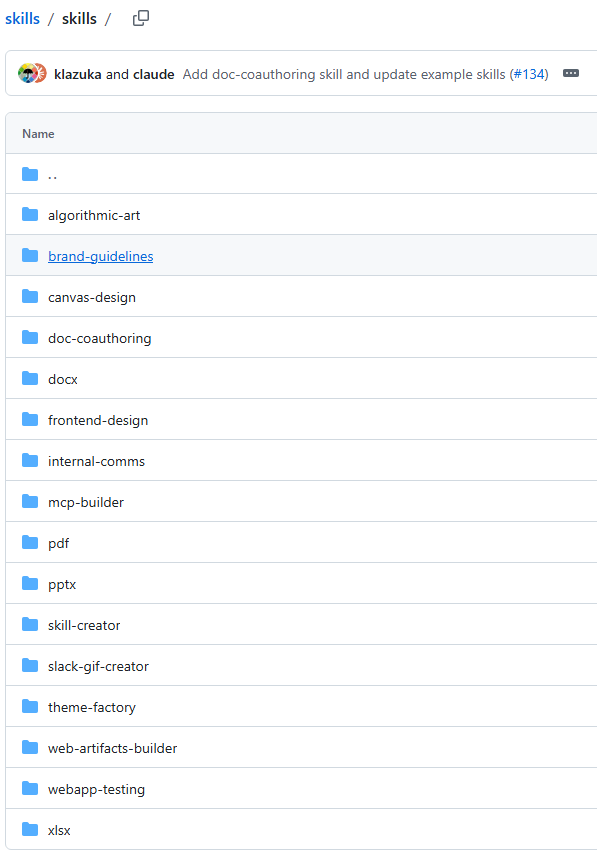
https://github.com/anthropics/skills
Skills是由Anthropic提出的,官方给了开源的skills的模板,很快就接入了其他各大模型
Agent Skills 是一个用于为 AI 智能体扩展专门能力的开放标准。Skills 会把特定领域的知识和工作流封装起来,智能体可以调用这些 Skills 来执行对应的任务。
大白话解说:Skills 就是把平常我们命令 AI 去做的一些「复合模板 + Prompt + 规则」的事情,收敛成一个技能。这件事本身可能很复杂(需要若干步骤才能做完),也可能比较简单,一个命令就能搞定。
再说一下就是套路或者方法论,只要是有迹可循,可以模仿完成,并且有条理清晰的步骤的事情,它就可以变成一个Skill。
举个例子,我平常写 Blog 文章,经常需要 AI 帮我找一下错别字,拼音很容易打错了,自己又不一定能发现。我自己常用的 Prompt 就是下面这样,其实挺简单的:
帮我检查一下当前文档中是否存在的书写错误的情况,并修改,忽略标点符号、中英混排的问题
平常这种 Prompt,要么就单纯存一份 Prompt,要么弄成一条规则,但每次还是得手动提醒 Agent 去触发这个流程。
那如果这个 Prompt 再复杂一点,比如还想让 Agent 帮我再润色一下文章,那我就还得再提一个 Prompt:
阅读当前文档,并模仿文档中书写的风格和语气,对全文进行润色,忽略标点符号、中英混排的问题
你可能会说,直接把这两个 Prompt 合并不就完了?确实可以,但有些时候,你可能并不想让它帮你润色。
也可能有些时候,你只是想让它顺手帮你改一下标点符号。这种情况下,这个 Prompt 每次都不太一样,但来来回回核心就那两句。
这个时候,按照 Skills 的思路,我们就可以把这几个 Prompt 抽出来,转化成一个 Skill。以后要用的时候只需要一句话就能触发,不用再反复粘贴那几段文字。
按照上面的例子,我就用 Cursor 实践一下。其他 Agent 的使用方式大同小异,这里就不逐个展开了。
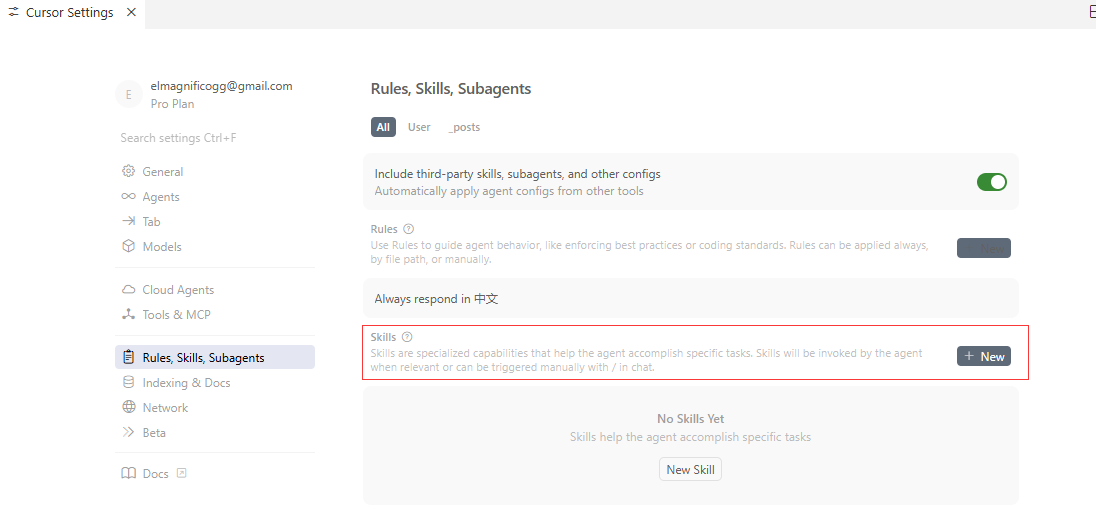
Cursor Settings中新建一个Skills,其实只是问了一下Agent,用处不大
需要先了解一些信息,以便创建合适的技能。
请提供:
1.技能名称和用途:这个技能要做什么?解决什么问题?
2.存储位置:
个人技能(~/.cursor/skills/):所有项目可用
项目技能(.cursor/skills/):仅当前项目
3.触发场景:什么情况下应自动使用这个技能?
4.具体需求:需要哪些特殊知识、工具或流程?
5.输出格式:是否有特定模板、格式或风格要求?
直接访问Cursor官方说明
https://cursor.com/cn/docs/context/skills
先在当前项目路径下新建一个 skills 的存储路径:
.cursor/skills/
一个完整一点的 skills 目录结构大概是下面这样,这里先看个概念:
.cursor/
└── skills/
    └── ArticleReview/
        ├── SKILL.md
SKILL.md 按照下面的内容来写,格式和我这篇文章类似,也是用 YAML 在开头做一些基础说明:
---
name: ArticleReview
description: 文章内容审查
disable-model-invocation: false
---

# 文章内容审查

为 Agent 提供的详细指令。

## 使用时机

- 在以下情况使用此技能
- 如果文档名称符合“年-月-日-文章标题”的规则,类似:2015-11-11-RaspberryStartup-5
- 如果只是要审查文章,那么只用执行指令的1、2、3步骤即可
- 如果要审查润色文章,那么执行所有步骤

## 指令

- 1.帮我检查一下当前文档中是否存在的书写错误的情况
- 2.忽略标点符号、中英混排的问题
- 3.完成上述检查和修改后,先向我简要汇报修改点,等待我确认
- 4.阅读当前文档,并模仿文档中书写的风格和语气,对全文进行润色
不小心手误打错了,Cursor 也会直接帮你检查并给出优化建议。
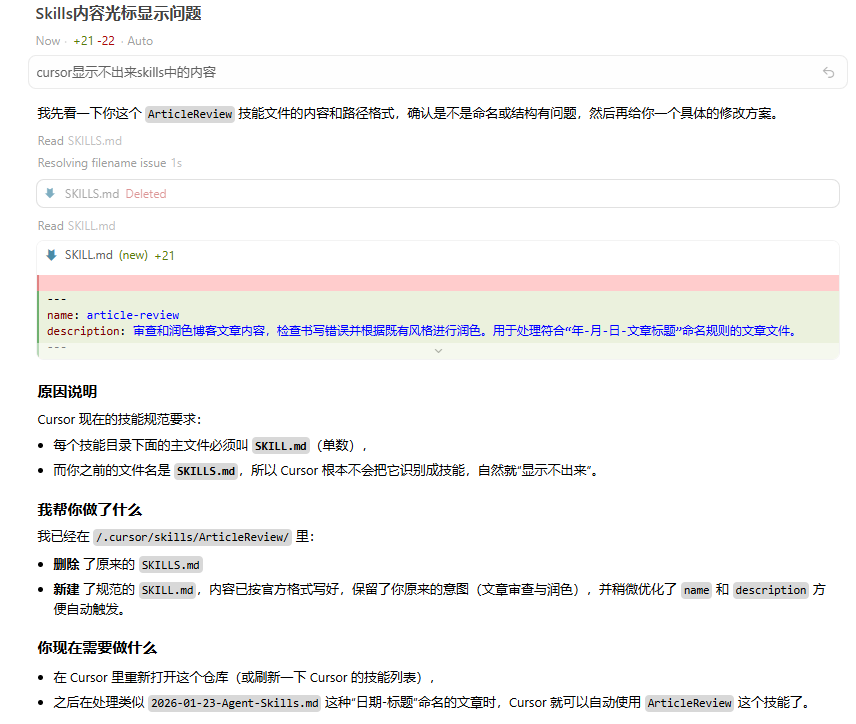
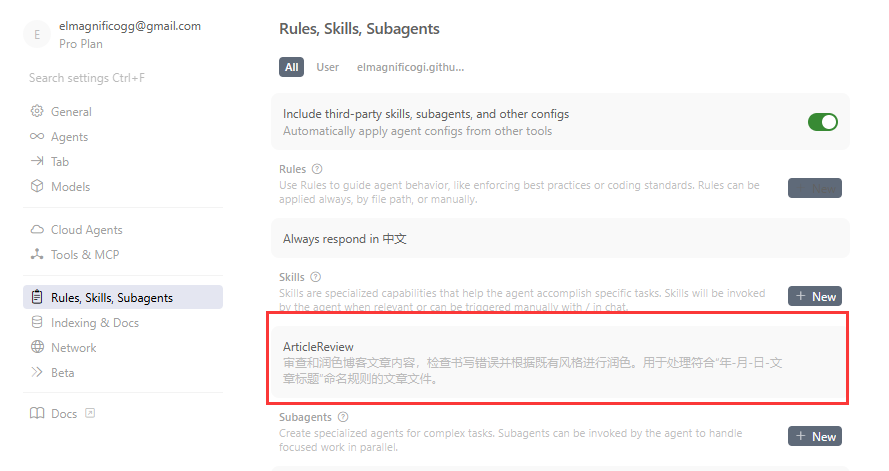
正确识别以后,就可以在这里看到我们刚才创建的 Skills 了:
接着试一下,看能否正常触发我们刚刚配置好的「审查流程」:
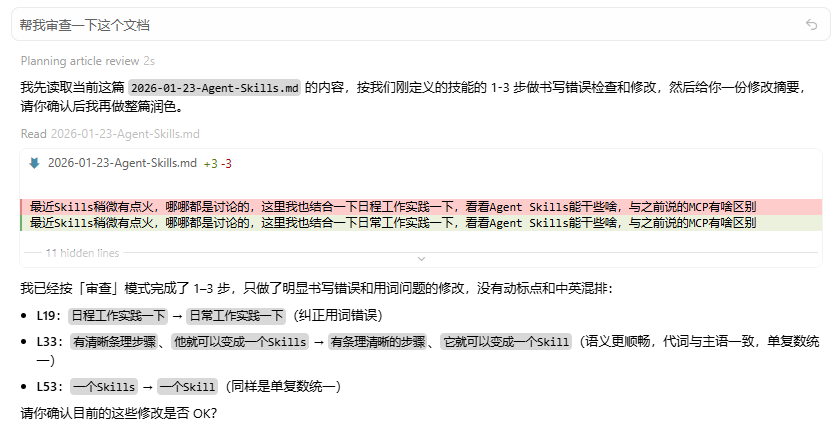
确认没问题之后,一个简单的 Skill 就算搭建完成了。如果后面还有类似的工作流,就可以直接在这个模板的基础上继续拓展。
.cursor/
└── skills/
    └── ArticleReview/
        ├── SKILL.md
        ├── scripts/
        │   ├── deploy.sh
        │   └── validate.py
        ├── references/
        │   └── REFERENCE.md
        └── assets/
            └── config-template.json
上面的例子还是比较简单的。如果我们希望把技能做得更复杂、更模块化,可以使用类似上面这样的目录结构:
同样的所有说明都是在SKILL.md中,在这里对内部的脚本、工具、参考元、素材等内容进行引用或者说明,这部分内容就会作为Prompt喂给Agent,说明中可以直接使用相对路径来调用其他内容
其次,SKILL中也可以调用MCP指令等内容
不仅如此,还可以再进一步,这是一个SKILL,但是如果是多个呢?
.cursor/
└── skills/
    └── ArticleReview1/
        ├── SKILL.md
        ├── S1.md
        ├── S2.md
        ├── S3.md
如果你把一整个步骤写得特别细、特别多,这会导致 Token 消耗一下就特别多,而实际上只需要执行其中某一条或者某几条的时候,SKILL 就会显得有点过于臃肿了。
SKILL.md就提供了类似目录的方式,你可以把一个方式方法拆解成N个步骤,然后每个步骤给他一个单独的md文档,具体执行的时候,只有被选中的这个步骤细节才会被作为Prompt喂给AI,这样Token消耗量就下去了
他就有点类似于经验书了,可以按照门类或者方法细节,逐步进行归类说明,相当于是把你的人类经验提供给了Agent,这样他就能帮你按照你的方法去实现任务目标了。
更复杂的功能,参考官方模板和示例,已经给的比较全了,干各种事情都有
感觉之前对于MCP的预判说大了,MCP对比Skills有点更底层了,它更像是把不同软件或者接口串联起来的工具,更接近开发层面,而Skills则是更接近用户侧的东西,把AI玩出花来。
MCP为Skills提供了底层技术支持,Skills则是把底层接口的各种玩法进行总结,这样用户侧就可以非常简单的让AI介入到自己的工作或者生活中,真正的实现提效
Agent Skills 确实挺不错,其实有点像是各种AI综合赋能的平台,通过无码化或者低代码化快速将一些常用的功能进行综合。他们的实现思路都是比较类似的,只是Agent Skills更文本化,门槛更低一些,不需要你真的懂底下的技术层面的内容,你只要把你能套路化、模板化的经验公式说清楚,AI就能帮你完成。
v2ex里这个帖子讲的也太抽象了,明明是个很简单的概念
https://www.v2ex.com/t/1187373
2026-01-20 00:00:00
RGB或者RGBW类似的多通道光源数据校准流程总结一下,之前一直把各种修正混在一起,实际上每个阶段都应该只做各自阶段的事情,混入别的东西就会导致最终输出跑偏
一般来说是两层进行处理,先处理感官层面的数据,此时不带有任何物理上的修正,这是我们理想的颜色应该有的样子,而后才是将这个理论值输出到现实中时需要处理的修正
为什么要先走感观层,因为我们很多时候在软件或者屏幕上看到的数值是被编码过的,比如PS、Maya、3DMax等等设计软件,大多数软件本身在显示这个颜色的时候就已经应用了Gamma编码(sRGB),然后才给你看到的(实际上是操作系统、屏幕等等处理过后的)
而你要把看到的编码后的数据还原到硬件上时,你就得走反向流程,你得先解码成真实的物理输出,再让设备显示。
感官层修正是比较简单的,把Gamma应用上去就行了

人眼对亮度的感知是非线性的,所以要通过Gamma进行修正,一般选取标准 Gamma值:2.2(sRGB)或 2.4(Rec.709)
# Gamma校正公式
def gamma_correct(value, gamma=2.2):
    if value <= 0.04045:
        return value / 12.92
    else:
        return ((value + 0.055) / 1.055) ** gamma

# 或者简化的幂函数(适用于某些场景)
def gamma_correct_simple(value, gamma=2.2):
    return value ** (1.0 / gamma)
前者分段函数是为了更好地处理精度问题,保证函数连续可导,这几个值基本都是经验值,用于高亮和低亮的区分点。
value输入的就是亮度,不是简单的RGB,所以感官层最好使用的数据是HSL,而不是RGB,更符合感官计算的流程
接下来就是把要输出的颜色转换到标准的颜色空间中,一般用CIE色度图就行,此时得到的就是一组线性的数据了,如果物理器件本身也是线性的就可以直接输出。
但是现实往往不是这样的,现实中颜色空间是有限的,可能你要输出一个超过颜色空间的颜色,那么此时就需要做颜色空间转换,转换逻辑也很简单,两个颜色空间做映射,然后越界的点去找最近的邻接点即可,这样可以最大程度降低色准偏差
Gamma计算后的数据要输出到物理层时,需要计算各种校正数据,比如温度、比如通道本身的色偏和光强差异,此时就要把HSL转换成RGB这种方式输出给物理器件
LUT主要是处理光源本身的偏移和不对齐的情况,实际是RGB输出,所以是3D,如果有更多颜色通道可能是4D、5D、6D等
简单说就是真实输出,然后反向测量输出的RGB到底是多少,从而得到一张大映射表,如果全量采样,花费的时间就太长了,所以一般都是精简采样,4×4×4(粗校准)、16×16×16(4096个采样点)、32×32×32、64×64×64(高精度),然后采样点插值一般使用三线性,直接取输入点周围的八个顶点,然后按比例插值即可。
但是这个测量其实也非常困难,因为本身光源就受到温度影响,你亮1s和亮0.5s测量的结果都是不一样的,所以要做好控制变量,对于测量环境的要求非常高。
当测量完LUT就得到了这个光源的颜色空间,对于非显示器这种级别,大部分点光源的色谱空间可能都有比较大的缺陷,某些颜色是无法还原的
在测量LUT时需要严格控制温度(因为温度会影响测量结果),但实际使用时还会遇到温漂的问题,因为三个RGB通道,可能输出功率不同,热量分布不均匀,而输出灯光本身受温度影响的偏移又非常明显,这就还需要单独测量温漂曲线,看每个通道与温漂的关系。
一般来说温度不会混到和LUT一起测量,多一个维度会导致LUT表爆炸(变成4D、5D等),温漂都是基于单通道进行测量,看每个通道在对应的温度下,输出的光强变化的情况,拟合成一个二次曲线或者映射表进行使用。实际使用时,通常是在应用LUT之后再根据当前温度应用温漂修正。
混光的问题,这里只是单独提出来说一下,实际上混光是硬件本身的物理特性,光会溢出激活旁边的通道。如果LUT是在完整测量了实际输出(包含混光效果)的基础上建立的,那混光的影响就已经被包含在LUT里了。但有时候混光可能会单独处理:一般情况下单通道输出的时候,颜色并不纯粹,光会溢出激活旁边的通道,所以单通道里往往都混了一部分其他通道的颜色,特别是光强越高,混入的越多,但是异色光占比反而是在光强比较低时,占比比较高,光强高了以后占比就急速衰减了。
还有一个特殊情况,如果是RGBW或者RGBWY等,这种情况下,别人实现一般都是把W和Y单独使用,而不是把WY拆成RGB以后再和主RGB进行混光,主要还是以各自需求为准。
整个校准流程的顺序应该是:
关键是要保证每个阶段只做自己该做的事,不要混在一起处理,否则会导致最终输出跑偏。
2026-01-19 00:00:00
这次往粤北走,补一下之前没去的地方,主要是为了跑山来玩一下。

官方给的线路,这个要走200多公里,估计下来得五六个小时才能环完
重新规划了一下线路,实际从油田收费站下高速,就开始往跑山线路上走,打算走一个外八侧线路,本来预计4-5个小时能跑完

线路:惠州再回楼农庄–>七星敦水库–>南昆山国家森林公园–>永汉河驿站–>增江竹畔驿站–>十三坝驿站–>酥醪景区–>下浪大幕–>罗浮山风景名胜区-2号门地上停车场–>博罗县吃晚饭–>广济高速回深圳
全程不走弯路大概100公里左右,导航时间3小时左右,算上停车游玩打卡什么的,可能要五六个小时
这次路线规划,最大的问题是忘了电量这事,走到快下高速的地方去沙迳服务区充电,结果沙迳服务区在维修中,虽然能进去,也提供一点点服务,但是充电真的太挫了,反复插了好几次才正常充上电,后来再插就完全不行了。
下了高速,还是得找地方充电,前面只充了一半的电,找了几个发现都有点问题,充电充不上,有点尴尬。
从惠州再回楼农庄到七星敦水库这段路,感觉车也没少多少,路也很短,很快就开到了,有点意犹未尽。
这里有机车俱乐部,很多机车压弯,也能遇到一些性能车在这里跑山,不过还是车多人多,没法全力跑

路是真的不错,看起来都是很新的铺装路面
中间导航去了南昆山的川龙瀑布,门票20,很小的瀑布,爬山也就一两百个台阶

小景区人也比较少,还有一个山路滑车,无动力那种,价格也不便宜,不推荐
南昆山没有准确的定义,是一片很大的地方,各种圈个小地方就作为一个景点,独立收费了
往永汉河驿站走的路上,有一处观景停车的位置,刚好能看到日落

往永汉河这边走的时候,路上的变化就多了,各种弯,高低起伏,开起来还是挺爽的,就是副驾有点难受,容易晕。
回看行程记录,速度也就70多,多数时间都是五六十往下,没有push,对向来车也时不时就有一辆。
看得出来惠州文旅是想把驿站作为开车兜风的中途休息点,可以充电、喝咖啡、吃饭等等,但是永汉河驿站这里空有一个建筑,充电没建好,还不能用,建筑里除了保安,啥都没有,连打卡都打不了。周边是个小镇子,镇子里各种东西还是挺丰富的。
中饭、晚饭就是各种农庄解决,价格还行吧,没特别难吃,也没多好吃。
由于时间关系,后续几站(增江竹畔驿站、十三坝驿站、酥醪景区、下浪大幕、罗浮山)来不及去了,以后有空再说吧
官方宣传和实物差太多了,这次组织了三辆车一起走,带了对讲机,跟车还是挺有用的,可以提前通知后面车走线要注意的情况,就是头车跑远了,容易联系不到后面的车。充电也忘了提前规划,没想到会出现一路找充电的情况,太拖累人了。
https://mp.weixin.qq.com/s?__biz=MzA4ODA1OTkxMw==&mid=2650504942&idx=1&sn=204ee34ba60bef309bda08bb20d9276c&chksm=89b9750ae9d086b2d6821a668a9d2222c726b6fe040a7b71992f858bb133278098c9529676cb&scene=27
https://mp.weixin.qq.com/s?__biz=MzA4ODA1OTkxMw==&mid=2650503567&idx=1&sn=0d28401cb75e6bb6649a1aac081c5b41&scene=21&poc_token=HNjcY2mjyUrRuKC_8sXEgdxbUAGNtPBeU9JX-n2f
2026-01-13 00:00:00
2025.8.31 开始学习艺术与审美的第二阶段课程:如何找到自己的艺术道路,继续之前的审美课二阶段。
艺术与审美课的二阶段内容如下,价格是 1200,总共是 13 节大课,大概 36 小时,每节课又大概按照正常授课时间 40-55 分钟拆分成一节一节的,一共有 47 节小课(总算发现了,这么久以来每节课 45 分钟的设定是多么合理,人的注意力要保持高度集中三四个小时是比较困难的)。
这是唯伟老师第二次做课程,目录和课程内容比第一次清晰了很多
民间艺术是指普通民众创造的,主要是农民或乡土社会中的手艺人创造的,反映民间的审美趣味与文化精神的,具有一定历史传承性与社区共享性的一种文化形态。
之所以有“民间”这么一个称谓,还是社会的阶级性使然,权力自然而然地要求每个东西要有阶级性,那么艺术也是这样。民间艺术大多数都是服务于用途,但是往往在这个过程中形成了一个个小圈子,并且代代相传保留了下来,形成了一个独特的文化符号。对应的“主流艺术”(官方艺术)为了凸显他的不实用、非用的特性,特意拉开了与民众生活的距离,这就体现了他的阶级性。
实际上大可不必如此,精湛的技艺同样具有艺术性,普通人对于艺术的评价,也恰恰意识到这一点。华而不实的东西,普通人无法理解这种跨越了 N 层阶级后的东西。反过来,匠人、民间艺术反倒是看得懂,因为这个离他们本来的生活更近。对于民间艺术的贬低,是从古至今都延续着的,因为阶级从未消亡,上层一定要通过这种东西来展现与下层的不同,这算是人性?或者社会性的必然结果,无法阻挡,对于我们普通的看客而言,充分理解、接纳即可。
同理现在很多追求艺术之人,走了一段路以后发现好像自己就是那样,自己的作品好像没有啥独特的?就会开始怀疑自我,是否还应该往这条道路继续走下去。
其中以刺绣艺术最为明显。刺绣找不到自己的路,早年大师复刻或者模仿西方绘画艺术,但是由于根基上缺少西方绘画艺术的一些基础内容,导致实际做出来的作品还是有差距,体现不出来艺术上的独特性,虽然工艺上确实非常厉害。与之对比的就是玉雕和瓷器,这方面一直有人推陈出新,在不断前行,本身也被社会和国家认可,有对应的完整的教育体系,从而让其生命延续了下去。
以摩西奶奶为例,讲解了一个非专业画家的成长经历,画作赏析,看到非专业画家的天赋,画作中突出的笔触和颜色,虽然形不对了,但是没问题,画画的三角必然有舍有得。摩西奶奶画中的单纯、不刻意,那种赤诚的感觉,是专业画家追求但又做不到的。再结合作者当时所处的时代背景,这样一个成名的画家,非常吃时机。她的出名是偶然也是必然,如果不是摩西奶奶成名,时代也会推出来另外一个奶奶。
非专业的艺术创作者,当他基于他的人生经验,把某一件事情做到极致或者说研究某一个东西,找到自己的乐趣点,并乐此不疲,就算他不具有传统所说的专业知识,那么他也能成为专业的,甚至某一方面的开拓者。
对应地,很多艺术创作者,如果你要他去阐释说明自己的作品是怎么做出来、怎么想到的,可能他是说不清的。这些作品都是基于他的生活经验、创作经验,只是恰巧被你或者伯乐看到了,被放大了,被知名了。这种现象有点类似于以前的阅读理解:作者真的有这么想吗?显然没有。只是刚好可以被读者理解成这样而已,并且这种理解又刚好达到了观众理解或者社会认知的最大公约数,被大家认同了而已。
进步史观,会迷惑艺术创作者,让他们以为要做出什么历史贡献,艺术突破,技艺上的突破,其实可能不是,艺术是找回自我,并不是突破,是表达自己,是把过往的人生经历或者视觉体验的总和汇聚在一起,然后使用艺术手段表达出来。
这个东西对比一下脱口秀的创作者,每个段子,你都得有对应的经历或者从他人那里获取到对应的经历,然后才能被编成段子,如果你是成天呆在家里,没有任何阅历、生活经历,体验,那你根本没有任何素材可以使用。

这节课以鸟山明为例,主要说明过程的意义,在绘画界,这个非常重要。绘画的目的,不是出名,不是赚钱,如果是以出名和赚钱为目的,这个目标可能很轻易的就达成了,而且不可持续,出名以后下一次出名要怎么做?要怎么更出名,或者更有钱。唯伟老师这里表达的哲学思想其实是说,不要受目标达成的多巴胺刺激,要戒掉对此形成的成瘾性。但是吧,其实普通人都不配,普通人达成目标就是一件困难的事情了,更不要说,完成一个又一个目标,还能达成多巴胺的成瘾性,能做到这种程度的都不是一般人了。很多中道崩殂的名人,多数都是在没有目标之后,失去了人生意义,进而选择结束人生了。这个东西有点类似嗑瓜子,为啥瓜子好嗑?因为它反馈快,和那种分解小目标之后立马就能完成、立马就能得到反馈一样,越嗑越停不下来。
为什么要专注于过程,其实也是嗑瓜子,只是你把完成目标才能获取到的多巴胺变成了细水长流。每次做擅长或者喜欢的事情时,这个东西就可以持续分泌,从而让你的体验从瞬间刺激变成持续刺激,那么这个事情你就可以做得长久,而一个事情做久了以后,就必然会突破,进入到另一个世界中,精益求精。
从这节课开始讲心理学相关内容。课程是 2024 年讲的,那会儿 MBTI 应该是最火的时候,所以以此为例进行讲解。我比较讨厌这一套东西,用模板套每个人,给每个人一个心理暗示,没啥意思。连自己都不了解的人,还是先去了解自己吧。用这种方法论套模板了解自己,有点蠢,说明你连起码的思考能力都没有。
如果有程序员相信这玩意,我只能说你程序都白写了。一个用 4 bits 来做人类型区分的模型,你不觉得可笑吗?随便来个业务枚举,4 bits 都不够用的,人竟然够用了?
这节课内容有点神棍色彩,建议跳过。 后续命理学、易经、天文天象、一些民科内容都介入了,只能说文科的底子真的是有硬伤。唯伟老师忘记了自己在第一阶段课程中带入原始人时的角度,越是未知,越会让人偏听偏信某些东西。
以儿童心理学为例,讲解心理学在绘画领域的应用。为什么以儿童为对象,因为儿童接触的东西少,对于世界理解的浅,更像一张白纸,控制变量更容易。
语言天生就有防御机制,会导致你无法充分表达你的内心的真实情感,但是类似于绘画,这种思考或者创作的方式,他就能通过绘画的语言表达出他的内心想法,这是一种需要过度解读的隐喻,需要结合儿童当下的状态去理解的。这种可以表达或者蕴含潜意识的创作,是很有意义的,可以说是类似解放天性、挣脱枷锁了。
主要投射类型,集团潜意识、成长、生理、象征、共鸣、需求、好恶、位置投射,这些类型的投射都会集中体现在儿童绘画中。绘画的欺骗成本很高,欺骗手段不像语言可以直接学习模仿到,所以绘画中体现得是很真实的情况。
总体来说是通过绘画接纳自己,认识自己,与自己和解,让绘画这个事情变成一个乐趣而不是工作。
上一堂课说了绘画会变现出来个人的内心的一些想法,这堂课直接从笔迹入手,说明为什么绘画可以显示出来个人想法。
绘画可以去模仿、抄、因为在你实现的时候,自然而然会把自己的操作习惯、真实的想法融入其中,这种类似下意识的东西是很难被刻意模仿或者刻意画进去的,当你完成一幅作品的时候,其实得到的就是你的版本,和原作已经没有关系了。这里不讨论抄袭、仿古等等,只是单纯的用来自己学习或者绘画。
他不像代码,你copy一份,那就是一模一样的,一个字不差,绘画中的形、笔触、颜色,你的力道,很轻微的习惯都会融入其中,这天然就形成了差异,就好像指纹一样。
同样的内容,同一个人,不同时期写出来的也可以完全不一样。心态上平淡天真,操作上返璞归真,要跨过这个批判自我的阶段,非常困难。
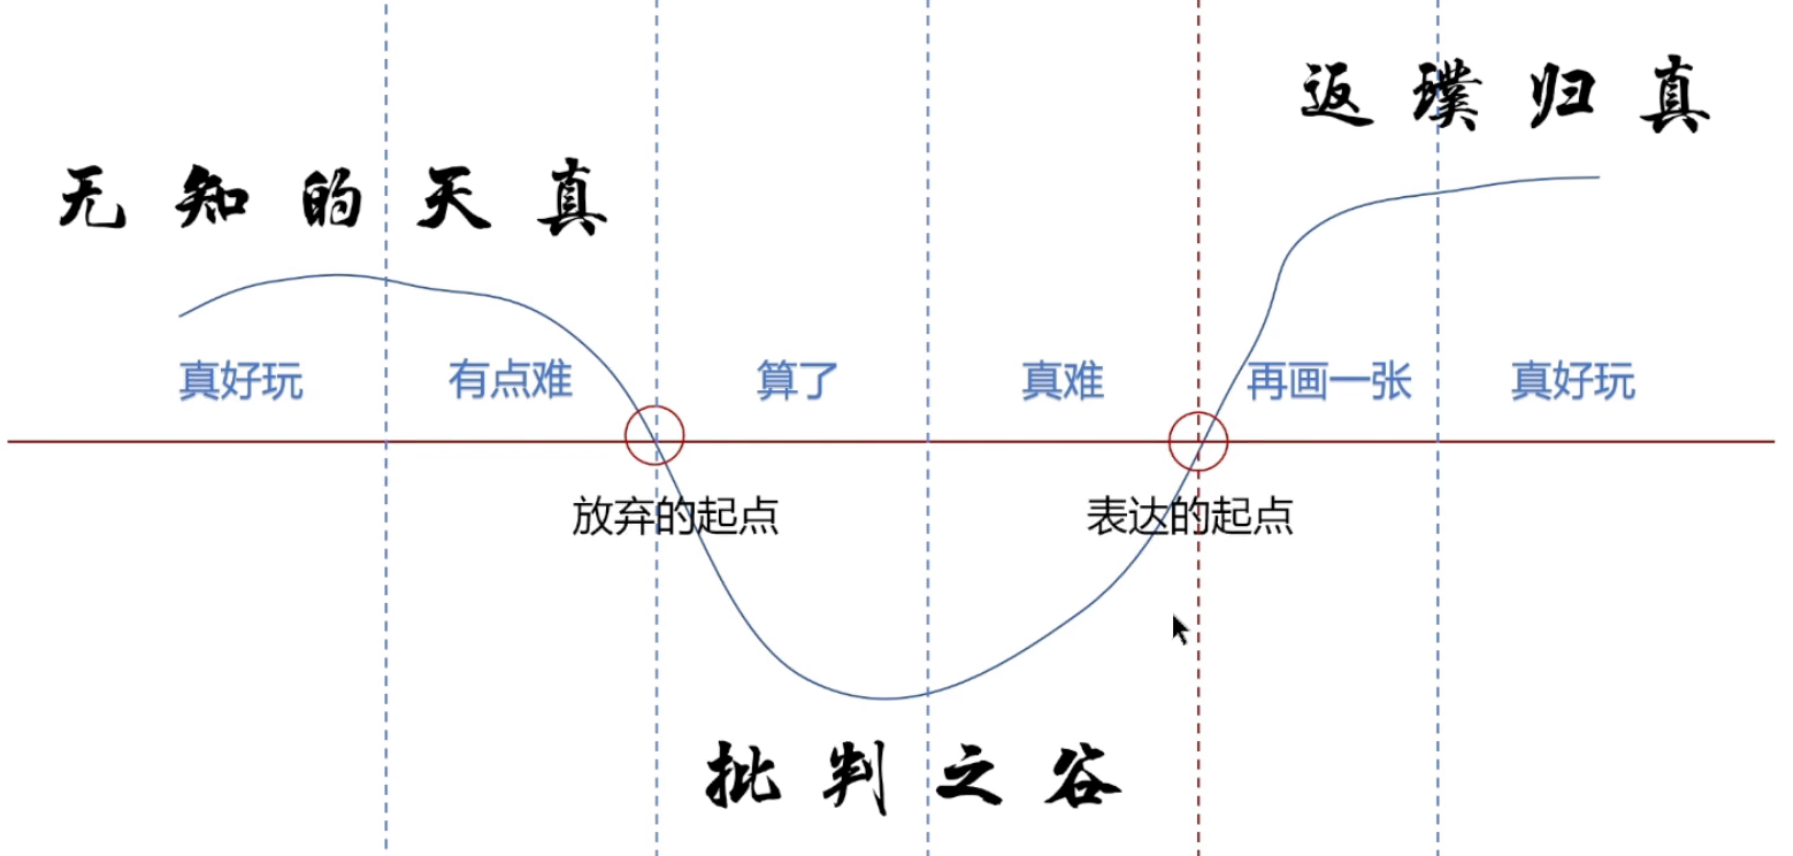
艺术道路千千万,越过苦海,才能到达彼岸
颜色或者绘画,也是类似的控制一部分变量,让其中某一个变量动起来,从而形成绘画的节奏或者艺术表现得节奏。如果你可以同时控制几个变量,并且也能让他们协调得动起来,对应得这个画就很有感觉了。印象派的画作就很能说明这个情况,但是其他派别的就不一样了,可能差距很大。
这里主要还是说怎么搭配颜色,或者说控制变量方式来搭配颜色,但是实际上各种配色方案都有。
用一种框架去描述视觉喜好,相当于是总结规律了,类似于物理规律是放在那里等着你去找的,但是绘画这里有很多前人的作品,但是对于作者来说是不会用这种规律来作画或者描述自己的画的,所以这个只能是后来者,欣赏者进行的强行分类,因为视觉的感受总是主观的,而这种框架则是用客观理性的方式进行总结了。
对于形的概括或者规律总结,这个东西其实应该是要艺术创作者自己去观察总结,而不是直接拿别人的套路,当你拿别人的套路来用的时候,当你做创作的时候就容易陷入来时的路,在套路中出不来,而如果你是自己观察总结的,那么你画出来的东西自成一派,不会被别人的套路限制住,只能是你自己限制住自己。
构图分析是事后诸葛亮,大部分都是为了分析而分析,实际设计或者绘画的时候根本不会用这个来框死自己
先不管喜不喜欢,先看看都有哪些流派,客观的先看看他们直接的联系。认知很重要,还是回到了老话常谈,你无法做出超过你认知的东西。这课以梵高为例,看梵高的生平都是收到了哪些画家的影响,看到的这些画家都潜移默化地受到了他们的影响,最终让梵高走出了自己的路子。

每个人精力有限,我没有家庭,所以可以在事业和喜好上拉满精力,但是对于很多人来说是不行的。你越孤独,或者说你需要顾及的事情越少,你在某一个方向上可以投入的精力就越多,自然而言,你就越来越强了。
艺术家是绝对自信、自恋的,不够自信与自恋,他们无法完成自己的作品。但是艺术家不是独立活在这个世界上的,他们一定会被政治、权力、金钱、名誉裹挟,在这种情况下,艺术家就一定要分出个高下。同样的艺术史也是人写的,既然是人写的那么自然就有所偏颇,不够客观。
很多上个世纪,一样很牛的艺术家,他们可能是为王权服务的,可能是为庙堂之上服务的,他们的东西不接地气,在当时可能是受欢迎的,但是放到百年以后,可能了连认识他的都没有几个了。而主流艺术,这里的主流也很好理解,就是商业艺术,谁赚钱,谁可以为大众服务,谁就是主流,但是艺术家并不仅仅是为商业服务的,有些郁郁不得志的人,他们是为自己服务的,为自己本心创作的,这样的作品,并不一定能得到大众的认可,曲高和寡。
更别提每个人的喜恶,这个东西本身就被主流的商业艺术潜移默化的影响了。很多分析都是事后诸葛亮,都是对过往的追溯,可以看到历史的偶然性和事件的必然性。
了解时代的风口,为什么某些艺术风格或者流派成为了当下的主流选择
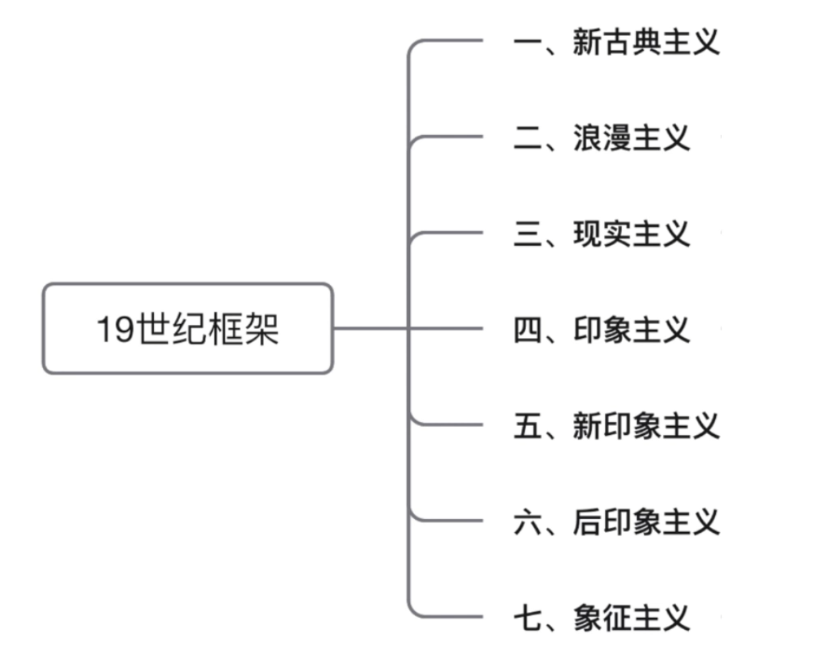 19世纪,艺术崛起是随着生产力爆炸一起起来的,他们都是随着资本阶级崛起而来的。当一个新的阶级产生时,他们本身必然会追求和其他阶级不同的东西来做区分,这种就影响到了艺术界,艺术品成为了新的金融产品。
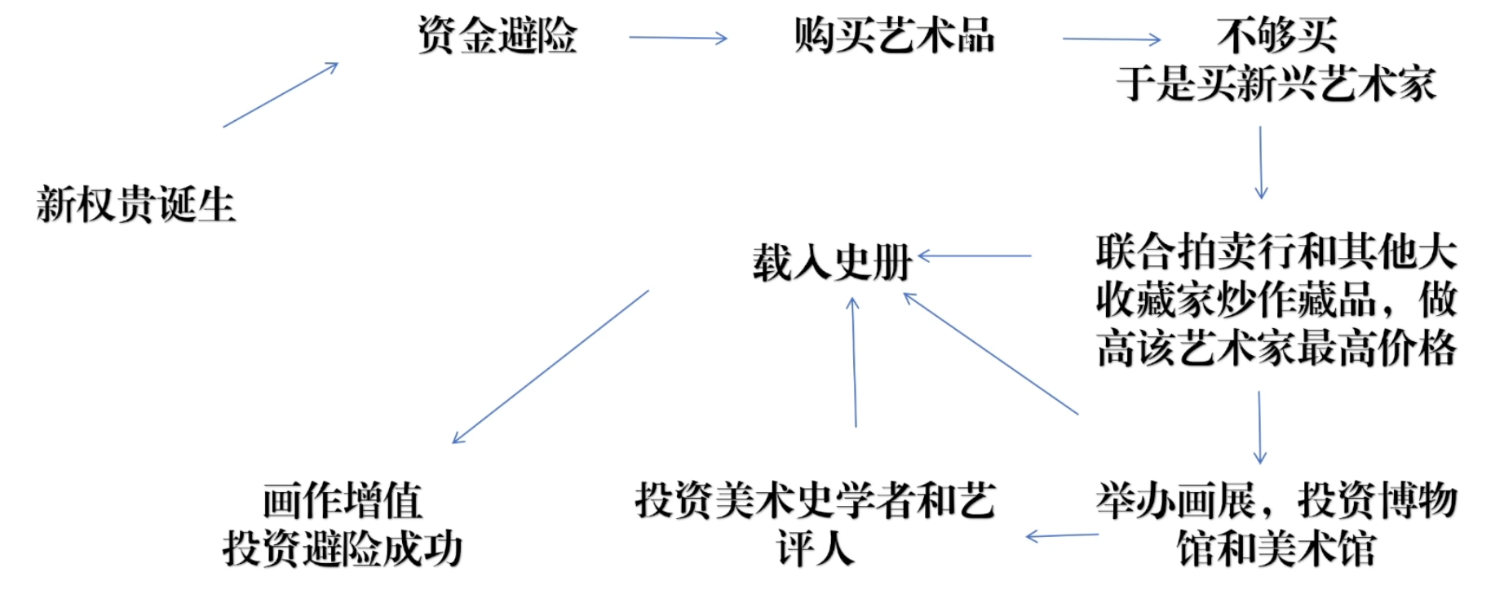
从历史课本上篡改普通人的记忆,让某些艺术家成为大师,进而让其作品升值,这种想法不是不行,但是操作起来需要每个环节都有人去做,而想要做到悄无声息,稍微有点难,总是人在干事情,这个目的还是很明显的,走漏风声也很容易。这里说的只是百家争鸣的资本推手的一条脉络,实际上肯定不仅仅只有这么一条脉络。
后续以李小龙为例,说明其实李小龙做的事情,行事之风格,其实就是一个优秀艺术大师的行为方式。凝视是来自上位者的软暴力,审美是来自上位者的软暴力。
后来有一天突然想通了一点点事情,艺术一直都是阶级的附属品,为了个性,不断追求阶级的不同而衍生出来的东西,反观动物就没有这种阶级性,没有个性(求偶不算),归根到底还是社会化带来了这种无法磨灭的阶级性,这样就导致了,艺术一直在为阶级服务,刻意为了不同而不同。从最原始的原始人,刚开始的雕刻或者点缀,本质上是为了生存、为了区分不同的瓶瓶罐罐,这里还没有足够的艺术性或者个性的显示,只是单纯的使用符号而已。但是当原始人后期出现了祭祀、出现了大家长、出现了阶级性的时候,符号就不单纯只是符号本身了,他变成了阶级权力的象征。而到了中国古代的时候,那会有什么东西可以用来娱乐或者划分阶级的,财富可以,权力也可以。但是在财富之内、权力之内又要如何划分高低贵贱,这个时候社会的自然选择就转向了稀缺的文字、绘画,那个年代就只有这种东西可以被用来干这个事情,如果他们也有手机、电脑、摄像机,那么古时候的文字、绘画就不会发展的那么深了。
这节说了半天的儒家、道家,总结就是平淡天真,实际上无论儒还是道,没有人是平淡天真的,他们生活的年代,做不到平淡天真。主要是说明,中国古代在儒、道、佛三家的影响下,中国绘画受到了影响,主要是精神内核的影响,崇尚君子,为什么古代的绘画是走神,走意,为什么画得平淡天真。中国古代社会变迁导致的艺术追求的变动。
绘画用形状、颜色、位置等等来表现主次,让画面中心突显出来,这样整个画面就更和谐,看起来更舒服。绘画的内容越多,就越需要做主次安排,群像中对于内容的安排,也变成了画师的能力之一。
主次符合我们人的视觉经验,视觉里必然是有一个焦点的,天然就是这样的,所以画出来这样的东西,在潜意识中就更符合人类的舒服的感觉
现代艺术,则就是对于古典艺术的探讨或者反抗,他要做的就是和古典艺术不一样,比如他故意破坏掉这主次关系,故意做出来一些先锋或者实验性质的东西,打破你固有的思想或者潜意识。
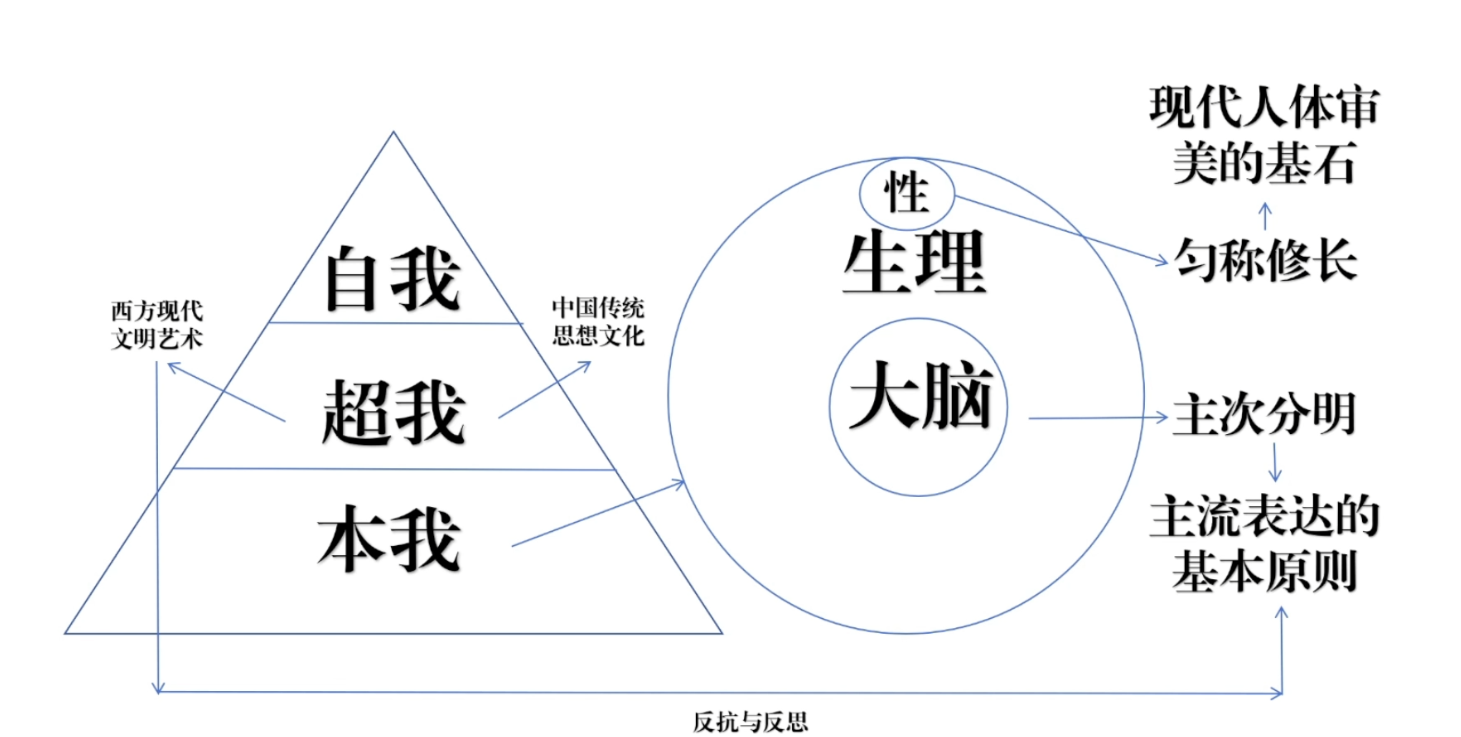
这两节课想通过历史、本能感受说明超我和本我的一些内容,不过有点过于抽象了,我感觉表达的不太好,最后贴主题有点困难
艺术家的情绪和创作的关系,情绪越多、越激烈,艺术家也就更容易有创作的灵感。艺术家在创作的时候是在相对平静的情绪之下。这个理论符合认知吧,无论是绘画还是写小说、写段子,都得有对应的生活或者情绪积累,没有这些原素材,巧妇难为无米之炊。
这节课的内容再次callback之前说的,绘画等艺术创作行为,其实是艺术家的宣泄或者表达的一种路径而已,普通人可能一句“屮”就完成了情绪的宣泄,而艺术家会用他们的方式进行表达。
后续就是强调基因、天赋每个人都是不一样的,艺术家的独特性就是从这里来的,感觉这里有点过于自我催眠了,作为艺术家必须得强调自己是与众不同的,如果你认为相同,那你就不可能是艺术家。这种过于强烈的与众不同的认知,与泯然众人矣的普通人对于自我的认知对比很明显。很多时候普通人的妥协或者躺平,不就是认可了我自己属于大多数或者说属于那个统计中的平均值了嘛,这样的持续的认知,让人最终也朝向这个平均值去发展了。
后续以崔寒柏为例,说明自然书写,古代书法艺术发展到了一个绝顶的高峰,导致现代人失去了古代的那种环境以后,今人很难在达到那样的地步了。
佛学和绘画的关系,用董其昌来论证,但是董之所以拿佛学来论证自己的说法,本质上还是因为他一人之言不足以服众,所以要借助更高的力量来干这个事情。但是这里唯伟却把佛学当成了核心,我感觉是走偏了。
后续就是主要介绍禅修,观呼吸,是如何放下贪嗔痴的,如何超脱自我的。但是这个东西在我看来,其实是你本身自我意志不够坚定,对于事物缺少足够的认知理解,当你遇到一个让你迷惑或者诱惑你的东西的时候,没有办法放下来审视自己或者这个事情本身,从而形成了自己和自己对抗的状态,进而变得扭曲,挣扎,想得太多,反而认不清自己了。这种情况或者说这种人,本身心理就是有问题的,他应该去看看心理医生,而不是拿禅修当作解药。禅修是能解决一部分问题,但是很明显按照唯伟的说法,你还是会反复禅修,反复去解决这个问题,那不恰恰说明禅修只治标,不治本吗?无法形成真正的审视自己,放下贪嗔痴的状态。
这个有点像酒肉和尚,他修禅到最后何尝不是一种方向,连禅修都放下了,这才是放下啊。世人过于受到情绪的影响,无法从乱世中静下来。
最后解释整个课程是怎么串起来的,主要就是想说明艺术家的一些特质,最后说明你要进入心流、你要放下俗世的那些东西,你才有可能成为大艺术家,但是艺术家自己的来时路,可能是扭曲或者沉迷在物欲横流的世界中,这是没问题的,是他的必经之路。而对于普通人来说,你能得到的或者说学会的东西就太少了,你要重塑性格、个性等等内容,谈何容易,艺术家的气息确实是个稀缺品,要耐得住寂寞,甚至要死后好多年才有可能成功,这样成功的可能性其实很低很低的,普通人还是接受现实,认识、了解清楚自己,顺从本心去做自己的事情就好了,不要强求
课程结束他说有问题随时问他,我问了一个,追问了一次,一直说在写,然后不回,我无语了,但是你问下一阶段课程,多少钱就又冒出来了,嗨呀,整个课说了半天的艺术家的放下,高雅、执着,最后还是离不开嘛
这个课又花了接近4个月才完整看完,总体收获还是太小了,很多内容都是唯伟老师之前讲过的一部分,但是深度又不是特别深,还有一些又被他做成视频公开分享了,同时这个课对于内心、人性、心理学这些谈的太多了,而且他讲的很多内容只是为了论证那一点就是遵从本心,走自己的道路,这种大道理没听过十遍也听过八遍吧,这就导致这个课很不值。这个第二阶段更契合唯伟自己的经历,所以他更推崇或者着重介绍这种方式,但是总感觉怪怪的,有点用力过猛的感觉。
第三阶段是商业设计案例,这个部分反而比较有意思,我可能会在年前或年后快速学完,看介绍这部分干货内容比较多一些。
https://mp.weixin.qq.com/s/cFCXRR-YtlO-3kXpVM23sw