2025-12-13 13:10:31
当 AI 成为编辑 最近我做了一个有点意思的项目——AIGC Weekly。这不仅是一份关注 AIGC(人工智能生成内容)领域的周刊,更是一次关于 Agentic AI(代理智能) 的深度实验。
周刊从此自动运转
今天想和大家聊聊,我为什么要做这个项目,以及它是如何通过一群 AI Agent 自动运转起来的。

作为一名开发者,我每天都会被海量的 AI 资讯淹没:
信息过载是这个时代的通病,尤其是在 AI 这样一个日新月异的领域。我希望能有一个工具,能帮我从这些噪音中筛选出真正有价值的信号。
但我不想人工来做这件事。
既然我们已经有了像 Claude 这样强大的 LLM,为什么不让 AI 自己来当编辑呢?于是,AIGC Weekly 诞生了。
目标很简单:全自动化、高质量、无需人工干预
AIGC Weekly 的核心不仅是一个网站,而是一套自主运行的流水线。每周日早上八点,当大部分人还在休息时,我的 AI Agent 们就开始上班了。
Agent 会从 Hacker News、知名 AI 博客、Telegram 频道等 15+ 个信源抓取最新的 AI 资讯。
Agent 会像一个挑剔的主编,根据 GitHub Star 数增长趋势、社区讨论热度等”智能标准”来评估每一条内容的价值。
筛选出的素材会被交给负责写作的 Agent。它会撰写标题、摘要,并整理成一篇结构清晰的周刊文章。
Agent 会通过 MCP (Model Context Protocol) 直接与 CMS 交互,将文章发布到网站上,并同步更新 RSS 源。
这一切,都在 Cloudflare 的云端容器里静悄悄地完成。
作为一个技术人,我也想借此机会实践一下最新的技术栈。AIGC Weekly 是一个典型的 Modern Web + AI 应用:
| 组件 | 技术选型 |
|---|---|
| 前端框架 | Next.js 15 (App Router) + OpenNext |
| 内容管理 | Payload CMS 3.0 |
| 基础设施 | Cloudflare D1 / R2 / Containers |
| AI 核心 | Anthropic Claude Agent SDK |
| 数据抓取 | Firecrawl |
这套架构最大的好处是 Serverless。我不需要维护复杂的服务器,系统会根据负载自动伸缩,而且成本极低。
期待在这个由 AI 驱动的小小角落里,与你相遇。✨
2025-08-31 12:50:55
和大家分享一个最近做的小工具——hink,一个用不到 10 行代码实现的短链接系统。
这个工具利用 Git 和 Serverless 平台,实现了短链接生成和访问统计功能。
hink 的核心思路很简单:用 Git 的空提交哈希值作为短链接的唯一标识符,把原始长链接存储在提交信息中。访问短链接时,系统通过 GitHub 的 .patch 文件接口读取提交信息,提取长链接并重定向。结合云平台的 WAF(Web 应用防火墙)分析面板,还能实现访问统计。
目前,这个方案已经在以下平台测试通过:
hink 的代码非常短小,核心逻辑只有几行。以下是针对不同平台的实现。
const GIT_REPO = "https://github.com/miantiao-me/hink"
export default {
  async fetch(request) {
    const { pathname } = new URL(request.url)
    const gitPatch = `${GIT_REPO}/commit${pathname}.patch`
    const patch = await fetch(gitPatch, { cf: { cacheEverything: true, cacheTtlByStatus: { '200-299': 86400 } }}).then(res => res.text())
    const url = pathname === '/' ? GIT_REPO : patch.match(/^Subject:\s*\[PATCH\](.*)$/m)?.[1]?.trim()
    return Response.redirect(url || GIT_REPO)
  }
}const GIT_REPO = "https://github.com/miantiao-me/hink"
addEventListener("fetch", async (event) => {
const { pathname } = new URL(event.request.url)
const gitPatch = `${GIT_REPO}/commit${pathname}.patch`
const patch = await fetch(gitPatch).then(res => res.text())
const url = pathname === '/' ? GIT_REPO : patch.match(/^Subject:\s*\[PATCH\](.*)$/m)?.[1]?.trim()
event.respondWith(new Response(null, { status: 302, headers: { Location: url || GIT_REPO } }))
});部署到 Serverless 平台后,绑定一个域名,就能拥有自己的短链接服务。
短链接服务并不新鲜,市面上有很多工具。但 hink 的目标是探索一种极简且有趣的实现方式。利用 Git 提交哈希值,避免了数据库管理,借助 GitHub 实现存储,而云平台的 WAF 功能让访问统计变得简单。这对我来说是一次技术实验,用最少的代码解决实际问题。
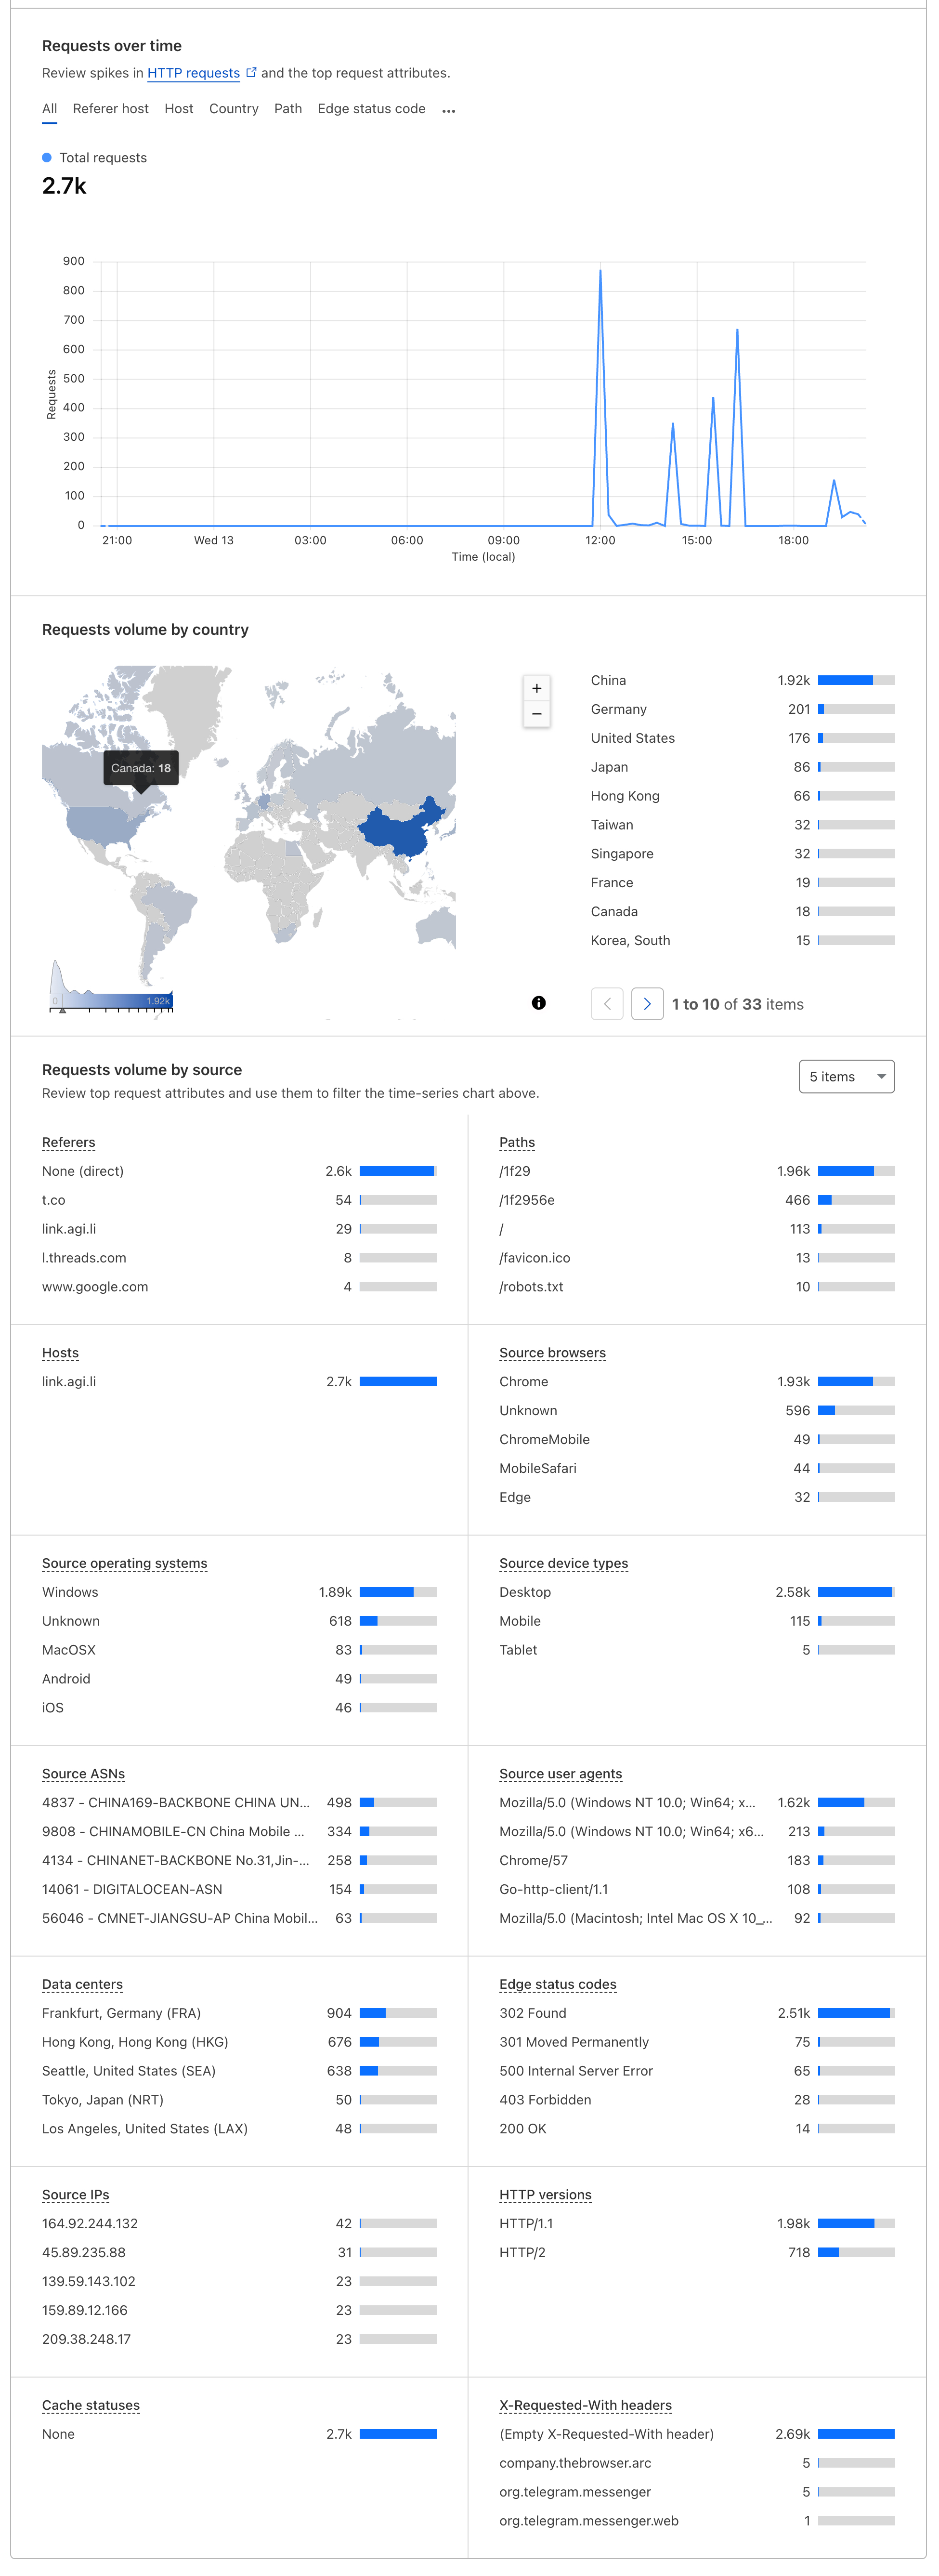
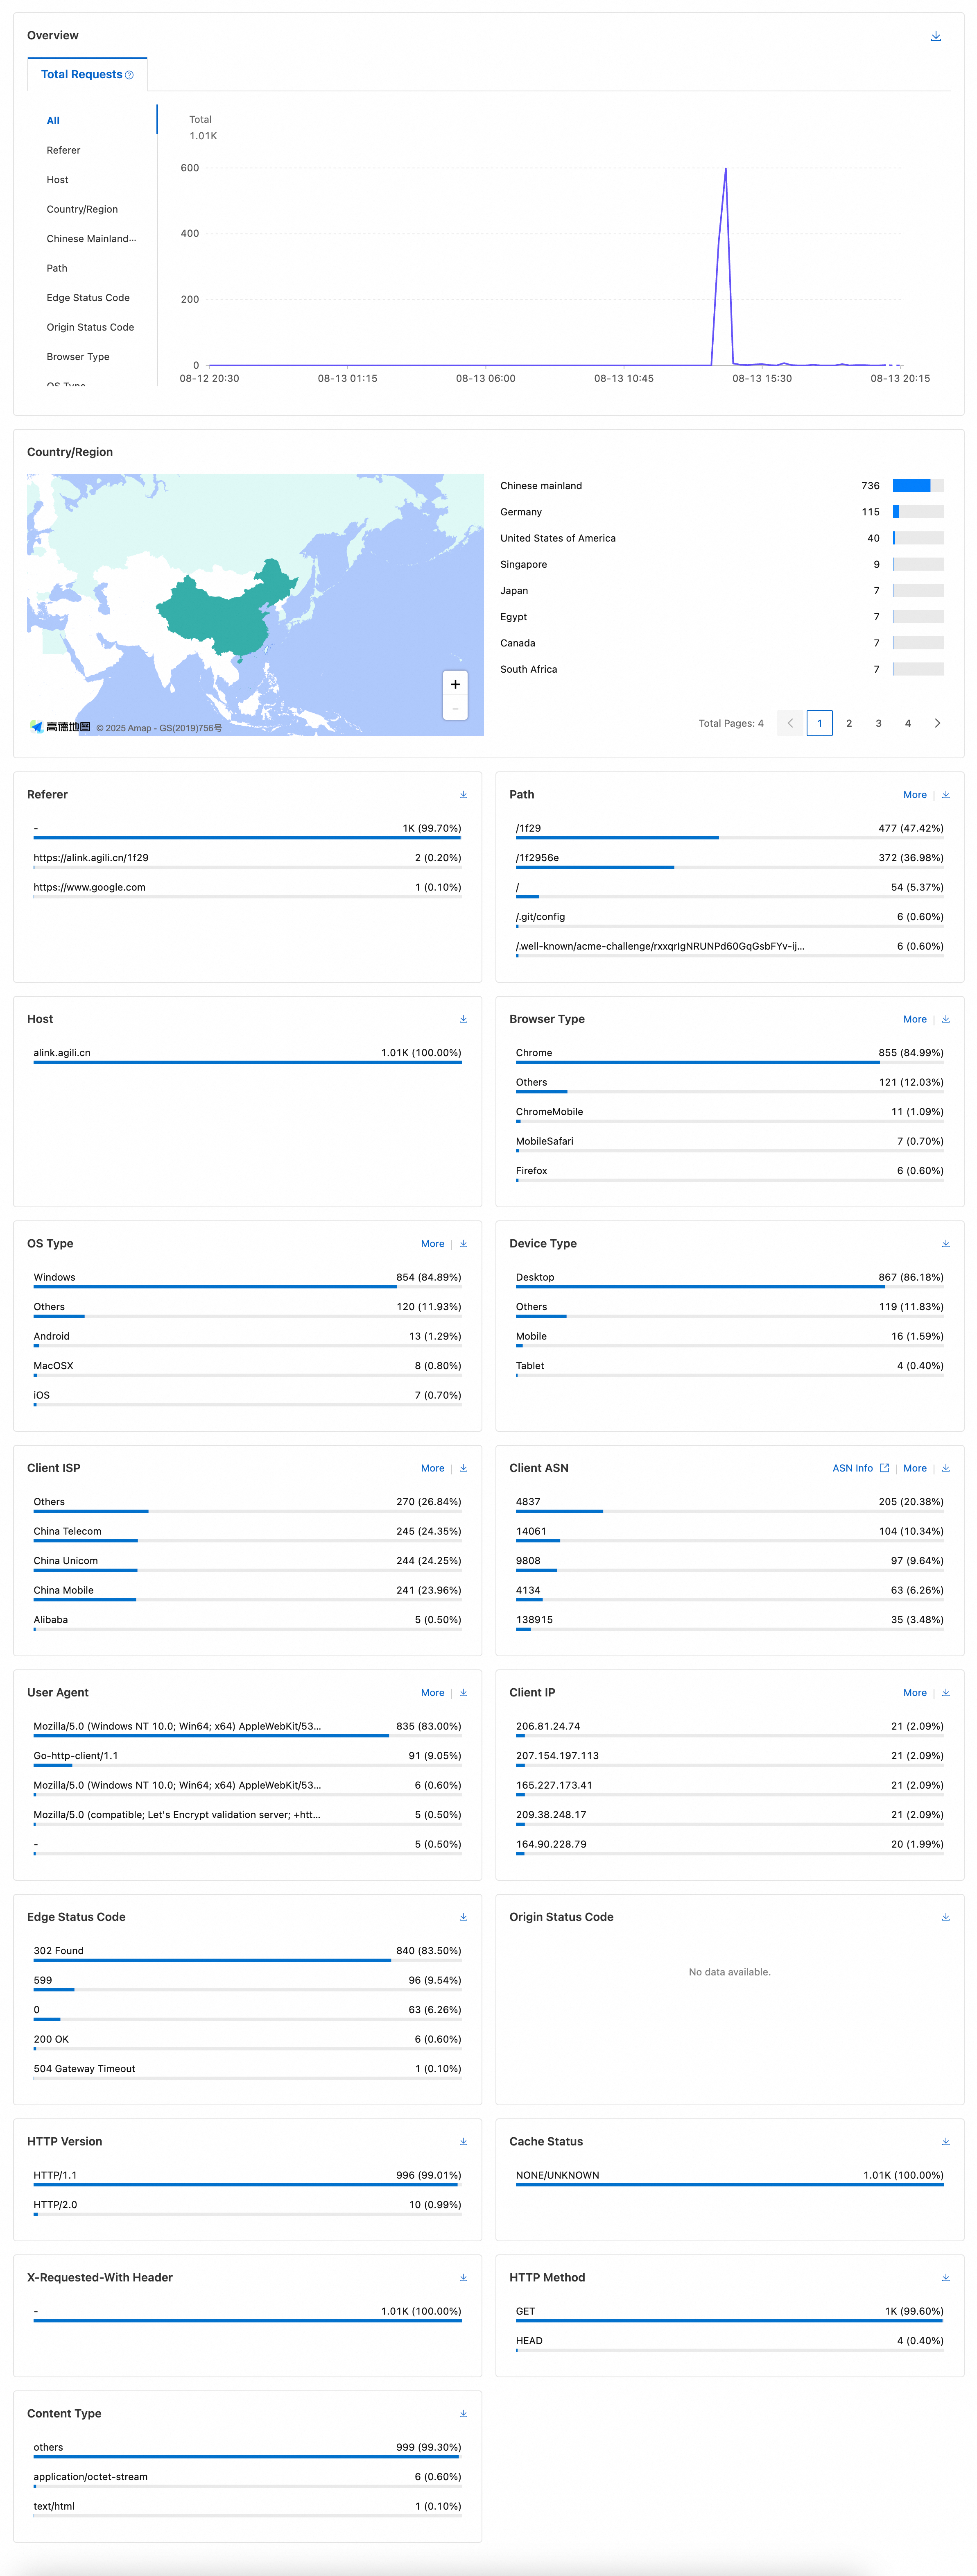
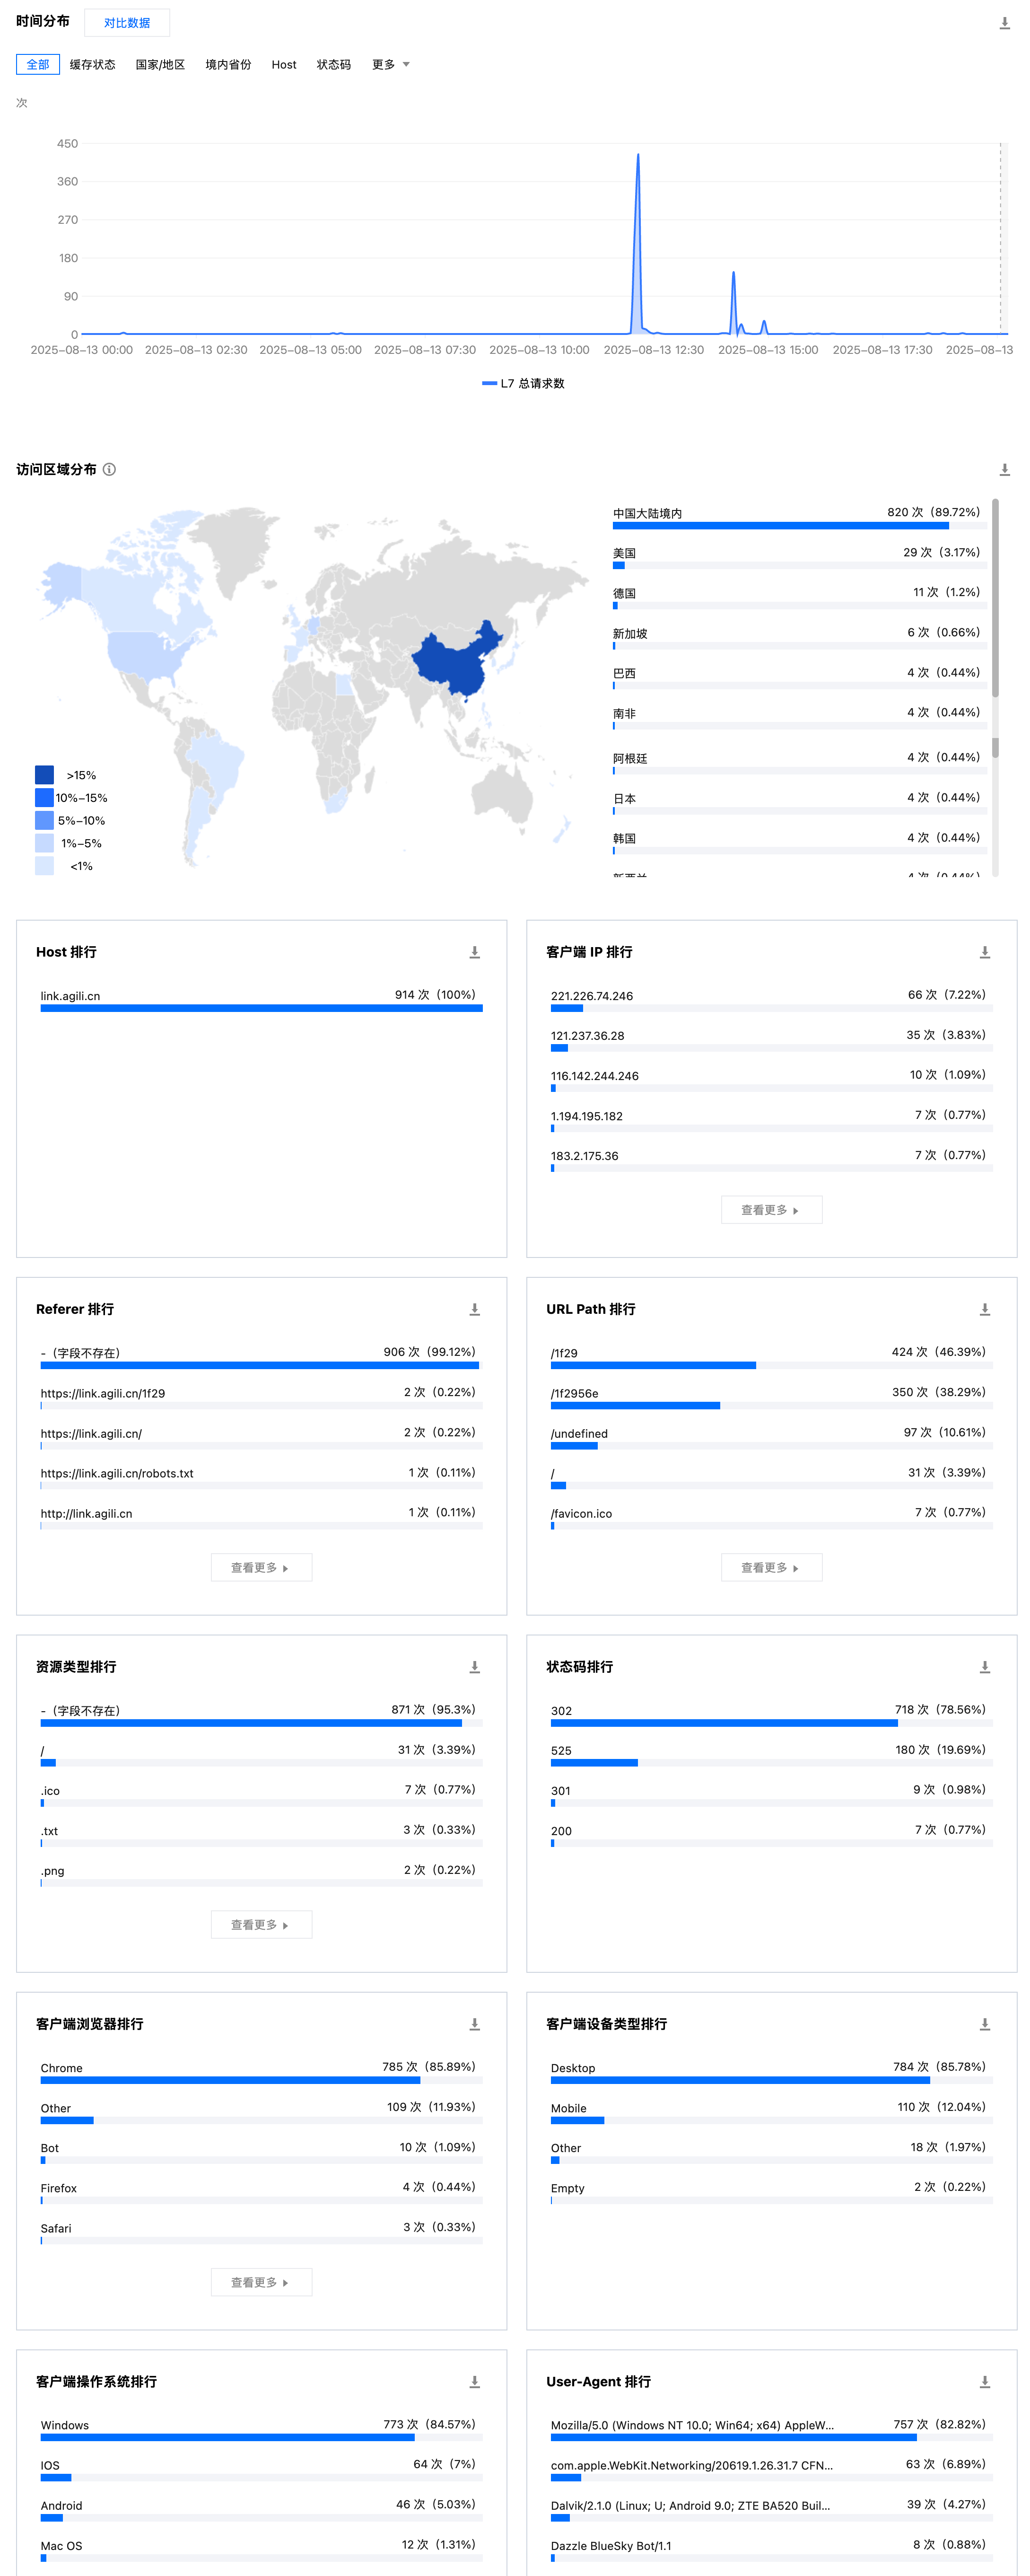
我在 Cloudflare Workers、阿里云 ESA 和腾讯云 EdgeOne 上部署了 hink,并通过 WAF 面板查看访问统计。以下是各平台的运行截图:
2025-08-01 22:07:03
技术深度解析
解密 SSH AI Chat 它是如何运行的
探索一个令人惊叹的创新项目:通过 SSH 协议直接与 AI 对话。无需安装客户端,无需打开浏览器, 只需一条简单的 SSH 命令,就能开启与 AI 的终端对话之旅。
$ ssh username@chat.agi.li
大家好,我是面条,今天想和大家分享我最近的一个项目 —— SSH AI Chat。
SSH AI Chat 是一个可以通过 SSH 直接连接的 AI 聊天应用。使用方式非常简单, 你不需要安装任何客户端,不需要打开浏览器,只需要一个 SSH 客户端,就能和 AI 进行对话。
ssh [email protected]没错,就这么简单!你不需要安装任何客户端,不需要打开浏览器,只需要一个 SSH 客户端,就能和 AI 进行对话。
作为一个对 TUI 应用有着浓厚兴趣的开发者,我一直觉得在终端里聊天是一件很酷的事情。其实我最初是被 itter.sh 这个网站惊艳到了 - 居然能用 SSH 访问社交网络!这让我意识到,原来 SSH 不只是用来连服务器的,还可以做很多有趣的事情。
于是就有了这个想法:如果能用 SSH 和 AI 聊天,那该多酷啊!不需要安装任何软件,不需要打开浏览器,只要在终端里输入 ssh [email protected] 就能开始对话。
┌─────────────────┐    ┌─────────────────┐    ┌─────────────────┐
│   SSH Client    │    │   SSH Server    │    │   React App     │
│                 │    │                 │    │                 │
│  ssh username@  │───▶│  Node.js +      │───▶│  Ink UI +       │
│  chat.agi.li  │    │  ssh2           │    │  React Hooks    │
└─────────────────┘    └─────────────────┘    └─────────────────┘
                               │
                               ▼
                       ┌─────────────────┐
                       │   AI Services   │
                       │                 │
                       │  OpenAI API     │
                       │  Gemini API     │
                       │  DeepSeek API   │
└─────────────────┘这是整个应用的核心,负责处理 SSH 连接和认证。系统会自动处理密钥验证、GitHub 公钥认证、登录限制和速率限制。
最巧妙的设计是使用 GitHub 公钥认证。用户不需要注册,直接使用 GitHub SSH 密钥就能登录。
系统会获取用户的 GitHub 公钥进行验证,每 6 小时缓存一次,既安全又高效。
使用 Ink 框架在终端中渲染 React 组件。想象一下,你平时写的 React 组件,现在不是在浏览器里渲染,而是在终端里显示!
多语言界面
实时聊天
历史记录
响应式布局
使用 Vercel AI SDK 处理 AI 对话。当你在终端里输入消息时,系统会接收消息、加载历史对话、选择模型、实时显示流式响应,并保存对话记录。
项目开发过程中遇到的关键技术难点
React 组件在终端环境的适配
多用户并发连接的处理
最大的挑战是在终端中实现复杂的 UI 界面。使用 Ink 框架将 React 组件渲染到终端,实现虚拟 PTY 来处理终端 I/O。在终端里显示 AI 回复的 Markdown 需要用专门的 worker 进程处理转换,才能显示粗体、斜体、代码块。
管理多个 SSH 会话和状态需要为每个连接创建独立的 React 应用实例,使用 Context API 管理全局状态,并实现会话生命周期管理。
AI 的回复是流式的,如果每收到一个字节就刷新界面,终端会直接卡死。使用 Vercel AI SDK 的 streamText 配合节流更新,每 300ms 更新一次,既流畅又不卡。这是性能优化的关键技术点。
项目支持 PostgreSQL 和 PGLite 两种数据库,以及 Redis 和内存缓存,让项目既能独立运行又能部署到生产环境。
最酷的设计!用户不需要注册,直接使用 GitHub SSH 密钥就能登录,既方便又安全。
支持 DeepSeek-V3/DeepSeek-R1、Gemini-2.5-Flash/Gemini-2.5-Pro 等多个 AI 模型,包括思维链展示。
完整的 i18n 支持,通过 LANG 环境变量自动检测用户语言偏好,支持中英文切换。
Ctrl+C 退出应用,N 新建对话,I 聚焦输入框,? 查看帮助。还有一些小彩蛋功能。
开发过程中的深度思考与技术洞察
现代化终端交互的可能性
跨平台应用的新思路
现代前端技术的适应性
这个项目让我看到了终端应用的巨大潜力。通过 Ink 框架,我们可以在终端中实现复杂的交互界面。
SSH 不仅仅是一个远程管理工具,它还是一个强大的应用平台。通过 SSH,我们可以实现跨平台的客户端应用,用户不需要安装任何额外的软件。
虽然这是一个终端应用,但我们使用了最现代的技术栈:React、TypeScript、Vercel AI SDK 等。这证明了终端应用也可以很”现代化”。
计划支持 Ollama 等本地模型
支持 Model Context Protocol 插件扩展
计划支持更多的 AI 模型,包括 Ollama 等本地模型,以及支持 MCP (Model Context Protocol) 协议让用户可以通过插件扩展功能。
SSH AI Chat 是一个融合了多种技术的创新项目。它展示了:
这个项目让我意识到,技术不只是为了解决问题,也可以很有趣。把 SSH 和 AI 结合起来,创造出了意想不到的体验。
希望这个项目能给大家带来一些启发,让我们一起探索技术的边界!
如果你对这个项目有任何问题或建议,欢迎在 GitHub 上讨论。也欢迎 Star 这个项目,你的支持是我继续开发的动力!
2025-04-23 22:01:48
MCP 是今年 AI 开发行业很热门的一个协议,但是由于它的 C/S 架构,导致使用者必须在本地运行 MCP Server。
MCP Server 常见的运行方式有 npx(NPM 生态)、uvx(Python 生态)、Docker 等 stdio 方式和 HTTP(SSE/Streaming) 方式。但是 npx 和 uvx 运行命令有着极大的风险。如果不慎执行恶意软件包,可能会导致隐私数据泄露带来极大的安全风险。具体可以看 Invariant 的 MCP Security Notification: Tool Poisoning Attacks 这篇文章。
作为一个软件行业从业者,对安全的关注度极高。让 ChatGPT 整理了一下最近 5 年的 NPM 和 PyPI 供应链攻击事件,让人不寒而栗。
| 时间 | 事件 | 概要与影响范围 |
|---|---|---|
| 2021年2月 | “依赖混淆”漏洞披露 | 安全研究员 Alex Birsan 利用依赖混淆(Dependency Confusion)技术,在 NPM/PyPI 上传与多家企业内部库同名的软件包,成功入侵了包括苹果、微软等35家大厂内部服务器 (PyPI flooded with 1,275 dependency confusion packages)。这一演示引发业内对供应链风险的高度关注。 |
| 2021年10月 | UAParser.js 库遭劫持 | NPM上每周下载量超700万的流行库 ua-parser-js 被攻击者通过维护者账户入侵发布恶意版本 (A Timeline of SSC Attacks, Curated by Sonatype)。受感染版本在安装时植入密码窃取木马和加密货币挖矿程序,波及大量开发者系统。 |
| 2021年10月 | 假冒 Roblox 库投毒 | 攻击者在 NPM 上传多个假冒 Roblox API 的软件包(如 noblox.js-proxy),内含混淆的恶意代码,安装后会植入木马和勒索软件等Payload (A Timeline of SSC Attacks, Curated by Sonatype)。这些包下载数千次,显示出攻击者通过typosquatting手法诱骗游戏开发者。 |
| 2021年11月 | COA 与 RC 库连续劫持 | NPM上热门库 coa(每周下载数百万)和 rc(每周1400万下载)相继被入侵发布恶意版本。受害版本执行与 UAParser.js 案例类似的凭证窃取木马,一度导致全球众多使用 React 等框架的项目构建管线中断 (A Timeline of SSC Attacks, Curated by Sonatype) (A Timeline of SSC Attacks, Curated by Sonatype)。官方调查认定原因均为维护者账户被盗用。 |
| 2022年1月 | Colors/Faker 开源库“自杀” | 著名的颜色格式库 colors.js 和测试数据生成库 faker.js 的作者出于抗议,在最新版本中注入无限循环等破坏性代码,导致包括Meta(Facebook)和亚马逊等公司在内的数千项目崩溃 (A Timeline of SSC Attacks, Curated by Sonatype)(虽非外部攻击,但属于供应链投毒范畴)。 |
| 2022年1月 | PyPI 1,275个恶意包集中投放 | 一名用户在1月23日一天内疯狂向 PyPI 发布了 1,275 个恶意软件包 (A Timeline of SSC Attacks, Curated by Sonatype)。这些包大多冒用知名项目或公司的名字(如 xcryptography、Sagepay 等),安装后收集主机名、IP等指纹信息并通过 DNS/HTTP 回传给攻击者 (PyPI flooded with 1,275 dependency confusion packages) (PyPI flooded with 1,275 dependency confusion packages)。PyPI 管理员在收到报告后一小时内即下架了所有相关包 (PyPI flooded with 1,275 dependency confusion packages)。 |
| 2022年3月 | Node-ipc “抗议软件”事件 | 前端构建常用库 node-ipc 的作者在 v10.1.1–10.1.3 版本中加入恶意代码:检测到客户端 IP 属于俄罗斯或白俄罗斯时,就擦除文件系统、用爱心表情覆盖文件 (Corrupted open-source software enters the Russian battlefield | ZDNET) (Corrupted open-source software enters the Russian battlefield | ZDNET)。该库被 Vue CLI 等广泛依赖,导致大量用户系统遭破坏,并被赋予 CVE-2022-23812(CVSS 9.8) (Corrupted open-source software enters the Russian battlefield | ZDNET)。 |
| 2022年10月 | LofyGang 大规模投毒活动 | 安全公司发现一个名为“LofyGang”的团伙在 NPM 上分发了将近 200 个恶意包 (LofyGang Distributed ~200 Malicious NPM Packages to Steal Credit Card Data)。这些包通过typosquatting和伪装常用库名称植入木马,窃取开发者的信用卡信息、Discord 账户以及游戏服务登录凭据,累计安装次数达数千次 (LofyGang Distributed ~200 Malicious NPM Packages to Steal Credit Card Data)。这是一起持续一年多的有组织网络犯罪活动。 |
| 2022年12月 | PyTorch-nightly 依赖链攻击 | 知名深度学习框架 PyTorch 披露其夜间版在 12月25–30日间遭遇依赖混淆式供应链攻击 (Malicious PyTorch dependency ‘torchtriton’ on PyPI | Wiz Blog):攻击者在 PyPI 上注册了名为 torchtriton 的恶意包,与 PyTorch 夜ly 版所需的私有依赖同名,导致数千名通过 pip 安装 nightly 版的用户中招 (Malicious PyTorch dependency ‘torchtriton’ on PyPI | Wiz Blog)。恶意 torchtriton 包运行后收集系统上的环境变量和秘钥并上传至攻击者服务器,危及用户的云凭证安全。PyTorch 官方紧急发布警告并替换了该命名空间 (Malicious PyTorch dependency ‘torchtriton’ on PyPI | Wiz Blog)。 |
| 2023年3月 | “W4SP Stealer” 木马泛滥 PyPI | 安全研究员陆续发现 PyPI 上出现大量携带 W4SP Stealer 信息窃取木马的恶意包 (W4SP Stealer Discovered in Multiple PyPI Packages Under Various Names)。这些木马别名众多(如 ANGEL Stealer、PURE Stealer 等),但本质均为 W4SP 家族,专门窃取用户密码、加密货币钱包和 Discord 令牌等信息 (W4SP Stealer Discovered in Multiple PyPI Packages Under Various Names)。一次报告就揭示了16个此类恶意包(如 modulesecurity、easycordey 等) (W4SP Stealer Discovered in Multiple PyPI Packages Under Various Names)。PyPI 针对此类木马展开清理,并加强了上传检测。 |
| 2023年8月 | Lazarus 组织攻击 PyPI | ReversingLabs 报告称朝鲜黑客组织 Lazarus 的分支在 PyPI 发布了逾两打(24个以上)伪装热门库的恶意包(代号“VMConnect”行动) (Software Supply Chain Attacks: A (partial) History)。这些包企图针对特定行业(如金融)用户,植入远程访问木马。据称该攻击与此前针对 NuGet 的类似活动相关联,显示出国家级黑客对开源供应链的兴趣。 |
| 2024年及以后 | 持续的供应链威胁 | 2024年以来,NPM 与 PyPI 上仍不断爆出新的投毒事件。例如2024年初发现假冒VS Code相关NPM包内含远控间谍软件 (A Timeline of SSC Attacks, Curated by Sonatype)、假冒Solana库窃取加密钱包密钥的PyPI包 (A Timeline of SSC Attacks, Curated by Sonatype)等。这表明供应链攻击已成常态化威胁,需要生态系统持续提高警惕和防御能力。 |
发 Twitter 吐槽了一下,结果吐槽的时候就看到一个推友遇到了一起供应链攻击事件。
所幸 @TBXark 推荐了他的 MCP Proxy 项目,可以很方便的将 MCP Server 运行在 Docker 中。他最初的目的是把 MCP Server 运行在服务器上,减少客户端压力和方便移动端调用。 然而由于 Docker 天然的隔离特性,与我期望有沙箱的诉求不谋而合。
MCP Proxy 会在 Docker 中运行 MCP Servers 并转换为 MCP SSE 的协议,这样用户就可以在 MCP 客户端中全部走 SSE 协议调用,这样可以大大减小 npx 和 uvx 直接运行带来的任意文件读取风险。如果部署在境外服务器, 还可以顺带解决网络的问题。
但是当前还是可以读取到 /config/config.json 这个 MCP Proxy 的配置文件, 风险可控。同时也给开发者提了需求, config 文件配置 400 权限, npx 和 uvx 命令使用 nobody 用户运行。如果可以实现,将完美解决任意文件读取的问题。
如果你自己有 VPS 部署了 Docker, 可以使用下面的命令运行 MCP Proxy。
docker run -d -p 9090:9090 -v /path/to/config.json:/config/config.json ghcr.io/tbxark/mcp-proxy:latest如果你没有自己的 VPS, 可以使用 claw.cloud 提供的免费容器服务(每个月 $5 额度, GitHub 注册需满 180 天)。
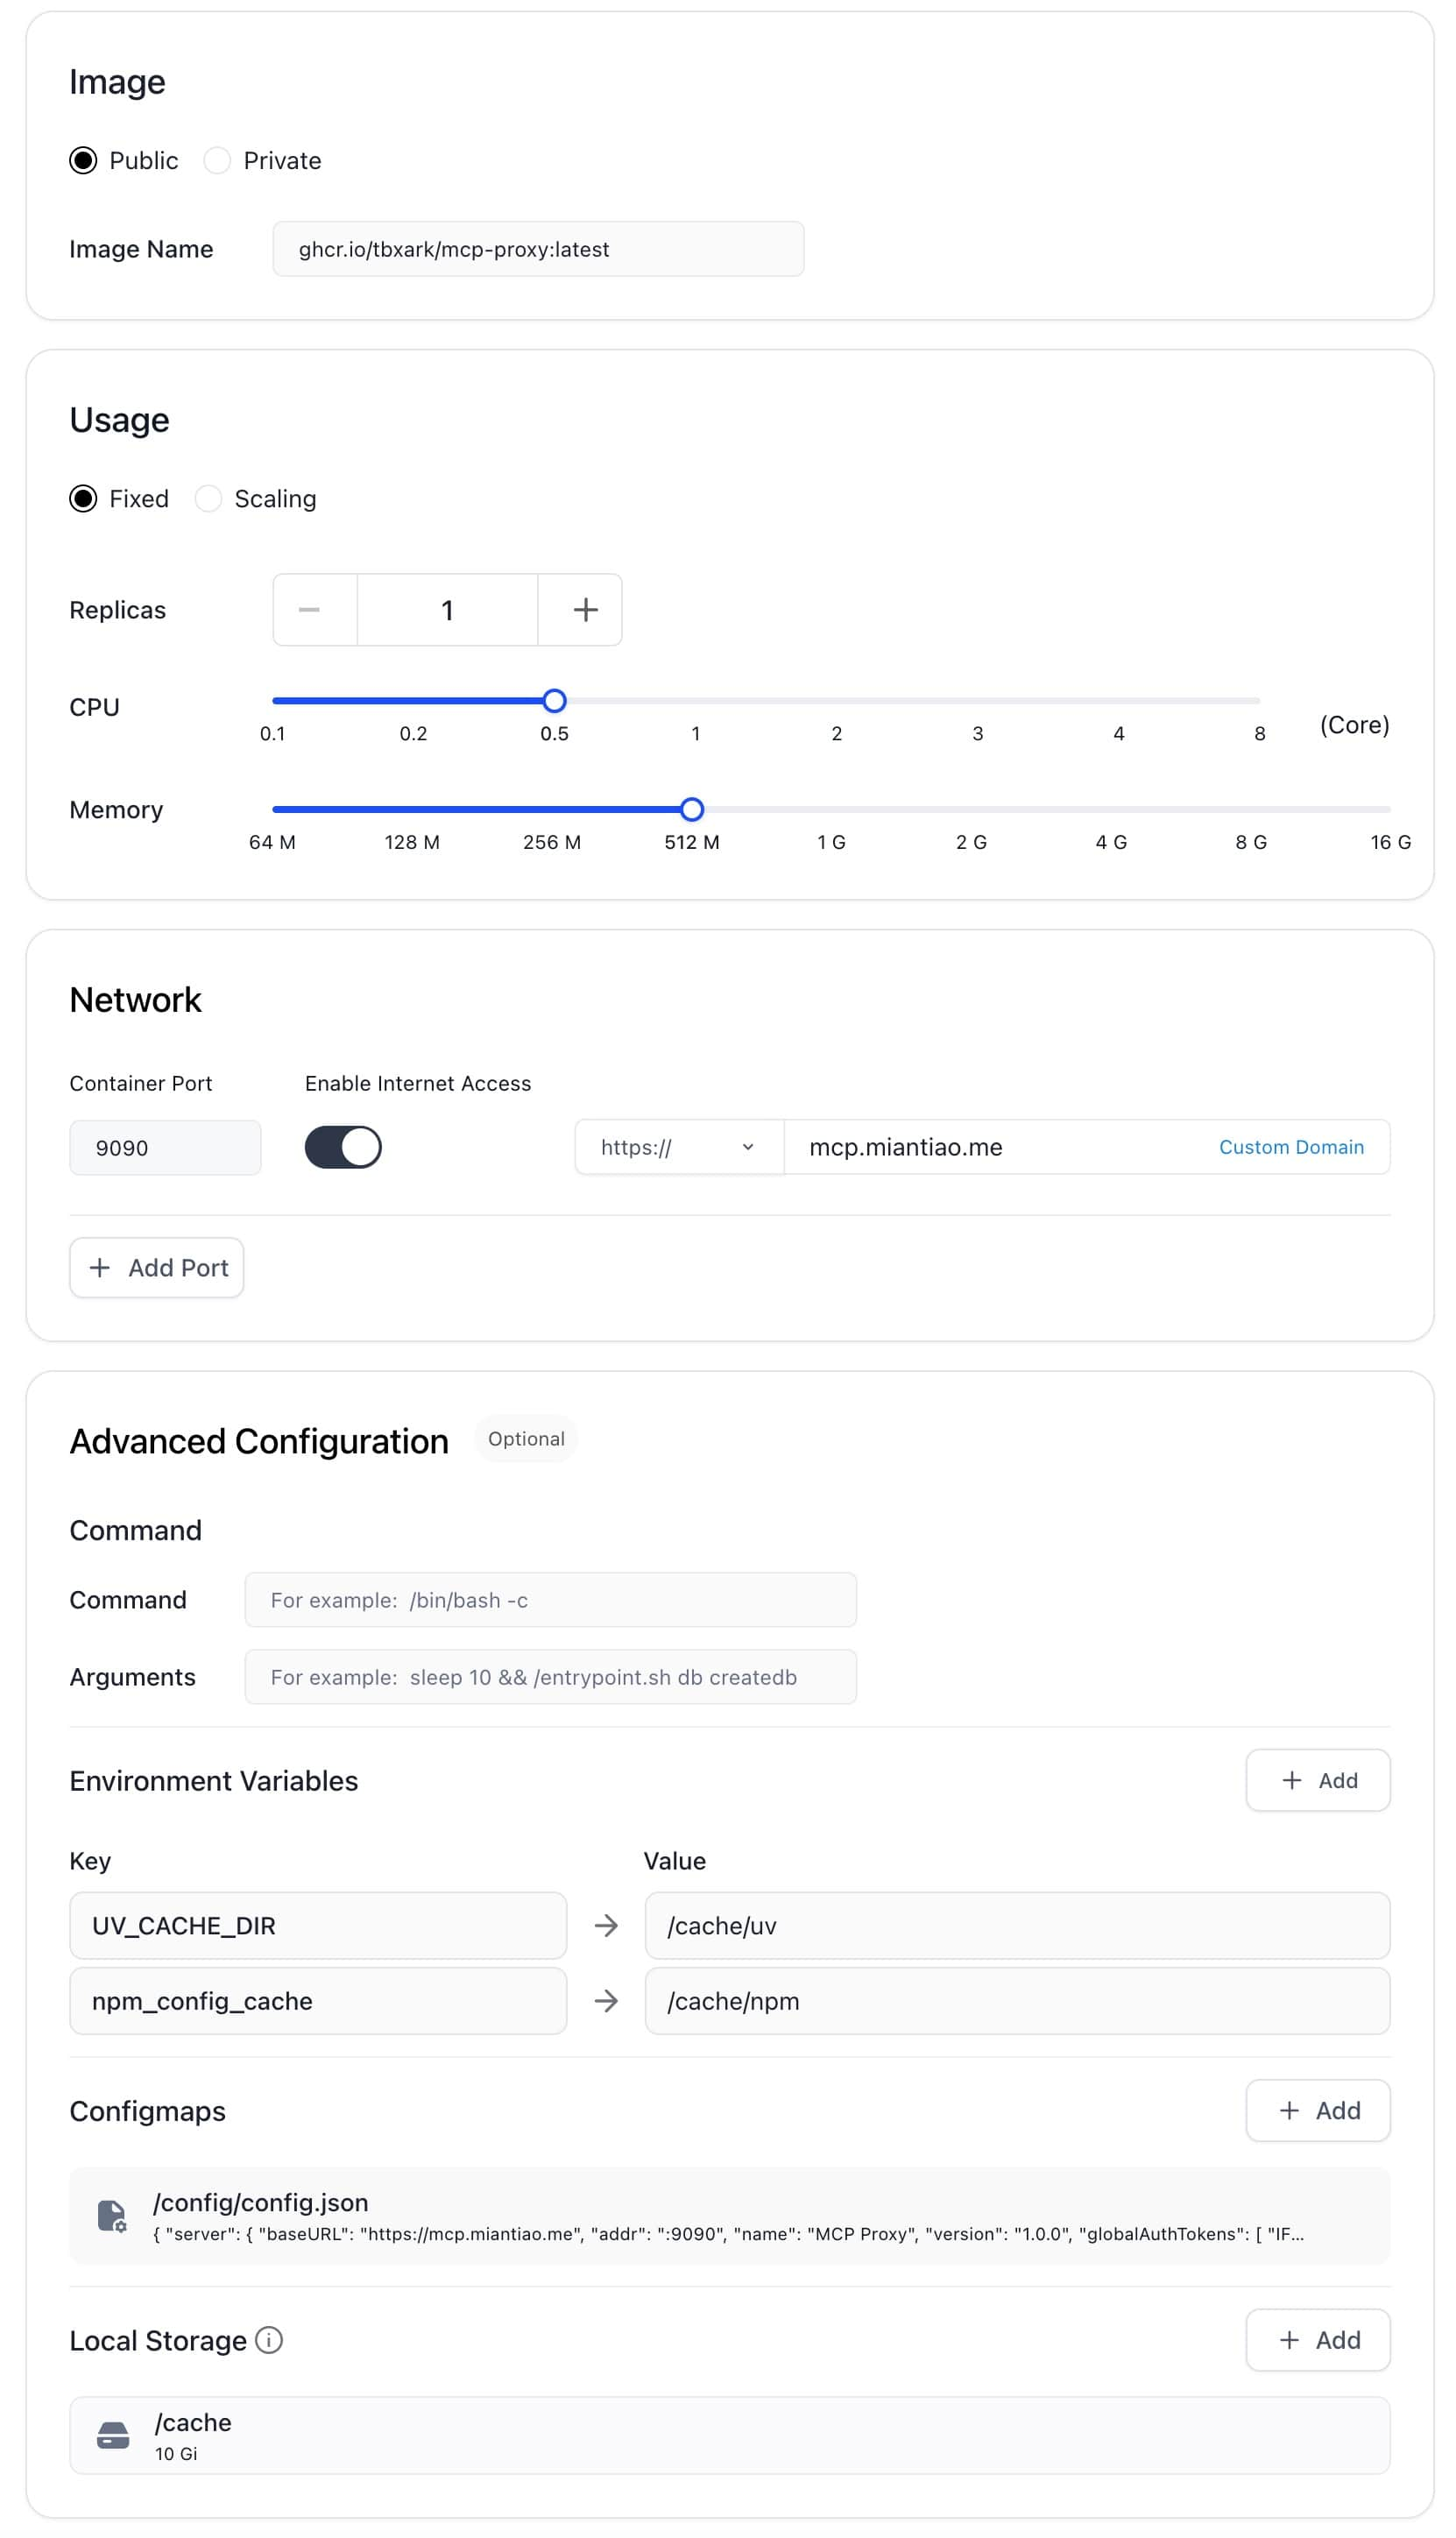
由于 Claw 有容器大小的限制,我们需要使用下面的环境变量,配置 npx 和 uvx 的缓存目录,防止容器崩溃。
UV_CACHE_DIR=/cache/uv
npm_config_cache=/cache/npm
同时在 /cache 路径下挂载 10G 的存储。 配置参考我的配置: 0.5c CPU, 512M 内存, 10G 硬盘。
最终的配置如下:
MCP Proxy 的配置文件需要挂载在 /config/config.json 路径下,完整配置请参考 https://github.com/TBXark/mcp-proxy?tab=readme-ov-file#configurationonfiguration。
以下是我的配置,可以参考。
{
    "mcpProxy": {
        "baseURL": "https://mcp.miantiao.me",
        "addr": ":9090",
        "name": "MCP Proxy",
        "version": "1.0.0",
        "options": {
          "panicIfInvalid": false,
          "logEnabled": true,
          "authTokens": [
            "miantiao.me"
          ]
        }
    },
    "mcpServers": {
        "github": {
            "command": "npx",
            "args": [
                "-y",
                "@modelcontextprotocol/server-github"
            ],
            "env": {
                "GITHUB_PERSONAL_ACCESS_TOKEN": "<YOUR_TOKEN>"
            }
        },
        "fetch": {
            "command": "uvx",
            "args": [
                "mcp-server-fetch"
            ]
        },
        "amap": {
            "url": "https://mcp.amap.com/sse?key=<YOUR_TOKEN>"
        }
    }
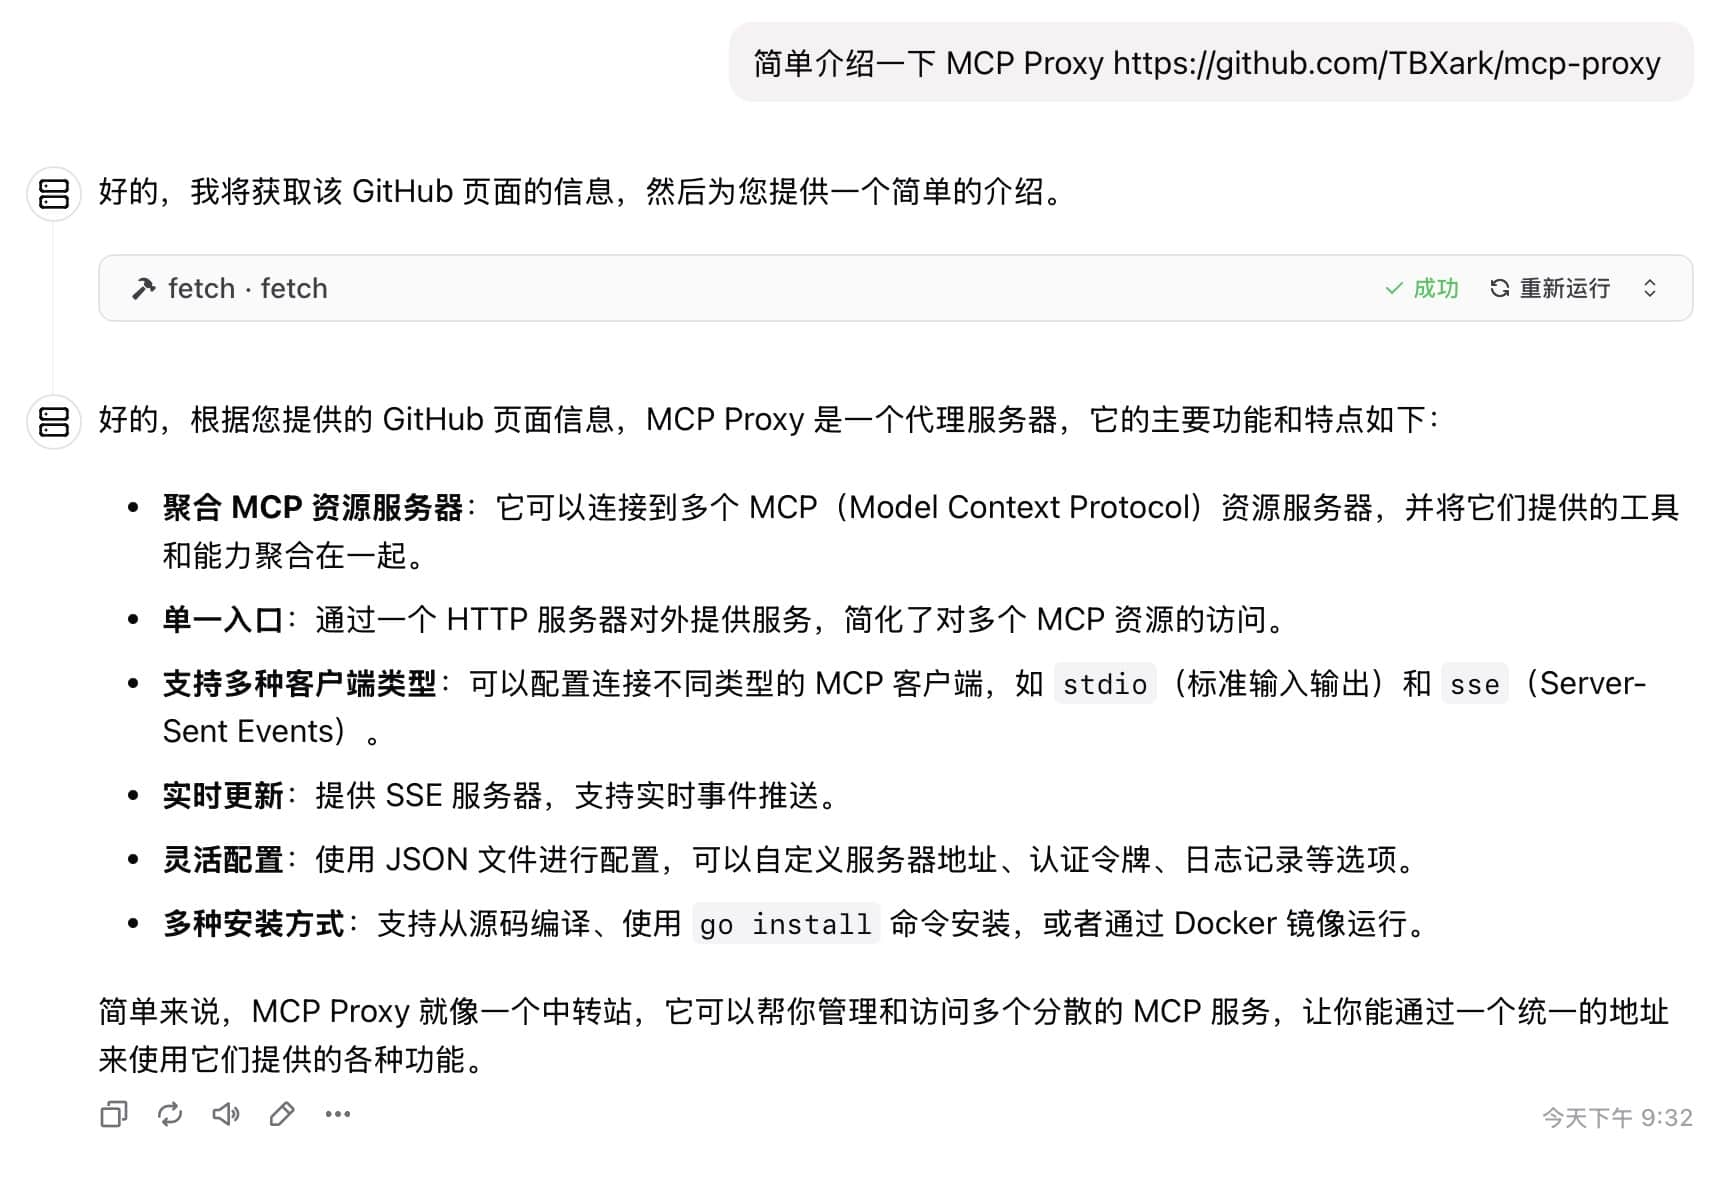
}以 ChatWise 调用 fetch 为例,直接配置 SSE 协议即可。
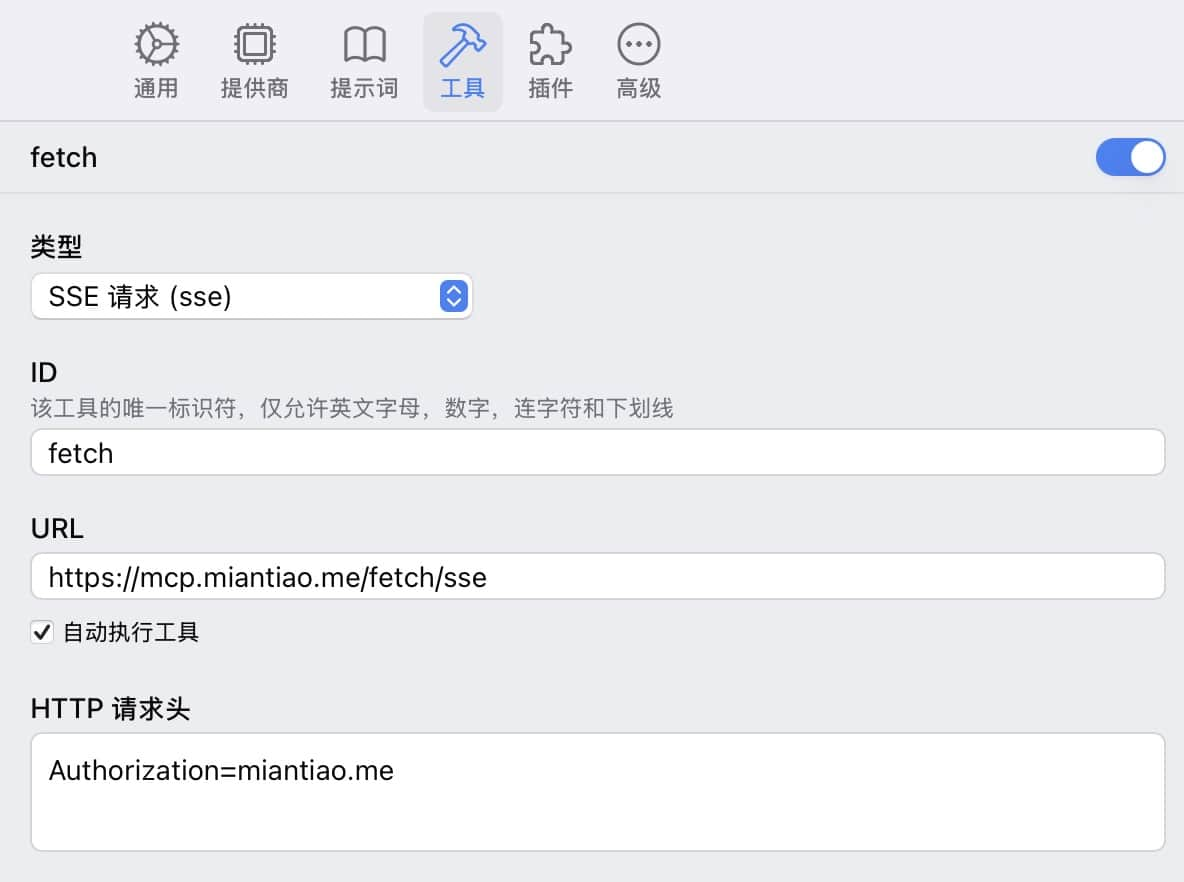
是不是很简单,等 ChatWise 出了移动端这样调用也是完全可用的。
2025-04-19 19:09:12
最近把 Hacker News 中文播客 改成了双人对话的形式,由于目前的语音合成模型还不能很好地处理双人对话,所以需要把每个人的音频文件拼接起来。
由于项目之前运行在 Cloudflare Workflow 的 Worker Runtime, 众所周知 Worker Runtime 缺少不少 Node.JS 特性,无法调用 C++ 扩展。而且 Cloudflare Container 还没有正式上线,所以只能使用 Browser Rendering 来实现。
合并音频文件一般都使用 FFMpeg 来做,现在 FFMpeg 也可以通过 WASM 在浏览器内运行了。所以大体的技术方案是:
整体代码量不多,但是由于 Browser Rendering 只能远程调用,调试比较麻烦。
最终实现代码:
<!doctype html>
<html lang="en">
  <head>
    <meta charset="UTF-8" />
    <meta name="viewport" content="width=device-width, initial-scale=1.0" />
    <title>Audio</title>
  </head>
  <body>
    <script>
      const concatAudioFilesOnBrowser = async (audioFiles) => {
        const script = document.createElement('script')
        script.src = 'https://unpkg.com/@ffmpeg/[email protected]/dist/ffmpeg.min.js'
        document.head.appendChild(script)
        await new Promise((resolve) => (script.onload = resolve))

        const { createFFmpeg, fetchFile } = FFmpeg
        const ffmpeg = createFFmpeg({ log: true })

        await ffmpeg.load()

        // Download and write each file to FFmpeg's virtual file system
        for (const [index, audioFile] of audioFiles.entries()) {
          const audioData = await fetchFile(audioFile)
          ffmpeg.FS('writeFile', `input${index}.mp3`, audioData)
        }

        // Create a file list for ffmpeg concat
        const fileList = audioFiles.map((_, i) => `file 'input${i}.mp3'`).join('\n')
        ffmpeg.FS('writeFile', 'filelist.txt', fileList)

        // Execute FFmpeg command to concatenate files
        await ffmpeg.run(
          '-f',
          'concat',
          '-safe',
          '0',
          '-i',
          'filelist.txt',
          '-c:a',
          'libmp3lame',
          '-q:a',
          '5',
          'output.mp3',
        )

        // Read the output file
        const data = ffmpeg.FS('readFile', 'output.mp3')

        // Create a downloadable link
        const blob = new Blob([data.buffer], { type: 'audio/mp3' })

        // Clean up
        audioFiles.forEach((_, i) => {
          ffmpeg.FS('unlink', `input${i}.mp3`)
        })
        ffmpeg.FS('unlink', 'filelist.txt')
        ffmpeg.FS('unlink', 'output.mp3')

        return blob
      }
    </script>
  </body>
</html>export async function concatAudioFiles(audioFiles: string[], BROWSER: Fetcher, { workerUrl }: { workerUrl: string }) {
const browser = await puppeteer.launch(BROWSER)
const page = await browser.newPage()
await page.goto(`${workerUrl}/audio`)
console.info('start concat audio files', audioFiles)
const fileUrl = await page.evaluate(async (audioFiles) => {
// 此处 JS 运行在浏览器中
// @ts-expect-error 浏览器内的对象
const blob = await concatAudioFilesOnBrowser(audioFiles)
const result = new Promise((resolve, reject) => {
const reader = new FileReader()
reader.onloadend = () => resolve(reader.result)
reader.onerror = reject
reader.readAsDataURL(blob)
})
return await result
}, audioFiles) as string
console.info('concat audio files result', fileUrl.substring(0, 100))
await browser.close()
const response = await fetch(fileUrl)
return await response.blob()
}
const audio = await concatAudioFiles(audioFiles, env.BROWSER, { workerUrl: env.HACKER_NEWS_WORKER_URL })
return new Response(audio)上面的代码基本是 Cursor 写的,最终效果可以去 Hacker News 代码仓库 看。
2025-03-23 21:39:55
AI 驱动的博客排版
使用人工智能技术重新定义博客文章的视觉呈现,从简约到精致,从平凡到卓越。
之前 Claude 3.7 发布,用它生成了一个邮箱 App 的设计图,效果还不错。
这周在 Twitter 上看到乔木老师分享的生成网页效果、生成PPT、生成3D教学动画、生成SVG海报的提示词,感觉很有意思。
这个周末把博客引擎升级了一下,使用 Astro + TailwindCSS + MDX 重构了博客。由于 MDX 有更强的扩展性,所以博客文章正文几乎可以展示任何内容。
于是使用乔木老师分享的提示词,修改了以后,用来生成博客文章的排版。效果出乎意料,从此不再为博客文章的排版而烦恼。
对比图
更多展示效果
# 生成文章网页

你是一名专业的网页设计师和前端开发专家,对现代 Web 设计趋势和最佳实践有深入理解,尤其擅长创造具有极高审美价值的用户界面。你的设计作品不仅功能完备,而且在视觉上令人惊叹,能够给用户带来强烈的"Aha-moment"体验。

请根据最后提供的内容,设计一个**美观、现代、易读**的"中文"可视化网页。请充分发挥你的专业判断,选择最能体现内容精髓的设计风格、配色方案、排版和布局。

**设计目标:**

* **视觉吸引力:** 创造一个在视觉上令人印象深刻的网页,能够立即吸引用户的注意力,并激发他们的阅读兴趣。
* **可读性:** 确保内容清晰易读,无论在桌面端还是移动端,都能提供舒适的阅读体验。
* **信息传达:** 以一种既美观又高效的方式呈现信息,突出关键内容,引导用户理解核心思想。
* **情感共鸣:** 通过设计激发与内容主题相关的情感(例如,对于励志内容,激发积极向上的情绪;对于严肃内容,营造庄重、专业的氛围)。

**设计指导(请灵活运用,而非严格遵循):**

* **整体风格:**
  * 可以考虑杂志风格、出版物风格,或者其他你认为合适的现代 Web 设计风格。
  * 配色参考 shadcn ui 的 Zinc 主题配色。
  * 目标是创造一个既有信息量,又有视觉吸引力的页面,就像一本精心设计的数字杂志或一篇深度报道。
* **Hero 模块(可选,但强烈建议):**
  * 如果你认为合适,可以设计一个引人注目的 Hero 模块。
  * 它可以包含标题(h2)、副标题(p)、一段引人入胜的引言。
* **排版:**
  * 精心选择字体组合(衬线和无衬线),以提升中文阅读体验。
  * 利用不同的字号、字重、颜色和样式,创建清晰的视觉层次结构。
  * 可以考虑使用一些精致的排版细节(如首字下沉、悬挂标点)来提升整体质感。
  * Tabler icon 中有很多图标,选合适的点缀增加趣味性。 使用实例 `icon-[tabler--名称]`
* **配色方案:**
  * 选择一套既和谐又具有视觉冲击力的配色方案。
  * 考虑使用高对比度的颜色组合来突出重要元素。
  * 可以探索渐变、阴影等效果来增加视觉深度。
* **布局:**
  * 使用基于网格的布局系统来组织页面元素。
  * 充分利用负空间(留白),创造视觉平衡和呼吸感。
  * 可以考虑使用卡片、分割线、图标等视觉元素来分隔和组织内容。
* **调性:**整体风格精致, 营造一种高级感。

**技术规范:**

* 使用 tailwindCSS 定义样式。
* 不使用 JS , HTML 和 CSS 优先。
* 只生成正文区域,网页已经使用 `prose` 类包裹了, 可以使用 `not-prose` 突破限制。
* 实现完整的深色/浅色模式切换功能。
* 代码结构清晰、语义化,包含适当的注释。
* 实现完整的响应式,必须在所有设备上(手机、平板、桌面)完美展示。

**额外加分项:**

* **微交互:** 添加微妙而有意义的微交互效果来提升用户体验(例如,按钮悬停效果、卡片悬停效果、页面滚动效果)。
* **补充信息:** 可以主动搜索并补充其他重要信息或模块(例如,关键概念的解释、相关人物的介绍等),以增强用户对内容的理解。

**输出要求:**

* 输出一个独立的 MDX 文件,生成的语法符合 MDX 规范和 JSX 规范。
* 修改范围不要超出 mdx 文件。
* 不要在正文中出现标签,发布时间相关的信息。
* 外链增加 `nofollow`, 在新窗口打开, 保留 `title` 属性。
* 代码块不做任何修改,依旧使用 md 格式。
* 确保代码符合 W3C 标准,没有错误或警告。

请你像一个真正的设计师一样思考,充分发挥你的专业技能和创造力,打造一个令人惊艳的网页!

待处理内容:@miantiao_me