2026-07-29 17:09:34
这篇文章记录下将本地部署的CrowdSec接入到CrowdSec Web UI以获取更多实用的功能:
由于CrowdSec LAPI的限制,此Web UI能做的事情(实现的功能)其实不多,更多的是一个数据可视化的作用,除此之外,还可以管理一下决策和警报,就不用每次都去使用cscli这个CLI工具了,但其它的操作还是得用cscli,所以并不是装上这个Web UI就完全不用了解CrowdSec了,至少得入个门,入门看看我这篇文章就可以了。
安装NGINX、CertBot、Docker:
apt update
apt install curl nginx python3-certbot-nginx
curl -fsSL https://get.docker.com -o get-docker.sh
sh get-docker.sh
生成一个足够复杂的密码:
openssl rand -hex 32使用刚生成的密码创建LAPI的登录凭据:
cscli machines add crowdsec-web-ui --password 'replace-with-generated-password' -f /dev/null请注意一定要加上-f /dev/null,否则它将替换掉/etc/crowdsec/local_api_credentials.yaml文件内的默认凭据。
新建compose文件:
mkdir /opt/crowdsec-web-ui && cd /opt/crowdsec-web-ui && nano docker-compose.yml由于我的CrowdSec是部署在服务器本地的(没有使用Docker),所以与CrowdSec Web UI对接的方案有多种,这里我会全部写下来,至于你选择用哪一种那就不是我能决定的事情了。
1.直接让crowdsec-web-ui容器使用主机网络(Host Network)这种是最简单的,因为不需要修改CrowdSec的配置:
services:
  crowdsec-web-ui:
    image: ghcr.io/theduffman85/crowdsec-web-ui:latest
    container_name: crowdsec_web_ui
    network_mode: "host"
    environment:
      CONFIG_SERVER_PORT: 3002
      CONFIG_INSTANCE_METRICS_URL: http://127.0.0.1:6060/metrics
      CONFIG_INSTANCE_LAPI_URL: http://127.0.0.1:8088
      CONFIG_INSTANCE_LAPI_AUTH_USERNAME: crowdsec-web-ui
      CONFIG_INSTANCE_LAPI_AUTH_PASSWORD:
    volumes:
      - ./data:/app/data
restart: unless-stopped1.crowdsec-web-ui默认使用3000端口,但3000端口是一个常用端口,已经被我服务器上的其它程序占用了,所以这里我改成了3002端口。因使用的是主机网络,所以不存在端口映射,只能修改程序自身运行的端口,依靠程序自带的环境变量CONFIG_SERVER_PORT实现。
2.之所以说这种配置是最简单的原因是,CrowdSec的LAPI默认就是监听在127.0.0.1的,且两者都在同一个网络中了,所以无论是CONFIG_INSTANCE_LAPI_URL还是CONFIG_INSTANCE_METRICS_URL都直接配置成127.0.0.1就行了。还有CrowdSec的信任IP配置默认就是信任127.0.0.1的。
启动:
docker compose up -d2.使用host.docker.internal:host-gateway:
services:
  crowdsec-web-ui:
    image: ghcr.io/theduffman85/crowdsec-web-ui:latest
    container_name: crowdsec_web_ui
    ports:
      - "3002:3002"
    extra_hosts:
      - "host.docker.internal:host-gateway"
    environment:
      CONFIG_SERVER_PORT: 3002
      CONFIG_INSTANCE_METRICS_URL: http://host.docker.internal:6060/metrics
      CONFIG_INSTANCE_LAPI_URL: http://host.docker.internal:8088
      CONFIG_INSTANCE_LAPI_AUTH_USERNAME: crowdsec-web-ui
      CONFIG_INSTANCE_LAPI_AUTH_PASSWORD:
    volumes:
      - ./data:/app/data
    restart: unless-stopped
这种方案必须修改CrowdSec的主配置文件:
nano /etc/crowdsec/config.yaml将LAPI监听改为0.0.0.0并配置信任IP:
api:
  server:
    log_level: info
    listen_uri: 0.0.0.0:8088
    trusted_ips: # IP ranges, or IPs which can have admin API access
      - 127.0.0.1
      - ::1
- 172.16.0.0/12 # 信任Docker默认的桥接网络1.host.docker.internal:host-gateway本质是往容器的操作系统里面写了一个Hosts,指向的是宿主机Docker默认的桥接网络的网关IP,CrowdSec如果只监听127.0.0.1,host.docker.internal也无法访问。
2.必须将crowdsec-web-ui容器的源IP地址(最好是其Docker网络的CIDR)添加到CrowdSec的信任IP配置中。这不是你浏览器的IP地址或Docker主机的公网IP地址。如果没有此配置,决策操作仍可正常工作,但警报删除操作会失败并报错:403 Forbidden。
3.这方案有一点好处就是,在你配置反向代理后,可以将端口映射改为:
ports:
  - "127.0.0.1:3002:3002"
这可以保证crowdsec-web-ui只能通过NGINX反向代理访问,且在你部署了crowdsec-nginx-bouncer时能够为crowdsec-web-ui提供保护。如果不这样配置,你的crowdsec-web-ui相当于裸奔在公网,既没有TLS也没有受到crowdsec-nginx-bouncer保护。这方案也有缺点,那就是将CrowdSec LAPI暴露在公网了,虽然LAPI是必须要鉴权的,但原本只监听在127.0.0.1肯定是最安全的,假设哪一天CrowdSec自身曝了个洞这些也说不准。
重启CrowdSec使新的配置生效:
systemctl restart crowdsec启动:
docker compose up -d新建NGINX站点配置文件:
nano /etc/nginx/sites-available/crowdsec-webui写入如下内容:
server {
    listen 80;
    server_name crowdsec-webui.example.com;
    client_max_body_size 0;

    location / {
        proxy_pass http://127.0.0.1:3002/;
        proxy_http_version 1.1;
        proxy_set_header Host $host;
        proxy_set_header X-Forwarded-Host $http_host;
        proxy_set_header X-Real-IP $remote_addr;
        proxy_set_header X-Forwarded-For $proxy_add_x_forwarded_for;
        proxy_set_header X-Forwarded-Proto $scheme;
        proxy_set_header Upgrade $http_upgrade;
        proxy_set_header Connection "upgrade";
    }
}
启用站点:
ln -s /etc/nginx/sites-available/crowdsec-webui /etc/nginx/sites-enabled/crowdsec-webui访问crowdsec-webui.example.com创建一个管理员账户就可以登录了,看下效果。
仪表板:
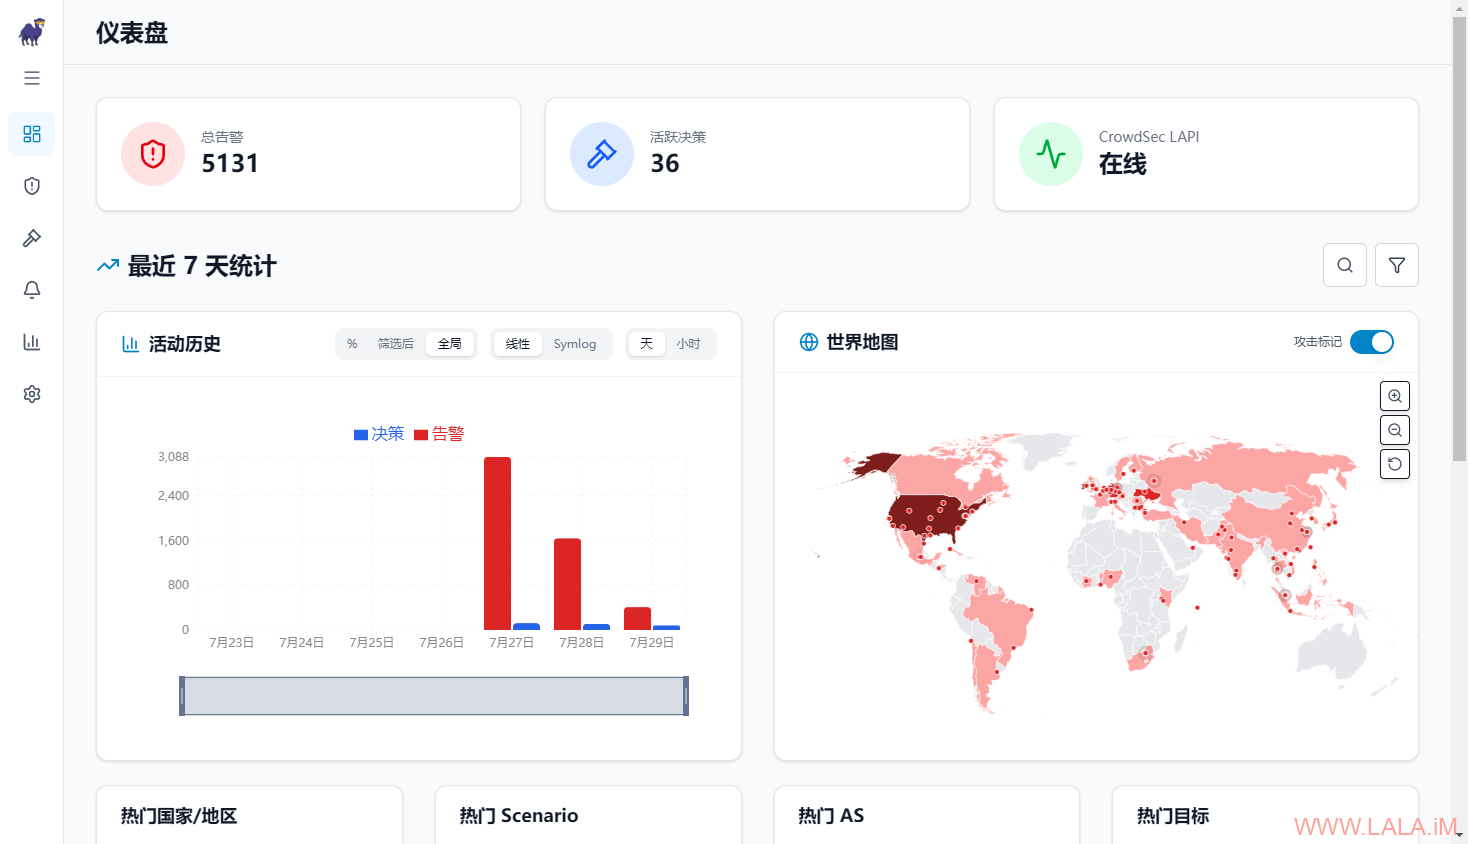
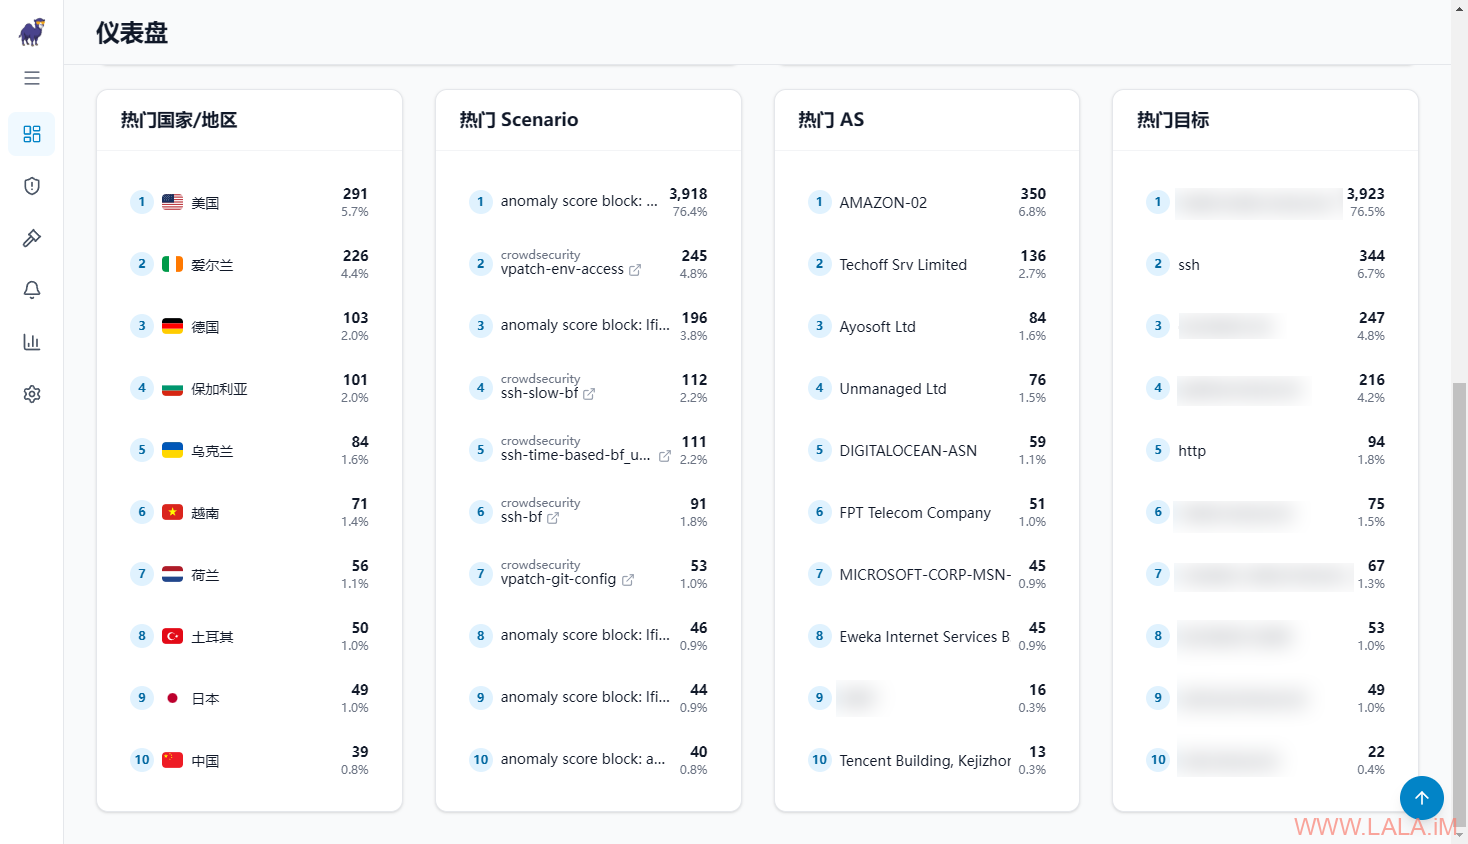
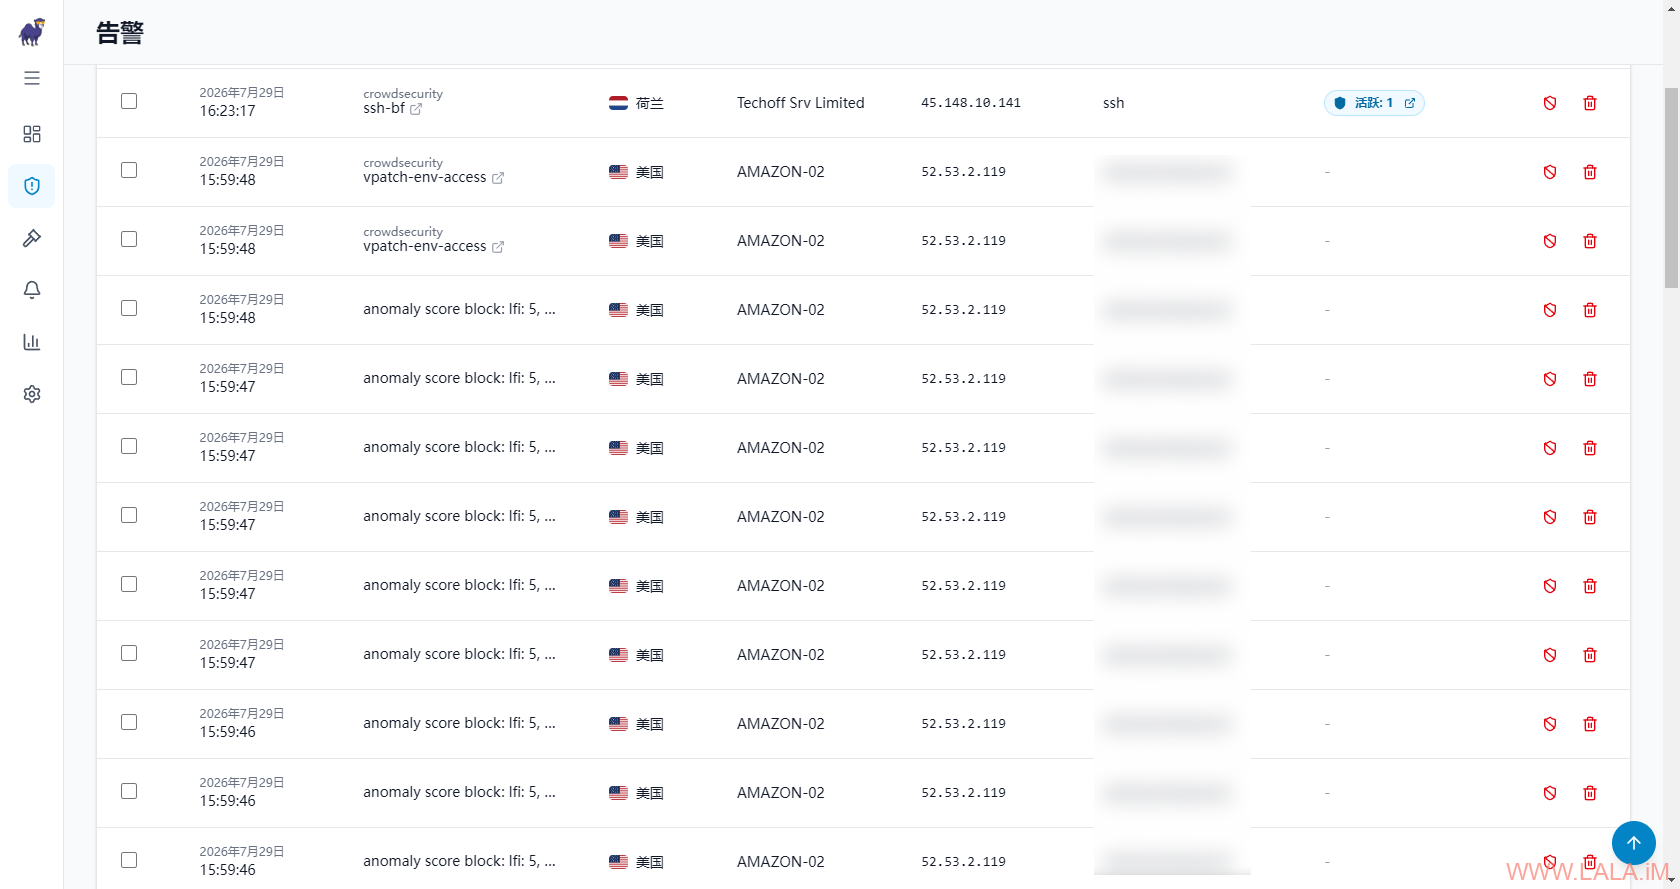
告警:
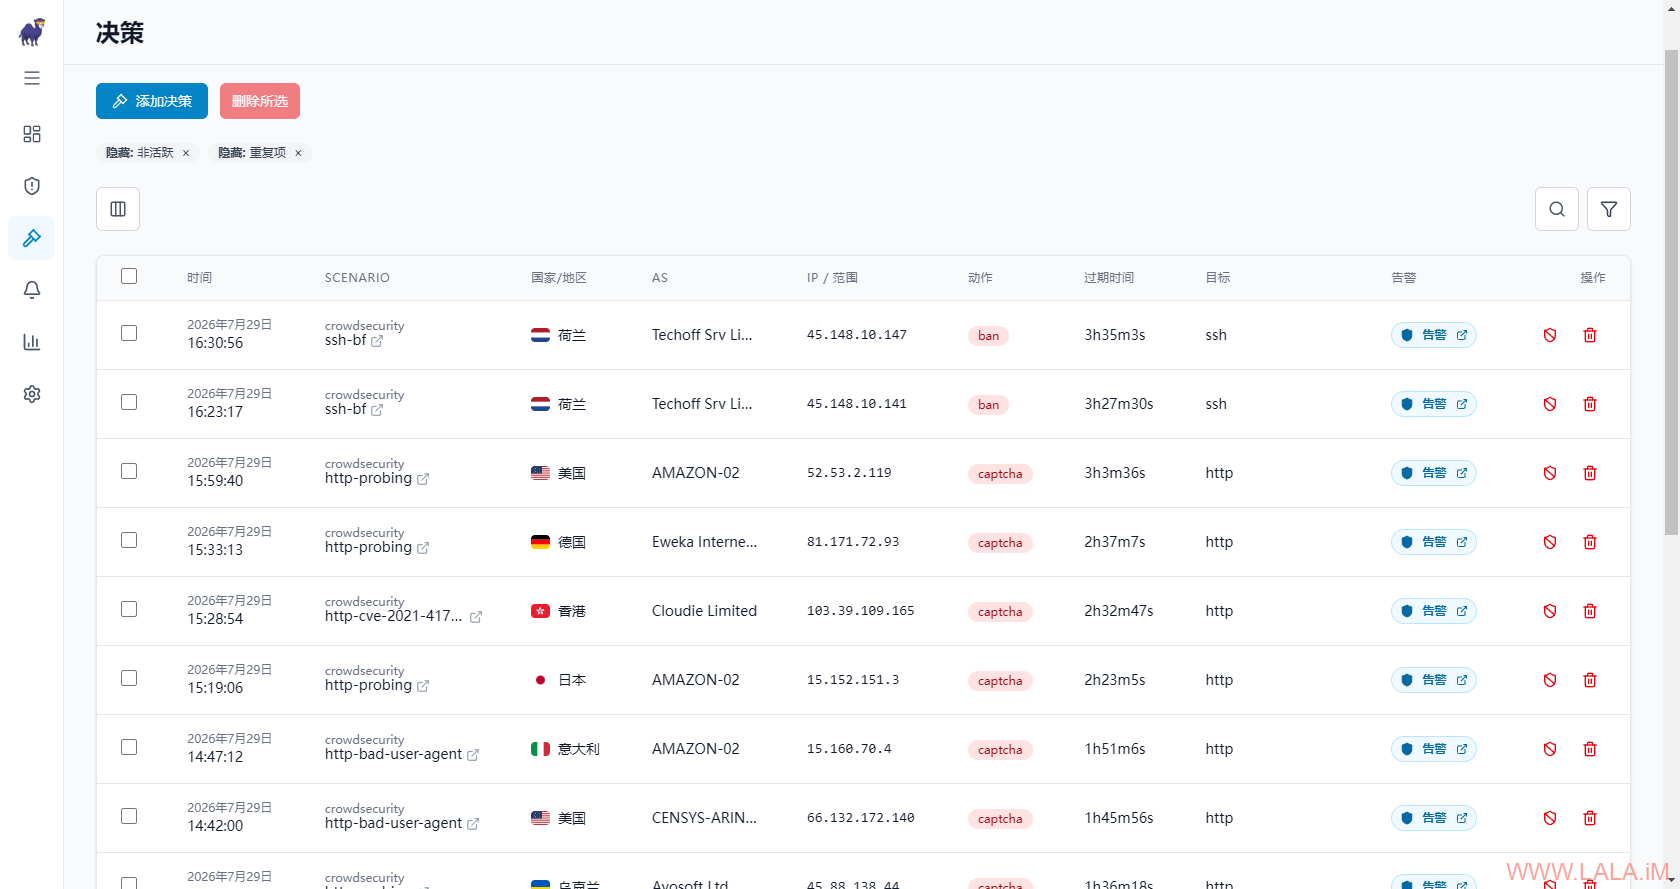
决策:
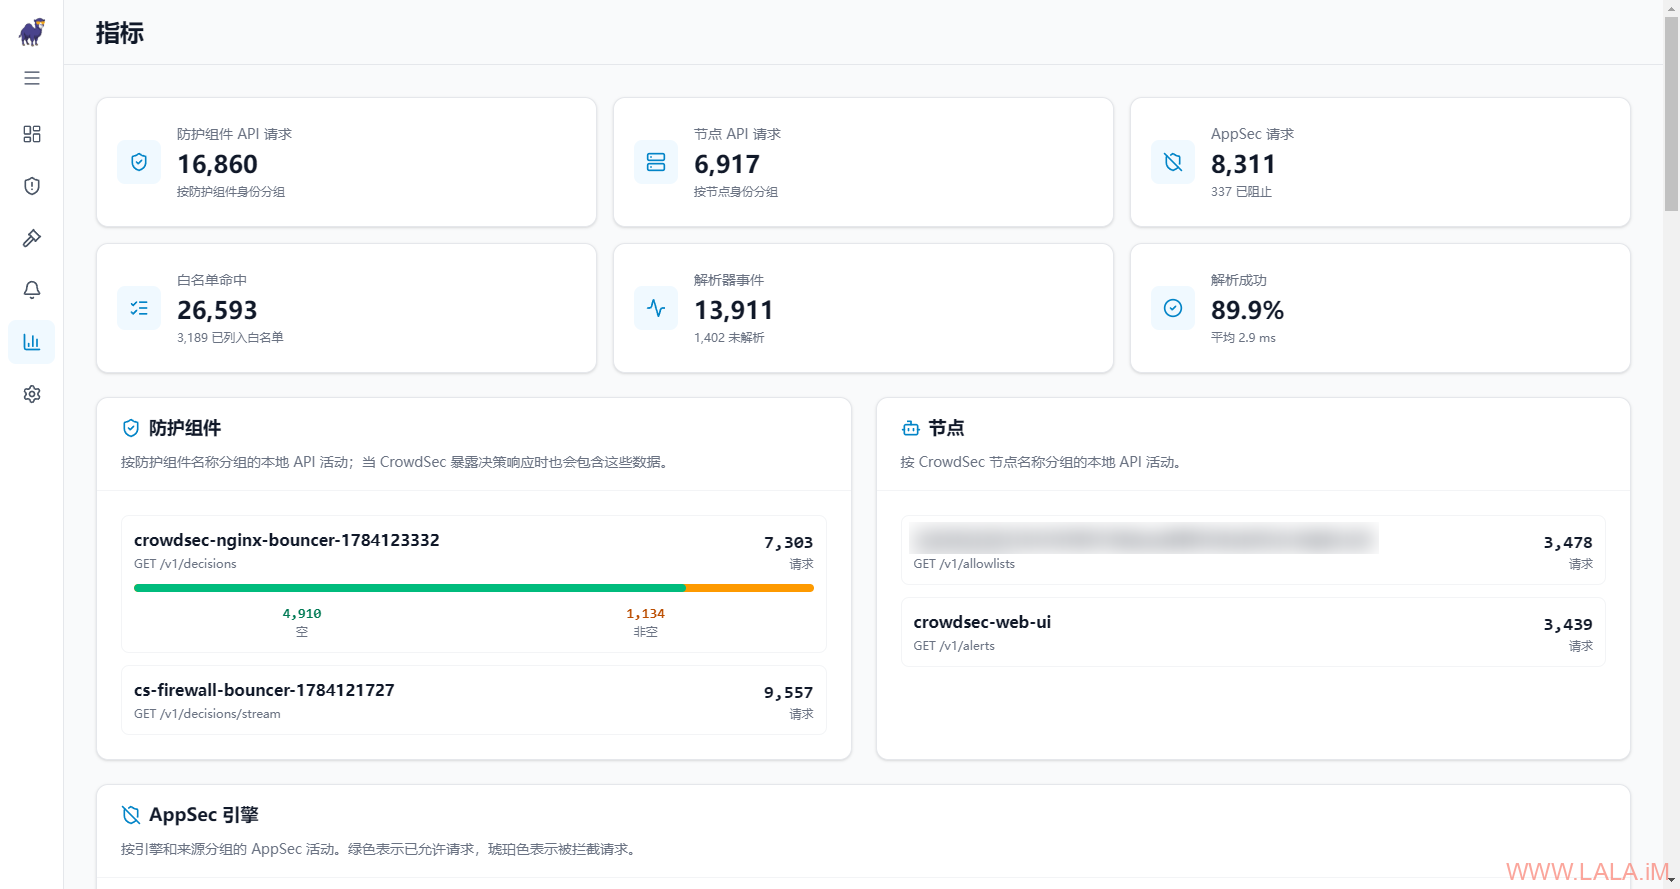
指标:
2026-07-25 20:32:07
CrowdSec的一大亮点就是有一个CAPI(官方的中央API服务器)专门收集和共享各类威胁情报,其中包括攻击者的IP,这些恶意IP会被记录到“社区黑名单”,CrowdSec会定期从CAPI拉取这份黑名单来保护你的服务器。同时如果你的服务器刚被攻击了,那么CrowdSec也会把刚刚发现的恶意IP提交给CAPI,全球其它数万个部署了CrowdSec的服务器也在实时上报,这样就提供了一套联动的防御体系。平子有人类命运共同体,CrowdSec有网络安全共同体
除此之外,CrowdSec的整体设计架构也挺有意思,有人说它和Fail2Ban很像,都是读取、分析系统日志然后作出决策,但现如今的CrowdSec已经远不止这些能力了,CrowdSec不久前还推出了AppSec组件,它可以将你的CrowdSec安装变成一个功能齐全的WAF(虽然肯定不如长亭的雷池)
本文将详细介绍CrowdSec的安装与使用方法。我的服务器系统是Debian,Web服务器是NGINX。
安装需要用到的软件包:
apt update
apt install curl gnupg apt-transport-https debian-archive-keyring
导入GPG密钥:
mkdir -p /etc/apt/keyrings/
curl -fsSL https://packagecloud.io/crowdsec/crowdsec/gpgkey | gpg --dearmor > /etc/apt/keyrings/crowdsec_crowdsec-archive-keyring.gpg
创建存储库配置文件:
nano /etc/apt/sources.list.d/crowdsec_crowdsec.list写入如下内容:
deb [signed-by=/etc/apt/keyrings/crowdsec_crowdsec-archive-keyring.gpg] https://packagecloud.io/crowdsec/crowdsec/any any main
deb-src [signed-by=/etc/apt/keyrings/crowdsec_crowdsec-archive-keyring.gpg] https://packagecloud.io/crowdsec/crowdsec/any any main
现在就可以安装CrowdSec了:
apt update
apt install crowdsec
CrowdSec LAPI(Local API)默认监听的端口是8080(127.0.0.1:8080)如果服务器已经有程序占用了8080端口,毕竟8080算是一个比较热门的端口,很多程序都喜欢用这个端口,此时为了避免端口冲突CrowdSec是不会自己启动的,你需要将LAPI的端口改为其它的才能让CrowdSec正常运行,为此我们得修改两个配置文件:
nano /etc/crowdsec/config.yaml这里我将其改为8088:
api:
  server:
    log_level: info
    listen_uri: 127.0.0.1:8088
还有这个配置文件:
nano /etc/crowdsec/local_api_credentials.yaml将url改为如下所示内容:
url: http://127.0.0.1:8088启动并设置开机自启:
systemctl enable --now crowdsec默认情况下,CrowdSec会尝试检测服务器正在运行的服务(CrowdSec >= 1.7.0),然后安装相应的日志源和集合。例如我的服务器在安装CrowdSec前就有SSH服务、NGINX服务在运行,那么CrowdSec就会自动将这些日志源和集合安装好,可以执行如下命令查询当前已经安装的日志源:
cscli metrics show acquisition这里就列出了我的SSH和NGINX日志源,这里我还有一个Appsec的日志源,这个我稍后说明:
╭───────────────────────────────────────────────────────────────────────────────────────────────────────────────────────────────────────────╮
│ Acquisition Metrics                                                                                                                       │
├─────────────────────────────────────────────────┬────────────┬──────────────┬────────────────┬────────────────────────┬───────────────────┤
│ Source                                          │ Lines read │ Lines parsed │ Lines unparsed │ Lines poured to bucket │ Lines whitelisted │
├─────────────────────────────────────────────────┼────────────┼──────────────┼────────────────┼────────────────────────┼───────────────────┤
│ appsec:appsec                                   │ 221        │ 221          │ -              │ 210                    │ -                 │
│ file:/var/log/nginx/access.log                  │ 2.41k      │ 2.40k        │ 1              │ 1.09k                  │ -                 │
│ file:/var/log/nginx/error.log                   │ 422        │ 259          │ 163            │ 235                    │ -                 │
│ journalctl:journalctl-_SYSTEMD_UNIT=ssh.service │ 13.90k     │ 9.14k        │ 4.76k          │ 35.87k                 │ -                 │
╰─────────────────────────────────────────────────┴────────────┴──────────────┴────────────────┴────────────────────────┴───────────────────╯此时假设你不打算将NGINX作为Web服务器了,想用Caddy替换NGINX,那么你就需要手动配置一个新的日志源。先去CrowdSec的Hub找到你需要的集合:
找到Caddy的集合URL:

根据集合页面提供的命令安装Caddy集合:
cscli collections install crowdsecurity/caddyCrowdSec Hub上的每个集合都包含一个采集示例,Caddy也不例外,所以你只需要在acquis.d目录下创建一个日志采集的配置文件:
nano /etc/crowdsec/acquis.d/caddy.yaml对于Caddy而言,你应该写入如下内容:
filenames:
  - /var/log/caddy/*.log
labels:
  type: caddy
同时你的Caddyfile配置文件内应该指定日志文件的路径。重启CrowdSec使新的配置生效:
systemctl restart crowdsec请注意CrowdSec或者说CrowdSec的安全引擎,本身是一个检测引擎(IDS),它只做行为检测,不负责阻止攻击行为。
我们刚才配置的这些内容如果拆分的更细一点,其实就是配置了:log-parsers(日志解析器) + scenarios(攻击场景) + Acquisition(日志采集)
其中日志解析器和攻击场景都是由collections(集合)提供的,集合就是自动打包好了这些内容,方便你一次性部署,你就不需要单独去一个个部署了,如果你没有特殊的需求,我们后续在使用过程中都是直接安装集合,很少单独去安装日志解析器和攻击场景。
CrowdSec在首次部署时会根据当时系统内运行的服务自动安装集合、配置日志采集,但如果后续你的系统内安装了新的服务,你想用CrowdSec保护它,那就需要你手动配置了,刚才我们已经使用Caddy实战演示过一遍完整的流程了。
在较新版本的CrowdSec中还有交互式自动探测与添加模式,如果你不想手动配置,可以尝试使用这个命令:
cscli setup interactive静默全自动添加(适用于自动化脚本):
cscli setup unattended使用自动化的方式往往没有手动配置可靠,如果可以请一定手动检查添加的配置是否正确。
CrowdSec基本的工作流程是:先采集某个服务的日志,然后将采集到的日志结构化解析再去和攻击场景匹配,比如一个攻击场景描述的是:只要一个IP在10秒内发起了5次SSH登录验证,且全部登录失败,那就说明这个IP在暴力破解SSH。当一个IP触发了此攻击场景后,CrowdSec的安全引擎会作出一个决策:把这个IP封禁4小时。
请注意这里的决策:“把这个IP封禁4小时”,此时的IP根本没有被真正的封禁,它只是CrowdSec安全引擎给出的一个建议或者说决定,还没有真正的去执行。
谁去执行CrowdSec安全引擎的决策?此时就需要你安装对应的Remediation Components(修复组件)了,官方以前又称为Bouncers(拦截器),这才是真正去执行决策的工具。在你安装并配置好修复组件后,CrowdSec就会从IDS变成一个IPS(入侵防御系统)。
下面我们就来实战配置一个防火墙Bouncer,防火墙Bouncer非常适合保护SSH基础架构服务。先查看当前系统使用的是iptables还是nftables:
iptables -V如果回显中有显示nf_tables,那么就说明你的系统正在使用nftables:
iptables v1.8.11 (nf_tables)此时你应该安装的软件包是:
apt install crowdsec-firewall-bouncer-nftables否则安装:
apt install crowdsec-firewall-bouncer-iptables查看防火墙bouncers运行状态,确保正常:
systemctl status crowdsec-firewall-bouncer.service防火墙bouncers几乎是开箱即用的,你在安装好后无须修改任何配置应该就能很好的工作。
让我们更进一步,现在来保护Web服务(NGINX)。我的服务器之前已经安装好NGINX了,所以这里我不需要重新安装NGINX,并且我在安装CrowdSec前就已经安装了NGINX,那么CrowdSec会自动帮我配置好NGINX的集合和日志采集,所以这里我只需要安装NGINX bouncers需要用到的依赖即可:
apt install lua5.1 libnginx-mod-http-lua luarocks gettext-base lua-cjson如果你没有安装NGINX,则这里需要先安装,仅支持Debian官方存储库的NGINX软件包,如果你是NGINX官方存储库安装的NGINX或者自己编译的NGINX则这里的步骤不适合你:
apt install nginx然后安装对应的集合:
cscli collections install crowdsecurity/nginx配置日志采集这里就不重复说明了,这是CrowdSec自动为我配置的,仅供参考:
filenames:
  - /var/log/nginx/*.log
labels:
  type: nginx
source: file
接下来安装crowdsec-nginx-bouncer:
apt install crowdsec-nginx-bouncer这里有个坑,可能会遇到这个报错:
lua-cjson 2.1.0.10-1 depends on lua >= 5.1 (5.1-1 provided by VM)
gcc -O2 -fPIC -I/usr/include/lua5.1 -c lua_cjson.c -o lua_cjson.o
sh: 1: gcc: not found
Error: Build error: Failed compiling object lua_cjson.o
原因是系统内缺少编译用的gcc,也可能还缺少其它编译用的依赖包,所以这里安装一下这个全家桶:
apt install build-essential将之前的crowdsec-nginx-bouncer软件包卸载重装以触发重新编译:
apt purge crowdsec-nginx-bouncer
apt install crowdsec-nginx-bouncer
由于安装了两次crowdsec-nginx-bouncer软件包,在CrowdSec那边可能会出现多个相同的Bouncer,可以通过这个命令查看:
cscli bouncers list我不知道哪个是不再需要的Bouncer,所以我使用curl往NGINX发送一个请求:
curl 127.0.0.1稍等片刻再次查看bouncers list应该就能发现Last API pull的时间更新了,没更新的那个就是没用的,可以执行如下命令删除:
cscli bouncers delete crowdsec-nginx-bouncer-1784122720我还发现一个问题,crowdsec-nginx-bouncer软件包不支持Debian 11,我在另外一台Debian 11服务器内安装会报错。排查了一下发现是该软件包对NGINX版本有硬性限制:
crowdsec-nginx-bouncer
  Depends: nginx
    nginx-core
    nginx-extras
    nginx-full
    nginx-light
  Depends: lua5.1
  Depends: libnginx-mod-http-lua
  Depends: luarocks
  Depends: gettext-base
Breaks: libnginx-mod-http-lua (此修改见Pull。这意味着如果NGINX版本低于1.20将无法安装,而Debian 11官方存储库内的NGINX版本为1.18。如果你也遇到这个问题,可以改为手动安装:
wget https://github.com/crowdsecurity/cs-nginx-bouncer/releases/download/v1.2.0/crowdsec-nginx-bouncer.tgz
tar xvzf crowdsec-nginx-bouncer.tgz
cd crowdsec-nginx-bouncer-v1.2.0/
./install.sh
经过测试,手动安装的crowdsec-nginx-bouncer可以完美工作在NGINX 1.18,至少目前我没有发现有什么问题,搞不懂官方为什么要放弃对NGINX 1.20之前的版本支持。
请注意手动安装crowdsec-nginx-bouncer也需要先安装之前提到的那些依赖包,尤其是build-essential,如果你在执行install.sh安装脚本后也遇到了编译lua_cjson.o报错,请补全依赖后执行如下命令重新编译lua_cjson.o:
luarocks install lua-cjson 2.1.0.10-1在默认情况下,CrowdSec安全引擎的决策是封禁(ban),当crowdsec-nginx-bouncer执行这个决策后,用户将无法访问你的网站,这在很多时候太过于武断了,可能会误杀正常访问的真实用户,此时你可以将HTTP场景的决策改为更灵活的验证码挑战(captcha)。配置验证码挑战,主要分为两个部分,既CrowdSec安全引擎要能够支持验证码挑战的决策,同时Bouncer还需要拥有“展示验证码”的能力。
我们先来配置crowdsec-nginx-bouncer,目前支持的验证码有:recaptcha / hcaptcha / turnstile,这里我选择使用turnstile。编辑crowdsec-nginx-bouncer的配置文件:
nano /etc/crowdsec/bouncers/crowdsec-nginx-bouncer.conf修改如下内容:
CAPTCHA_PROVIDER=turnstile
# Captcha Secret Key
SECRET_KEY=
# Captcha Site key
SITE_KEY=
CAPTCHA_TEMPLATE_PATH=/var/lib/crowdsec/lua/templates/captcha.html
CAPTCHA_EXPIRATION=3600
为了让验证码挑战功能能够正常工作,你还需要编辑这个NGINX配置文件添加一个DNS resolver:
nano /etc/nginx/conf.d/crowdsec_nginx.conf写入如下内容:
resolver 1.1.1.1 ipv6=off;同时请确保该配置文件内有这一行内容,如果没有请自己加上:
lua_ssl_trusted_certificate /etc/ssl/certs/ca-certificates.crt;重启NGINX服务使新配置生效:
systemctl restart nginx接下来配置CrowdSec安全引擎,编辑profiles.yaml决策配置文件:
nano /etc/crowdsec/profiles.yaml在文件的顶部加入如下内容:
name: captcha_remediation
filters:
  - Alert.Remediation == true && Alert.GetScope() == "Ip" && Alert.GetScenario() contains "http"
## Any scenario with http in its name will trigger a captcha challenge
decisions:
 - type: captcha
   duration: 4h
on_success: break
---
修改后的文件内容应该长这样:
name: captcha_remediation
filters:
  - Alert.Remediation == true && Alert.GetScope() == "Ip" && Alert.GetScenario() contains "http"
## Any scenario with http in its name will trigger a captcha challenge
decisions:
 - type: captcha
   duration: 4h
on_success: break
---
name: default_ip_remediation
#debug: true
filters:
 - Alert.Remediation == true && Alert.GetScope() == "Ip"
decisions:
 - type: ban
   duration: 4h
#duration_expr: Sprintf('%dh', (GetDecisionsCount(Alert.GetValue()) + 1) * 4)
# notifications:
#   - slack_default  # Set the webhook in /etc/crowdsec/notifications/slack.yaml before enabling this.
#   - splunk_default # Set the splunk url and token in /etc/crowdsec/notifications/splunk.yaml before enabling this.
#   - http_default   # Set the required http parameters in /etc/crowdsec/notifications/http.yaml before enabling this.
#   - email_default  # Set the required email parameters in /etc/crowdsec/notifications/email.yaml before enabling this.
on_success: break
---
name: default_range_remediation
#debug: true
filters:
 - Alert.Remediation == true && Alert.GetScope() == "Range"
decisions:
 - type: ban
   duration: 4h
#duration_expr: Sprintf('%dh', (GetDecisionsCount(Alert.GetValue()) + 1) * 4)
# notifications:
#   - slack_default  # Set the webhook in /etc/crowdsec/notifications/slack.yaml before enabling this.
#   - splunk_default # Set the splunk url and token in /etc/crowdsec/notifications/splunk.yaml before enabling this.
#   - http_default   # Set the required http parameters in /etc/crowdsec/notifications/http.yaml before enabling this.
#   - email_default  # Set the required email parameters in /etc/crowdsec/notifications/email.yaml before enabling this.
on_success: break
重启CrowdSec使新的决策配置生效:
systemctl restart crowdsec然后我们模拟真实攻击场景进行测试,看看验证码挑战是否能够正常工作,往NGINX日志里面写一些假的访问日志:
for i in {1..15}; do
echo "1.2.3.4 - - [22/Jul/2026:12:00:00 +0000] \"GET /random-test-$i.html HTTP/1.1\" 404 150 \"-\" \"Mozilla/5.0\"" | tee -a /var/log/nginx/access.log
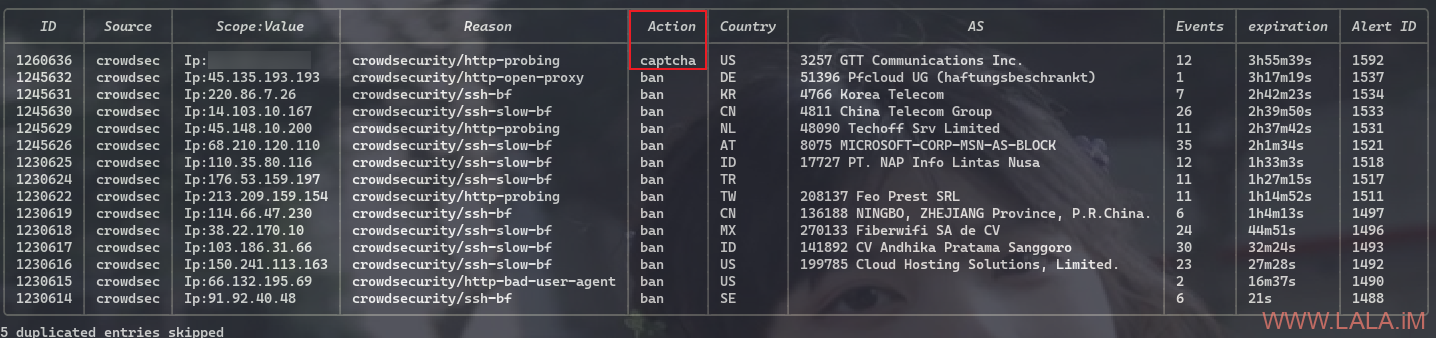
done将1.2.3.4换成你的代理IP或者蜂窝移动网络IP,然后查看决策列表:
cscli decisions list正常的话应该有一条如图所示的记录:
此时你通过代理IP访问网站也应该弹出验证码挑战页面。如果你只是想单纯测试验证码挑战页面能否正常加载,可以使用此命令进行快速测试:
cscli decisions add -i 1.2.3.4 -t captcha请注意此命令会完全绕过整个检测管线,所以无法用来测试profiles.yaml的逻辑。要真正验证profiles.yaml的配置是否正常,关键在于:必须触发一次真实的“告警(Alert)”
如果要测试完整的逻辑,建议使用往NGINX写假日志的方式。测试完成后别忘了删除决策:
cscli decisions delete -i 1.2.3.4还记得最开始日志源里面有一个appsec:appsec吗?现在让我们来深入了解这个AppSec是什么。
AppSec全称:CrowdSec WAF - AppSec Component,你可以简单理解为配置好AppSec后,你安装的CrowdSec将变成一个功能齐全的WAF。
这和之前基于日志分析的模式有本质区别,在没有WAF的时候CrowdSec的防御其实叫“事后惩罚”,假设一个攻击者向你的WordPress网站发送一个SQL注入请求:
1.恶意的SQL注入请求直接成功到达了你的WordPress网站并执行了
2.NGINX把这次请求记录到了日志文件access.log
3.后台的CrowdSec进程读取日志,发现日志里包含SQL注入的攻击的请求
4.场景触发(Scenario):“哦!这个IP刚才对我们进行了SQL注入”
5.CrowdSec做出决策:ban掉这个IP
6.等到这个攻击者下次再来请求时,crowdsec-nginx-bouncer才会去封禁它
很明显这种模式防不住“一发入魂”的攻击:如果攻击者通过第一个SQL注入请求就把你的数据库拖走了,或者通过第一个XSS请求就盗取了管理员的Cookie。虽然CrowdSec在1秒后读取日志发现了异样并拉黑了它,但伤害已经造成了。而当你启用WAF后,请求还没到达网页时就被拦截了,直接返回403。
安装AppSec规则集(集合):
cscli collections install \
   crowdsecurity/appsec-virtual-patching \
   crowdsecurity/appsec-generic-rules
创建日志采集配置文件:
nano /etc/crowdsec/acquis.d/appsec.yaml写入如下内容:
appsec_configs:
  - crowdsecurity/appsec-default
labels:
  type: appsec
listen_addr: 127.0.0.1:7422
source: appsec
name: myAppSecComponent
重启CrowdSec使新的配置生效:
systemctl restart crowdsec编辑crowdsec-nginx-bouncer的配置文件:
nano /etc/crowdsec/bouncers/crowdsec-nginx-bouncer.conf将crowdsec-nginx-bouncer接入AppSec:
APPSEC_URL=http://127.0.0.1:7422
APPSEC_FAILURE_ACTION=passthrough
APPSEC_CONNECT_TIMEOUT=
APPSEC_SEND_TIMEOUT=
APPSEC_PROCESS_TIMEOUT=
ALWAYS_SEND_TO_APPSEC=true
APPSEC_DROP_UNREADABLE_BODY=false
SSL_VERIFY=true1.修改APPSEC_URL指向127.0.0.1:7422
2.启用ALWAYS_SEND_TO_APPSEC始终将所有请求都发送给AppSec检查。
重启NGINX使配置生效:
systemctl restart nginx现在你已经拥有了基本的防护,为什么说是基本?因为刚才安装的两个集合内的规则仅能防护特定的已知CVE漏洞和一些常见的网络攻击,对于其它未知的攻击和漏洞基本无能为力。官方这么做的目的其实更多的是为了减少误报和方便运维(快速上手)。
如果你需要更高级别的防护,就需要启用CRS规则了。启用CRS规则有利有弊,利就是防护范围更广,全面覆盖各种通用且未知的SQL注入、XSS、RCE远程代码执行、路径穿越等Web攻击,也有一定的0Day防护能力,即便漏洞今天刚曝光,如果这个漏洞涉及SQL注入/XSS,CRS规则依然能直接阻断。但弊也很明显,CRS规则非常严格,正常用户发含特殊字符的文章/代码段时,可能会被误判,需要后期不断调优设置白名单。
CRS在CrowdSec WAF中又分为带外CRS和带内CRS,只有带内CRS才是真正的WAF模式,它的处理动作是:直接阻止请求,如果某个IP地址被阻止3次请求后还会被封禁。而带外CRS是:可疑请求不会立即被阻止,只有屡犯者才会被封禁。我个人是建议直接用带内CRS。
[不推荐]如果你使用带外CRS,则安装:
cscli collections install crowdsecurity/appsec-crs如果你使用带内CRS,则安装:
cscli collections install crowdsecurity/appsec-crs-inband然后编辑AppSec日志采集配置文件:
nano /etc/crowdsec/acquis.d/appsec.yaml 带外CRS配置:
appsec_configs:
  - crowdsecurity/appsec-default
  - crowdsecurity/crs
labels:
  type: appsec
listen_addr: 127.0.0.1:7422
source: appsec
name: myAppSecComponent
带内CRS配置:
appsec_configs:
  - crowdsecurity/appsec-default
  - crowdsecurity/crs-inband
labels:
  type: appsec
listen_addr: 127.0.0.1:7422
source: appsec
name: myAppSecComponent
我使用带内CRS来保护我的WordPress,但遇到了非常多的误报,此时可以安装官方提供的插件,来一定程度缓解:
cscli collections install crowdsecurity/appsec-crs-exclusion-plugin-wordpress很多时候还是会出现误报甚至把自己给拦在门外,导致无法登录服务器的尴尬场面,为避免这种情况发生,我们可以配置白名单。CrowdSec中有三种白名单类型:
咱这里先介绍一下最简单最暴力的方法:AllowLists,这是一种IP / CIDR级别的白名单。
创建AllowList列表:
cscli allowlists create my_trusted_ip -d "我的代理节点IP"添加IP或网段:
cscli allowlists add my_trusted_ip 8.9.6.4
cscli allowlists add my_trusted_ip 10.0.0.0/24 -d "内网网段"
查看列表内的IP:
cscli allowlist inspect my_trusted_ip由于文章篇幅过长,还有很多内容没写,这篇文章先暂时写到这里,未完待续。
2026-07-18 17:15:11
Fluxer目前还处于Beta测试阶段,但已经是我见过的开源软件当中仿Discord完成度最高的了。现已支持如下功能:
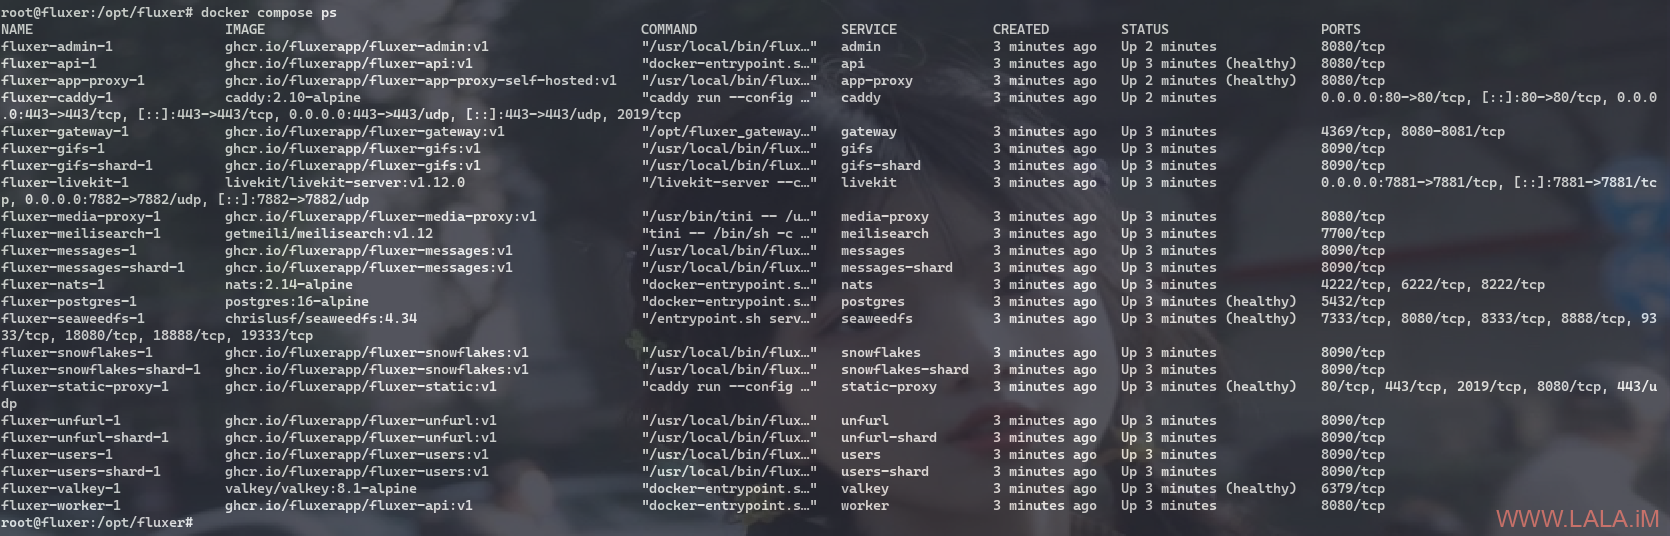
虽然这个项目目前来看非常值得期待,但是如果你打算自托管的话,这里我可能要给你泼一盆冷水了,目前这个项目的架构极其复杂,当你使用Docker部署的时候,它需要启动足足24个容器:
不过好在官方的部署文档足够详细,且我认为官方对自托管的步骤做了一定的优化,如果你不介意让Caddy容器独占服务器的80 / 443端口,那么其实整个项目部署起来不算麻烦。鉴于此本文不对官方的部署步骤做修改,全部照搬官方文档的步骤,只在一些容易出问题的地方重点说明一下。
部署前的准备:
启动时是最耗内存的阶段,因为所有服务的镜像都会同时初始化,4GB内存是最低运行要求,对于小型活跃社区建议使用8GB内存或更多。
安装Docker:
apt update
apt install curl
curl -fsSL https://get.docker.com -o get-docker.sh
sh get-docker.sh
创建工作目录并下载需要用到的文件:
cd /opt
mkdir fluxer
cd fluxer

base=https://raw.githubusercontent.com/fluxerapp/fluxer/main/deploy/self-hosting
curl -fsSLO "$base/docker-compose.yml"
curl -fsSLO "$base/Caddyfile"
curl -fsSLO "$base/livekit.yaml"
curl -fsSL "$base/.env.example" -o .env
你现在应该拥有这些文件:
docker-compose.yml
Caddyfile
livekit.yaml
.env
编辑.env环境变量配置文件:
nano .env我们使用Caddy容器直接获取证书,所以必须正确配置如下内容:
FLUXER_DOMAIN=chat.example.com
FLUXER_PUBLIC_SCHEME=https
FLUXER_PUBLIC_PORT=443
FLUXER_CADDY_SITE_ADDRESS=chat.example.com
[email protected]
[可选]配置SMTP:
FLUXER_EMAIL_ENABLED=false
FLUXER_EMAIL_PROVIDER=none
[email protected]
FLUXER_EMAIL_FROM_NAME=Fluxer
FLUXER_EMAIL_SMTP_HOST=
FLUXER_EMAIL_SMTP_PORT=587
FLUXER_EMAIL_SMTP_USERNAME=
FLUXER_EMAIL_SMTP_PASSWORD=
FLUXER_EMAIL_SMTP_SECURE=true
.env文件里的其它内容不用手动配置,全部使用如下命令,一次性生成所需的全部密钥:
for key in POSTGRES_PASSWORD MEILI_MASTER_KEY FLUXER_S3_SECRET_KEY \
  FLUXER_SUDO_MODE_SECRET FLUXER_CONNECTION_INITIATION_SECRET \
  FLUXER_GATEWAY_RPC_AUTH_TOKEN FLUXER_MEDIA_PROXY_SECRET_KEY \
  FLUXER_ADMIN_SECRET_KEY_BASE FLUXER_ADMIN_OAUTH_CLIENT_SECRET \
  LIVEKIT_API_SECRET; do
  sed -i "s|^$key=.*|$key=$(openssl rand -hex 32)|" .env
done

sed -i "s|^FLUXER_MEDIA_PROXY_UPLOAD_RELAY_SECRET_BASE64=.*|FLUXER_MEDIA_PROXY_UPLOAD_RELAY_SECRET_BASE64=$(openssl rand -base64 32)|" .env

VAPID=$(docker run --rm node:24-alpine npx --yes web-push generate-vapid-keys --json)
pub=$(printf '%s' "$VAPID" | grep -o '"publicKey":"[^"]*"' | cut -d'"' -f4)
priv=$(printf '%s' "$VAPID" | grep -o '"privateKey":"[^"]*"' | cut -d'"' -f4)
sed -i "s|^FLUXER_VAPID_PUBLIC_KEY=.*|FLUXER_VAPID_PUBLIC_KEY=$pub|" .env
sed -i "s|^FLUXER_VAPID_PRIVATE_KEY=.*|FLUXER_VAPID_PRIVATE_KEY=$priv|" .env接下来为域名创建DNS记录,Caddy将使用你之前配置的FLUXER_CADDY_SITE_ADDRESS=chat.example.com自动申请和续订证书:
A chat.example.com ---> 服务器的公网IPv4
AAAA chat.example.com ---> 服务器的公网IPv6(可选)
按正常情况来说,接下来就可以启动了,但是这里有个坑,我提前替你们踩了。
因为它一次性要启动24个容器,对于一般的服务器来说可能有点顶不住(性能不太够),再加上它使用的是seaweedfs作为s3对象存储服务,seaweedfs本来启动时加载各个组件就慢,再加上其它的容器一怼,大概率会导致seaweedfs-init容器的初始化失败。
一旦这个容器初始化失败了,就会导致S3存储桶无法成功创建,你后续在Fluxer上传头像、表情包、贴纸都会报错500,见此issue:#1164。这个issue里面有解决方法,但是我仔细看了下并没有完全解决问题,而且他那个解决方法也不是最优解,这里记录下我的解决思路。
既然是容器内服务启动优先级问题,那我加一个健康检查不就行了,编辑compose文件:
nano docker-compose.yml将seaweedfs / seaweedfs-init服务的配置修改为如下内容:
services:
  seaweedfs:
    image: chrislusf/seaweedfs:4.34
    restart: unless-stopped
    networks: [fluxer]
    command: ["server", "-s3", "-dir=/data"]
    volumes:
      - seaweedfs-data:/data
    healthcheck:
      test: ["CMD-SHELL", "test -S /tmp/seaweedfs-filer-grpc-18888.sock || exit 1"]
      interval: 2s
      timeout: 2s
      retries: 10
      start_period: 10s

  seaweedfs-init:
    image: chrislusf/seaweedfs:4.34
    networks: [fluxer]
    depends_on:
      seaweedfs:
        condition: service_healthy
    restart: "no"
    entrypoint:
      - /bin/sh
      - -c
      - >
        for i in $$(seq 1 60); do
          echo "s3.bucket.create -name fluxer" | weed shell -master=seaweedfs:9333 >/dev/null 2>&1 && break || sleep 2;
        done;
        for b in fluxer fluxer-uploads fluxer-downloads fluxer-reports fluxer-harvests; do
          echo "s3.bucket.create -name $$b" | weed shell -master=seaweedfs:9333 || true;
        done;
echo "buckets ready";seaweedfs容器启动后,里面的服务启动还得很长一段时间,尤其是S3服务,所以这里探测/tmp/seaweedfs-filer-grpc-18888.sock套接字是否创建,只要这个GRPC套接字创建了,那seaweedfs的S3服务就肯定是起来了的,那么seaweedfs-init服务用于创建S3存储桶的脚本肯定就能执行成功了。
现在我们就可以启动整个堆栈了:
docker compose up -d有关实例的备份和升级,请参阅官方的文档:
https://docs.fluxer.app/operator/get-started/#backups
https://docs.fluxer.app/operator/get-started/#upgrading
群聊、私聊、URL预览、文件上传、表情包、贴纸和管理员面板,都可以正常工作:
此项目的开发团队目前正大力开发中,基本上是一天发一个版,BUG肯定还是有点多的,再加上这24个容器的架构,说真的,我有点不敢用,我觉得可以再观望一下。。。
2026-07-14 14:23:06
RomM(一款游戏ROM管理器)界面简洁流畅,方便您扫描、丰富、浏览和畅玩您的游戏收藏。它支持多种平台、多种命名规则和自定义标签,是所有模拟器玩家的必备工具。
本文将介绍如何自建并使用RomM畅玩以前的经典游戏,如:拳皇97、合金弹头、魂斗罗等。
准备工作:
1.一个域名,添加A记录解析:romm.example.com
2.如果你需要刮削游戏的元数据,则最好准备一个IGDB(互联网游戏数据库)的API密钥。IGDB是Twitch旗下的服务,你必须注册一个Twitch账号并启用2FA。然后按照这篇文档创建API密钥。在创建API密钥期间,回调地址直接配置为:http://localhost
3.RomM只是一个管理工具,游戏的ROM资源需要你自己准备,如果你不知道在哪里可以安全获取这些资源,这里我有一些推荐:Reddit的Roms板块、r-roms、minerva-archive 、 Internet Archive
其中minerva-archive是以BT种子为主的资源站,所有ROM均以BT种子的形式提供,Internet Archive提供ROM压缩包直链下载,但往往需要你注册账号才能下载。请勿轻易相信搜索引擎提供的ROM网站,通过这些网站下载的ROM很有可能携带病毒、木马等恶意软件。
安装NGINX、CertBot、Docker:
apt update
apt install curl nginx python3-certbot-nginx
curl -fsSL https://get.docker.com -o get-docker.sh
sh get-docker.sh
新建compose文件:
mkdir /opt/romm && cd /opt/romm && nano docker-compose.yml写入如下内容:
volumes:
  mysql_data:
  romm_resources:
  romm_redis_data:

services:
  romm:
    image: rommapp/romm:latest
    container_name: romm
    restart: unless-stopped
    environment:
      - DB_HOST=romm-db
      - DB_NAME=romm
      - DB_USER=romm-user
      - DB_PASSWD=
      - ROMM_AUTH_SECRET_KEY=
      - SCREENSCRAPER_USER= # These are the recommended metadata providers
      - SCREENSCRAPER_PASSWORD= # https://docs.romm.app/latest/getting-started/metadata-providers/#screenscraper
      - RETROACHIEVEMENTS_API_KEY= # https://docs.romm.app/latest/getting-started/metadata-providers/#retroachievements
      - STEAMGRIDDB_API_KEY= # https://docs.romm.app/latest/getting-started/metadata-providers/#steamgriddb
      - HASHEOUS_API_ENABLED=true # https://docs.romm.app/latest/getting-started/metadata-providers/#hasheous
      - IGDB_CLIENT_ID=
      - IGDB_CLIENT_SECRET=
    volumes:
      - romm_resources:/romm/resources
      - romm_redis_data:/redis-data
      - ./library:/romm/library
      - ./assets:/romm/assets
      - ./config:/romm/config
    ports:
      - 127.0.0.1:8080:8080
    depends_on:
      romm-db:
        condition: service_healthy
        restart: true

  romm-db:
    image: mariadb:latest
    container_name: romm-db
    restart: unless-stopped
    environment:
      - MARIADB_ROOT_PASSWORD=
      - MARIADB_DATABASE=romm
      - MARIADB_USER=romm-user
      - MARIADB_PASSWORD=
    volumes:
      - mysql_data:/var/lib/mysql
    healthcheck:
      test: [CMD, healthcheck.sh, --connect, --innodb_initialized]
      start_period: 30s
      start_interval: 10s
      interval: 10s
      timeout: 5s
retries: 51.ROMM_AUTH_SECRET_KEY的值使用如下命令生成:
openssl rand -hex 322.请注意MARIADB_ROOT_PASSWORD设置的是数据库root用户的密码不是romm-user用户的密码,所以DB_PASSWD的值应匹配MARIADB_PASSWORD而非MARIADB_ROOT_PASSWORD。
3.配置IGDB_CLIENT_ID和IGDB_CLIENT_SECRET,以体验最佳的刮削效果。
4.如果你配置了IGDB,则这些涉及刮削的环境变量可不配置,用处不大。大多数情况下IGDB + HASHEOUS足够了:
SCREENSCRAPER_USER=
SCREENSCRAPER_PASSWORD=
RETROACHIEVEMENTS_API_KEY=
STEAMGRIDDB_API_KEY=
启动:
docker compose up -d新建NGINX站点配置文件:
nano /etc/nginx/sites-available/romm写入如下内容:
server {
    listen 80;
    server_name romm.example.com;
    client_max_body_size 0;

    location / {
        proxy_pass http://127.0.0.1:8080;
        proxy_http_version 1.1;
        proxy_set_header Host $host;
        proxy_set_header X-Real-IP $remote_addr;
        proxy_set_header X-Forwarded-For $proxy_add_x_forwarded_for;
        proxy_set_header X-Forwarded-Proto $scheme;
        proxy_set_header Upgrade $http_upgrade;
        proxy_set_header Connection "upgrade";
    }
}
启用站点:
ln -s /etc/nginx/sites-available/romm /etc/nginx/sites-enabled/romm签发证书:
certbot --nginx首次访问的时候会提示你是否要创建选中的游戏平台目录,我建议直接全选创建,这样可以省去你自己整理文件夹结构的时间,后续你可以通过Web UI直接将游戏ROM上传到对应的平台下,开箱即玩。
详情见官方的这两篇文档:Folder Structure、Supported Platforms
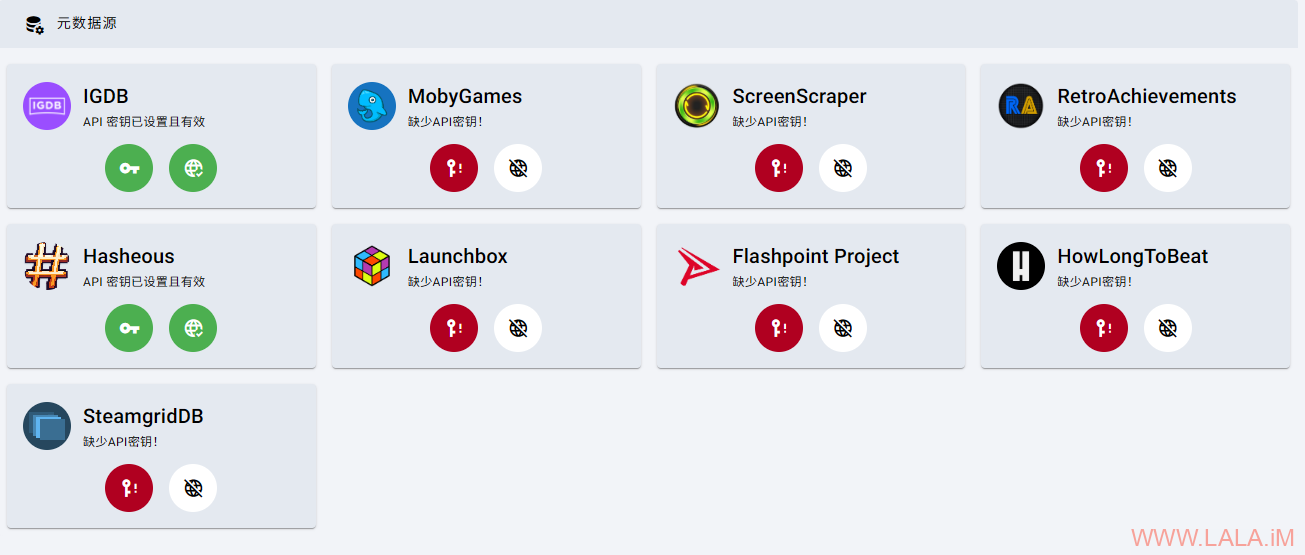
首次访问RomM请在“元数据源”页面查看IGDB配置是否正常:
现在我们来下载ROM资源,我通过Internet Archive下载了:
合金弹头1(mslug.zip)
合金弹头2(mslug2.zip)
合金弹头4(mslug4.zip)
合金弹头5(mslug5.zip)
合金弹头X (mslugx.zip)
拳皇97(kof97.zip)
下载地址:https://archive.org/download/fbnarcade-fullnonmerged/arcade/
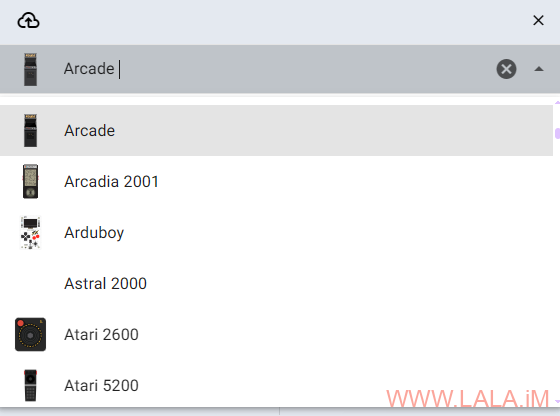
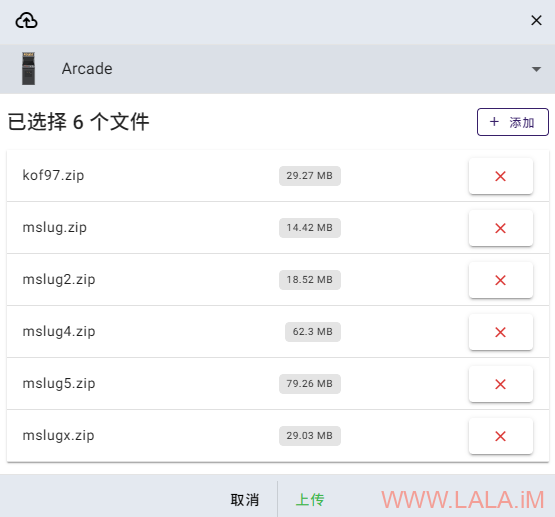
将这些压缩包通过Web UI上传到RomM内,我刚下载的这些游戏全部都是街机游戏(Arcade)所以平台就选择Arcade:
上传完成后,RomM会自动开始扫描,扫描完成后,你应该看到游戏库有更新,此时会显示游戏的海报、简介等信息:

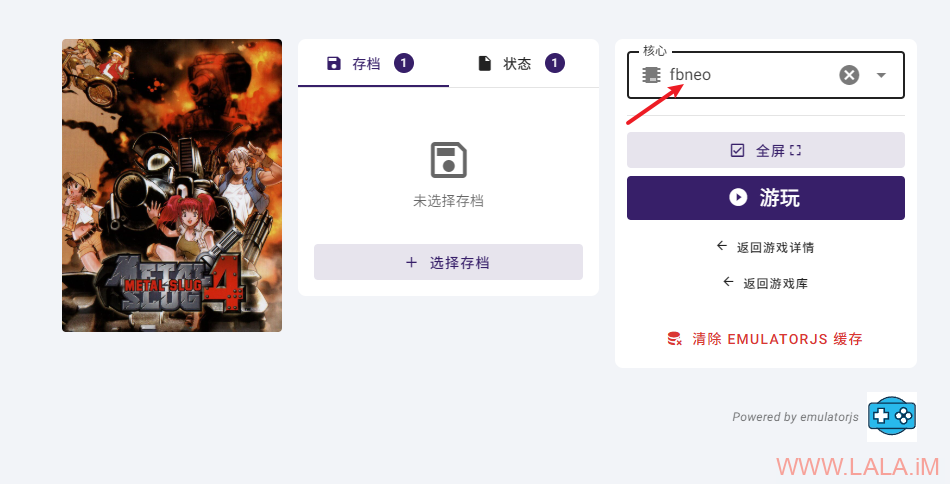
游戏启动的时候需要你自己选择一个核心,对于我刚才下载的这些游戏而言,核心一律选择fbneo:
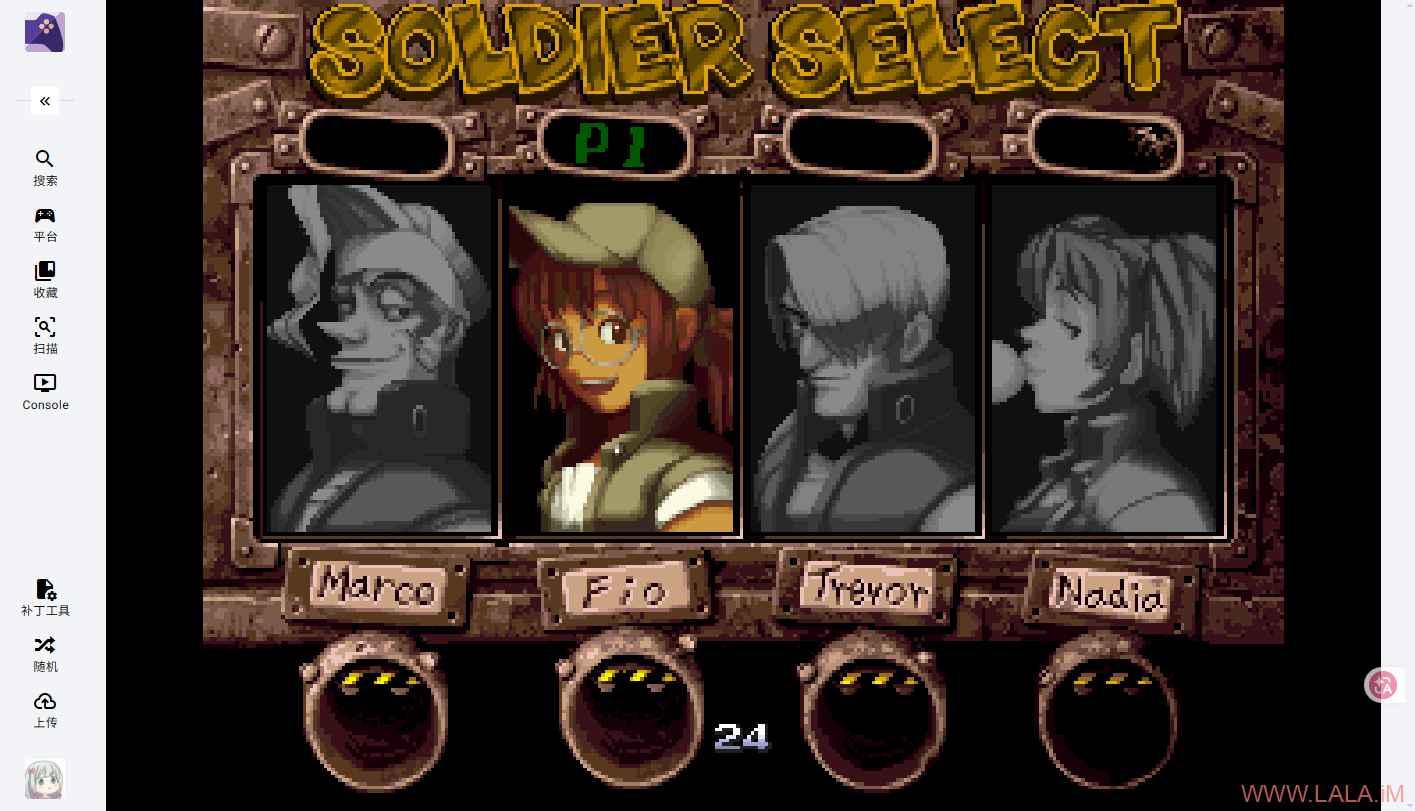
可以玩了:

现在说一下魂斗罗这款游戏如何添加到RomM,首先你得通过r-roms找到对应的平台,这里魂斗罗对应的平台是Nintendo Entertainment System:
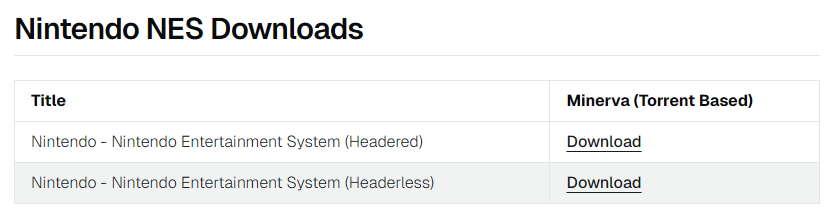
然后你会发现这里有Headered和Headerless两个分类,这里一定要下载Headered分类的压缩包,Headerless是无法启动的。跳转到minerva-archive后搜索Contra:
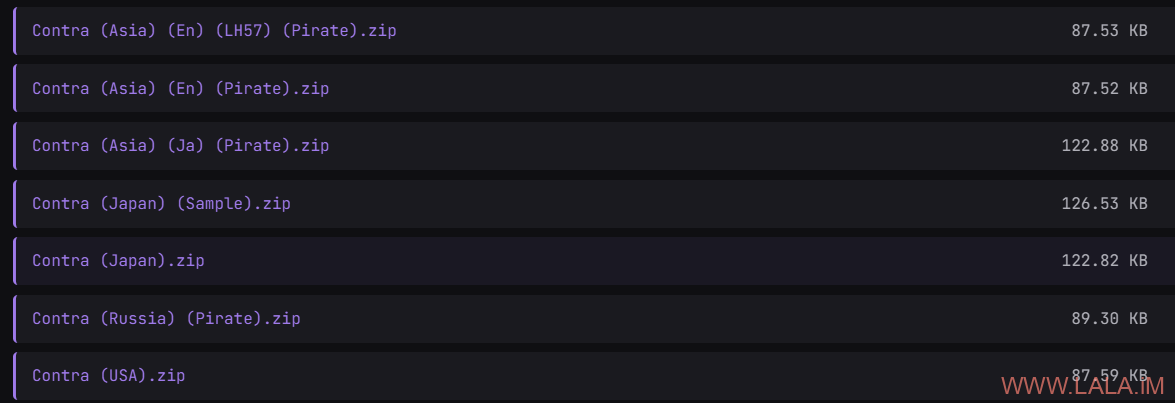
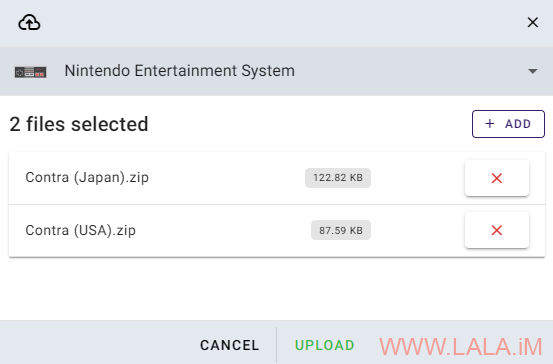
后面的步骤就和之前一样了,找到对应的平台Nintendo Entertainment System,上传压缩包:
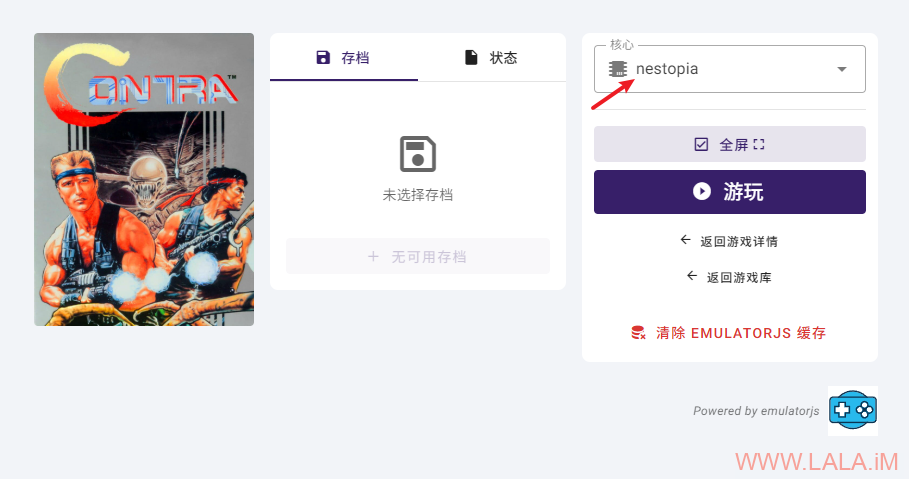
启动游戏的时候选择核心,这里我个人推荐nestopia:
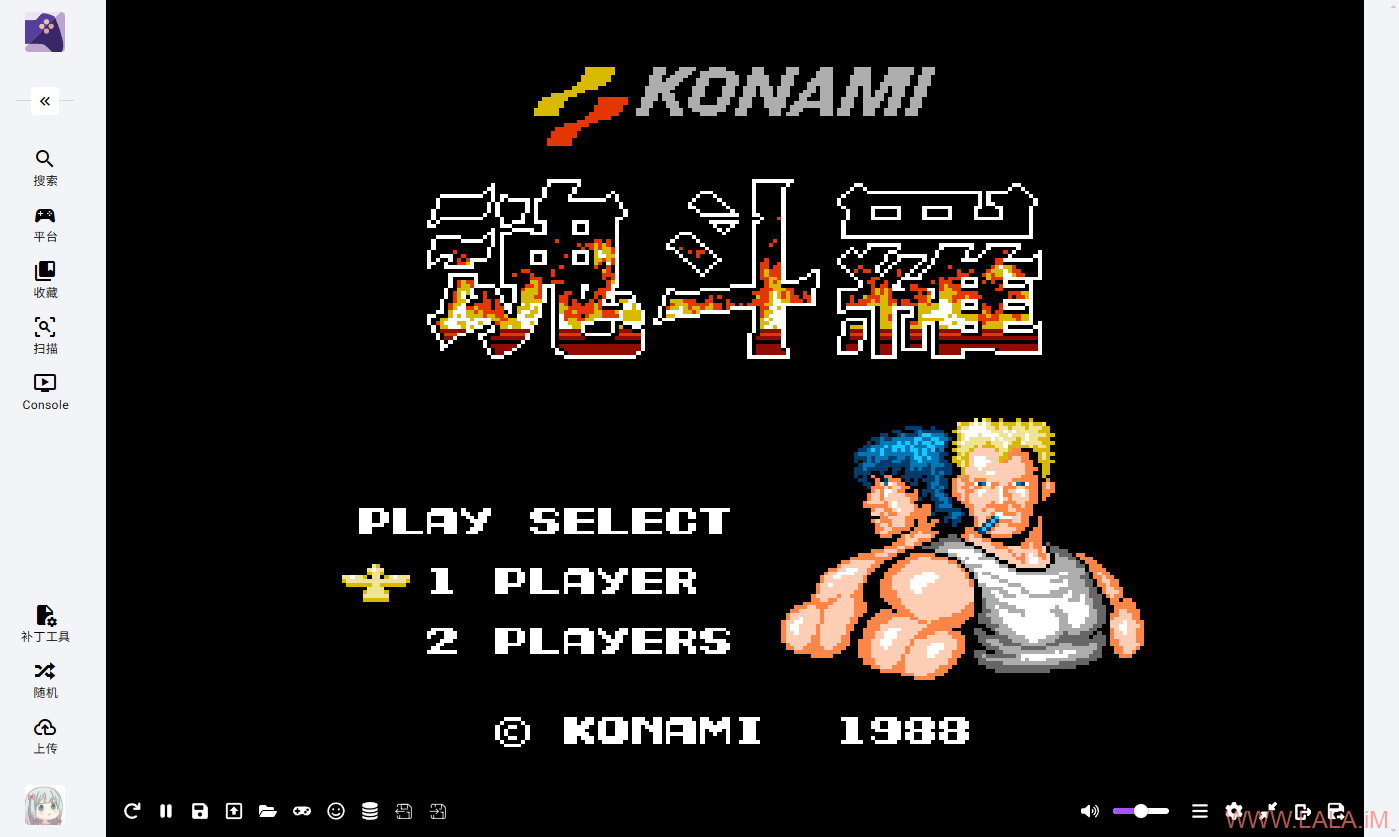
可以玩了:

总结向RomM添加游戏的步骤:
1.通过r-roms找到游戏对应的平台、分类。
2.通过r-roms提供的minerva-archive或Internet Archive网页地址下载正确的游戏ROM压缩包。
3.在RomM选择正确的游戏平台后将压缩包上传到RomM,这一步非常重要,因为关系到RomM在运行时选择哪个核心来运行游戏。
如果你不知道游戏属于哪个平台,游戏ROM压缩包的名字叫什么,游戏运行时该使用哪个核心,可以问AI。
2026-07-11 17:44:19
Chatto是一款功能齐全的基于Web的聊天应用程序,您可以使用自己的服务器来托管它。
Chatto主要特点:
部署前需要准备:
本文不使用官方文档的Docker Compose方式来部署,原因是官方文档使用了Caddy容器,这会把服务器的80 / 443端口独占。本文改为使用主机的NGINX反向代理。
安装NGINX、CertBot、Docker:
apt update
apt install curl nginx python3-certbot-nginx
curl -fsSL https://get.docker.com -o get-docker.sh
sh get-docker.sh
新建compose文件:
mkdir /opt/chatto && cd /opt/chatto && nano docker-compose.yml写入如下内容:
services:
  nats:
    image: nats:latest
    command: ["--jetstream", "--store_dir=/data", "--auth=${NATS_TOKEN}"]
    volumes:
      - nats_data:/data
    healthcheck:
      test: ["CMD", "nats-server", "--help"]
      interval: 5s
      timeout: 3s
      retries: 3

  livekit:
    image: livekit/livekit-server:latest
    command:
      - --config
      - /etc/livekit.yaml
    ports:
      - "50000-50200:50000-50200/udp"  # WebRTC media (UDP, must be direct)
      - "3478:3478/udp"  # TURN/STUN relay for NAT traversal
      - "127.0.0.1:7880:7880"
    volumes:
      - ./livekit.yaml:/etc/livekit.yaml:ro
    healthcheck:
      test: ["CMD", "wget", "-q", "--spider", "http://localhost:7880"]
      interval: 5s
      timeout: 3s
      retries: 3

  chatto:
    image: ghcr.io/chattocorp/chatto:latest
    env_file: .env
    environment:
      PUID: "${PUID:-1000}"
      PGID: "${PGID:-1000}"
    depends_on:
      nats:
        condition: service_healthy
      livekit:
        condition: service_healthy
    ports:
      - "127.0.0.1:4000:4000"

volumes:
  nats_data:
新建livekit配置文件:
nano livekit.yaml写入如下内容:
port: 7880

rtc:
  port_range_start: 50000
  port_range_end: 50200
  use_external_ip: true

turn:
  enabled: true
  udp_port: 3478

keys:
  chatto: 729594219c7e...

webhook:
  urls:
    - https://chatto.example.com/webhooks/livekit
  api_key: chatto

logging:
  level: info
1.keys使用如下命令生成:
openssl rand -hex 322.webhook.urls改为你自己的域名:
https://chatto.example.com/webhooks/livekit新建.env文件:
nano .env写入如下内容:
PUID=1000
PGID=1000

NATS_TOKEN=

[email protected]
CHATTO_NATS_EMBEDDED_ENABLED=false
CHATTO_NATS_CLIENT_URL=nats://nats:4222
CHATTO_NATS_CLIENT_AUTH_METHOD=token
CHATTO_NATS_CLIENT_TOKEN=
CHATTO_WEBSERVER_URL=https://chatto.example.com
CHATTO_WEBSERVER_PORT=4000
CHATTO_WEBSERVER_COOKIE_SIGNING_SECRET=
CHATTO_WEBSERVER_COOKIE_ENCRYPTION_SECRET=
CHATTO_CORE_SECRET_KEY=
CHATTO_CORE_ASSETS_SIGNING_SECRET=
CHATTO_LOG_LEVEL=info
CHATTO_LOG_FORMAT=json
CHATTO_OPERATOR_API_ENABLED=true
CHATTO_OPERATOR_API_SOCKET_PATH=/tmp/chatto/operator.sock

# SMTP is required for direct email/password registration, email verification,
# and password reset. Replace these placeholders with your provider settings.
CHATTO_SMTP_ENABLED=true
CHATTO_SMTP_HOST=mail.example.com
CHATTO_SMTP_PORT=587
CHATTO_SMTP_TLS=mandatory
# Use when CHATTO_SMTP_HOST is an IP address or internal alias but the certificate is issued for a DNS name.
# CHATTO_SMTP_TLS_SERVER_NAME=mail.example.com
# Insecure; use only for trusted internal SMTP servers with self-signed or mismatched certificates.
# CHATTO_SMTP_TLS_SKIP_VERIFY=false
CHATTO_SMTP_USERNAME=smtp
CHATTO_SMTP_PASSWORD=passwd
[email protected]

CHATTO_PUSH_ENABLED=true
CHATTO_PUSH_VAPID_PUBLIC_KEY=
CHATTO_PUSH_VAPID_PRIVATE_KEY=
CHATTO_PUSH_VAPID_SUBJECT=mailto:[email protected]

CHATTO_LIVEKIT_ENABLED=true
CHATTO_LIVEKIT_URL=wss://livekit.chatto.example.com
CHATTO_LIVEKIT_API_KEY=chatto
CHATTO_LIVEKIT_API_SECRET=
1.以下这些变量的值:
NATS_TOKEN=
CHATTO_NATS_CLIENT_TOKEN=
CHATTO_WEBSERVER_COOKIE_SIGNING_SECRET=
CHATTO_WEBSERVER_COOKIE_ENCRYPTION_SECRET=
CHATTO_CORE_SECRET_KEY=
CHATTO_CORE_ASSETS_SIGNING_SECRET=
全部使用如下命令生成:
openssl rand -hex 32请注意NATS_TOKEN与CHATTO_NATS_CLIENT_TOKEN的值应保持一致,NATS_TOKEN用作NATS容器,而CHATTO_NATS_CLIENT_TOKEN是Chatto用于连接NATS容器的。
2.CHATTO_PUSH_VAPID_PUBLIC_KEY和CHATTO_PUSH_VAPID_PRIVATE_KEY用作Web通知,如果您需要启用消息通知,则需要使用如下命令生成:
docker run --rm node:24-alpine npx --yes web-push generate-vapid-keys --json3.CHATTO_LIVEKIT_API_KEY和CHATTO_LIVEKIT_API_SECRET的值应与livekit.yaml内的值保持一致,这是Chatto与Livekit通信的关键。
4.CHATTO_WEBSERVER_URL和CHATTO_LIVEKIT_URL请确保改为您自己的域名。
5.CHATTO_OWNERS_EMAILS请改为您的邮箱,且稍后您在注册账户的时候请使用这个邮箱,因为只有使用这个邮箱注册的账户才拥有管理员权限。
6.配置与SMTP相关的环境变量,因为Chatto注册的时候需要验证您的邮箱。
全部可配置的环境变量见官方文档:https://docs.chatto.run/reference/environment-variables/
启动:
docker compose up -d新建NGINX站点配置文件:
nano /etc/nginx/sites-available/chatto写入如下内容:
upstream chat_backend {
    server 127.0.0.1:4000;
}

upstream livekit_backend {
    server 127.0.0.1:7880;
}

server {
    listen 80;
    listen [::]:80;
    server_name chatto.example.com;

    gzip on;
    gzip_types text/plain text/css application/json application/javascript text/xml application/xml application/xml+rss text/javascript;

    location / {
        proxy_pass http://chat_backend;
        proxy_http_version 1.1;
        proxy_set_header Upgrade $http_upgrade;
        proxy_set_header Connection "upgrade";
        proxy_set_header Host $host;
        proxy_set_header X-Real-IP $remote_addr;
        proxy_set_header X-Forwarded-For $proxy_add_x_forwarded_for;
        proxy_set_header X-Forwarded-Proto $scheme;
    }
}

server {
    listen 80;
    listen [::]:80;
    server_name livekit.chatto.example.com;

    location / {
        proxy_pass http://livekit_backend;
        proxy_http_version 1.1;
        proxy_set_header Upgrade $http_upgrade;
        proxy_set_header Connection "upgrade";
        proxy_set_header Host $host;
        proxy_set_header X-Real-IP $remote_addr;
        proxy_set_header X-Forwarded-For $proxy_add_x_forwarded_for;
        proxy_set_header X-Forwarded-Proto $scheme;
        proxy_read_timeout 86400s;
        proxy_send_timeout 86400s;
    }
}
启用站点:
ln -s /etc/nginx/sites-available/chatto /etc/nginx/sites-enabled/chatto签发证书:
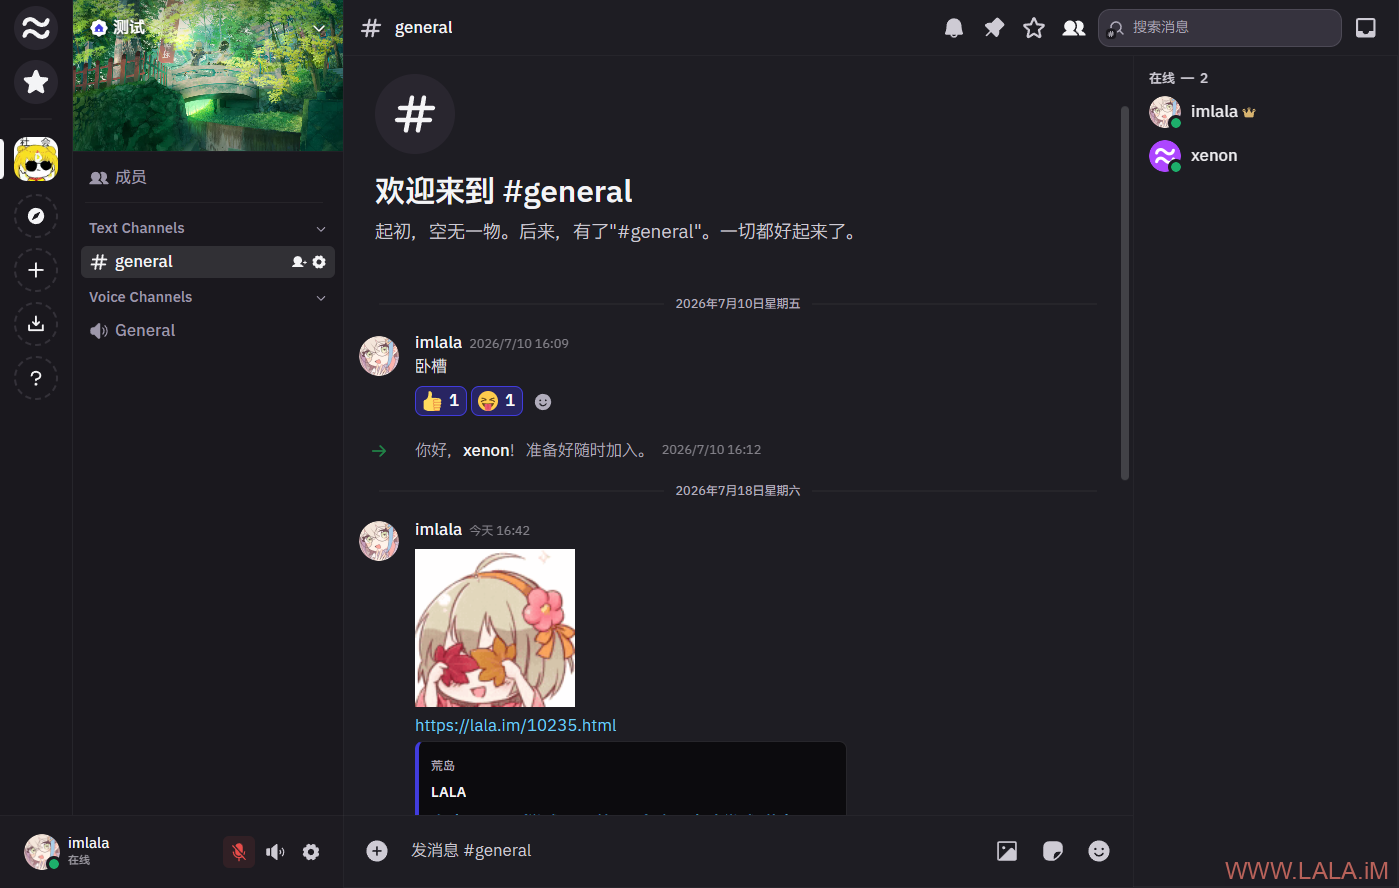
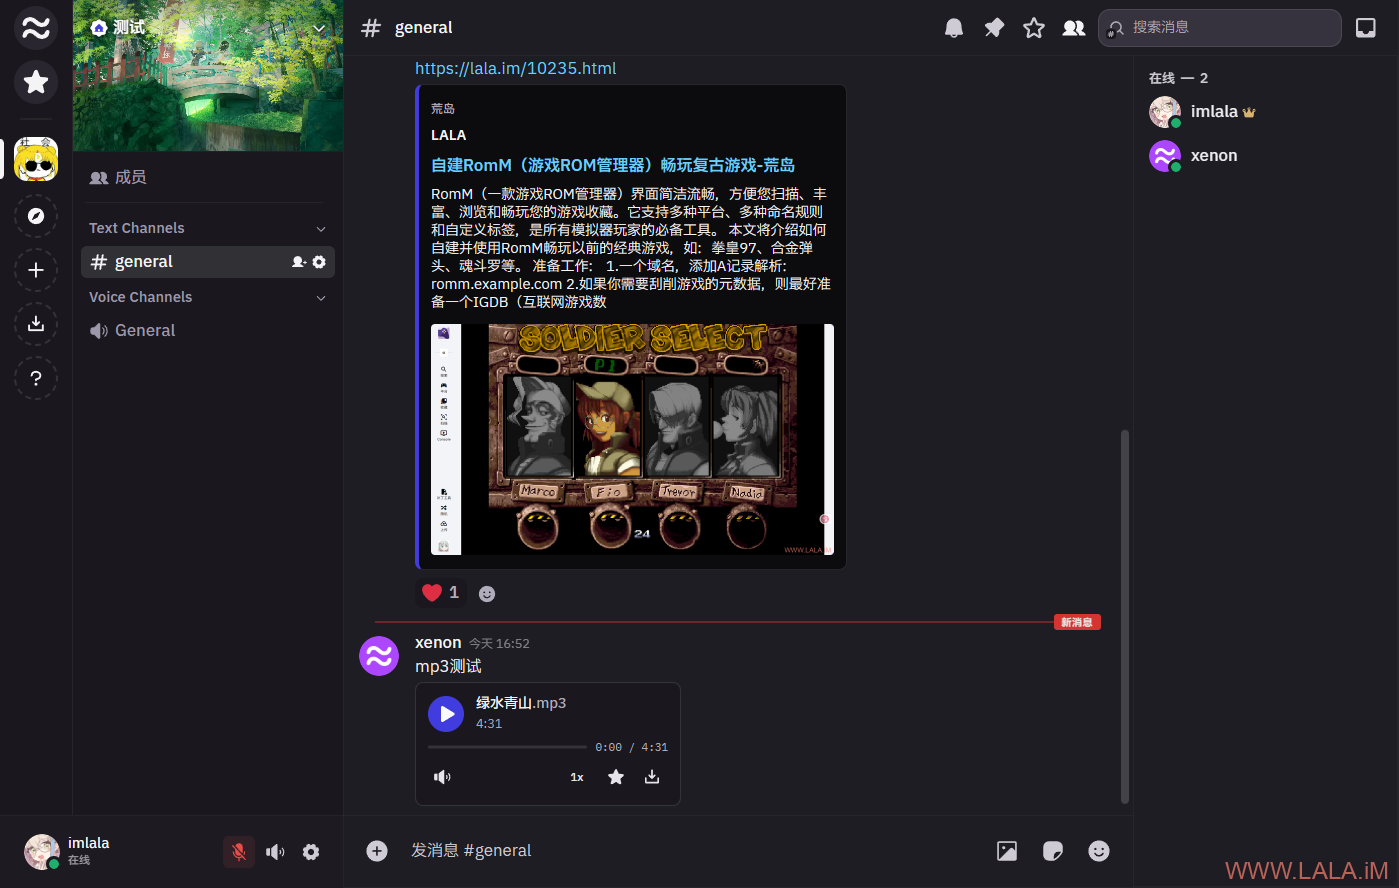
certbot --nginx简单测试了下,各项功能全部正常,群聊:
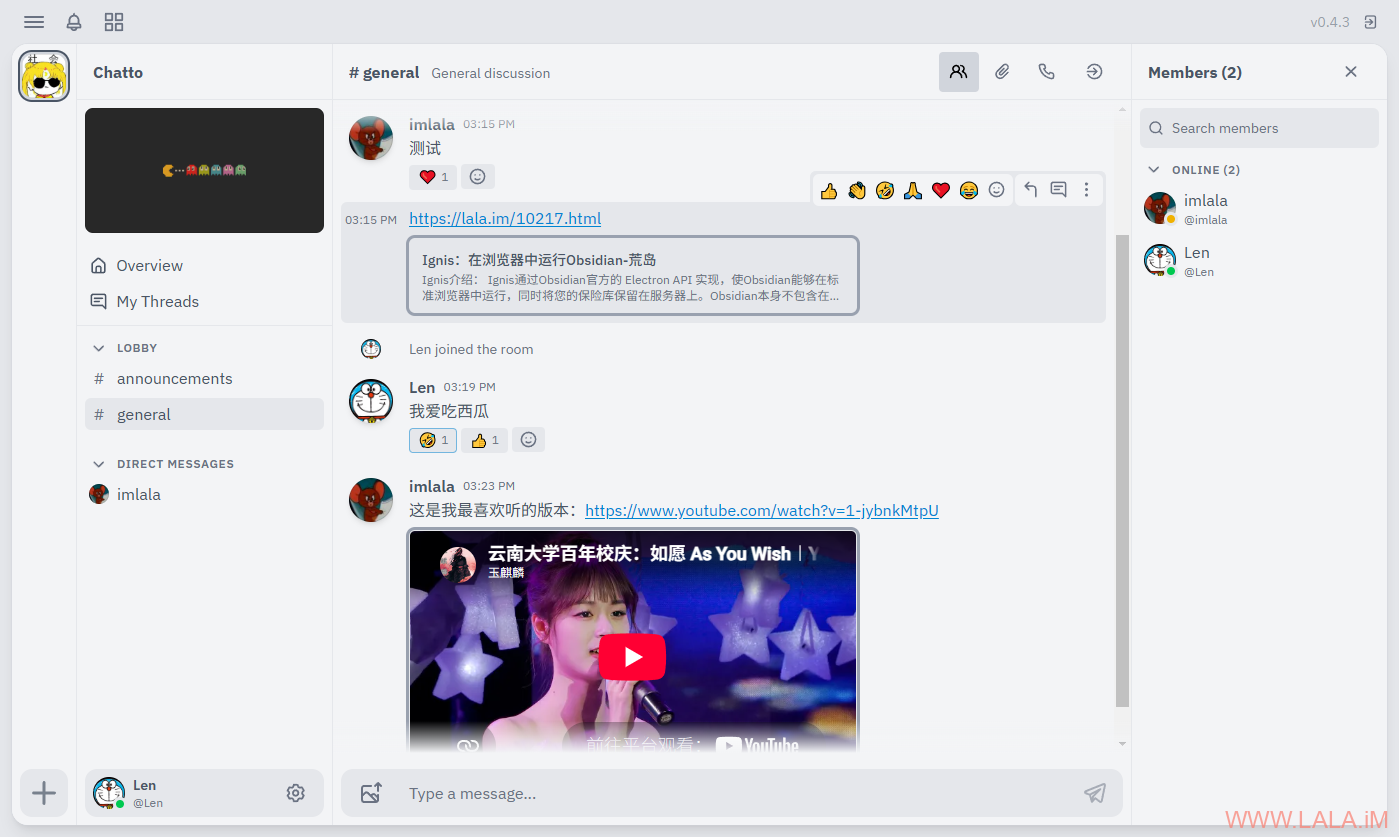
私聊:
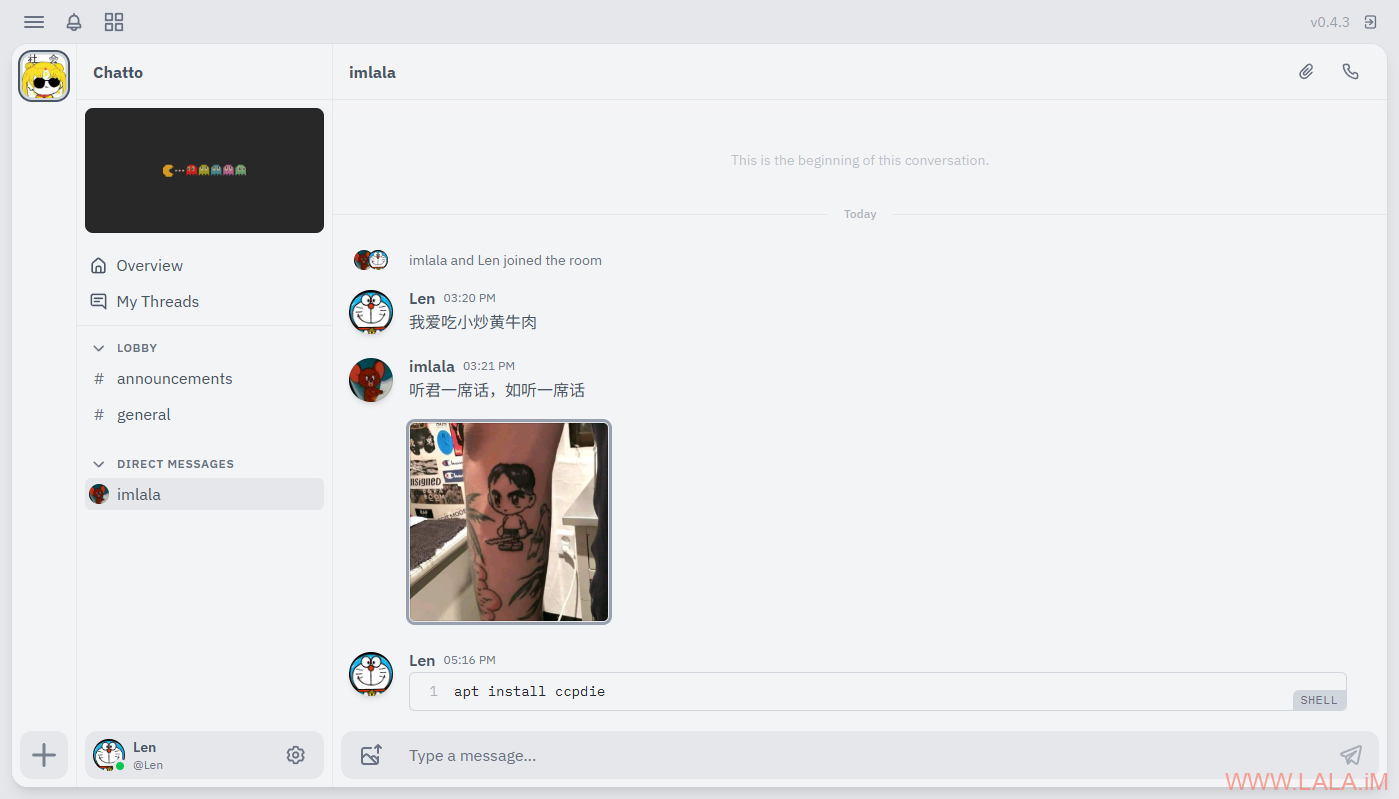
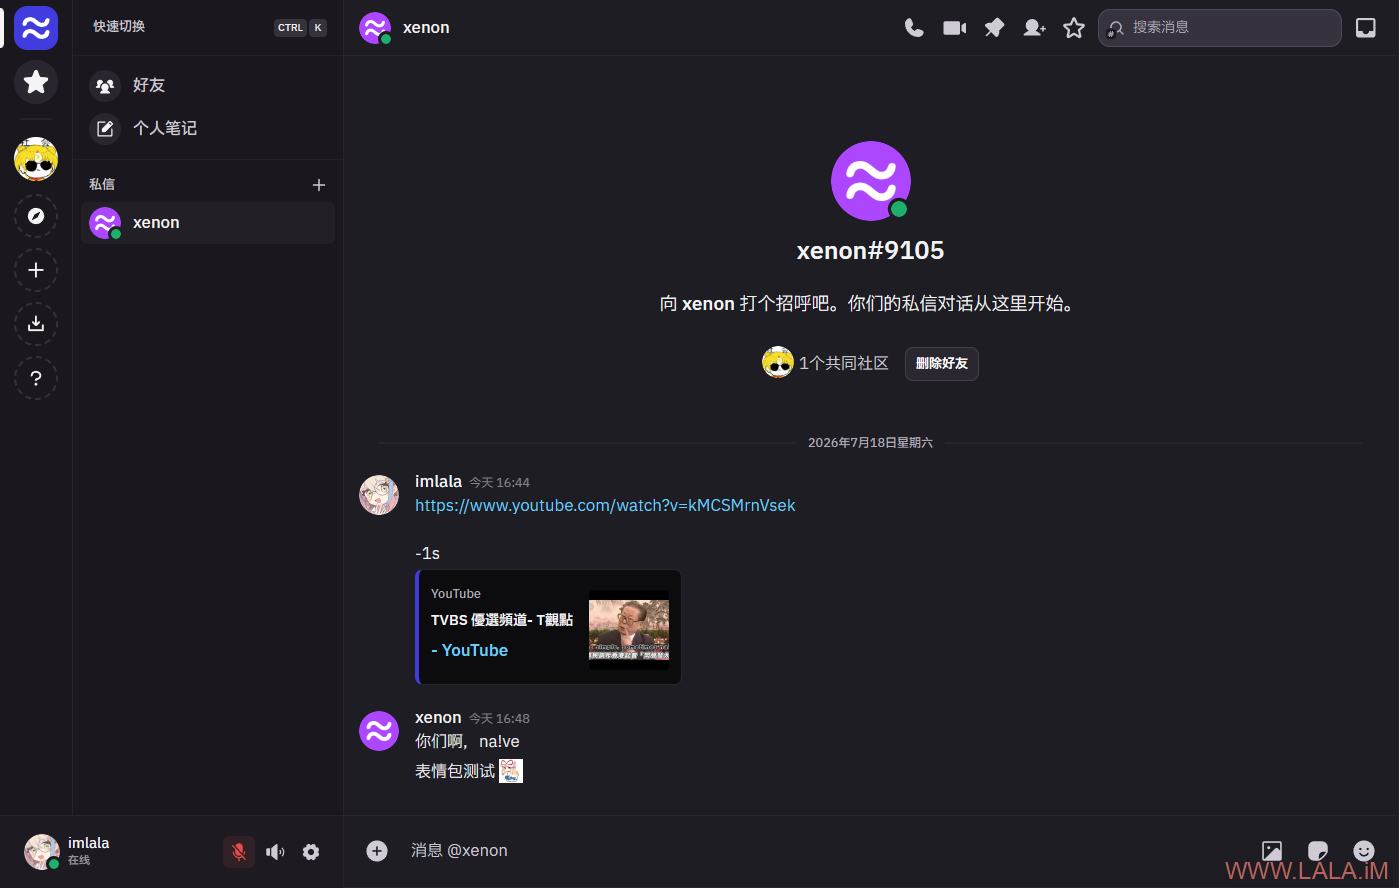
这个项目的布局很明显是仿Discord的,但是目前仅实现了单群组,意思就是你部署的实例只能创建一个群组,不能创建多个。不知道后续作者会不会实现多群组的功能。整体使用下来没发现什么明显的问题,功能也非常完善了,硬要说我感觉差了点什么的话,就是不支持自定义表情包。
我还知道另外一个聊天程序是目前开源当中对Discord还原度最高的,但是这个程序目前BUG有点多,且架构非常臃肿,需要启动18个容器,你没看错整整18个容器。。。我有点纠结要不要水一篇文章= =
2026-07-10 15:00:18
Ignis介绍:
Ignis通过Obsidian官方的 Electron API 实现,使Obsidian能够在标准浏览器中运行,同时将您的保险库保留在服务器上。Obsidian本身不包含在本项目中,也不随本项目一起分发,Docker容器会在首次运行时直接从其官方仓库下载Obsidian。
虽然Obsidian的本地优先策略对大多数用户来说效果不错,但如果用户想远程访问自己的Obsidian却只能通过基于VNC的解决方案来实现,用户体验不佳。Ignis为希望通过浏览器以接近原生方式访问Obsidian的用户提供了一种替代方案。
请注意,Ignis不是远程桌面,不是类似VNC这样的东西,它是一个真正的Web APP。且Ignis只能工作在HTTPS下,为此你必须配置反向代理。
Ignis在Obsidian的基础功能上还增加了一些功能,比较实用的有:
保险库(Vaults)
文件(Files)
服务器端同步
安装NGINX、CertBot、Docker:
apt update
apt install curl nginx python3-certbot-nginx apache2-utils
curl -fsSL https://get.docker.com -o get-docker.sh
sh get-docker.sh
新建compose文件:
mkdir /opt/ignis && cd /opt/ignis && nano docker-compose.yml写入如下内容:
services:
  ignis:
    image: nobbe/ignis:latest
    ports:
      - "127.0.0.1:18080:8080"
    environment:
      - OBSIDIAN_VERSION=1.12.7
      - PUID=1000
      - PGID=1000
    volumes:
      - ./vaults:/vaults
      - ./data:/app/data
      - obsidian-app:/app/obsidian-app
    restart: unless-stopped

volumes:
  obsidian-app:
离线/受限网络安装,例如你的机子无法通过Github下载Obsidian安装包,可以事先准备好deb软件包:
wget https://github.com/obsidianmd/obsidian-releases/releases/download/v1.12.7/obsidian_1.12.7_amd64.deb修改compose文件使用如下配置:
services:
  ignis:
    image: nobbe/ignis:latest
    ports:
      - "127.0.0.1:18080:8080"
    environment:
      - OBSIDIAN_VERSION=1.12.7
      - OBSIDIAN_PACKAGE=/packages/obsidian.deb
      - PUID=1000
      - PGID=1000
    volumes:
      - ./obsidian_1.12.7_amd64.deb:/packages/obsidian.deb:ro
      - ./vaults:/vaults
      - ./data:/app/data
      - obsidian-app:/app/obsidian-app
    restart: unless-stopped

volumes:
  obsidian-app:
启动:
docker compose up -d1.全部可配置的环境变量,见Ignis官方文档。
2.Ignis目前没有原生身份验证能力,如果你将其暴露在公网运行,务必配置一个身份验证,你可以使用OIDC / SSO或者Basic Auth。
这里我配置一个NGINX Basic Auth,创建htpasswd文件:
htpasswd -c /etc/nginx/.htpasswd imlala新建NGINX站点配置文件,请注意Ignis需要WebSocket支持:
nano /etc/nginx/sites-available/ignis写入如下内容:
map $http_upgrade $connection_upgrade {
    default upgrade;
    ''      close;
}

server {
    listen 80;
    server_name ignis.example.com;
    client_max_body_size 5G;

    auth_basic "auth";
    auth_basic_user_file /etc/nginx/.htpasswd;

    location / {
        proxy_pass http://127.0.0.1:18080;
        proxy_http_version 1.1;
        proxy_set_header Host $host;
        proxy_set_header X-Real-IP $remote_addr;
        proxy_set_header X-Forwarded-For $proxy_add_x_forwarded_for;
        proxy_set_header X-Forwarded-Proto $scheme;
        proxy_set_header Upgrade    $http_upgrade;
        proxy_set_header Connection $connection_upgrade;
    }
}
启用站点:
ln -s /etc/nginx/sites-available/ignis /etc/nginx/sites-enabled/ignis签发证书:
certbot --nginx首次使用,需要创建一个保险库(Vault)
效果: