2025-08-31 15:31:47
今年的东京似乎比以往更热,走在路上能真实得感受到什么是炙烤,阳光穿透皮肤直达肌肉,给你一种平时感受不到的通透感,甚至会想多晒一会,让自己熟悉这个陌生的身体。
最近脑海会闪现很多产品的对比,比如我曾经最喜欢的 Apple 在 AI 上意外的缓慢,最早做出 Copilot 的 VSCode 没有成为 AI Code 的领导者,甚至有点跟不上 Cursor 的脚步,Gemini 模型一次次霸榜却无法取代 ChatGPT 成为我日常的工具,我很欣赏 Grok 在交互设计上创新的劲头,却无法真的喜欢上 Grok 的模型效果。
为什么觉得很强的组织,产品却难产或者怎么也不如另一个?尤其是当这些全球最顶尖的团队在一起竞技的时候,这种矛盾凸显到了你不需要思考都会察觉。
产品到底是谁做出来的?
塔尖的决策者时常会被神化,有时候是神化老板,有时候神化产品经理,我也不止一次遇到有朋友会说 “我都想清楚了,只需要找个人来执行就可以了” 以前也许还要去讨论下要找什么样的人来执行,现在有了 Agent 可能大部分人也都有了体会,如果 Agent 的模型能力太差,会需要你一次次的描述自己要做的事情,最后疲惫不堪,开始降低标准妥协。
对吧,产品就是团队一起做出来的,产品是这群人状态和能力的映射。
我在自己做产品的过程中,不止一次的体会到这个观察。
产品哪里出了问题,就是那里的人才密度出了问题。
之所以想这么说,是因为「做什么」和「怎么做」这两件事只有愚蠢的决策者才会认为自己想的就是对的,你需要的是更多的想法和方法,然后筛选,而不是去执行自己的方案。
对于产品的想法,我可能在发布前变更过至少 3 次,一个方案的实现思路,我也可能因为和朋友的一次简短的对谈中完全切换到另一个角度。
碰上有产品感的设计师,最后可能是他告诉你应该怎么做。
碰上对技术有追求工程师,我可能唯一的贡献只是说清楚了需求,在此之上有诸多地方都超越了你的预期,但这都是他自己琢磨的。
蹩脚的产品,修不完的 Bug,拿不出手的交付,并没有什么很复杂的原因,这就是人才密度的现状, 而且要把自己算进去。
人才密度,是一种能量的吸引,双向的筛选,也许现状无力改变,但至少需要认清原因。
2025-08-29 21:03:43
昨天和朋友一起沿着涉谷,代官山,原宿走了一下午,到了晚饭时间连走了 3 家半熟牛肉的餐厅,最后才在原宿的 Galaxy 店旁边找到一家环境不错的店,前两家都开在 B1 层,又小又挤,像是摆满图标的手机桌面,很难慢慢喝点东西聊聊天。
和朋友聊起产品的时候,他感叹道 “我当年产品比同行好,但是还是一个劲的打磨产品,如果当时我花更多精力在营销上,收入能多好多倍。”
这似乎是一个时常发生的争论,产品重要还是营销重要。
其实我也经历过醉心打磨产品细节的时光,尤其是爱花很多时间去打磨动效和交互,现在虽然很少这么干了,但回想起来都还是很喜欢以前那个不懂事得,沉浸在「单纯的热爱」的自己。
话说回来,要我看的话,这个问题提出的角度就是错了,但在重新阐述之前,我们还是要搞清楚为什么会有这样的问题。
通常来说,提出这个问题的人指的是
“埋头产品细节好重要,还是各种无底线的增长手段赚钱更重要”
看不上做营销的人,其实是看不上那些上不了台面的手段,以为是在做营销,实际上做的是销售的事。
而轻视产品的人,是看不上那些无法带来增长的自嗨式打磨,以为是做产品,其实是在做手工艺品。
如果能够正确的理解营销和产品,这个问题的答案就会自然得呈现。
伪产品 —— 为饱和的需求制造产品,认为用户需要的是“要你命3000”,好的产品像是在米饭盖上了一层半熟牛肉,提供新的体验带来增长。
伪营销 —— 把卖掉这一单作为目标,利用信息差诓骗,利诱用户,好的营销和产品是一体的,挖掘需求,创造价值,然后尝试找到最好的角度和力道,把产品这个纸飞机推出去。
所以成为销售之前,应该先 Double Check 下伪产品和伪营销。
2025-07-20 13:27:27
在几个月前,我购买了一个 8845HS 的主机,尝试了一番 ROCm,AMD 在 API 的 iGPU 支持上可以说相当慢了,直到目前也只是在利用 DirectML 和 ONNX 的能力实现 iGPU 上运行模型,非常费劲。
Intel 这边就优雅且慷慨的多,oneAPI 统一了 CPU GPU NPU 多端的运行,看起来非常的靠谱,并且提供了 PyTorch+XPU 的后端,已经并入官方仓库,意味着 PyTorch 项目只需要简单的修改下模型的 device 就可以推理了,真是一种方便你我他的好方案。
不过有了上次 8845HS 的经验后,我也没有贸然下单,总想着先找个机器测一测吧,几经辗转,发现 Intel 的 Tiber Cloud 已经可以用了,开了台机器简单测了几个场景,相较 ROCm 之前在 iGPU 的各种报错,Intel 的 XPU 后端顺利的过于幸福。
Tiber 虽然提供的是 Intel 的商用 GPU,但既然官方表示是一视同仁,我相信 iGPU 的支持也不会差,立刻购入了一个摸到支持门坎的 Ultra 5 225H 的迷你主机,瞧瞧是什么情况。
PyTorch+XPU 安装起来也非常简单,通过这个命令即可:
pip3 install torch torchvision torchaudio --index-url https://download.pytorch.org/whl/xpu这个官方编译的 XPU 版本集成了 https://github.com/intel/torch-xpu-ops 的算子支持
先测一下 Kokoro 这个 TTS 模型
from kokoro import KPipeline
from IPython.display import display, Audio
import soundfile as sf
pipeline = KPipeline(lang_code='a', device='xpu')

text = '''
[Kokoro](/kˈOkəɹO/) is an open-weight TTS model with 82 million parameters. Despite its lightweight architecture, it delivers comparable quality to larger models while being significantly faster and more cost-efficient. With Apache-licensed weights, [Kokoro](/kˈOkəɹO/) can be deployed anywhere from production environments to personal projects.
'''
generator = pipeline(text, voice='af_heart')
for i, (gs, ps, audio) in enumerate(generator):
    print(i, gs, ps)
    display(Audio(data=audio, rate=24000, autoplay=i==0))
    sf.write(f'{i}.wav', audio, 24000)
这个 20s 的音频首次生成大概是 4s,之后大概花费 2s 左右
import soundfile as sf
from misaki import en, espeak

from kokoro_onnx import Kokoro

# Misaki G2P with espeak-ng fallback
fallback = espeak.EspeakFallback(british=False)
g2p = en.G2P(trf=False, british=False, fallback=fallback)

# Kokoro
kokoro = Kokoro("kokoro-v1.0.onnx", "voices-v1.0.bin")

# Phonemize
text = '''
[Kokoro](/kˈOkəɹO/) is an open-weight TTS model with 82 million parameters. Despite its lightweight architecture, it delivers comparable quality to larger models while being significantly faster and more cost-efficient. With Apache-licensed weights, [Kokoro](/kˈOkəɹO/) can be deployed anywhere from production environments to personal projects.
'''
phonemes, _ = g2p(text)

# Create
samples, sample_rate = kokoro.create(phonemes, "af_heart", is_phonemes=True)

# Save
sf.write("audio.wav", samples, sample_rate)
print("Created audio.wav")
Intel 可以通过 pip install onnxruntime-openvino 来开启 GPU 的支持,稍微修改下 Kokoro 这个类
providers = [('OpenVINOExecutionProvider', {'device_type': 'GPU'})]很遗憾,出错了
RuntimeException: [ONNXRuntimeError] : 6 : RUNTIME_EXCEPTION : Exception during initialization: /onnxruntime/onnxruntime/core/providers/openvino/ov_interface.cc:98 onnxruntime::openvino_ep::OVExeNetwork onnxruntime::openvino_ep::OVCore::CompileModel(std::shared_ptr<const ov::Model>&, std::string&, ov::AnyMap&, const std::string&) [OpenVINO-EP]  Exception while Loading Network for graph: OpenVINOExecutionProvider_OpenVINO-EP-subgraph_1_0Exception from src/inference/src/cpp/core.cpp:109:
Exception from src/inference/src/dev/plugin.cpp:53:
Check 'inputRank == 2 || inputRank == 4 || inputRank == 5' failed at src/plugins/intel_gpu/src/plugin/ops/interpolate.cpp:37:
Mode 'linear_onnx' supports only 2D or 4D, 5D tensors
PaddleOCR-onnx 需要修改一下 PredictBase 这个类
       if use_gpu:
            providers = [('OpenVINOExecutionProvider', {
                          'device_type': 'GPU'})]
也可以使用 'device_type': 'NPU' 'device_type': 'HETERO:GPU,CPU' 这类方式指定计算方式
然后运行项目自带的 test_ocr.py 即可,开启 use_gpu=True
import cv2
import time
from onnxocr.onnx_paddleocr import ONNXPaddleOcr, sav2Img
import sys
import time

model = ONNXPaddleOcr(use_angle_cls=False, use_gpu=True)

img = cv2.imread('./onnxocr/test_images/00006737.jpg')
s = time.time()
result = model.ocr(img)
e = time.time()

for box in result[0]:
    print(box)
print("total time: {:.3f}".format(e - s))
sav2Img(img, result, name=str(time.time())+'.jpg')
运行良好,花费了大概 1s
Ollama 的 Intel 支持需要通过 https://github.com/intel/ipex-llm 这个项目,使用 Intel 编译的 Ollama 在运行时可以看到
get_memory_info: [warning] ext_intel_free_memory is not supported (export/set ZES_ENABLE_SYSMAN=1 to support), use total memory as free memory
get_memory_info: [warning] ext_intel_free_memory is not supported (export/set ZES_ENABLE_SYSMAN=1 to support), use total memory as free memory
看来自己不需要解决 iGPU 有多少显存的问题
比 8845HS 的 8 tokens/s 慢一些,不知道未来 ipex-llm 是不是还能在这里加把劲。
这次玩下来,PyTorch 的支持挺不错,足以作为一个推理机器使用。
SD 有两个选择,一个是 Diffusers,一个则是 stable-diffusion.cpp
Flux 占用的内存真的不少,32GB 内存跑 FP16 完全不够,官方也给出了的例子使用 GGUF 量化模型的方法,不过这个方案还是不够省内存
import torch

from diffusers import FluxPipeline, FluxTransformer2DModel, GGUFQuantizationConfig

ckpt_path = (
    "./models/flux1-dev-Q4_0.gguf"
)
transformer = FluxTransformer2DModel.from_single_file(
    ckpt_path,
    quantization_config=GGUFQuantizationConfig(compute_dtype=torch.bfloat16),
    torch_dtype=torch.bfloat16,
)
pipe = FluxPipeline.from_pretrained(
    "black-forest-labs/FLUX.1-dev",
    transformer=transformer,
    torch_dtype=torch.bfloat16
)
pipe.enable_model_cpu_offload()
prompt = "A cat holding a sign that says hello world"
image = pipe(prompt,
    generator=torch.manual_seed(0),
    num_inference_steps=20,
    height=512,
    width=512
 ).images[0]
image.save("flux-gguf.png")这部分我参考了此处的实现 ,通过分步的方式节省了不少内存
import torch
from diffusers import FluxPipeline, FluxTransformer2DModel, GGUFQuantizationConfig
import gc

def flush():
    gc.collect()
    torch.xpu.empty_cache()

def main():
    # downloaded from https://huggingface.co/city96/FLUX.1-dev-gguf
    gguf_file = "./models/flux1-dev-Q4_K_S.gguf"
    model_id = "black-forest-labs/FLUX.1-dev"

    pipeline = FluxPipeline.from_pretrained(
            model_id,
            transformer=None,
            vae=None,
            torch_dtype=torch.bfloat16
    ).to("xpu")

    prompt = "a lovely cat holding a sign says 'hello world'"

    with torch.no_grad():
        prompt_embeds, pooled_prompt_embeds, text_ids = pipeline.encode_prompt(
            prompt=prompt,
            prompt_2=None,
        )

    print("text_encoder:")
    print(f"torch.xpu.max_memory_allocated: {torch.xpu.max_memory_allocated()/ 1024**3:.2f} GB")

    del pipeline
    flush()

    transformer = FluxTransformer2DModel.from_single_file(
        gguf_file,
        quantization_config=GGUFQuantizationConfig(compute_dtype=torch.bfloat16),
        torch_dtype=torch.bfloat16
    )
    pipeline = FluxPipeline.from_pretrained(
        model_id,
        transformer=transformer,
        text_encoder=None,
        text_encoder_2=None,
        tokenizer=None,
        tokenizer_2=None,
        torch_dtype=torch.bfloat16
    ).to("xpu")

    image = pipeline(
        prompt_embeds=prompt_embeds,
        pooled_prompt_embeds=pooled_prompt_embeds,
        generator=torch.Generator("xpu").manual_seed(0),
        height=512,
        width=512,
        num_inference_steps=20
    ).images[0]

    save_file = gguf_file.replace(".gguf", ".jpg")
    image.save(save_file)

    print("transformer:")
    print(f"torch.xpu.max_memory_allocated: {torch.xpu.max_memory_allocated()/ 1024**3:.2f} GB")

if __name__ == "__main__":
    main()
Q4 结果如下
Loading checkpoint shards: 100%|███████████████████████████████████████████████████████████████████████████████████████████████████| 2/2 [00:00<00:00, 94.74it/s]
Loading pipeline components...:  60%|████████████████████████████████████████████████████████▍                                     | 3/5 [00:00<00:00, 28.63it/s]You set `add_prefix_space`. The tokenizer needs to be converted from the slow tokenizers
Loading pipeline components...: 100%|██████████████████████████████████████████████████████████████████████████████████████████████| 5/5 [00:00<00:00, 14.99it/s]
text_encoder:
torch.xpu.max_memory_allocated: 9.32 GB
Loading pipeline components...: 100%|██████████████████████████████████████████████████████████████████████████████████████████████| 3/3 [00:00<00:00, 48.13it/s]
100%|████████████████████████████████████████████████████████████████████████████████████████████████████████████████████████████| 20/20 [02:52<00:00,  8.62s/it]
transformer:
torch.xpu.max_memory_allocated: 9.32 GB
Q8 结果如下
Loading checkpoint shards: 100%|███████████████████████████████████████████████████████████████████████████████████████████████████| 2/2 [00:00<00:00, 19.84it/s]
Loading pipeline components...: 100%|██████████████████████████████████████████████████████████████████████████████████████████████| 5/5 [00:00<00:00, 11.03it/s]
text_encoder:
torch.xpu.max_memory_allocated: 9.32 GB
Loading pipeline components...: 100%|██████████████████████████████████████████████████████████████████████████████████████████████| 3/3 [00:00<00:00, 45.77it/s]
100%|████████████████████████████████████████████████████████████████████████████████████████████████████████████████████████████| 20/20 [01:41<00:00,  5.06s/it]
transformer:
torch.xpu.max_memory_allocated: 12.61 GB
Q8 比 Q4 更快,神奇,似乎是因为硬件有原生 Q8 的加速支持
stable-diffusion.cpp 除了对后端支持很全面( CUDA, Metal, Vulkan, OpenCL and SYCL)另一大优点应该就是占内存比较少了,结合其 Python 的绑定 stable-diffusion-cpp-python可以轻松跑起来 Q8 的模型
from stable_diffusion_cpp import StableDiffusion
import torch

def callback(step: int, steps: int, time: float):
    print("Completed step: {} of {}".format(step, steps))

gen = torch.Generator(device="xpu").manual_seed(0)

stable_diffusion = StableDiffusion(
    diffusion_model_path="./models/flux1-dev-Q8_0.gguf", # In place of model_path
    clip_l_path="./models/clip_l.safetensors",
    t5xxl_path="./models/t5xxl_fp16.safetensors",
    vae_path="./models/ae.safetensors",
    vae_decode_only=True, # Can be True if we dont use img_to_img
)
output = stable_diffusion.txt_to_img(
      prompt="a lovely cat holding a sign says 'hello world'",
      sample_steps=20,
      width=512, # Must be a multiple of 64
      height=512, # Must be a multiple of 64
      cfg_scale=1.0, # a cfg_scale of 1 is recommended for FLUX
      sample_method="euler", # euler is recommended for FLUX
      progress_callback=callback,
      seed=gen.initial_seed()
)

output[0].save("output.png")
Q4 结果如下
stable-diffusion.cpp:1525 - sampling completed, taking 113.58s
stable-diffusion.cpp:1533 - generating 1 latent images completed, taking 113.58s
stable-diffusion.cpp:1536 - decoding 1 latents
ggml_extend.hpp:1148 - vae compute buffer size: 1664.00 MB(VRAM)
stable-diffusion.cpp:1129 - computing vae [mode: DECODE] graph completed, taking 11.54s
stable-diffusion.cpp:1546 - latent 1 decoded, taking 11.54s
stable-diffusion.cpp:1550 - decode_first_stage completed, taking 11.54s
stable-diffusion.cpp:1684 - txt2img completed in 138.73s
Q8 结果如下
stable-diffusion.cpp:1525 - sampling completed, taking 117.70s
stable-diffusion.cpp:1533 - generating 1 latent images completed, taking 117.70s
stable-diffusion.cpp:1536 - decoding 1 latents
ggml_extend.hpp:1148 - vae compute buffer size: 1664.00 MB(VRAM)
stable-diffusion.cpp:1129 - computing vae [mode: DECODE] graph completed, taking 11.57s
stable-diffusion.cpp:1546 - latent 1 decoded, taking 11.57s
stable-diffusion.cpp:1550 - decode_first_stage completed, taking 11.57s
stable-diffusion.cpp:1684 - txt2img completed in 144.15s
可以使用 Intel 提供的性能查看工具 intel_gpu_top
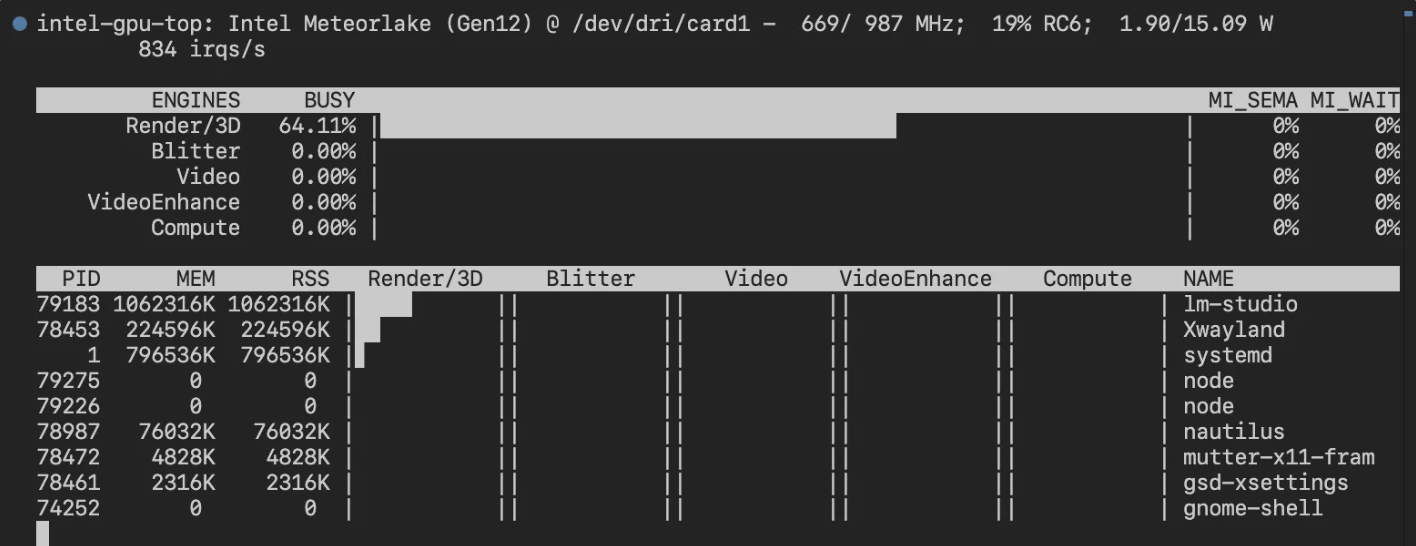
也可以使用 watch -n 1 xpu-smi stats -d 0
2025-03-24 13:11:58
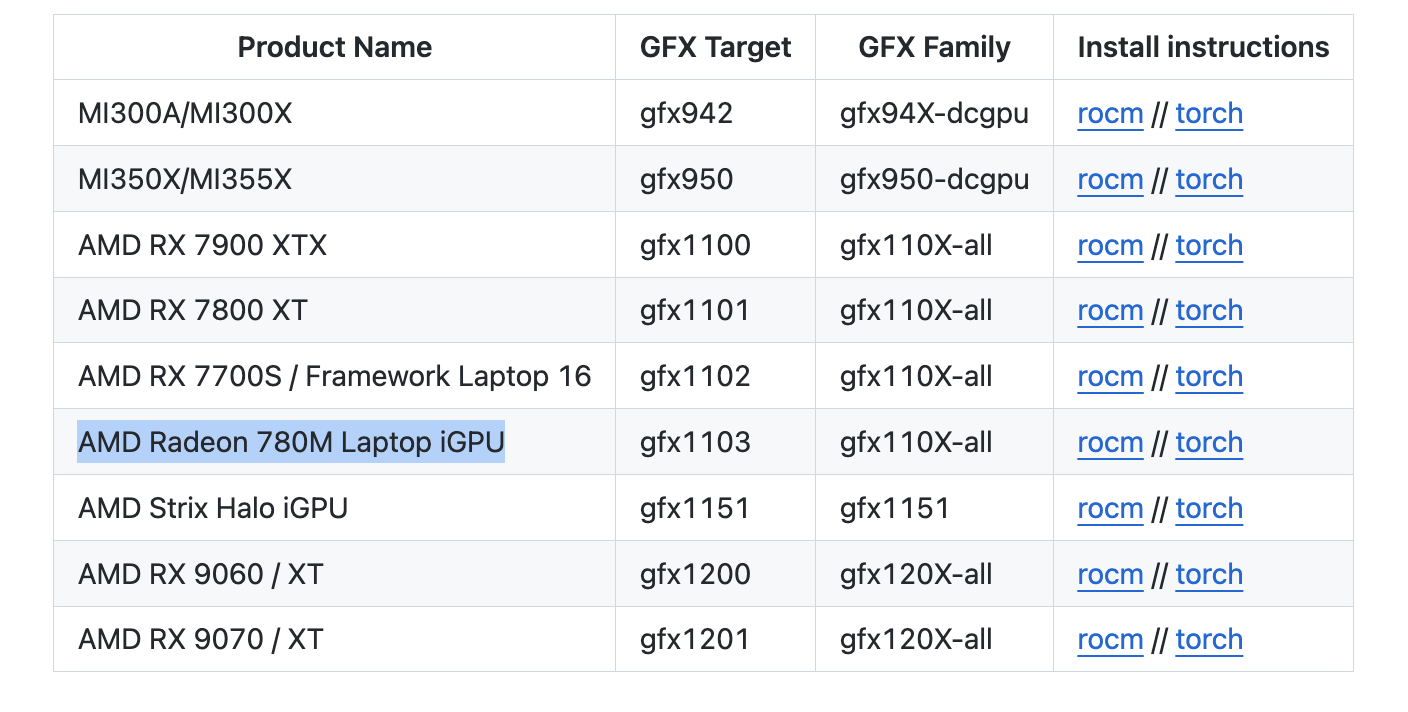
最近 rocBLAS 和 AMD 新的 TheRock 构建项目都支持了 780M(gfx1103) 的显卡,详情见这个指南
安装后我参考之前Intel XPU 体验测试了几个项目。
ROCm 7.1.1
Python 侧(需要注意这个对应关系,如果直接按照官方的命令安装可能出现不匹配的情况)
rocm==7.11.0a20260121
torch==2.11.0a0+rocm7.11.0a20260121
torchaudio==2.11.0a0+rocm7.11.0a20260121
torchvision==0.25.0a0+rocm7.11.0a20260121

uv pip install torch==2.11.0a0+rocm7.11.0a20260121 rocm==7.11.0a20260121 torchaudio==2.11.0a0+rocm7.11.0a20260121 torchvision==0.25.0a0+rocm7.11.0a20260121 --index-url https://rocm.nightlies.amd.com/v2/gfx110X-all/ --pre✅正常通过 CUDA 检测
import torch

print(torch.cuda.is_available())
print(torch.cuda.get_device_name(0))❌错误 RuntimeError: miopenStatusUnknownError
✅正常运行,可以使用 CUDA Provider
✅直接测试了原版,正常运行并启用 CUDA 加速
✅Ollama 方面暂未支持 gfx1103,需要像之前那样用 HSA_OVERRIDE_GFX_VERSION 绕一下
✅用了个 int8 的量化版本,成功
import torch
from diffusers import FluxPipeline

def main():
    pipe = FluxPipeline.from_pretrained(
        "diffusers/FLUX.1-dev-torchao-int8",
        torch_dtype=torch.bfloat16,
        use_safetensors=False,
        device_map="balanced"
    )
    prompt = "a lovely cat holding a sign says 'hello world'"

    out = pipe(
        prompt=prompt,
        height=512,
        width=512,
        num_inference_steps=9
    ).images[0]

    out.save("out.jpg")

if __name__ == "__main__":
    main()
100% 9/9 [01:08<00:00, 7.57s/it]
✅ 成功

import torch
from diffusers import ZImagePipeline

# 1. Load the pipeline
# Use bfloat16 for optimal performance on supported GPUs
pipe = ZImagePipeline.from_pretrained(
    "Tongyi-MAI/Z-Image-Turbo",
    torch_dtype=torch.bfloat16,
    low_cpu_mem_usage=False,
)
pipe.to("cuda")

prompt = "Young Chinese woman in red Hanfu, intricate embroidery. Impeccable makeup, red floral forehead pattern. Elaborate high bun, golden phoenix headdress, red flowers, beads. Holds round folding fan with lady, trees, bird. Neon lightning-bolt lamp (⚡️), bright yellow glow, above extended left palm. Soft-lit outdoor night background, silhouetted tiered pagoda (西安大雁塔), blurred colorful distant lights."

# 2. Generate Image
image = pipe(
    prompt=prompt,
    height=512  ,
    width=512,
    num_inference_steps=9,  # This actually results in 8 DiT forwards
    guidance_scale=0.0,     # Guidance should be 0 for the Turbo models
    generator=torch.Generator("cuda").manual_seed(42),
).images[0]

image.save("example.png")
100% 9/9 [00:35<00:00, 4.00s/it]prompt = "a lovely cat holding a sign says 'hello world'"
100% 9/9 [00:33<00:00, 3.70s/it]感觉再过些时间 780M 兼容性应该会变得更好,但从种种痕迹来看,iGPU 至少要从 Strix Halo (aka AI MAX) 开始,才算得上得到了 AMD 的重视,RuntimeError 应该是会大幅减少的
最近买了个 8845HS 的小主机,但因为 780M 的显卡并没有被 ROCm 列为官方支持的卡,所以目前需要很多 trick 来运行
最主要的就是通过 HSA_OVERRIDE_GFX_VERSION 来假装成受支持的显卡。虽然我用的都是 HSA_OVERRIDE_GFX_VERSION=11.0.2 但实际上因 ROCm 版本的不同,到底哪个能在你的显卡上工作需要自己测试下。
你可以通过 AMD 官网的 Supported GPUs 中的 Architecture 和 LLVM target 来查找,比如 gfx1101,那就是 HSA_OVERRIDE_GFX_VERSION=11.0.1
除此之外,ls /opt/rocm/lib/rocblas/library 命令也会列出一些没显示在官网上的支持,比如 11.0.2
ROCm 是 AMD 显卡玩机器学习的基础组件,现在安装起来很简单,amdgpu-install 这个包就可以很好的解决
sudo apt install amdgpu-install
amdgpu-install --usecase=rocm
Ollama 的运行可以参考下面的 PR Enable AMD iGPU 780M in Linux, Create amd-igpu-780m.md #5426
简而言之,直接通过这个命令就可以运行
HSA_OVERRIDE_GFX_VERSION=11.0.2 ollama serve目前 Ollama 对 igpu 的显存支持有些问题,不能够将所有共享内存计算在内,解决方案可以参考这里 AMD integrated graphic on linux kernel 6.9.9+, GTT memory, loading freeze fix #6282
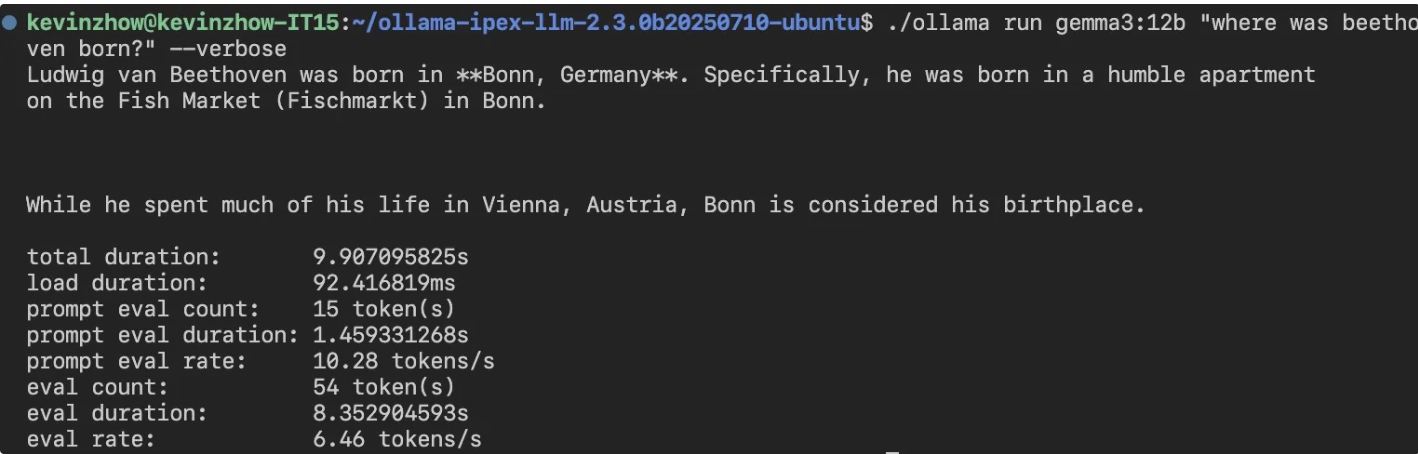
我的主要场景并非用 8845HS 来跑 LLM,所以就跑个简单的测试下吧,gemma3:12b 这个量化模型的速度大概是 8.44 tokens/s 可以说堪用
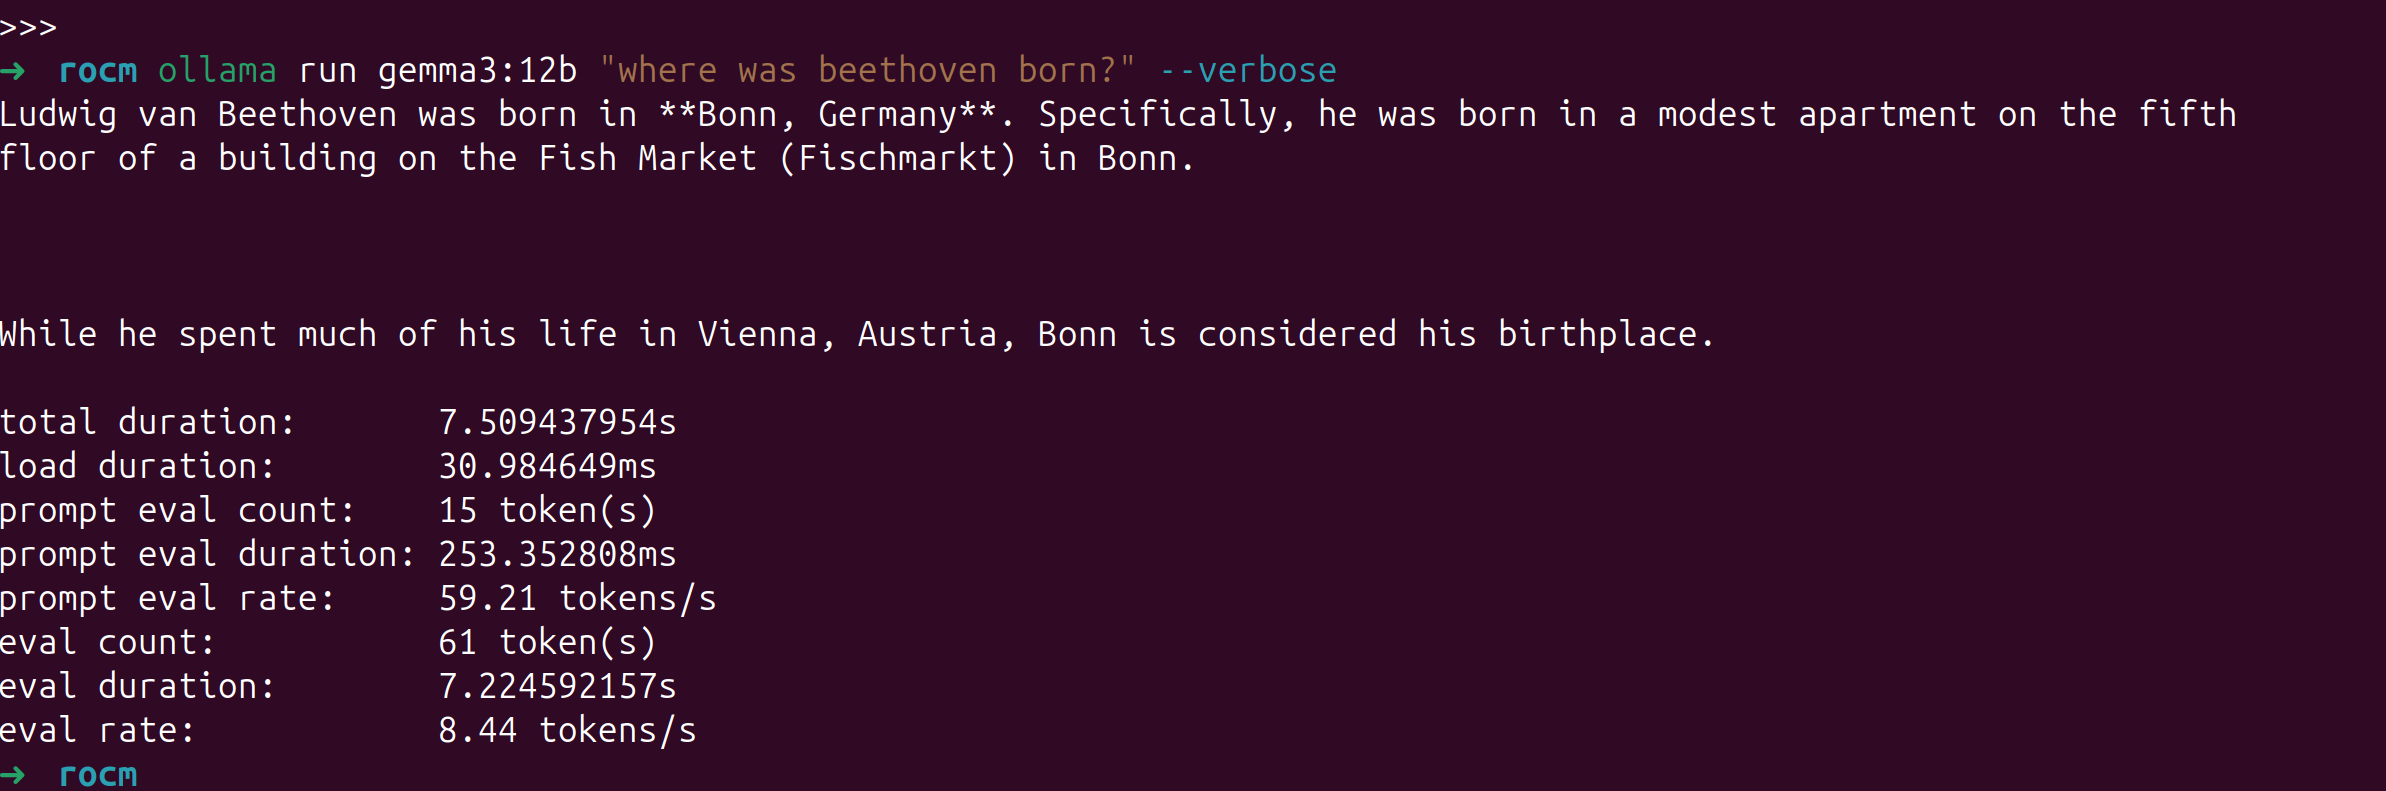
使用 ollama ps命令可以查看模型是分配在哪个设备上运行的。

PyTorch 直接通过AMD 官网提供的命令来安装即可,需要注意的是我使用 PyTorch 官网的命令安装稳定版并不能成功运行,AMD 官网给出的 nightly 版本可以。
pip3 install --pre torch torchvision torchaudio --index-url https://download.pytorch.org/whl/nightly/rocm6.2.4/同样,需要使用 HSA_OVERRIDE_GFX_VERSION=11.0.2 来运行,可以创建一个 .env 文件在 ipynb 里动态载入,如果是 vscode 的话,.env 文件会自动加载,不需要下述步骤
pip install python-dotenv在 ipynb 顶部加入一个 code block 每次运行一下即可
%load_ext dotenv
%dotenv
其它内容无需修改
配置完成后,如果有时候不确定有没有跑在 GPU 上,可以用 radeontop 来监控
sudo apt install radeontop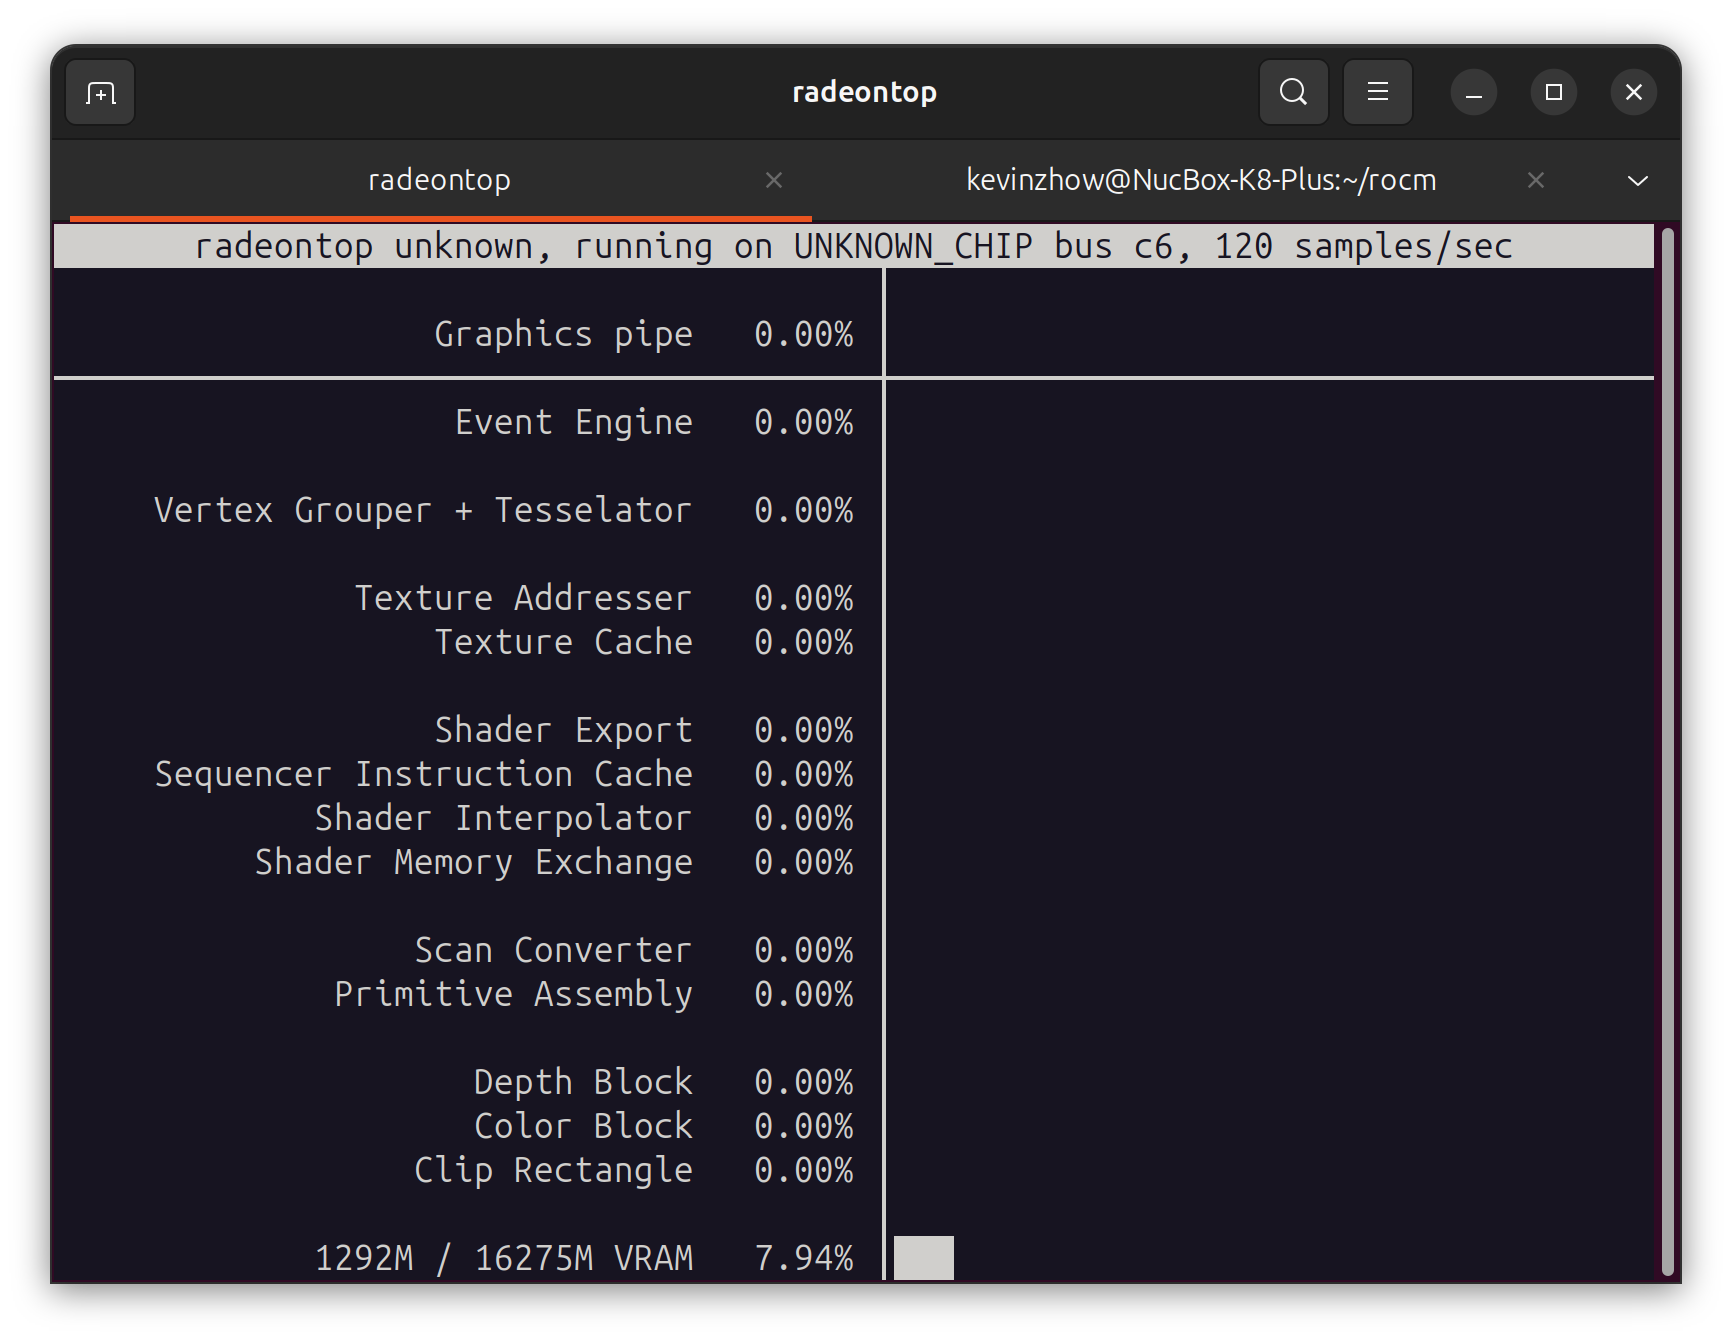
8845HS 还带了个 16 TOPS 的 NPU,不过要等到 Linux 6.14 才会合并进去。
届时 ONNX Runtime 的 VitisAIExecutionProvider 和 HuggingFace 的 RyzenAI 应该都能开箱即用。
唯一的问题是兼容性如何。
暂时还没折腾,等到时候也会测试一下再写一篇折腾的博客
Does ROCm 5.7 support Radeon 780M (gfx1103)? #2631
Feature: ROCm Support for AMD Ryzen 9 7940HS with Radeon 780M Graphics #3398
2025-03-20 16:25:56
最近经常想起自己为什么离开公司自己做产品,都已经是 7 年前的事情了
当时为了能够按照自己的意志去做产品
做一款足够独特,有趣的产品
这些年事情虽然做的慢了些
但现在对这个目标有了更好的想法,更成熟的思考
7 年间发生了很多事情,失去了挚友
身份,家庭,关系也都在变化
但今天我真的迈入新的副本了
副本开始前,是应该好好休息一下的!
2025-03-08 11:07:40
昨天看介绍说乔布斯在设计苹果的新总部时希望有在公园里办公的感觉,因为在亲近自然的时候最有灵感。
想起了去年住的东越谷,东越谷是真的挺美的,河道,公园,家里的窗外。
因为不能养猫所以搬家了,离开了这个环境后经常会想念,所以也在考虑是不是应该再搬家,找一个能养猫又亲近自然的地方。
但还是等春天来了之后,看看这里万物复苏后是什么感觉,或许也会很美。
最近集中看了一些电影,「怪物」「去唱卡拉OK吧」「爱的接力棒」这些
感觉也许是自己真的步入中年,远离青春了
「去唱卡拉OK吧」是那种后劲很足的青春感
而且不是那种恋爱的青春