2024-02-25 17:43:54
Recently when I deploying one of my Next.js applications to production, after running the command yarn build, it stucks on Creating an optimized production build ... forever:
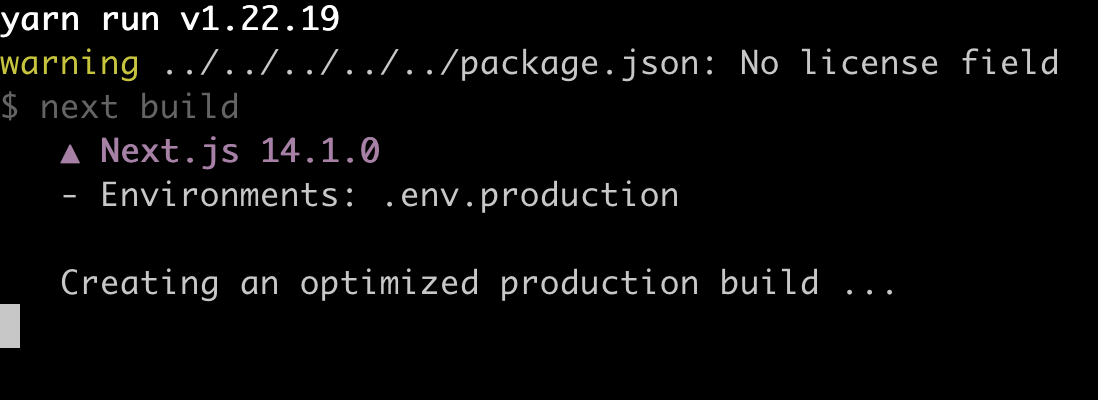
This is kind of weird as it works well on my local machine but hangs here almost everytime I run it on production.
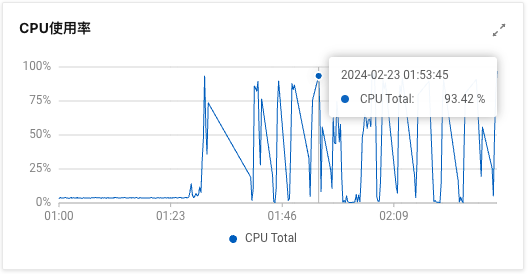
Checked online monitor and I noticed the high CPU and memory usage:

I've tried many ways to solve this problem:
yarn build againyarn install againNone of them worked, it just stuck on Creating an optimized production build ... forever, this issue drives me crazy!
To further diagnose the problem, I decided to deploy my application to another server on DigitalOcean to see if the issue was specific to the Aliyun ECS machine.
Unfortunately I got the same result. But additionally I got an error shows on the screen:
FATAL ERROR: Reached heap limit Allocation failed - JavaScript heap out of memory
<--- Last few GCs --->

[1120666:0x6ef96b0]    87503 ms: Mark-Compact (reduce) 462.5 (486.3) -> 461.9 (485.8) MB, 690.73 / 0.00 ms  (average mu = 0.260, current mu = 0.170) allocation failure; GC in old space requested
[1120666:0x6ef96b0]    88403 ms: Mark-Compact (reduce) 462.3 (486.3) -> 462.0 (486.5) MB, 762.13 / 0.00 ms  (average mu = 0.207, current mu = 0.153) allocation failure; GC in old space requested


<--- JS stacktrace --->

FATAL ERROR: Reached heap limit Allocation failed - JavaScript heap out of memory
----- Native stack trace -----

 1: 0xcc0a72 node::OOMErrorHandler(char const*, v8::OOMDetails const&) [/usr/bin/node]
 2: 0x1054530 v8::Utils::ReportOOMFailure(v8::internal::Isolate*, char const*, v8::OOMDetails const&) [/usr/bin/node]
 3: 0x1054817 v8::internal::V8::FatalProcessOutOfMemory(v8::internal::Isolate*, char const*, v8::OOMDetails const&) [/usr/bin/node]
 4: 0x1273a55  [/usr/bin/node]
 5: 0x128a578  [/usr/bin/node]
 6: 0x1261a7e v8::internal::HeapAllocator::AllocateRawWithLightRetrySlowPath(int, v8::internal::AllocationType, v8::internal::AllocationOrigin, v8::internal::AllocationAlignment) [/usr/bin/node]
 7: 0x1262d64 v8::internal::HeapAllocator::AllocateRawWithRetryOrFailSlowPath(int, v8::internal::AllocationType, v8::internal::AllocationOrigin, v8::internal::AllocationAlignment) [/usr/bin/node]
 8: 0x123f986 v8::internal::Factory::AllocateRaw(int, v8::internal::AllocationType, v8::internal::AllocationAlignment) [/usr/bin/node]
 9: 0x12314e4 v8::internal::FactoryBase<v8::internal::Factory>::AllocateRawWithImmortalMap(int, v8::internal::AllocationType, v8::internal::Tagged<v8::internal::Map>, v8::internal::AllocationAlignment) [/usr/bin/node]
10: 0x123380f v8::internal::FactoryBase<v8::internal::Factory>::NewRawTwoByteString(int, v8::internal::AllocationType) [/usr/bin/node]
11: 0x155dd05 v8::internal::String::SlowFlatten(v8::internal::Isolate*, v8::internal::Handle<v8::internal::ConsString>, v8::internal::AllocationType) [/usr/bin/node]
12: 0x10623fd v8::String::Utf8Length(v8::Isolate*) const [/usr/bin/node]
13: 0xdc1baf  [/usr/bin/node]
14: 0x1a6aadd  [/usr/bin/node]
Compiler server unexpectedly exited with code: null and signal: SIGABRT
OK. Perhaps there is something to do with memory leak?
I searched online, maybe the memory allocated to Node.js is insufficient.
I then use this command to see the current value of max-old-space-size:
node -e ‘console.log(v8.getHeapStatistics().heap_size_limit/(1024*1024))’
the result is only 512MB.
OK, I increased the memory to 2GB:
export NODE_OPTIONS="--max-old-space-size=2048"
then run yarn build again to see if it works now.
After waiting for about 1min, the build process exited with the following error:
Compiler server unexpectedly exited with code: null and signal: SIGKILL
S**t! Why is this happening? I have no idea cause there is no more other logs to check.
Eventually, I had to take the build process on my local machine.
I use Docker to build on my local and push to production to deploy the application. Unfortunately this is the only workaround I've found for now.
Many Next.js users faced the problem:
https://github.com/vercel/next.js/discussions/60147
https://github.com/vercel/next.js/issues/32314
https://github.com/vercel/next.js/issues/54708
Some of them were able to solve it by the approaches I mentioned above, but none of those worked for me.
https://www.toptal.com/nodejs/debugging-memory-leaks-node-js-applications
2023-09-18 15:46:26
今天想给应用快速撸一个用户系统,注册登录,没想到搞了半天。上了 devise, 发现 current_user 在 sign_in 之后还是 nil. sign_in 本身是正常的,但是这个 current_user 只能 per request 有效。
原因:session-based authentication 在 API mode Rails application 中无法使用
解决思路:
devise-jwt (https://github.com/waiting-for-dev/devise-jwt) 或 http authenticationconfig.middleware.use ActionDispatch::Cookies
config.middleware.use ActionDispatch::Session::CookieStore
方法1 需要重新写代码,成本相对高,放弃
方法3 尝试了引入之后还是不行,以为是方向错了,实际可用以下方法检查:
rake middleware
还可在浏览器查看 cookie, 正常 sign_in, sign_out 之后应该会有 cookie change, 如果没有,那说明 application cookie set 有问题
方法2 尝试了之后发现还是不行,才明白不是 API-only 的问题,看浏览器里面 cookie 根本没有正常 set
后来发现是只解决了一半,还有一个跨域的问题,因为这次我这个应用是彻底前后端分离,不在一个端口,所以需要使用 credentials (https://developer.mozilla.org/en-US/docs/Web/API/Request/credentials) 在前端请求的时候 来处理这种 cross-origin requests. 不然 cookie 在发送请求的时候就不会发过去
当然了,rack-cors 也要配置一下,允许 credentials:
Rails.application.config.middleware.insert_before 0, Rack::Cors do
  allow do
    origins "127.0.0.1:3000"

    resource "*",
      headers: :any,
      methods: [:get, :post, :put, :patch, :delete, :options, :head],
      credentials: true  // Add this line
  end
end
另外今天还被自己坑了一把,之前没用 devise 的时候,自己为了测试方便写了如下代码:
def current_user
  @user = User.first
end
我说怎么 sign out 了,current_user 还一直在,登出就是登不出去,devise 请求 检查半天... 被自己坑惨
哦对了还有个问题,我项目里前端请求用的是 rails/request.js (https://github.com/rails/request.js) 这个库,还不支持请求的时候带 credentials option,我看已经有人 MR 了但是还没有 release, 先用着 axios 或者 fetch 都行。
2023-08-16 21:07:13
When building web applications, sometimes you might need to provide a customized right-click context menu to enhance the user experience. In this article, I'm going to explore how to create a custom right-click menu in a React application.
Before starting, it's worth mentioning that there are some existing libraries available that offer solutions for context menu (like react-contextmenu or react-contexify or react-context-menu). If you don't want to use the library and want to roll up your sleeves to create a customized solution tailored to your application's unique needs, let's move on!
A context menu, often referred to as a right-click menu, is a pop-up menu that appears when a user right-clicks on an element.
the oncontextmenu event is typically triggered by clicking the right mouse button. In the context of React, we can utilize the onContextMenu event to capture the right-click action.
For further details, you can refer to the MDN Web Docs or w3schools Doc
To prevent the default context menu from showing up, we can use the preventDefault() method on the event object:
function Home() {
 const handleContextMenu = (e) => {
   e.preventDefault(); // prevent the default behavior when right-clicked
   console.log("right click");
 };

 return (
   <div onContextMenu={handleContextMenu}>
     {/* Your content here */}
   </div>
 );
}

export default Home;First, let's create a new component called CustomMenu. This component will render the menu items and handle the actions when a menu item is clicked.
This component takes two props: handleMenuItemClick for handling menu item clicks and menuPosition for positioning the menu based on the mouse coordinates.
import React from 'react';

function CustomMenu({ handleMenuItemClick, menuPosition }) {
 const menuItems = ['foo', 'bar', 'item3'];

 const handleClick = (item) => {
   handleMenuItemClick(item);
 };

 return (
   <div className="custom-menu rounded shadow bg-white absolute" style={{ left: menuPosition.x, top: menuPosition.y }}>
     {menuItems.map((item) => (
       <div className="cursor-pointer rounded px-4 py-2 hover:bg-slate-400" key={item} onClick={() => handleClick(item)}>
         {item}
       </div>
     ))}
   </div>
 );
}

export default CustomMenu;Now, let's integrate the custom context menu into our main component.
When the user right-clicks, we'll set the menuVisible state to true and also store the mouse coordinates to determine the menu position.
import React, { useState } from 'react';
import CustomMenu from './CustomMenu';

function Home() {
 const [menuVisible, setMenuVisible] = useState(false);
 const [menuPosition, setMenuPosition] = useState({ x: 0, y: 0 });

 const handleContextMenu = (e) => {
   e.preventDefault();
   setMenuVisible(true);
   // Store the mouse coordinates
   const mouseX = e.clientX;
   const mouseY = e.clientY;
   setMenuPosition({ x: mouseX, y: mouseY });

   // Add an event listener to handle clicks outside the menu
   document.addEventListener('click', handleOutsideClick);
 };

 const handleOutsideClick = (e) => {
   // Check if the click is outside the menu
   if (!e.target.closest('.custom-menu')) {
     setMenuVisible(false);
     document.removeEventListener('click', handleOutsideClick);
   }
 };

 const handleMenuItemClick = (item) => {
   switch (item) {
     case 'foo':
       // Perform the foo action
       break;
     case 'bar':
       // Perform the bar action
       break;
     default:
       break;
   }
   setMenuVisible(false);
 };

 return (
   <div onContextMenu={handleContextMenu}>
     {/* Your other content here */}
     {menuVisible && <CustomMenu handleMenuItemClick={handleMenuItemClick} menuPosition={menuPosition} />}
   </div>
 );
}

export default Home;
Now, let's take a look at the result:

Feel free to customize the design and behavior of the custom menu to fit your application's style and requirements.
With this approach, you can create context menus that provide specific actions and options, making your application more user-friendly and efficient.
2023-06-16 19:05:34
Online example: https://ac.aiichat.cn
Code repository: https://github.com/renny-ren/action-chat
In this article, I'm going to explore how to leverage the power of Rails ActionCable and React to build a web chat application. ActionCable provides a straightforward way to incorporate real-time features into Rails applications, while React serves as a powerful and flexible frontend framework. By combining these technologies, we can create an interactive and dynamic chat application. Let's dive into the details of how to implement this solution.
Before we dive into the implementation details, make sure you have the following prerequisites in place:
- Ruby on Rails: Ensure that you have Rails installed on your local machine.
- React: Familiarize yourself with React and have a basic understanding of how React components and states work.
To begin with, let's create an ActionCable channel for our chat application. In your terminal, run the following command to generate the channel:
rails g channel chat_channelThis command will generate a chat_channel.rb file under the app/channels directory. Open this file and update it as follows:
class ChatChannel < ApplicationCable::Channel
  def subscribed
    stream_from "ChatChannel"
  end

  def unsubscribed
    # Any cleanup needed when the channel is unsubscribed
  end

  def receive(data)
    @message = user.messages.create(body: data["body"])
    ActionCable.server.broadcast("ChatChannel", JSON.parse(@message.to_json))
  end
end
stream_from method inside the subscribed specifies the channel you want to subscribe to and receive updates from. It means that whenever there is a new message sent to the ChatChannel, the clients subscribed to this channel will receive the message in real-time.
To establish a connection between the client and the server, we need to create an ActionCable consumer in our React application. Add the following code snippet where you want to initiate the connection:
app/javascript/channels/consumer.js
// Create a consumer object
const consumer = ActionCable.createConsumer();
This code initializes an ActionCable consumer object, which acts as the bridge between the client and the server.
Now, let's subscribe to the chat channel we created earlier. Use the following code snippet to subscribe to the channel:
// Subscribe to a channel
const subscription = consumer.subscriptions.create("ChatChannel");
Ensure that the channel name passed matches the name of the channel you defined in your Rails application.
If at any point you want to unsubscribe from the chat channel, you can call the unsubscribe method on the subscription object:
subscription.unsubscribe();This will effectively terminate the connection and stop receiving updates from the channel.
Finally, when you're done using the consumer object, it's good practice to disconnect it. Use the following code snippet to disconnect the consumer:
consumer.disconnect();This will release any resources associated with the consumer and prevent unnecessary connections.
Online example: https://ac.aiichat.cn
Code repository: https://github.com/renny-ren/action-chat
Refer to the following resources for more detailed information and examples:
Integrating ActionCable with React
2023-05-19 20:31:23
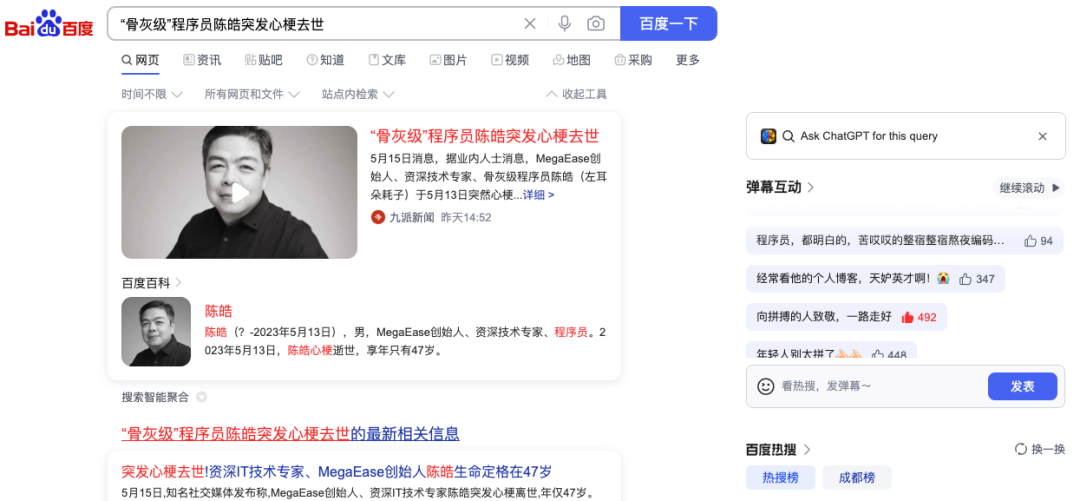
没有想到突然以这样的方式看到皓叔,在百度的热搜榜。
前几天看到这个噩耗时,我正在地铁上,非常震惊。一开始是不敢相信,然后感到错愕,从我上地铁到下地铁,我整个人是木在那里,一直在刷相关的消息,朋友圈已经刷屏了。
好几天过去了,今天忙完,看到了这个仓库,里面记录了大家对左耳朵耗子的点滴回忆,我把这个仓库大家写的文字基本都看了一遍,然后自己也来写一写。
大概是 2016 年吧,我还没毕业,那时偶然间刷到了酷壳的文章,很受启发,当时就收藏了。
后来又刷到了,我说这篇文章怎么写这么好,一看又是皓叔出品,果然是精品啊。
皓叔很多文章一看就是经过深度思考总结出来的,像《X-Y PROBLEM》,《谈谈我的“三观”》这些,都是很经典,一方面我发现找到了共鸣,有一些观点,有一些我认为的但是没有说出来的,皓叔说出来了,简直不能认同更多;另一方面让人感觉醍醐灌顶,深受启发。
我是普通野生程序员一枚,在前司上班时候,有一天,我们 leader 说邀请到了左耳朵耗子来给我们分享,我当时看了非常激动,期待着他的到来,没想到突然就能见到自己敬仰的人,想听听大佬会带来什么样的分享。
第二天皓叔来了,一身朴素的装扮,沉稳的技术人形象,背着个包,和在网上看到的照片上一模一样的衣服,甚至可以说是和修理工人有几分相似。

白发苍苍,我看过他说的,那段时间家庭的事,父亲的事,一下头发就白了。
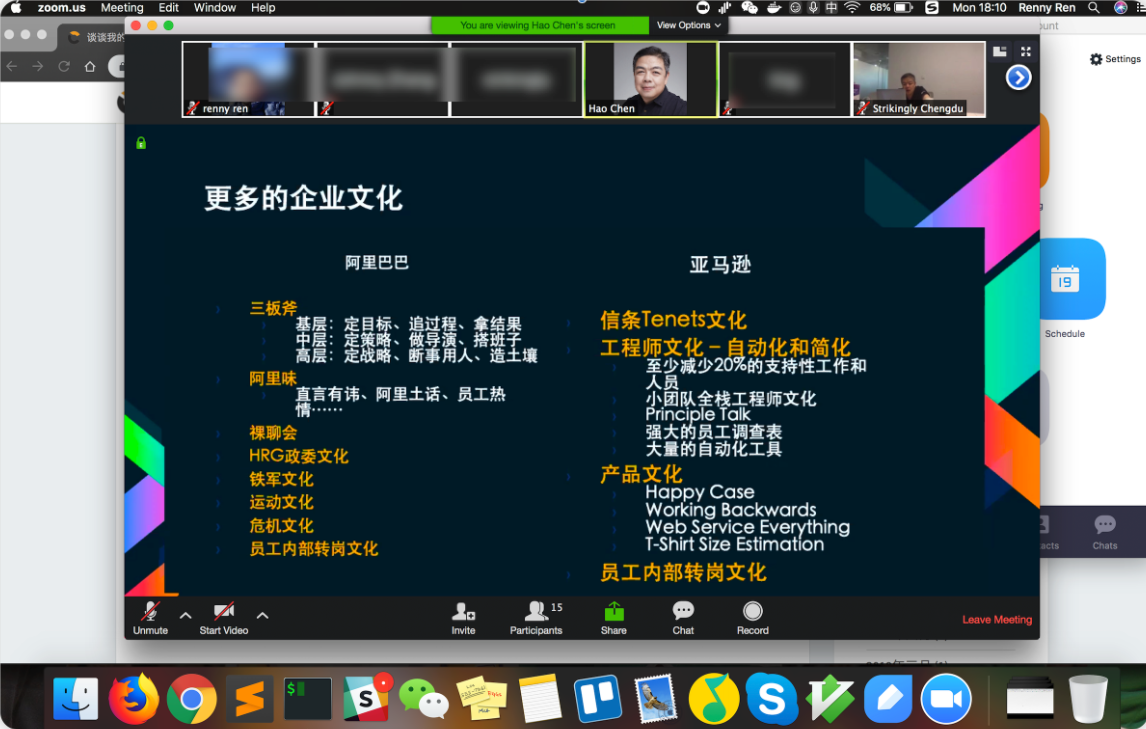
分享的时候我就坐他旁边,听得津津有味。我还记得他说他这人很喜欢总结,确实,在他分享过程中不难看出他自己独特的思考,他对于事情的认真的态度,以及钻研的精神,这些都是令我十分敬佩的。
就像 Kevin 说的,他聊了很多,他喜欢对比阿里和亚麻的企业文化,我当时还截屏了,这张截图一直保留到现在。
分享完皓叔就要赶去机场了,空隙间和他聊了几句,还记得他说:“你们现在都叫我皓叔了啊…”
我想,虽然按辈分讲可以叫叔了,但看了大家写的,他应该不太喜欢这个称呼,哈哈。
我与皓哥其实没有太多交集,大部分时候我都是默默地看,看他发的文章,看他朋友圈的分享,偶尔点个赞,看他在推特上和别人深夜对线。
但我从他身上学到了很多,他的认知、他的思考、他的态度。我很佩服皓哥的钻研精神、分享精神和乐于助人的精神。
长期坚持深耕底层技术,不容易;博客坚持分享二十年,不容易;他说帮助他人收获最大的是自己,他说至少 45 岁之前不会写书因为觉得自己积累不够,他还痛恨那些出烂书的人,有自己的痛恨手册。
关注多年,就我个人主观片面的了解而言,皓哥是一个有原则、棱角分明、犀利、热爱技术、谦逊、对自己有高标准高要求的人。
虽然有时候他的一些言论我也无法认同,有时候感觉他怼人怼得太直接了,有时候觉得他太犀利了,但一个人不可能什么都是对的,这不妨碍其他的内容给人的正向激励和影响。
所以最近看到一些无脑的评论,我实在无法理解,还有各种黑他的,哈哈,不过这也正说明了他的影响力。
对于一些人来讲,可能无法理解失去这样一位前辈对我们是什么样的打击。
天妒英才,惋惜之余,我相信皓哥留下的文章和作品将会继续影响、激励着中国的程序员们。
最后贴上这句在任何平台都能看到座右铭:
2023-05-01 01:02:37
中文版本 (Chinese version): https://ruby-china.org/topics/43052
When using ChatGPT, you may notice that the response is not returned all at once after completion, but rather in chunks, as if the response was being typed out:
If we check OpenAI API document, we can find that there's a param called stream for the create chat completion API.
If set, partial message deltas will be sent, like in ChatGPT. Tokens will be sent as data-only server-sent events as they become available, with the stream terminated by a
data: [DONE]message.
So what is SSE?
Basically, SSE, short for “Server-Sent Event”, is a simple way to stream events from a server. It is used for sending real-time updates from a server to a client over a single HTTP connection. With SSE, the server can push data to the client as soon as it becomes available, without the need for the client to constantly poll the server for updates.
SSE can be implemented through the HTTP protocol:
https://www.host.com/stream
Connection: keep-alive to establish a long-lived connectionContent-Type: text/event-stream response headerevent: add
data: This is the first message, it
data: has two lines.It looks like SSE is similar to WebSocket? they are both used for real-time communication between a server and a client, but there are some differences between them.
In conclusion, SSE seems like a simpler alternative to websockets if you only need to have the server send events. WebSocket, on the other hand, is more powerful and can be used in more complex scenarios, such as real-time chat applications or multi-player games.
Now let's talk about how to use OpenAI's API to receive Server-Sent Events (SSE) on your server, and forward those events to your client using SSE.

Here is the workflow for implementing SSE in Rails to use ChatGPT:
EventSource to server endpoint with SSE configured.stream: true parameter.[Done] message signals that we can close the SSE connection to OpenAI, and our client can close the connection to our server.After understanding SSE and the workflow, we start coding the entire process.
const fetchResponse = () => {
  const evtSource = new EventSource(`/v1/completions/live_stream?prompt=${prompt}`)
  evtSource.onmessage = (event) => {
    if (event) {
      const response = JSON.parse(event.data)
      setMessage(response)
    } else {
      evtSource.close()
    }
  }
  evtSource.onerror = () => {
    evtSource.close()
  }
}
We uses the EventSource API to establish a server-sent event connection. And the onmessage event will be triggered when a message is received from the server.
class CompletionsController < ApplicationController
  include ActionController::Live

  def live_stream
    response.headers["Content-Type"] = "text/event-stream"
    response.headers["Last-Modified"] = Time.now.httpdate
    sse = SSE.new(response.stream, retry: 300)
    ChatCompletion::LiveStreamService.new(sse, live_stream_params).call
  ensure
    sse.close
  end
end
We include the ActionController::Live module to enable live streaming.
As we mentioned above, the content-type response headers should be set to text/event-stream.
Please note that the stream response in Rails 7 does not work by default due to a rack issue, you can check for more details on this issue.
it took me hours to find out the issue is related to rack… Rails includes Rack::ETag by default, which will buffer the live response.
anyway, this line is necessary if your rack version is 2.2.x:
response.headers["Last-Modified"] = Time.now.httpdate
module ChatCompletion
  class LiveStreamService
    def call
      client.create_chat_completion(request_body) do |chunk, overall_received_bytes, env|
        data = chunk[/data: (.*)\n\n$/, 1]
        send_message(data)
      end
    end

    def send_message(data)
      response = JSON.parse(data)
      if response.dig("choices", 0, "delta", "content")
        @result = @result + response.dig("choices", 0, "delta", "content")
      end
      sse.write(status: 200, content: @result)
    end

    private

    def client
      @client ||= OpenAI::Client.new(OPENAI_API_KEY)
    end
  end
end
The code above uses an OpenAI gem to send request to OpenAI API, it's a simple Ruby wrapper and support streaming response.
BTW, If you're using Hotwire in Rails, you can check this guide.
That's all! Thanks for reading!
demo website: aiichat.cn