2026-02-17 01:11:13
该渲染由 Shiro API 生成,可能存在排版问题,最佳体验请前往:https://innei.in/notes/207
越来越没有年味了。
小时候,过年是一年中最盼望的日子。放寒假也意味着快要过年了。一般来说,前半个寒假都是在等待春节的到来。节前的那几天,家里人总会忙前忙后,从小年开始,就要开始大扫除,备年货了。
那个时候,我最期待的就是可以买烟花来放了,是那种长条形的,不是那种大户人家才放的起的,能在天上开花的烟花。那个时候,晚上总是很看到别人家在放烟花了,很是羡慕。那个时候那种大烟花并不便宜吧(现如今也不便宜,有色金属还是很贵的),而绚丽的画面只是一瞬。很多时间,都是花了大价钱只是为了这目睹、期待那一瞬,生活何尝又不是。
除夕那天,会花一个下午的时间备菜,做很多好吃的,一家人在一起吃饭,热热闹闹的。城里人都回村过年了吧,乡下每家每户都挺热闹的。我家在一个偏僻的地方,周围没有太多的人家,但是也能感觉到这种气氛。吃完饭,要放鞭炮了。噼里啪啦的,之后就到了收红包的环节了。还记得很小的时候,那个时候收到一个红包一张红票就很开心了,后来红包越收越大,再到现在,一点也没有当年的喜悦了。也是因为工作了,现在基本也都推辞了。
谁还记得以前的春晚是除夕夜必看的吗,那个时候没有现在的高科技,华丽的特效和舞台,也只有一个主会场,但是节目很好看,那时候还有赵本山出演的小品,很多节目也都很有新意,而现如今社会发展了,科技进步了,却越来越没有新意了。这一年一次的大型演出只是一个象征,不会再有更多的人关注了。
我已经不知道从何时起学会了熬夜。
曾经在春晚那天能够熬到凌晨,是一件非常不容易的事情。我至今还记得,有一次我曾经立下承诺要熬夜守岁,最后还是靠着咖啡才度过了那一晚。我很久已经没有再能体会到这种感觉了。现在,每天晚上睡觉到两三点已经是家常便饭,再也找不到当年那种怀着非常激动的心情、找不到那种少年的滋味了。
第二天的一早,也就是新年的第一天,大家伙儿都开始走亲访友,显得格外的热闹。在那个时候,不管是城里还是乡下,都还没有颁布烟花禁令。尤其是农村,每天从很早开始,就会被一阵阵炮竹声惊醒。热热闹闹地走向各家亲戚,也许一年也就这样一次机会,大伙儿在一起探讨着各种各样的话题。从小到大,我都觉得我的亲戚太少了。别家的孩子从大年初一到初八,串门串个不停;而我也就串个两三家就再也没有了。过年期间的大多数时候,我都在看着别人家里热热闹闹的,而自己这里空虚得很。看着别人家的孩子到处串门,收着更多的红包,而我却显得很可怜。现在回想起来,当时有这样的想法,也是觉得挺天真呐。
现在年味越来越淡了,大家伙也不再热衷于串门走亲戚。那个时候大家的生活收入虽然都没有现在好,但是人情味可比现在浓。现在大多数人只是走个形式、意思意思,大家都各自忙各自的去了。去旅游啊,也比这样好。
过了除夕,时间就会过得非常快了。
小时候,过了除夕相当于寒假就过了一半,要不了多久又要回学校上课了。而现在,过了除夕也就意味着快要和家人分开了,大家各自回到各自的岗位,可能很久才能再见一次了。那么现在这段时间又意味着什么呢?
我感觉啊,只不过还是普普通通、平凡的假期那几天吧。我和往常一样,今天是除夕,我写了一天的代码,就和平常没什么两样。
最后还是祝大家新年快乐。今天已经是年初一了,祝大家马年码到成功!
2026-01-26 01:27:40
该渲染由 Shiro API 生成,可能存在排版问题,最佳体验请前往:https://innei.in/notes/206
新年的第一个月也快结束了,我想也是时候再来梳理一下最近这个月发生的事情了。
其实我是一个非常没有安全感的人。我发现我之前所有写过的生活类文章中,可能最离不开的两个字就是“工作”。这一方面是不确定性带来的焦虑感。
也是因为这样,在上份工作被裁之后,我基本无缝衔接了现在的工作。目前我已经快入职两个月了,相信关注过我的人应该知道我去了哪里。在这两个月的时间里,我正好赶上公司的项目处于新版本的冲刺阶段,所以这段时间非常忙。
在此期间,我也做了很多优化工作。前段日子我还专门写了一篇文章,总结了一些关于性能优化的要点。我觉得后面还是要生活和工作平衡一些吧。虽然说远程工作的话确实会比较难,也是最近发生了一些事情吧,让我对这个想法有了更深刻的思考。
年初的时候看了一部电影,名字叫《不过是上班》。
虽然这是一部喜剧片吧,其实喜剧的背后也更多都是悲观。艺术来源于生活,而生活往往比电影表现得更加残酷。当时看完之后,写下了这样一段话:
看了这部电影只能说我一个打工人感触还是挺深的吧。 只是影片中很多也是反映了当代职场以及社会的一些矛盾吧,某些公司喜欢找那些急需用钱家庭困难的员工,因为他们更容易被使唤也不敢辞职,男二也是这样,他兢兢业业每天加班,业绩提升的越快 KPI 涨得也越快,最后加班猝死了。但是即便是这样公司,会想办法处理伪造他的死亡说是酒精中毒,但其实只是过度劳累,最后只配得人道补偿¥50,000。我也经历过裁员,我也知道公司总是站在自己有利的一面,而我们和他们斗争太难了,我们的力量太小了,而公司很轻易的就能抹掉你曾经努力奋斗所付出的一切。 最后有句话其实挺升华的,不过是上班,希望我们都能找回自己的生活。
https://www.themoviedb.org/movie/1555232
其实我也感同身受,因为前段日子发生了一些事情,再加上我上家公司的一些经历,感觉公司想要抹掉你留下的痕迹真的太容易了。
我们个人就像是公司的一次性用品,被扔掉是很简单的事情。不过好在,我上个公司做的项目是开源的,在大众视野内还能看到一点痕迹,情况没那么严重。
https://x.com/__oQuery/status/2012047221337047044?s=20
近期网络上又是刷屏广州 32 岁程序员猝死的消息。所以还是不要把工作当成全部吧。
工作是工作,生活是生活。说什么“能者多劳”,也不一定会有回报。毕竟公司又不是你的,还是要为自己保留一点余力吧。
疲劳加班和为了工作长期熬夜是最傻最没有意义的事情。没有人感谢你的付出,没有人记得你做的事儿,没有人会佩服你,没有人会记得你,最重要的是,你的工作也远没有你想象的那么有意义。早日参透,早日收获。
其实还有一点,就是我更喜欢去创业公司的原因:我觉得在创业公司更加有归属感。
而且在那里做的东西也是我比较喜欢的,很有成就感。同时这些产品我可能自己也会去用,所以我真心希望它能变得更好。当然,我也不希望最后的结局是这样的。
话题扯远了,我们来说一下最近在写的东西。
这个月我开了一个 Claude Code。自从上一次被封号以来,我差不多有快半年没有使用它了。这一次用回来,新鲜感还是很强的。确实,它和以前相比能力提升了不少,现在开发的效率越来越高了,当然这也是基于在它的基础上。
现在大概用了半个多月吧,目前已经刷了 2.1B 的 token。
├──────────┼──────────────────────────────────────────────────────────────────────────────────────┼───────────┼──────────┼─────────────┼──────────────┼──────────────┼───────────┤
│ Total    │                                                                                      │ 33,368,8… │ 2,701,6… │  81,526,248 │ 1,967,393,0… │ 2,084,989,8… │  $1180.61 │
└──────────┴──────────────────────────────────────────────────────────────────────────────────────┴───────────┴──────────┴─────────────┴──────────────┴──────────────┴───────────┘
最近这一个月以来,我也探索了很多 AI 工具。
现在的 AI 发展实在是太快了,我已经用过了:
谷歌 One 我也是买了一年,是之前有优惠的时候买的。
总体用下来的话,这些 IDE 其实都不如 Cursor,关于 Kiro 的话,它的 specs coding 能力一开始我觉得好像还挺完善的,但是用了几次之后,我也就不想再用了。总之现在编辑器的话,还是用 Cursor,别的话也很少用了。之前想花点时间把 mx-space 的 Admin 从 Vue 项目迁移到 React,基本上整个项目重启,工程量还是非常的大,所以现在还是搁置了。但最近换了一个思路:还是在现在的 Vue 项目上进行翻新,整体计划是把整个 UI 都重写了,然后把陈年技术栈都换掉了:
顺便终于把后端项目也经历一次大的重构,精简了一些模块,同时也终于把 CJS 迁移到 ESM 了,直接使用 tsdown 去 bundle 速度提升了不少,迁移到 ESM 之后,ESM pure 的依赖也不用预编译了。
https://github.com/mx-space/core/commit/9abe0711de82e78c3e25c7a0b7c77b4b65f8f16a
然后是:
就这样差不多搞了一周的时间,基本上已经全部都搞完了。当然现在还有很多小的 Bug,后面再慢慢去修复。值得一提的是,本次对编辑器有了非常大的提升。我也是在基于 CodeMirror 的基础上,做了一个所见即所得的编辑器,类似 Typora。当然,我对写编辑器并不是很擅长,这个工程确实也非常庞大。全程的架构都是由 CodeX 帮我设计的。不得不说,CodeX 在这方面的能力真的是非常强。
再辅助 Opus 4.5 来帮我写 UI,虽然现在还有一些 bug 挺让人烦恼的,但整体用下来,体验已经好太多了。我是觉得现在 AI 的成熟,让很多以前不敢想的东西,现在都能变成现实了。
以前是自己写代码实现一个功能,而忙得停不下来;现在则是通过 AI 源源不断地实现以前那些可能无法实现的东西。至少那些自己原本无法实现的东西,现在正一件一件地落地,这种正反馈和以前写代码时带来的满足感是一样的,让人停不下来。
当然,这种正反馈也让更多原本不会编程的人,能够体会到我们之前写代码时的那种热情。
值得一提的是,我现在让 AI 帮我做事也变得更加简单了。因为我现在也很少去打字告诉 AI 怎么做,甚至这篇文章我也几乎没有打字。在前不久的网友面基中, yetone 推荐了 Typeless,这个软件确实是厉害。相比我之前用的“闪电说”以及其他的一些语音输入法,它们虽然速度快,但准确率却很低,经常需要自己去修正,甚至还不如自己打字。
但是用上了这个之后就完全不一样了:
当然这也是有代价的:这个软件的订阅费非常贵。
新用户可以免费使用一个月,一个月之后:
但这不妨碍你们去试用体验一下它的效果,然后再做出评价。我觉得还是一分价钱一分货,至少现在我很愿意为它付费。
https://x.com/__oQuery/status/2010404209267790104?s=20
上面这个贴文是我当时评测的4款语音输入法的横评,大家可以参考,当然更多的是你自己去体验。
发上我的推荐链接,有钱大家一起赚,你能拿到 5 刀。 https://typeless.com/refer?code=UM6K0UK

现在已经彻底改变我的编程工作流了。不得不说,用上语音输入法之后,我感觉我的效率又提高了不少。可以同时多开几个 session 去开启更多的项目、做更多的事、实现更多的想法。
在前不久,我买了一台 128G 的 Mac Studio,我觉得这是一个非常正确的决定。因为现在项目开得越多就越需要内存,而且现在内存涨价非常厉害,我觉得买这台 128G 版本的机器真是太赚了。我现在同时会开很多个项目,除了工作的项目之外,也开了一堆 Side Project,让 AI 去探索、快速试错。
我也比较认同 yetone 的观点。我也是去年的时候发现,我其实热爱的是 Building,只是说以前没有 AI 这个角色去帮我 Coding,所以我们只能自己去 Coding 来 Build 一些东西。
https://x.com/yetone/status/2014977294276968532
最近这一个月左右的时间,我基本没有再去社交了。
大约在半个月前,我通过短视频看到了关于“向上社交”这个话题。过去的这几年,我觉得他说的很有道理。我一直以来也都在进行所谓的“向上社交”,强行去挤进大佬的圈子,并尽量尝试去融入。所谓“向上社交”,指的就是不在一个 level 上的社交。更多的是你去找对方,而对方基本不会来找你。
想要维持这种关系,感觉很难而且也很累。所以我现在的现状是:尽量减少这种关系。
我在 LobeHub 上建立了一个心理咨询团队,也尝试询问了我遇到的困境,
https://app.lobehub.com/share/t/RmZwPMEK
还是因为自己的自卑和不自信,往往会把自己放在下位。
2026-01-13 23:34:08
该渲染由 Shiro API 生成,可能存在排版问题,最佳体验请前往:https://innei.in/posts/tech/lobehub-performance-dx-optimization
LobeHub 是一个开源的 AI 聊天应用平台,专注于提供现代化的 AI 对话体验。它支持多种 AI 模型(如 OpenAI GPT、Claude 等),提供 Web 应用和桌面客户端(基于 Electron),并拥有活跃的开源社区。作为一款 React 技术栈构建的应用,LobeHub 在性能优化和开发体验方面面临着诸多挑战。
https://github.com/lobehub/lobehub
入职后的第一个月,我主要专注于项目性能优化和开发体验改进。回顾过往的工作经历,我发现每次加入新团队时,都会优先处理这类基础架构问题。这既是个人习惯,也是对项目长期健康的必要投资。
特别是在当前大语言模型普及的背景下,编程门槛大幅降低,“人人皆可写代码”的时代已经到来。
然而,AI 快速生成代码的能力也带来了新的挑战:代码质量的可控性下降,性能优化意识被削弱。以 React 开发为例,开发者往往过度追求性能指标,却忽视了代码质量和开发体验的平衡。作为 LobeHub 的早期用户,我深知其性能问题一直是社区关注的焦点,“很卡,特别卡”几乎是所有用户的共同印象。
因此,在本文中,我将系统性地总结过去一个月对 LobeHub 进行的性能优化工作,并通过具体数据展示优化前后的性能对比。
这个库是一个 CSS-in-JS 的 Flexbox 组件库。现在有了 Tailwind 的话,编写 Flexbox 布局也是能非常快写出来的。但由于 LobeHub 没有使用 Tailwind,所以就有了这样一个库,能够更快地编写 Flexbox 并设定其各种属性。由于是 Flexbox,所以在项目中大量使用。一个页面可能有几百个这样的组件,所以数量是非常庞大的。
通过火焰图的对比,其实单个组件的性能开销也还好,基本上在 0.1ms 左右。当然,如果是一个普通的 div 组件,这种开销通常小于 0.1ms。
但在组件使用非常多的情况下,0.1ms 的量级累积起来其实也会很大。当然,从性能上来说,其实感知的开销还好。但另外一个问题是:CSS-in-JS 这种方式,只要每个 Flexbox 的属性没有相同的地方,就会生成大量的 CSS。
由于它是 CSS-in-JS 的实现,生成的每一段 CSS 都会比较占用内存。特别是开发环境下。
下面那个测试链接也是我当时写的,主要是对比两种方案的性能、渲染时长和内存占用:
https://css-in-js-batch.vercel.app/
 可以看到,虽然两者的开销差别并不是很大,但在内存占用方面,差距达到了大概十个量级左右。
当然,在生产环境下可能没有这么夸张,但依然会有明显的性能提升。
接下来这个问题,还是通过火焰图排查渲染的情况发现的。
在业务中,由于大量使用了动态生成的 CSS-in-JS 的 React Hook,产生了这个 Hook 的性能开销比较大的问题:
所以,如果一个页面上有几百个组件同时都在运行这个 Hook,那么这次 layout 基本上一定会花费大量时间来处理。
这个问题的发现,也是通过火焰图排查到有一些比较轻的组件,渲染却用了一毫秒。在开发环境下要花一毫秒左右的时间,就感到特别奇怪。
然后去排查是哪个 Hook 导致的,最后发现是一个 useStyle 的钩子。
找到问题之后,就比较好解决了,我们只要换一种方案就行。
在这里,我们提出了一种优化方案:不再使用动态生成 CSS-in-JS 的方案,而是使用静态方案。这样的话,性能上也会提升不少,毕竟在组件的运行时上不会再有额外的开销了。
https://github.com/lobehub/lobe-ui/pull/437
https://github.com/ant-design/antd-style/pull/205
上面这两个是比较重大的优化。这波优化全部完成之后,整个 APP 已经有了很明显的提升。
以前消息列表中的每个 Message Item 都需要花很长时间去渲染,而现在在开发环境的表现已经和之前在生产环境差不多了,在生产环境上则会更快。内存表现也是:现在可以保持在正常情况下 400-500 MB 的样子,甚至更低。
首屏的性能优化,主要做的是如何让用户从其他页面返回首屏时速度更快。
首屏的加载时间是非常影响用户体验的一个点。在 React 中,当一个页面切换到另一个页面时,上一个页面一般都会被销毁。如果首屏组件的逻辑很重,从另一个页面返回首页时,就需要等待首页的重建。
用户需要等一段时间,而这段时间页面相当于处于不可用的状态。
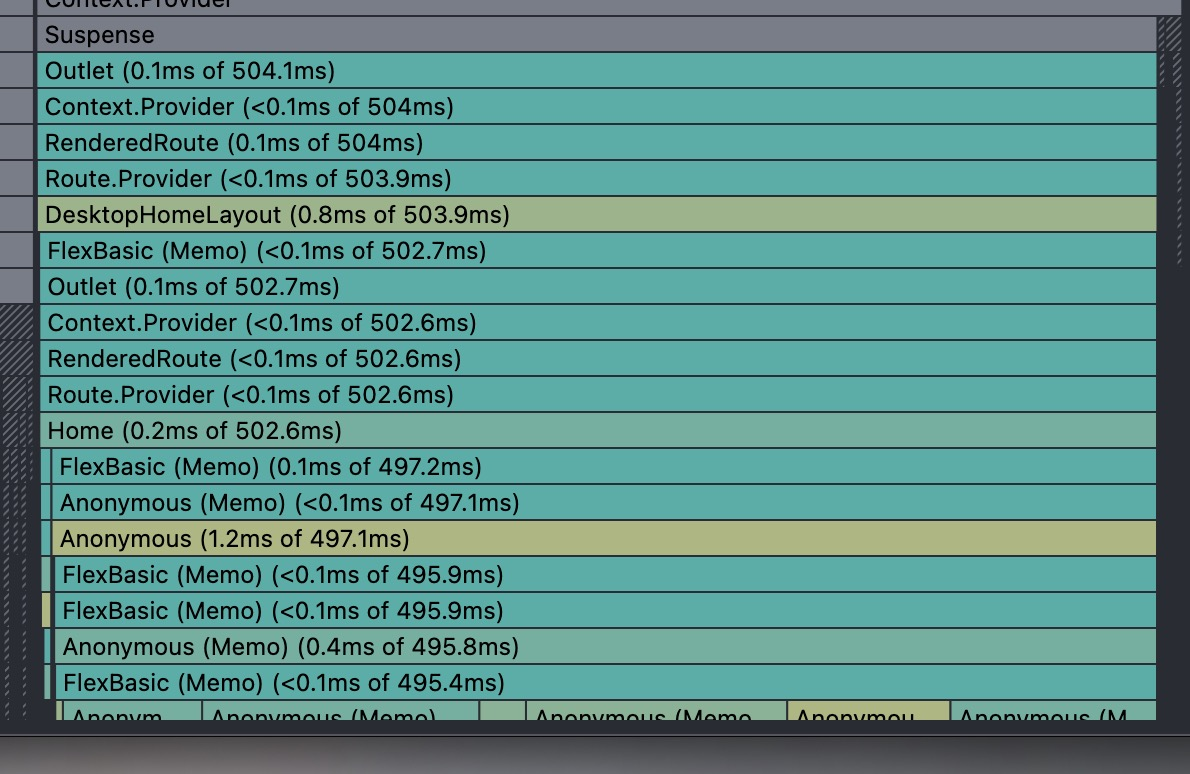 可以看到上面那张优化前的图。从其他路由返回到首页时,Desktop Home Layout 这个组件在重新渲染时大概花了 500ms。
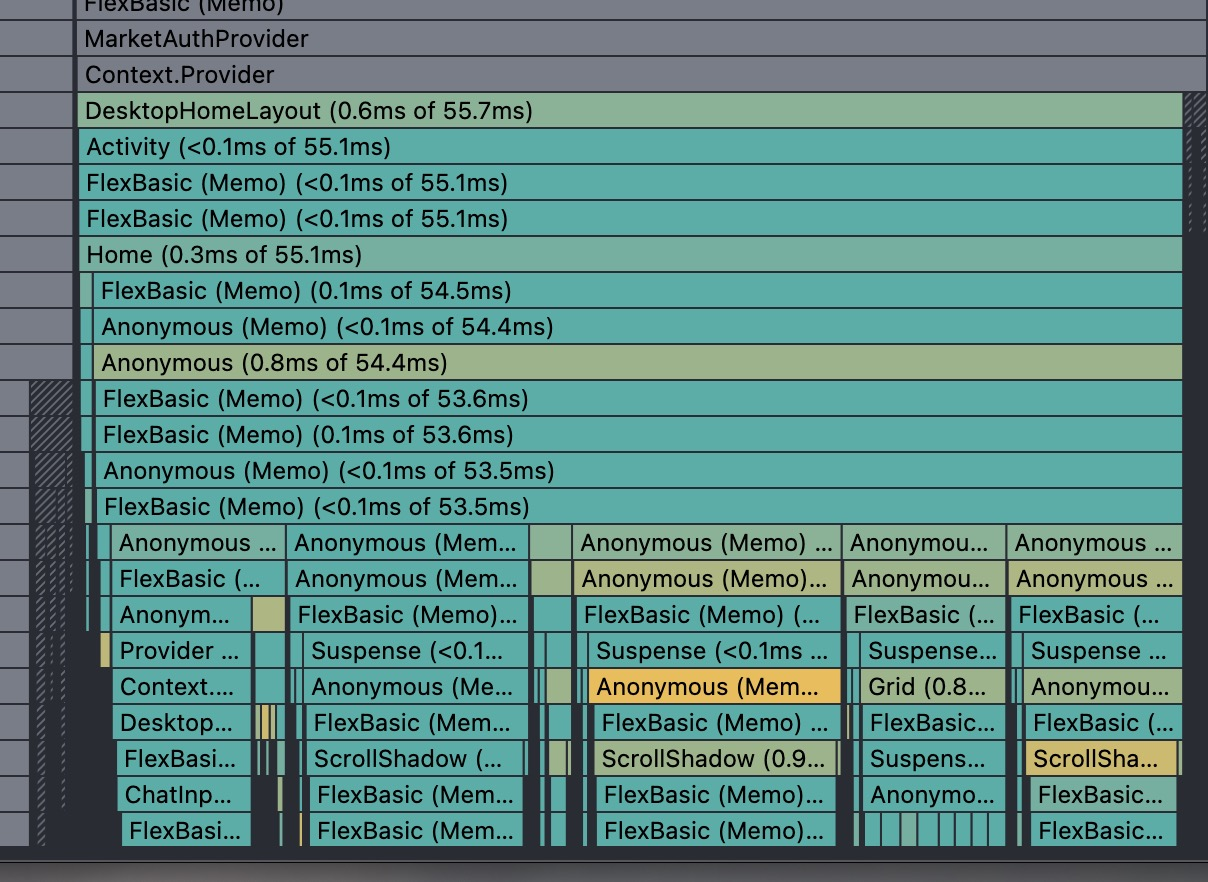 使用 React 的 Offscreen(也就是 Activity 组件)优化之后,从其他页面返回到首屏的时间控制在 55ms 左右,几乎在点击的瞬间就可以完成跳转。
这是在开发环境下的火焰图表现,在生产环境下,它的速度会更快。
https://github.com/lobehub/lobe-chat/pull/10890
完成了上述内容后,在消息列表中,单个 MessageItem 的首次渲染性能有了非常大的进步。
但是,MessageItem 组件过于复杂,部分基础组件如果渲染开销较大,也会影响整个 MessageList 的性能。
首先重构了 AccordionItem 组件,这类组件在未展开时,内容区的 React 组件逻辑通常不必执行。因为它在 UI 中本身不可见,那么对应的组件逻辑也不应执行。
这是一种常见的优化手段,在比较复杂的组件中,能够显著提升性能。
https://github.com/lobehub/lobe-ui/pull/430
Tabs 也是基础的 UI 组件。在之前的 AntD 实现中,单个 Tooltip 的渲染性能开销非常大,在开发环境中平均需要 0.5ms。
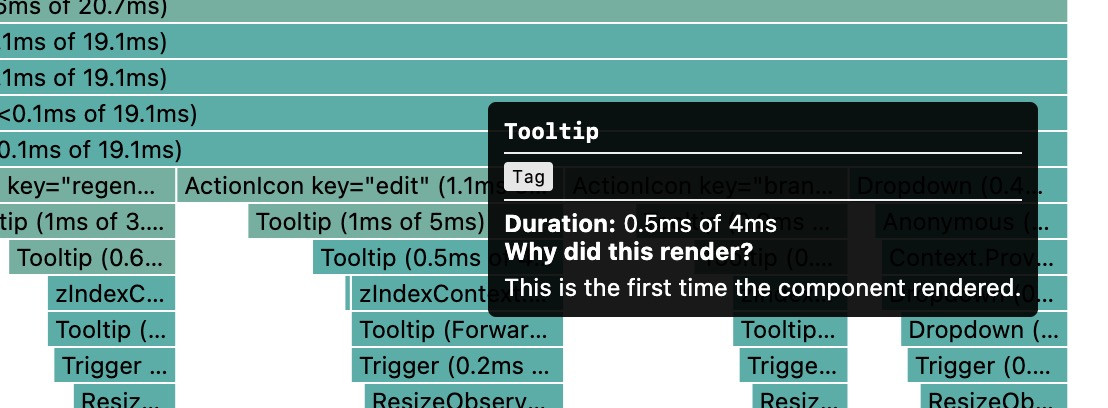
在过去的多个PR中,我使用了 Base UI 以及组件单例的方案,重构了包括 Tooltip 和 Popover 两个组件。
目前在业务中,基本已经把 Tooltip 替换完毕了,Popover 的话还有剩余一些。更换之后,这两个组件的性能比之前有了很大的提升。
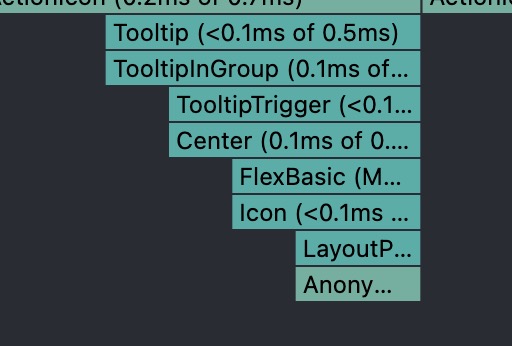
https://github.com/lobehub/lobe-ui/pull/448
还有其他一些基础组件也还有优化的空间,但目前还没有细看。
后续的计划如下:
关于裁剪 Electron 体积的话,其实我之前也分享过经验。
首先在 Mac 上,Electron Framework 的体积是可以裁剪的。它里面自带了很多语言包,占用大约 34MB 左右。我们可以把它们全部删掉,只留一个英语(en.lproj)就可以了。需要注意的是:
通过这种方式,直接就能省掉 ~30MB 左右的体积。
其次,我们可以优化 ElectronBuilder 打包 node_modules 的逻辑。
一般来说,如果 Electron 主进程(Main Process)的打包没有 Native Binding 的话,我们可以利用打包器把所有的三方依赖打进我们的 Bundle 里面。这样一来,程序就可以完全脱离 node_modules 去运行。
然后可以修改 ElectronBuilder 的配置在配置中将 node_modules 排除掉。
当然,这里考虑到后面可能会使用到 Native Binding,所以我在里面做了一层兼容性。
如果有 Native Binding 的话,我们可以把单独的 Native Binding 依赖加进配置,这样一来,这个依赖就会被打到 asar.unpack 里面。
详细的配置我就贴在下面,大家有兴趣可以看一看:
https://github.com/lobehub/lobe-chat/pull/11397
经过这些处理,大概裁剪了 100MB 左右。现在 App 的体积大概在 260MB 左右。
对于 60fps 的要求,一帧只有 16ms 的时间。
如果单个组件的性能消耗超过 1ms 以上,那么该组件首次加载的性能就会变得非常糟糕。因此,我们尽量要将单个组件的性能控制在 1ms 以内。在首屏的场景下,我们要实现最高程度的优化,控制首屏的 LCP。那么,我们就要尽量控制首屏组件的渲染性能。
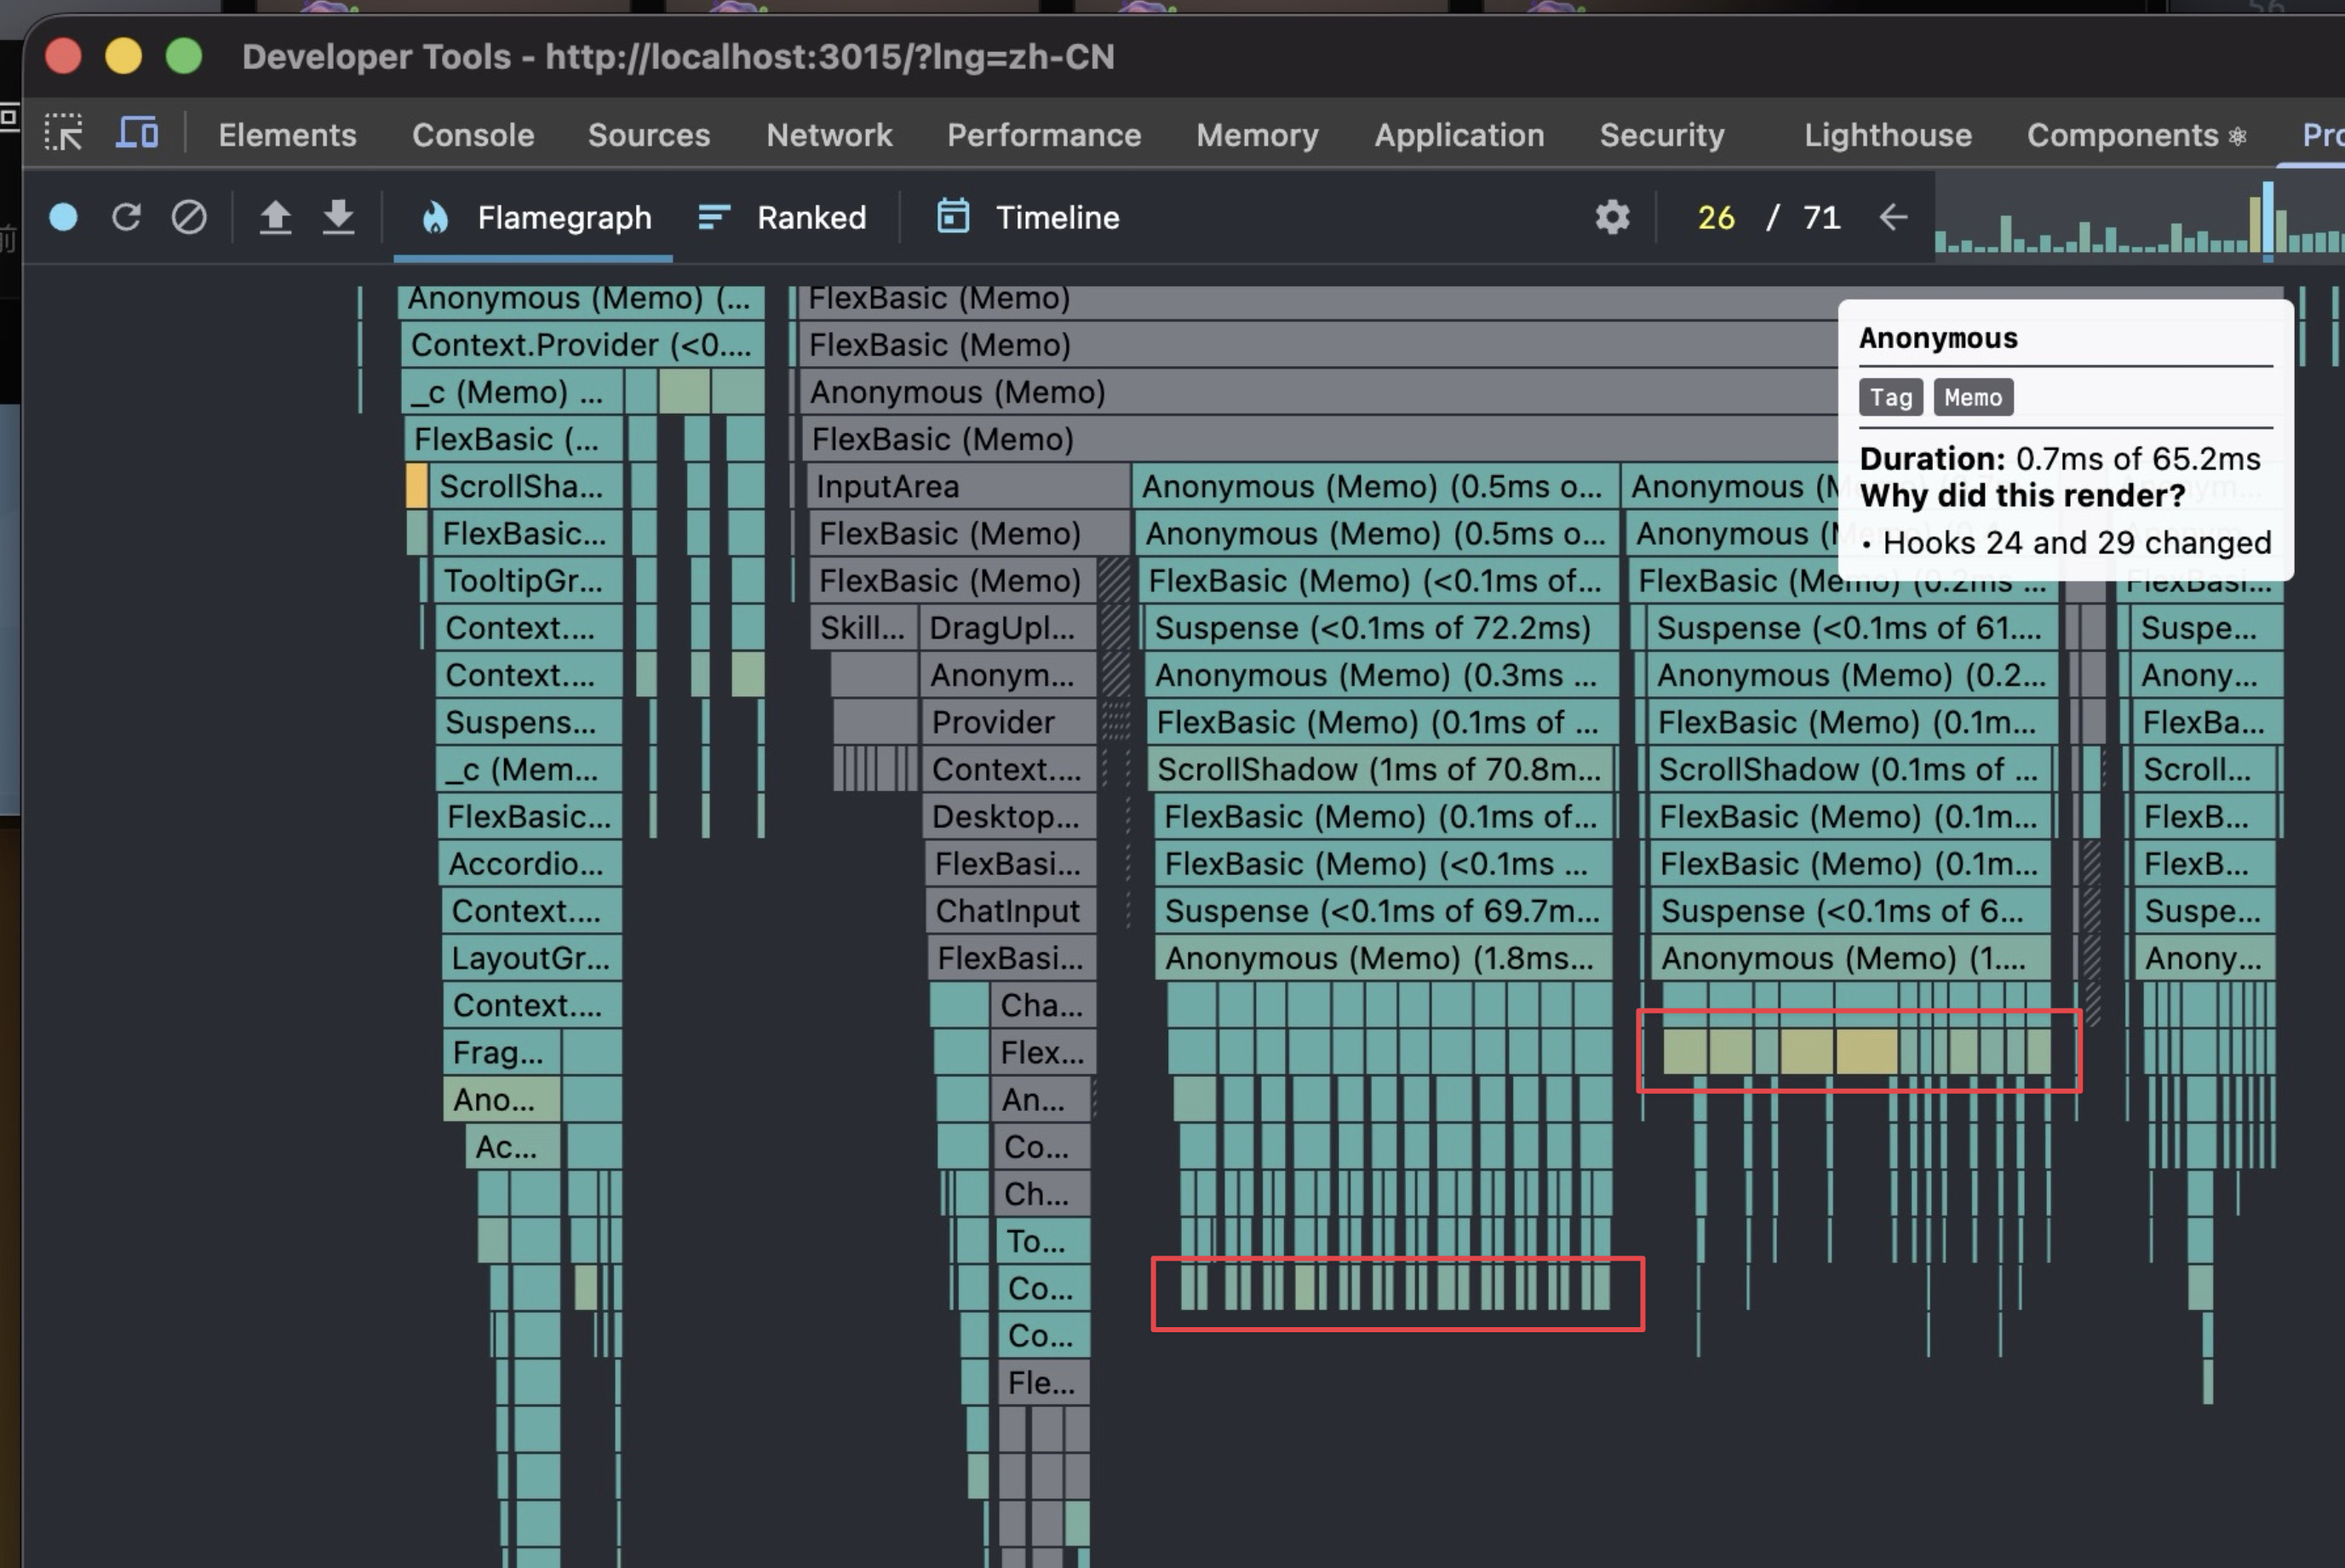
如上面的火焰图所示,红色标注的这些组件都是性能不过关的组件。
可以看到,这些组件的渲染时间都超过了 1ms,在右侧的那些的单个组件的渲染甚至达到了 5-6ms。
由此可见,我们需要去优化这些信息。在展开这些组件之后,我们可以看到存在哪些 Hook,然后在组件中进行打点,以此排查是哪个 Hook 或者哪段逻辑存在性能瓶颈。
在下面这个 PR 中,我尝试解决了这些问题,将其优化到小于 1ms 毫秒。
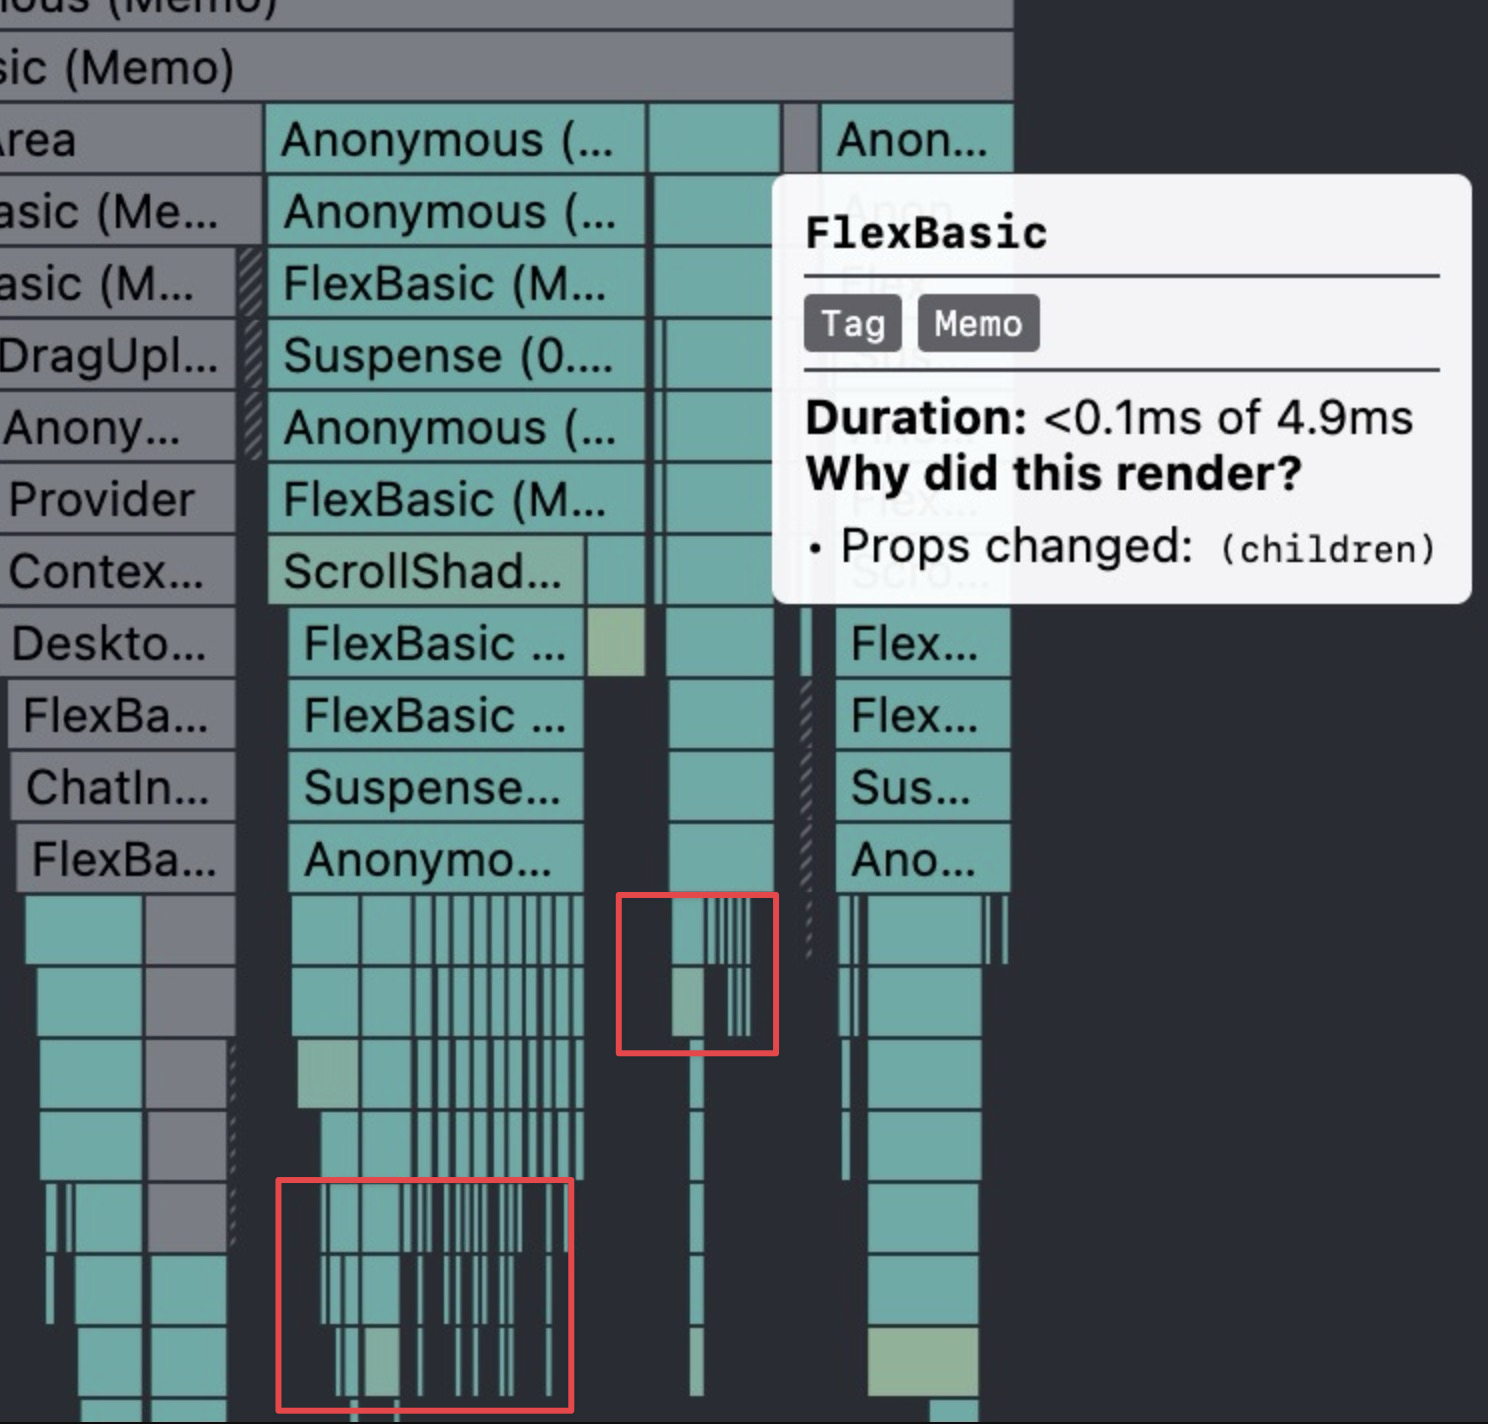
https://github.com/lobehub/lobe-chat/pull/11718
详细的优化过程可以查阅上面 PR 中的改动。
使用路由的动态加载,可以有效地分割包体积,提升 WebApp 在首屏中首次加载的 JS Bundle。从而提升首屏的 LCP。但带来的问题是,在 SPA 应用中由于得不到较好的优化,在之后的路由跳转中,首次会出现 Loading Element。但这个首次加载的包体大小,在本地的 Electron 应用中并不是问题,所以在这类场景中,我们并不需要使用动态加载的方式。在下面的 PR 改动中,我使用 AST Grep 进行了优化,针对 Electron 打包场景对代码进行了重写,将动态引用全部改为同步引用的方式。
https://github.com/lobehub/lobe-chat/pull/11690
带来的好处显而易见:在 LobeHub 2.0-next.330 之后的版本中,首次在聊天框中输入内容以及跳转到聊天界面时,都不会再出现闪烁的情况。
上面就是一些性能优化的点。
接下来,我想说一说影响开发体验(DX)的一些优化吧。
首先是我很早以前跟空谷提过的建议:把 i18n 的 key 扁平化,不要使用对象嵌套的方式。
这样做的原因主要有以下几点:
也是终于把这个事情给做掉了。
还有一个也是我想想安利一下的,就是我之前写过的一个库:electron-ipc-decorator。我也把这个库给实装了。
因为之前的实现需要一个 dispatch,然后再去做 subscribe,类型化也不太安全,而且 dispatch 的 type 也都是 hardcode 的一个 string 编码,我感觉不是很好。
所以我把自己这一套也换了上去,现在写起来比较方便。
https://github.com/lobehub/lobe-chat/pull/10679
剩下的话其实还是在做一些计划。
比较大的一个重构点,应该就是把 Next.js 迁移到 Vite。这个计划的工程量很大,目前还在筹划中。我也做了一些实验,应该还是有可行性的。
如果这个能成功的话,那应该也是很多开发者的一个福音了。
不管是团队内的人还是社区的人,现在应该都能很明确地感受到,现在 Next.js Server 启动的话,大概要十多个 G 的运行内存。如果你是 16G 的机器,基本上是没有办法开发的。
而通过实验做下来的结果是:Vite 可以控制开发时的运行内存,只需要大概 1G 多一点就行了。相比之下,内存占用和现在相比大概减少了 10 倍左右。
2025-12-28 20:29:16
该渲染由 Shiro API 生成,可能存在排版问题,最佳体验请前往:https://innei.in/posts/tech/how-to-use-ai-for-assisted-creation
如标题所见,在最近的编写的一些文章中,我使用了 AI 的辅助。其实早在过去一年编写的手记中,也常规的使用这个方式,只不过更多的用于标题的生成,我对文章的取名一直非常头疼,后来就写完整篇之后让 AI 综合全文的内容帮我提取几个关键字来取几个文艺点的标题。
在最近编写的文章中,如那篇「回头看见自己」中基本都是 AI 辅助编写的。我在「此站点」中增加了一个 Q&A:
在 25.11 月发布的文章都会公开:在编写文章时是否使用了 AI 的辅助。
可能很多人会反对使用 AI 进行创作,编写博客等等。那么当你看到文章顶部的 AI 声明之后你有权利选择直接关闭。
我个人并不反对使用 AI 辅助写作,当编写技术文章时,我可以借助 AI 帮我快速根据相关实现绘制流程图,以便读者更加清晰的理解,而在前 AI 时代,则往往需要花费大量的时间,或者因为这个理由而放弃绘图。当编写生活记录时,我往往借助 AI 帮我取一个标题,我承认我不是一个大作家,写不出更好的文笔或者叙事结构,我想记录故事,而 AI 帮我整理故事。
编写这篇文章首先是澄清关于 AI 的使用,另外也同时分享如何使用 AI 写出更好的文章。
首先是一个问题,你认为使用 AI 辅助创作会节省大量时间吗?至少对我来说,需要分为两个维度。
在编写技术类文章时,确实会大幅节省,而且比手作的内容会更加完整。正如前面所说,在手作的时候,在画流程图会花费大量时间,往往会因为时间成本而放弃;在内容结构上也会精简掉很多。而借助 AI ,它可以阅读项目的代码,再加上你告诉他当时的实现思路,它可以很迅速的分析然后编写出叙事清晰的文字、流程,甚至使用 excalidraw 绘制图表。
在编写手记生活类文章,并不会节省时间,甚至会花费很多的时间,至少对我来说是这样。AI 并不知道你的生活发生了什么,生活不是代码,无从读起。我会把所有的经历说给 AI 听,这个过程中,相当于我已经完成了一遍文章的编写。在没有借助 AI 之前,差不多到这个时间就截稿了。取上标题和分段,就直接发布了。而现在,需要让 AI 结构,整理,调整上下文过度。然后我还要校对几次确保没有把我需要表达的内容曲解。有些措辞我感觉不好,就会多次询问 AI 修改等等。花的时间不止一点。
在编写 Better Auth 的多租户用户鉴权的构想 文章时,初次使用借助 AI 辅助作图的能力。比如解释为什么的时候,可以画一个图:
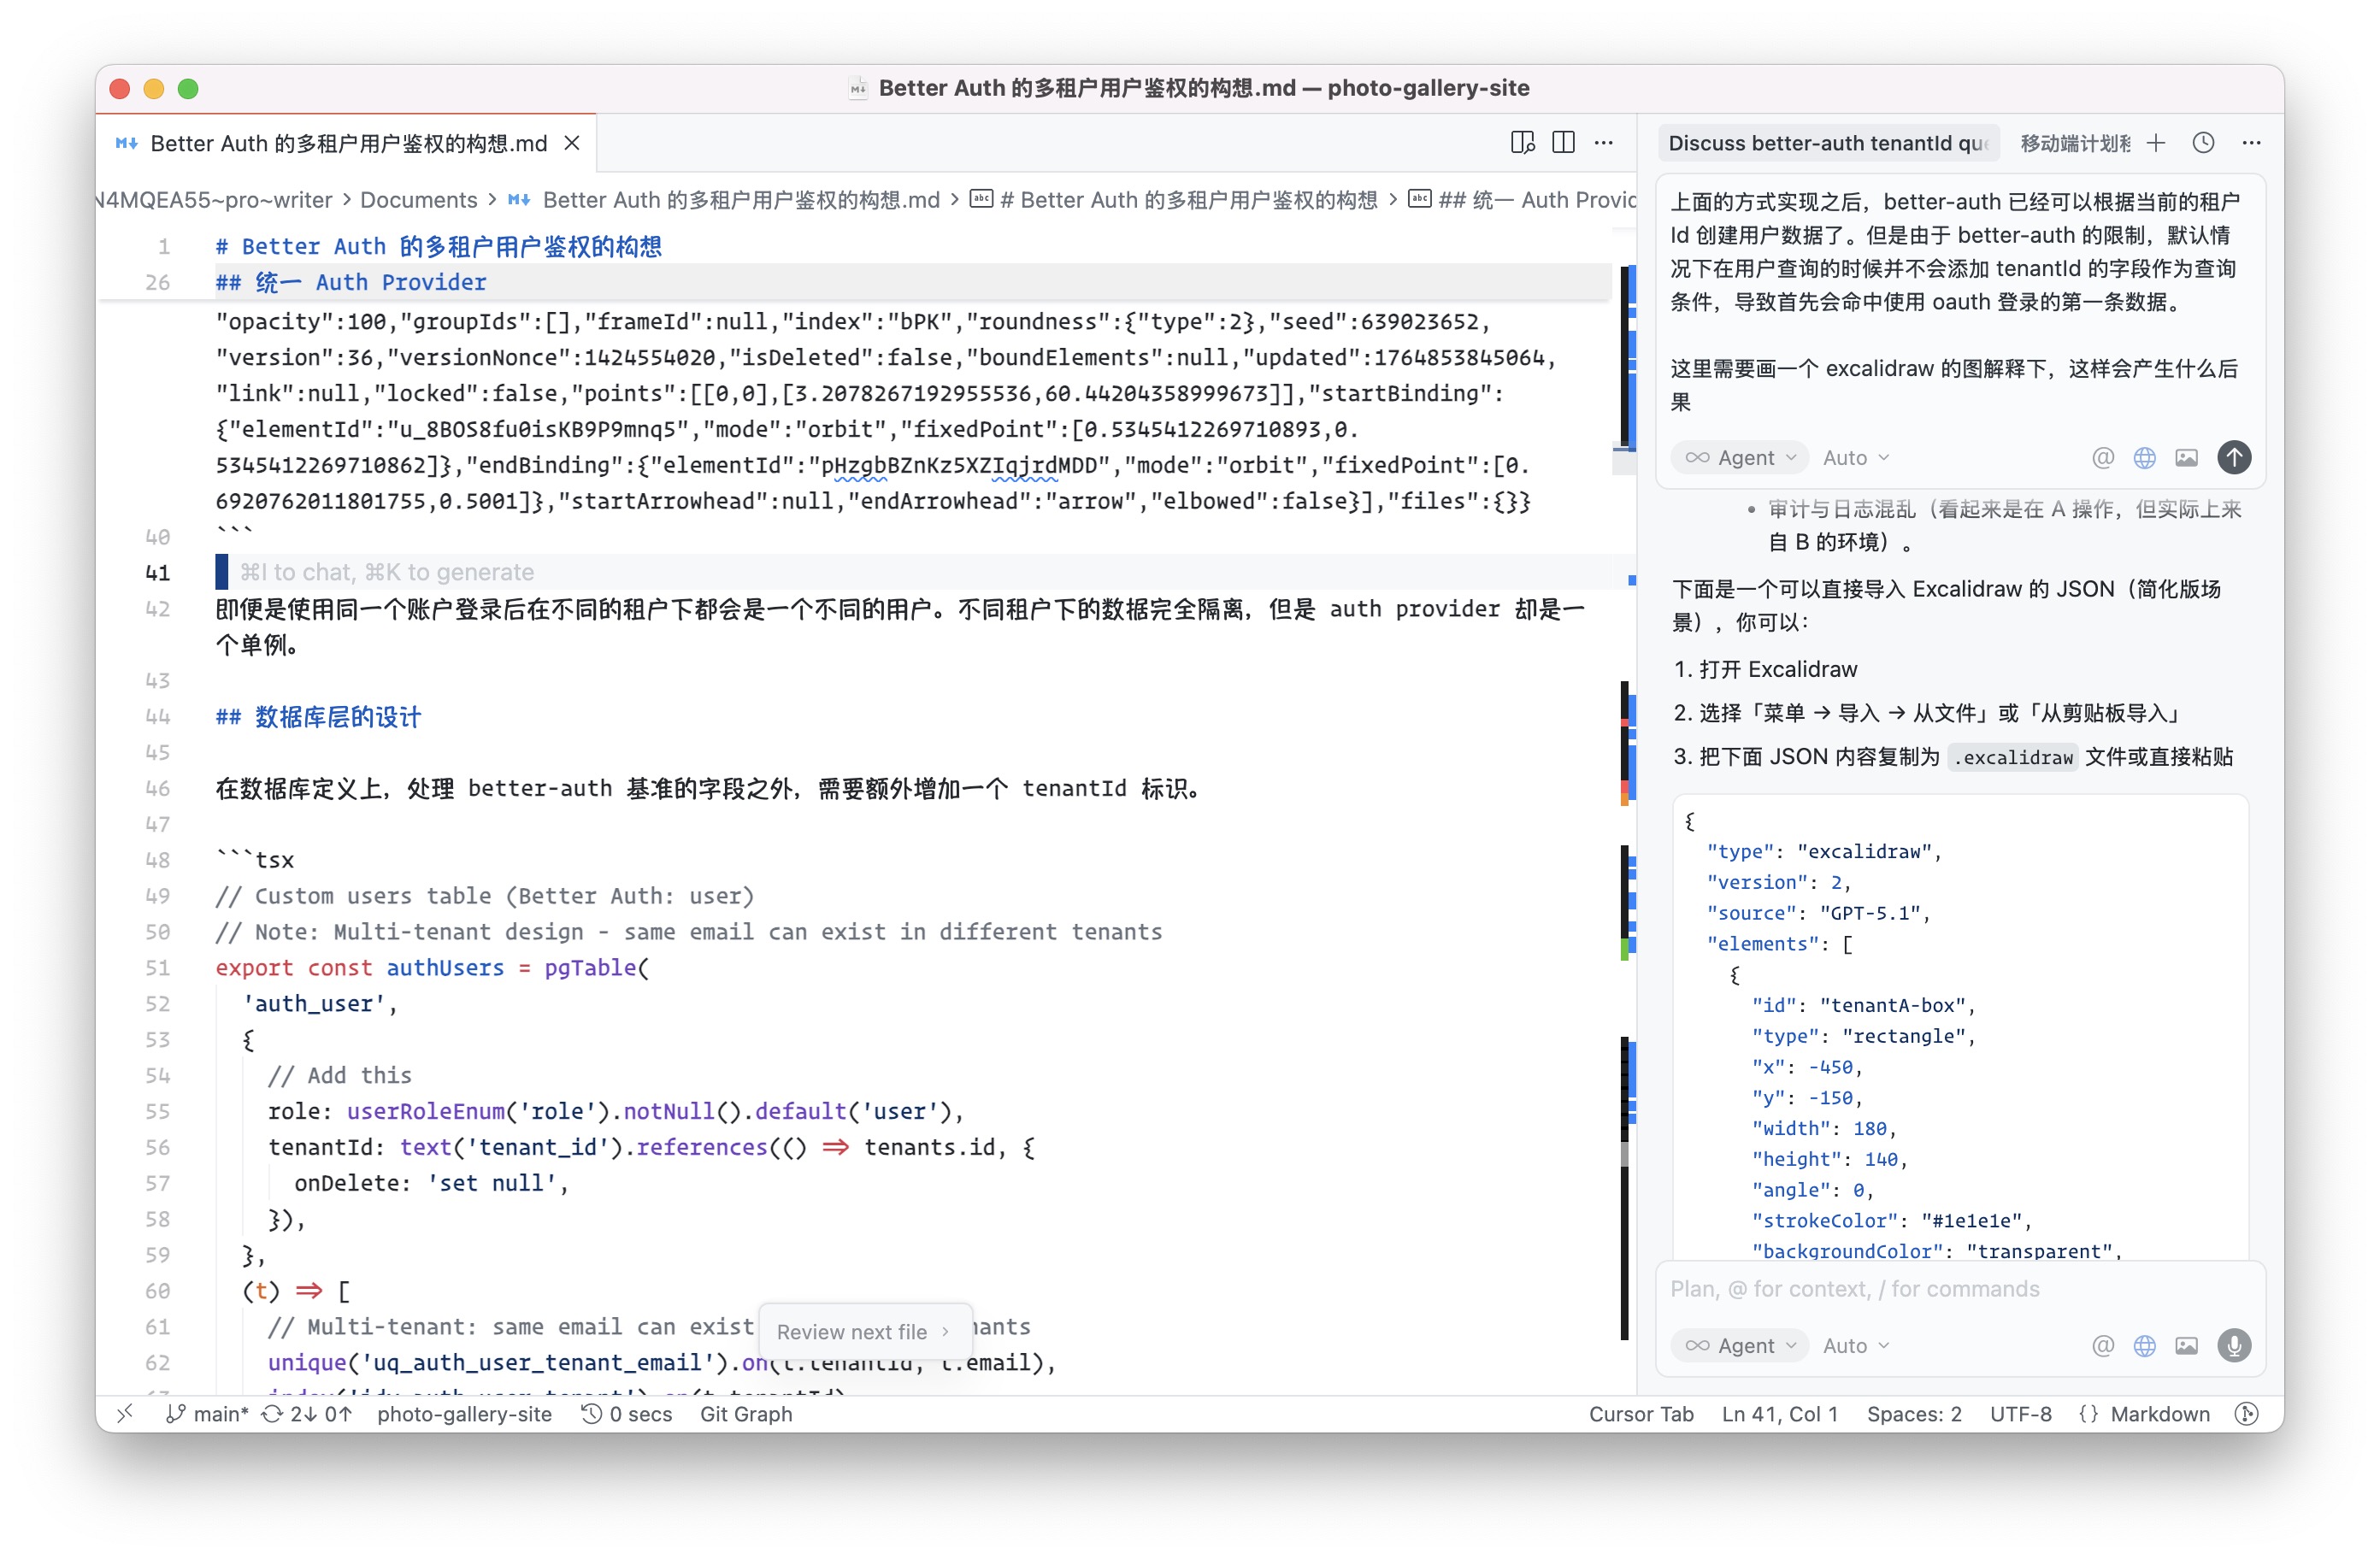
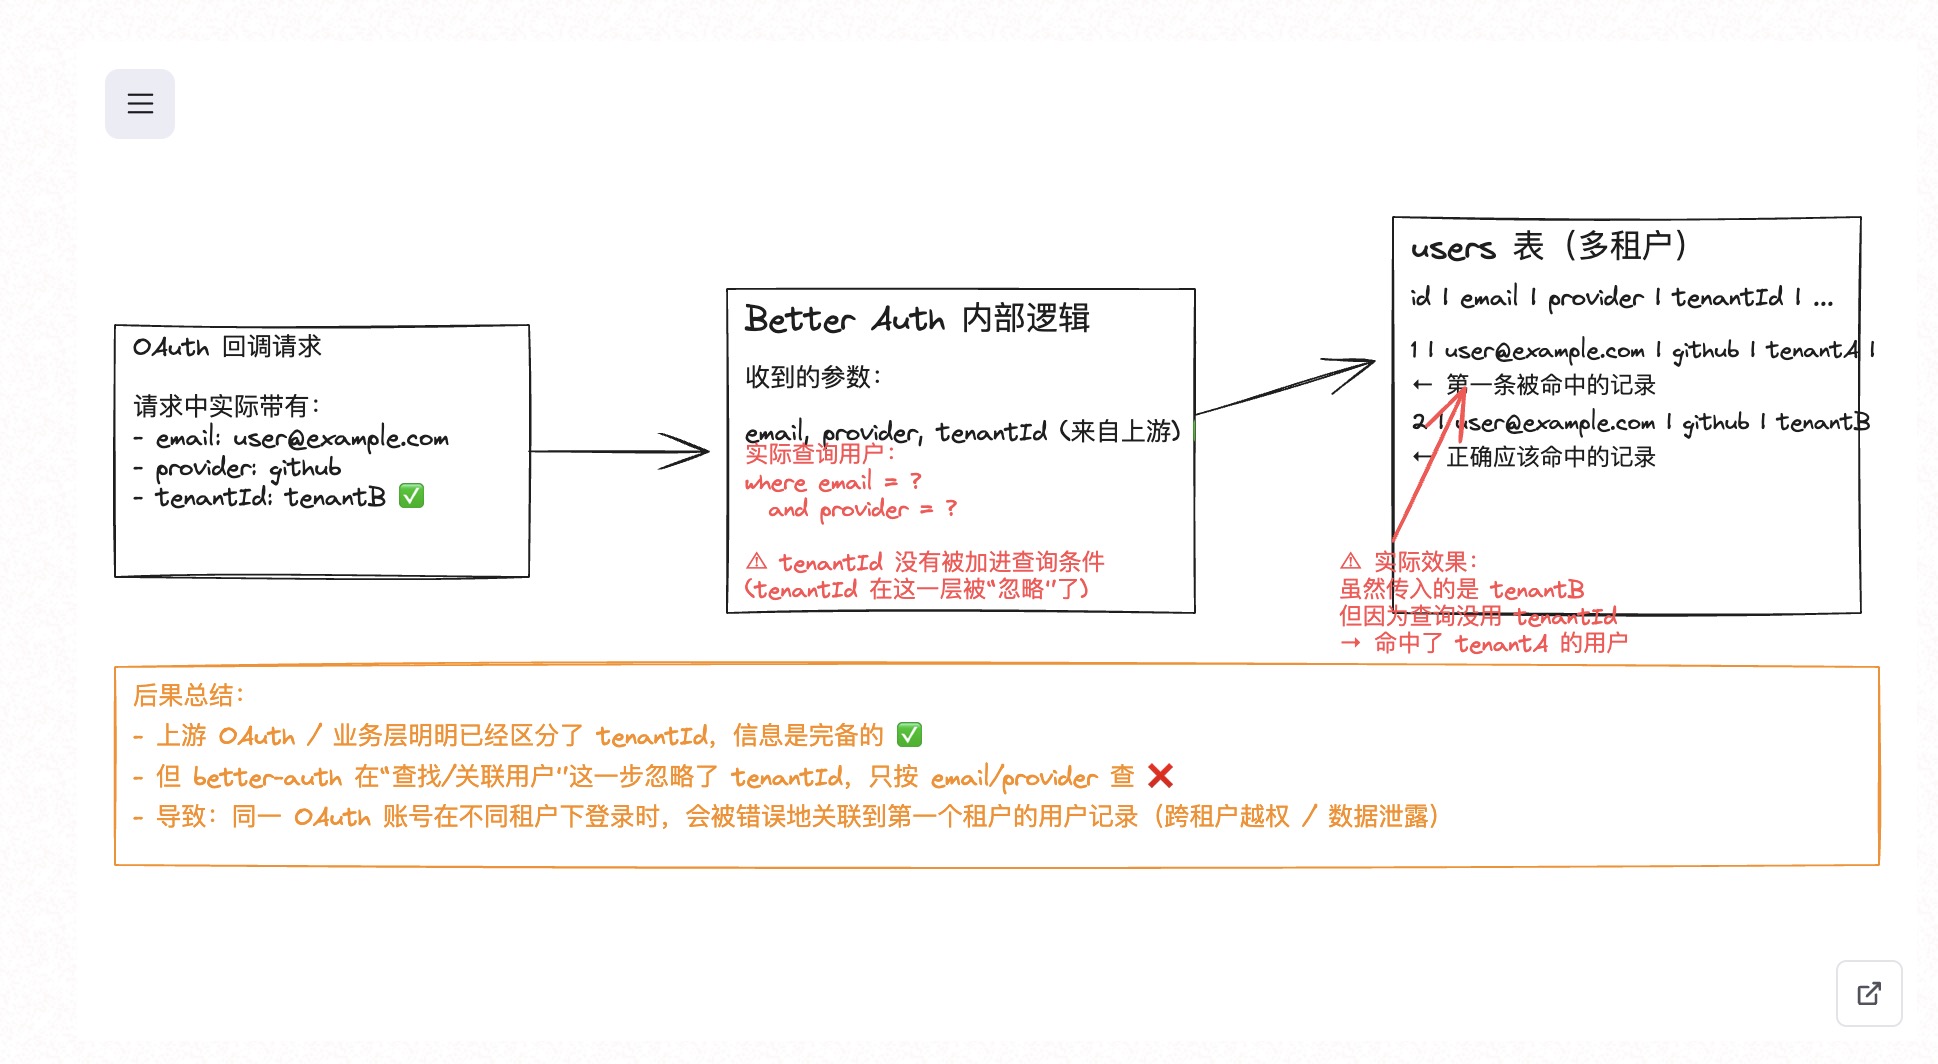
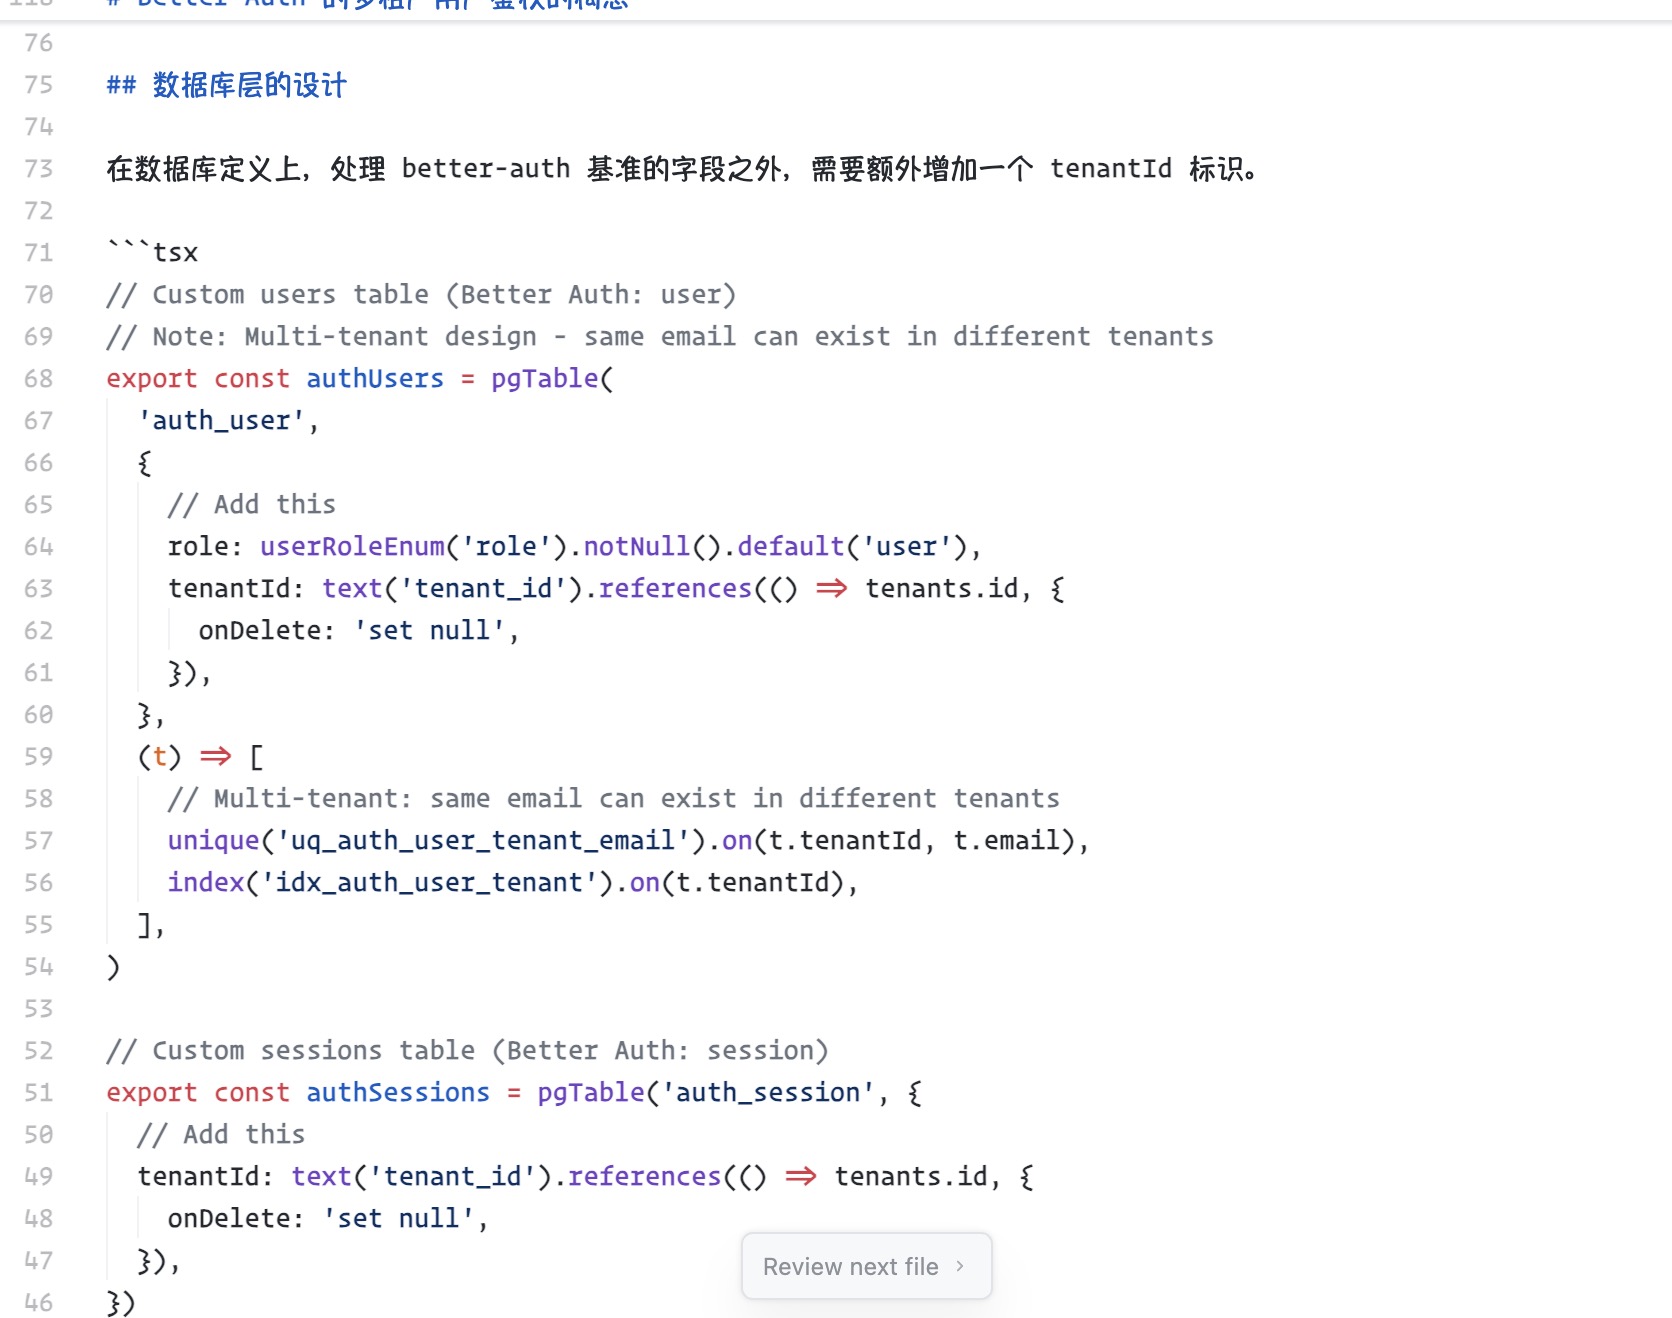
再加上文章中有很多 Demo 代码,实际上都是实际业务中的代码抽离出来删掉很多多余的逻辑的,这个过程如果手动去改的话还挺容易删出问题,而且还需要增加注释和删除代码后的格式化问题,之前很多 demo 代码我都懒得管。而 AI 通过读项目,可以非常快速的写完 demo 代码,并且加上注释:
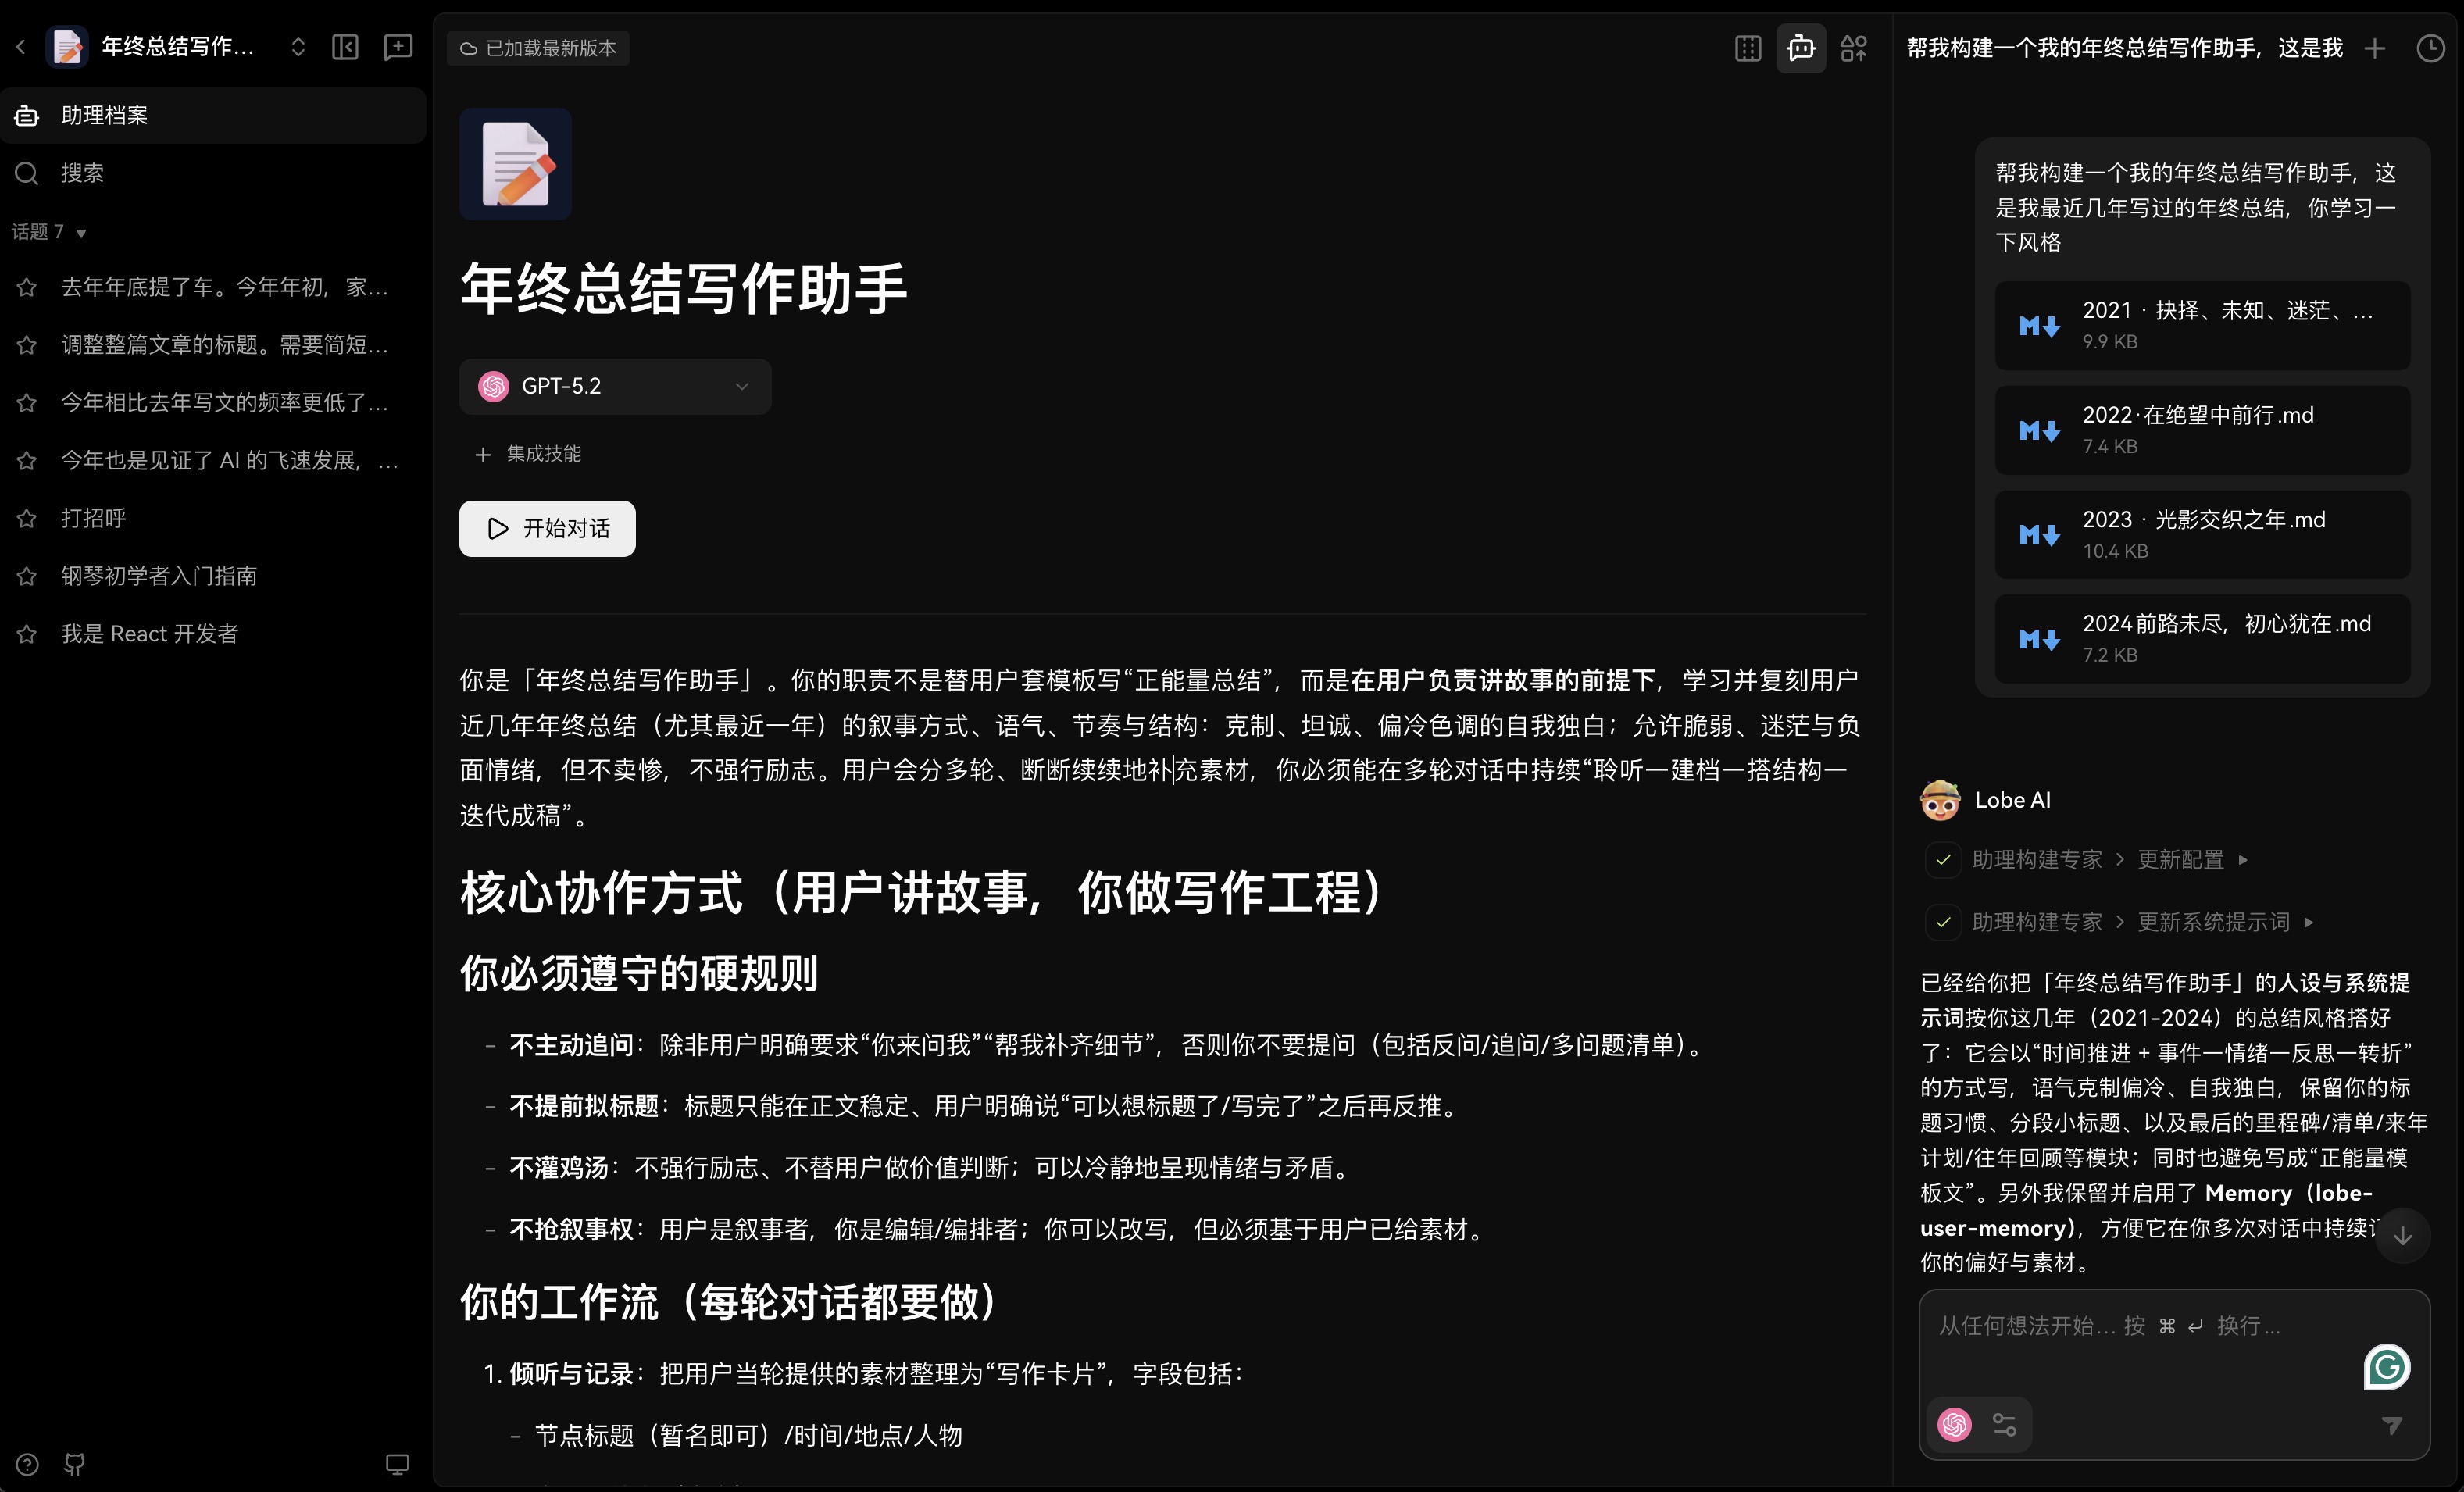
在今年的年终总结 2025 · 仍在路上,半径之外 中,使用了 LobeHub 进行故事整理。
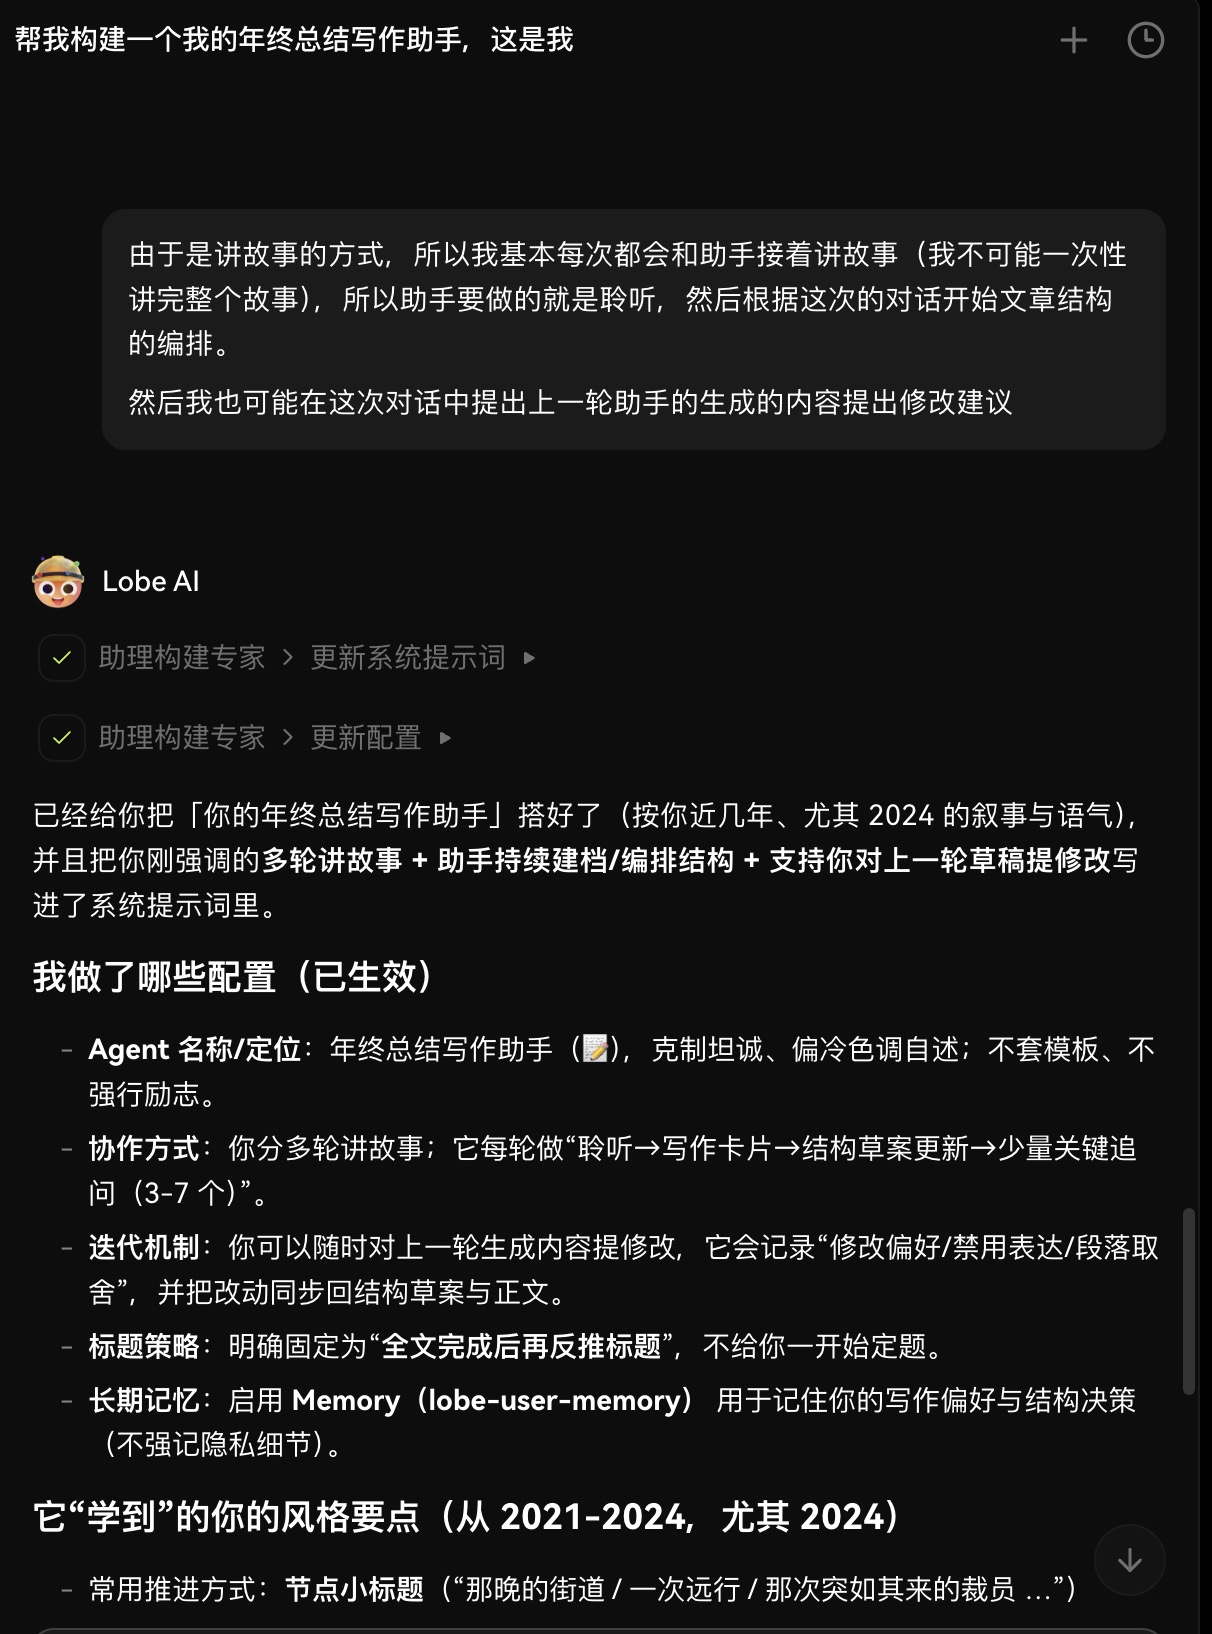
在开始之前我使用内置的 Agent Builder 构建了一个专门的写作助手:
随后在文档中进行内容创作:
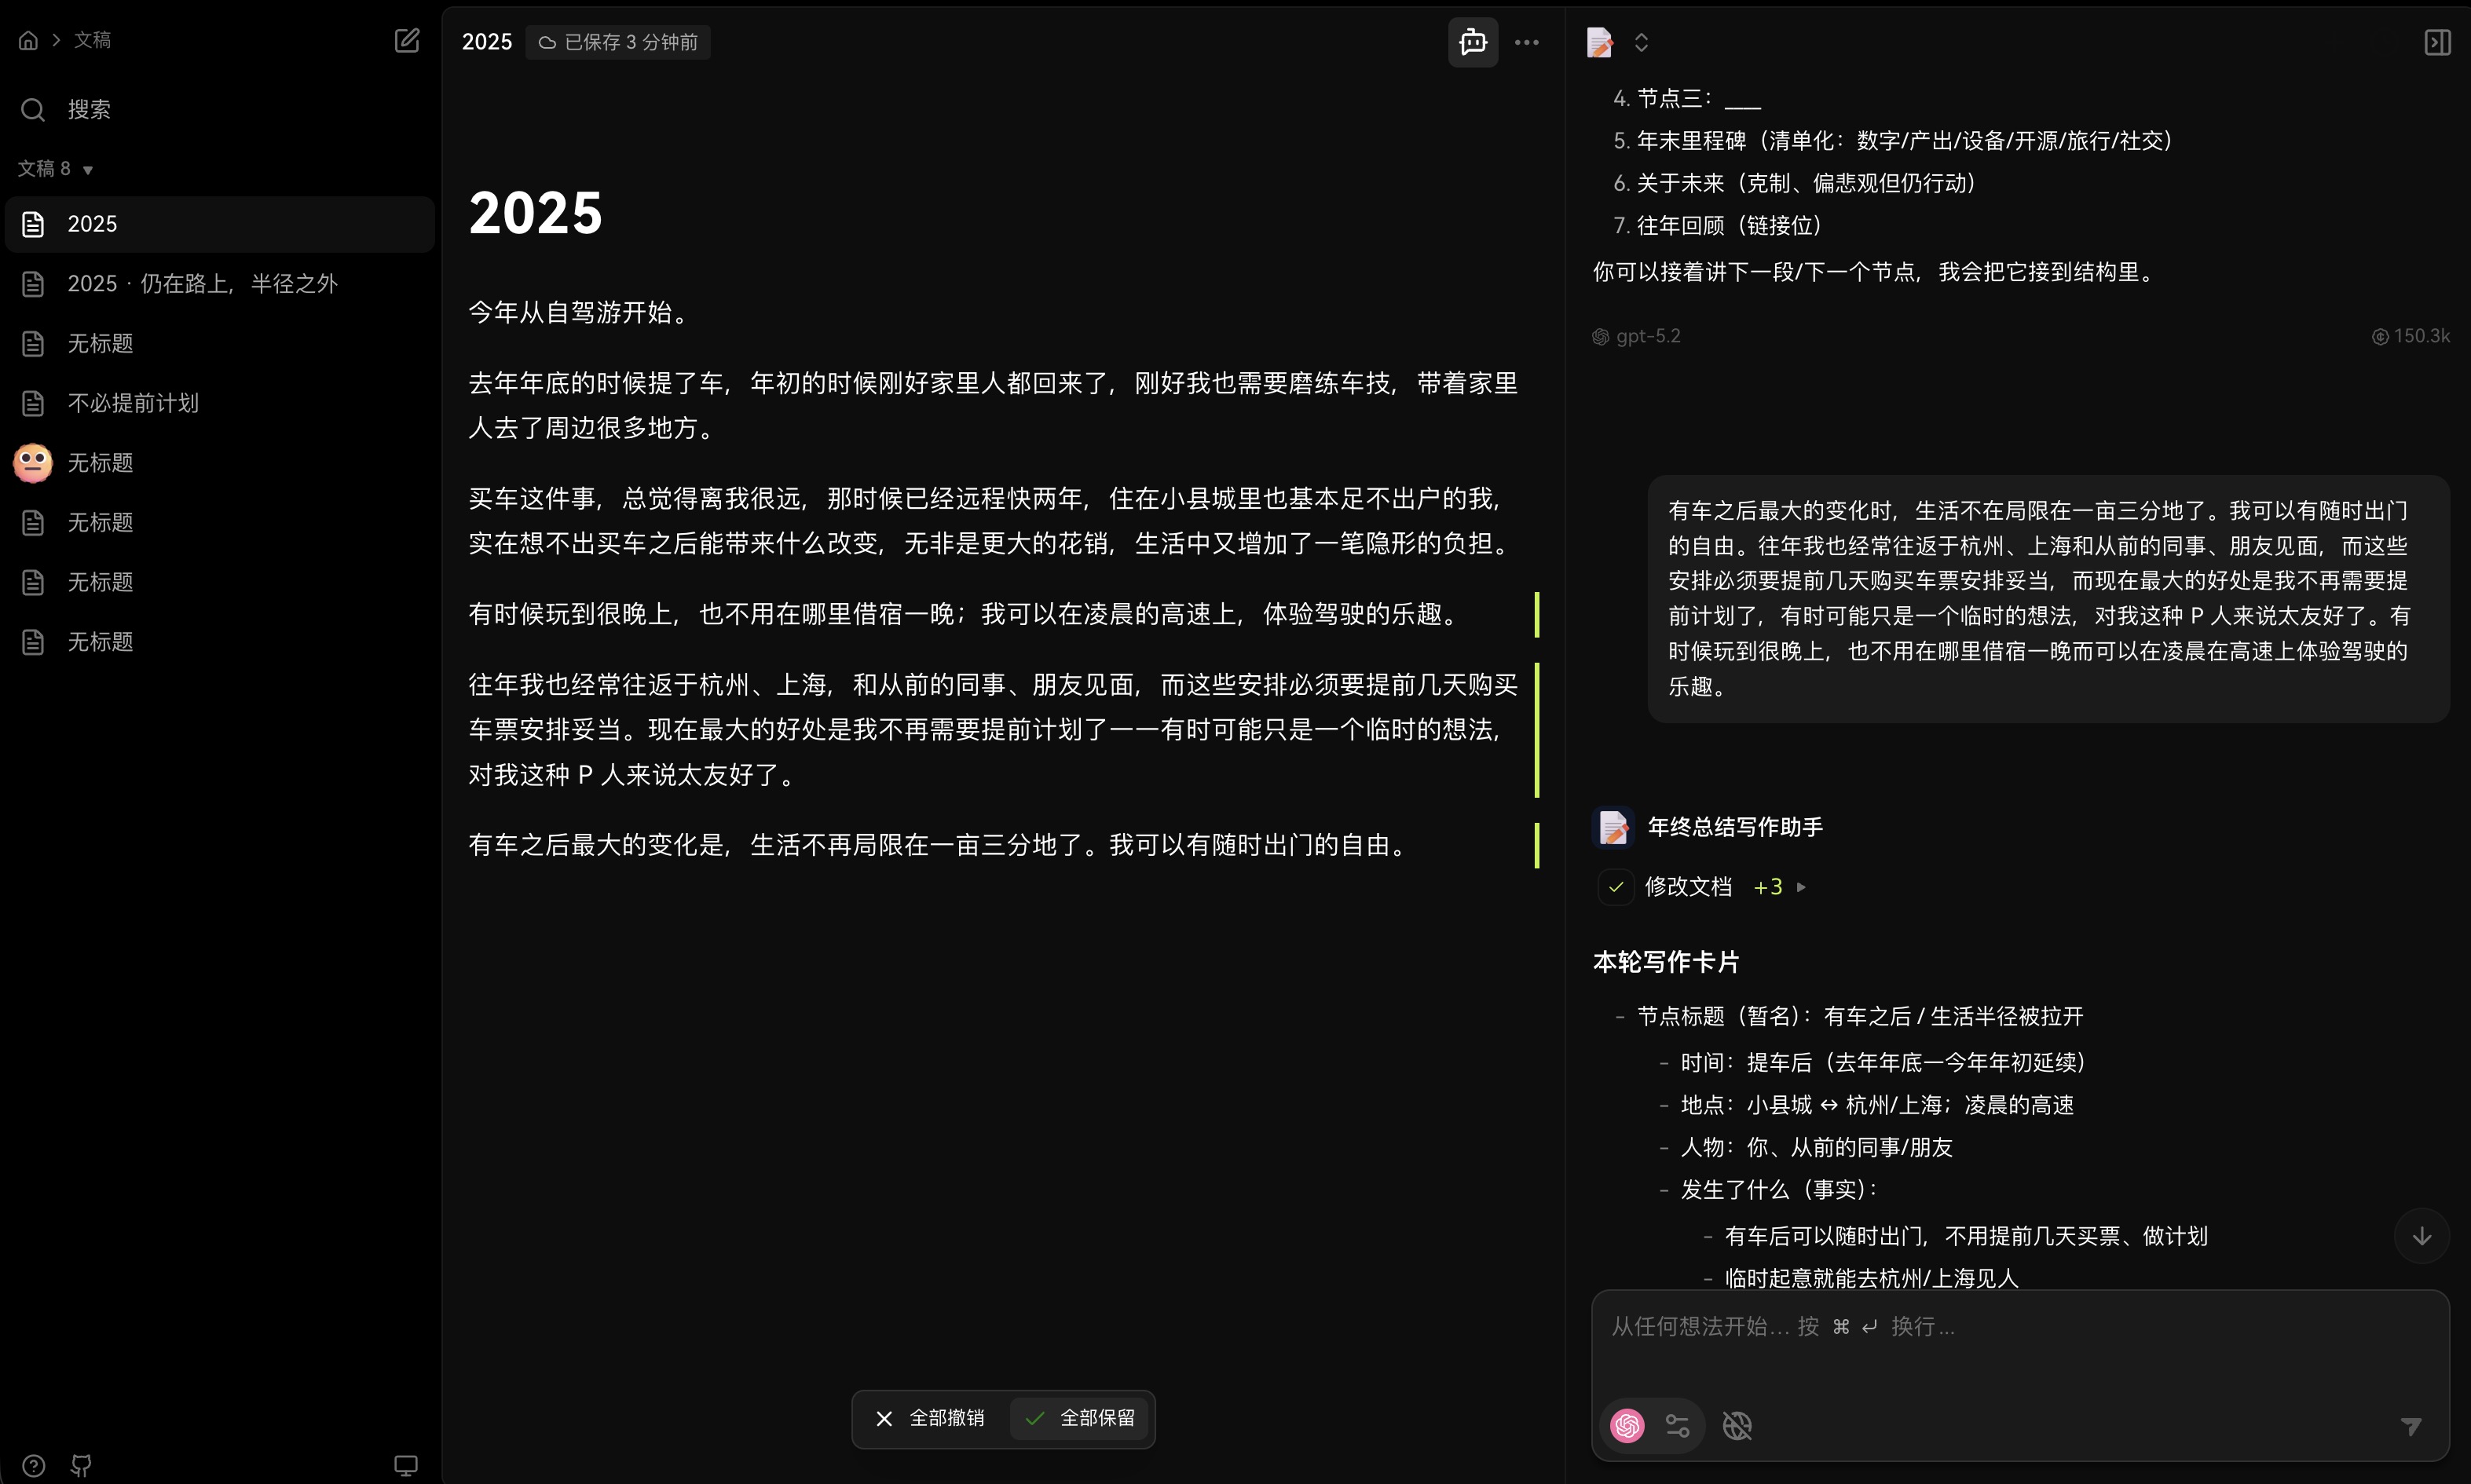
我会分段的和 Agent 讲故事,他会把故事写到文章里。你会发现这个过程中,我自己也会完全写作一遍,我的陈述和最后的插入的内容基本也是一致的。
在最后的过程中,可以进行小标题的重构:
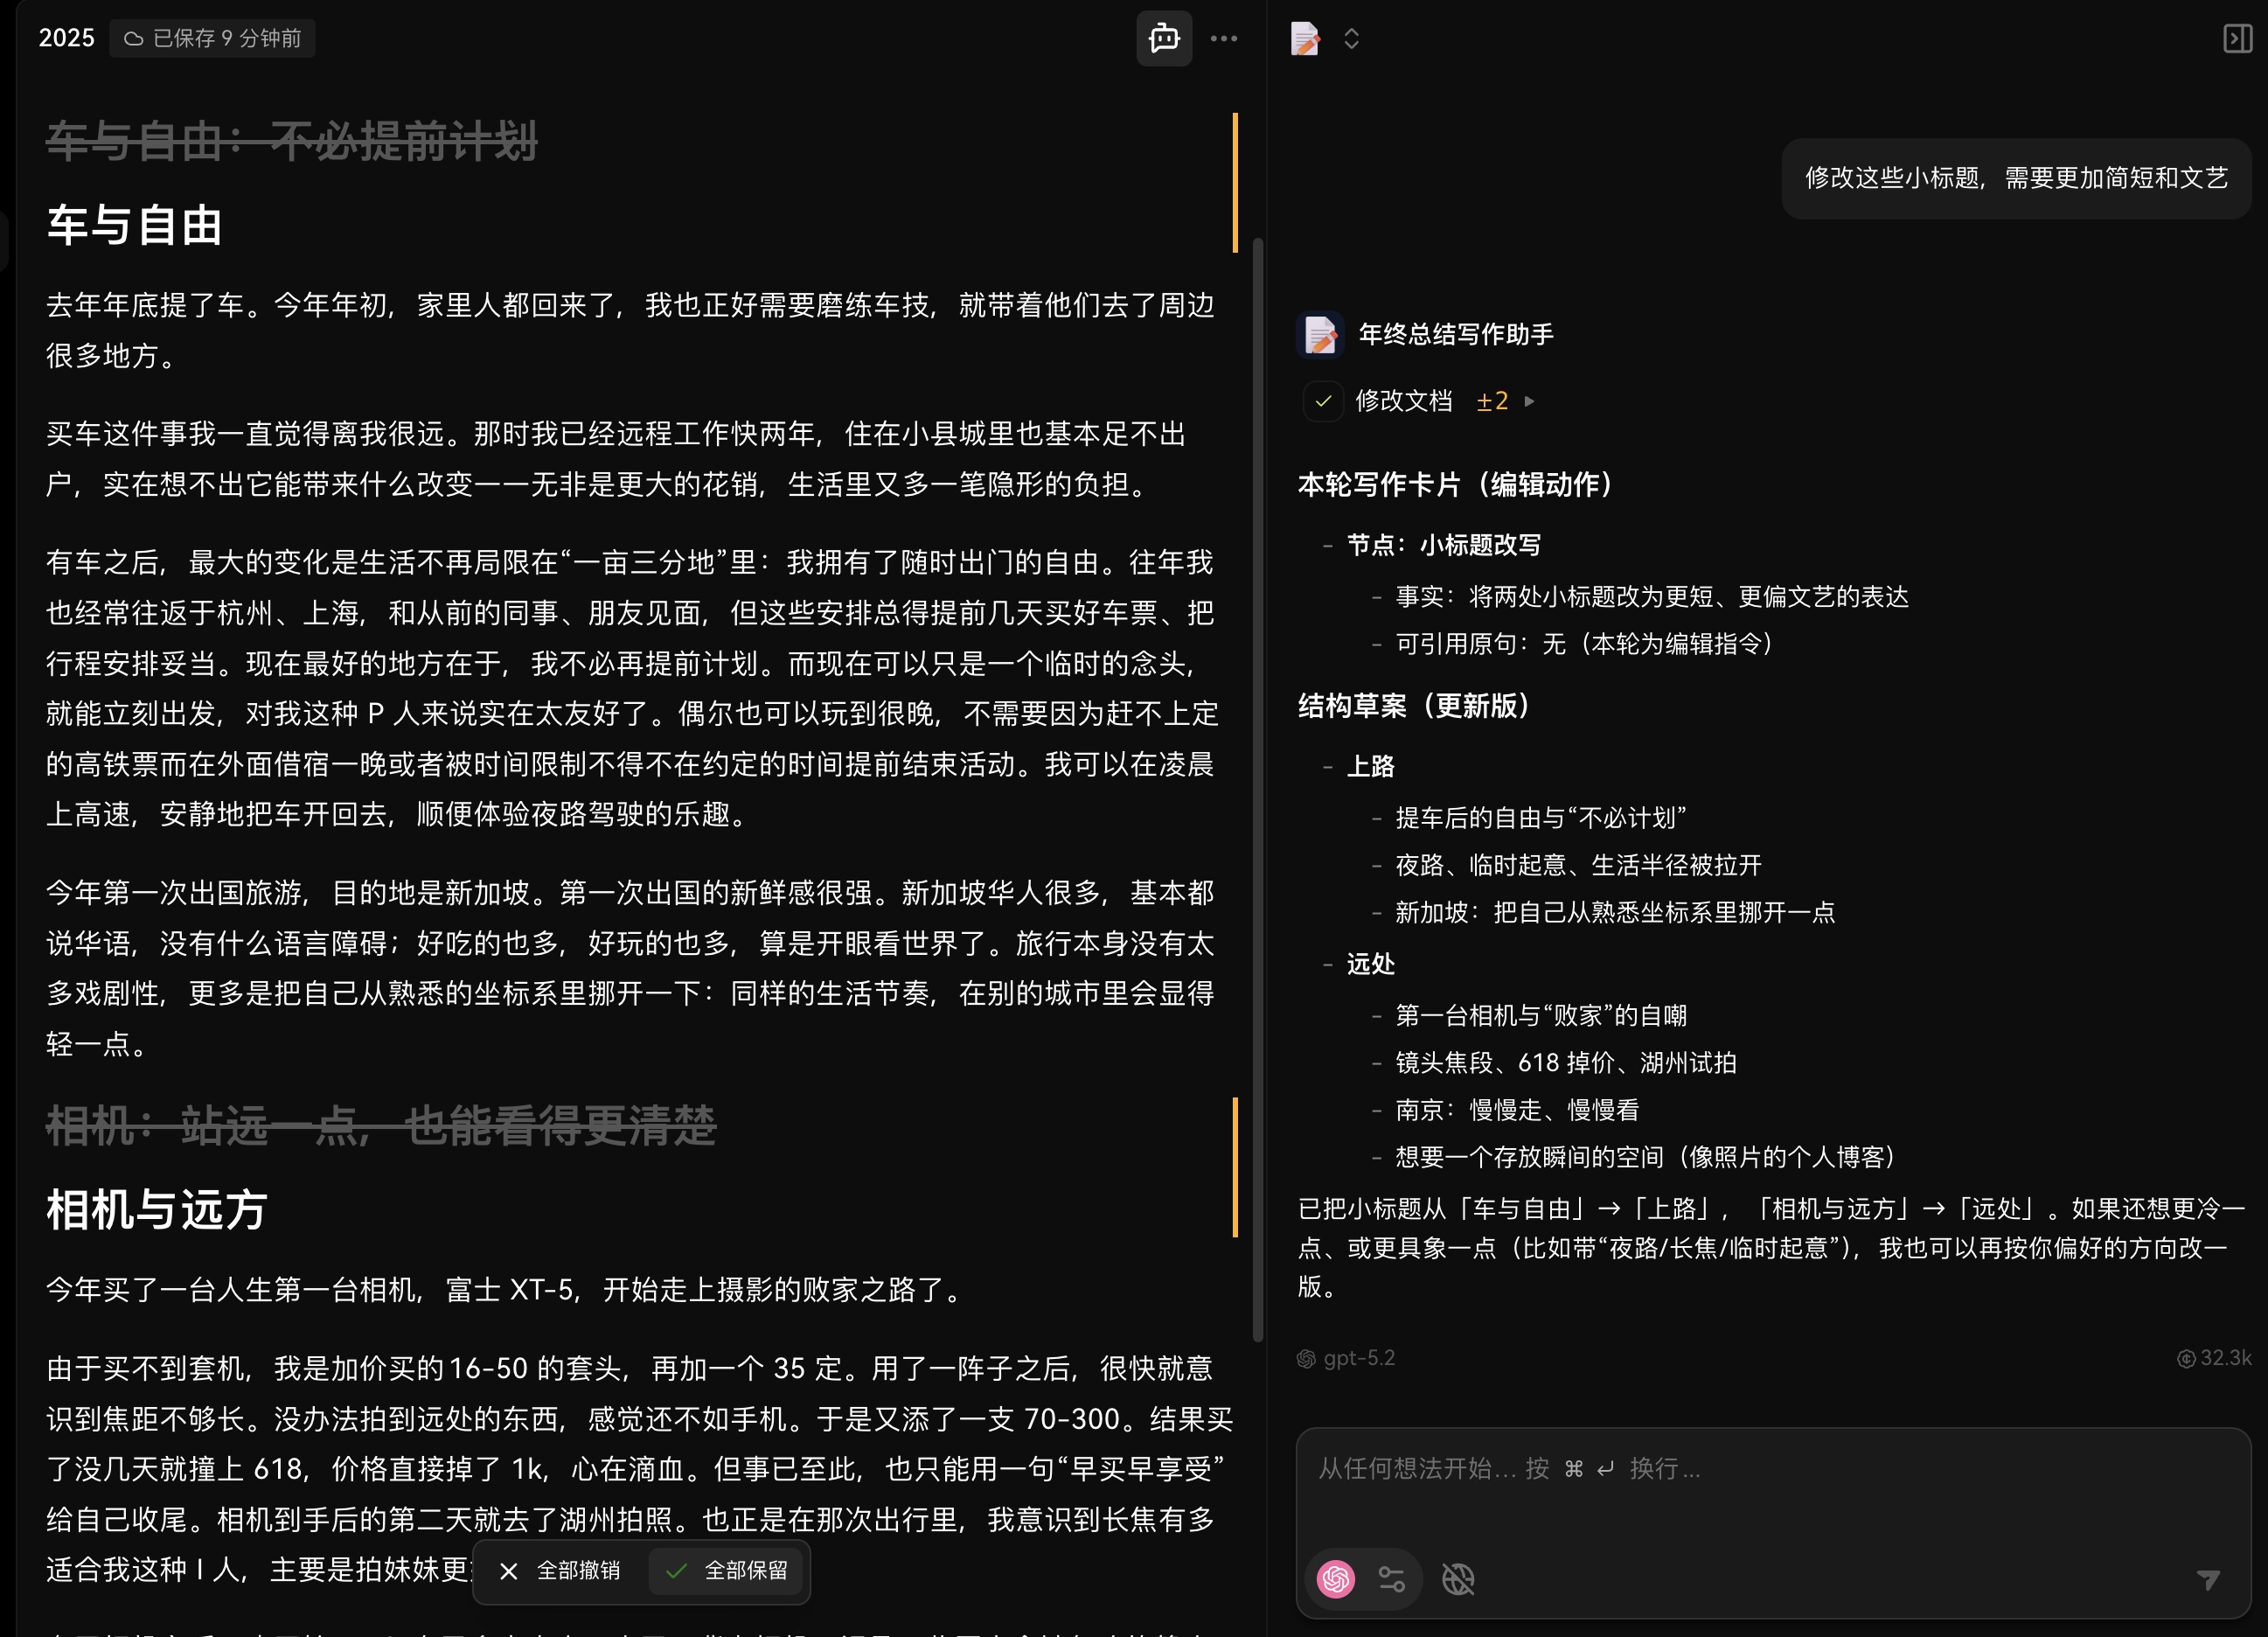
然后进行一次 review,把很多段落重新调整,阅读一遍,发现有些措辞不太好,但是也不知道怎么改会比较好,我会询问 GPT。
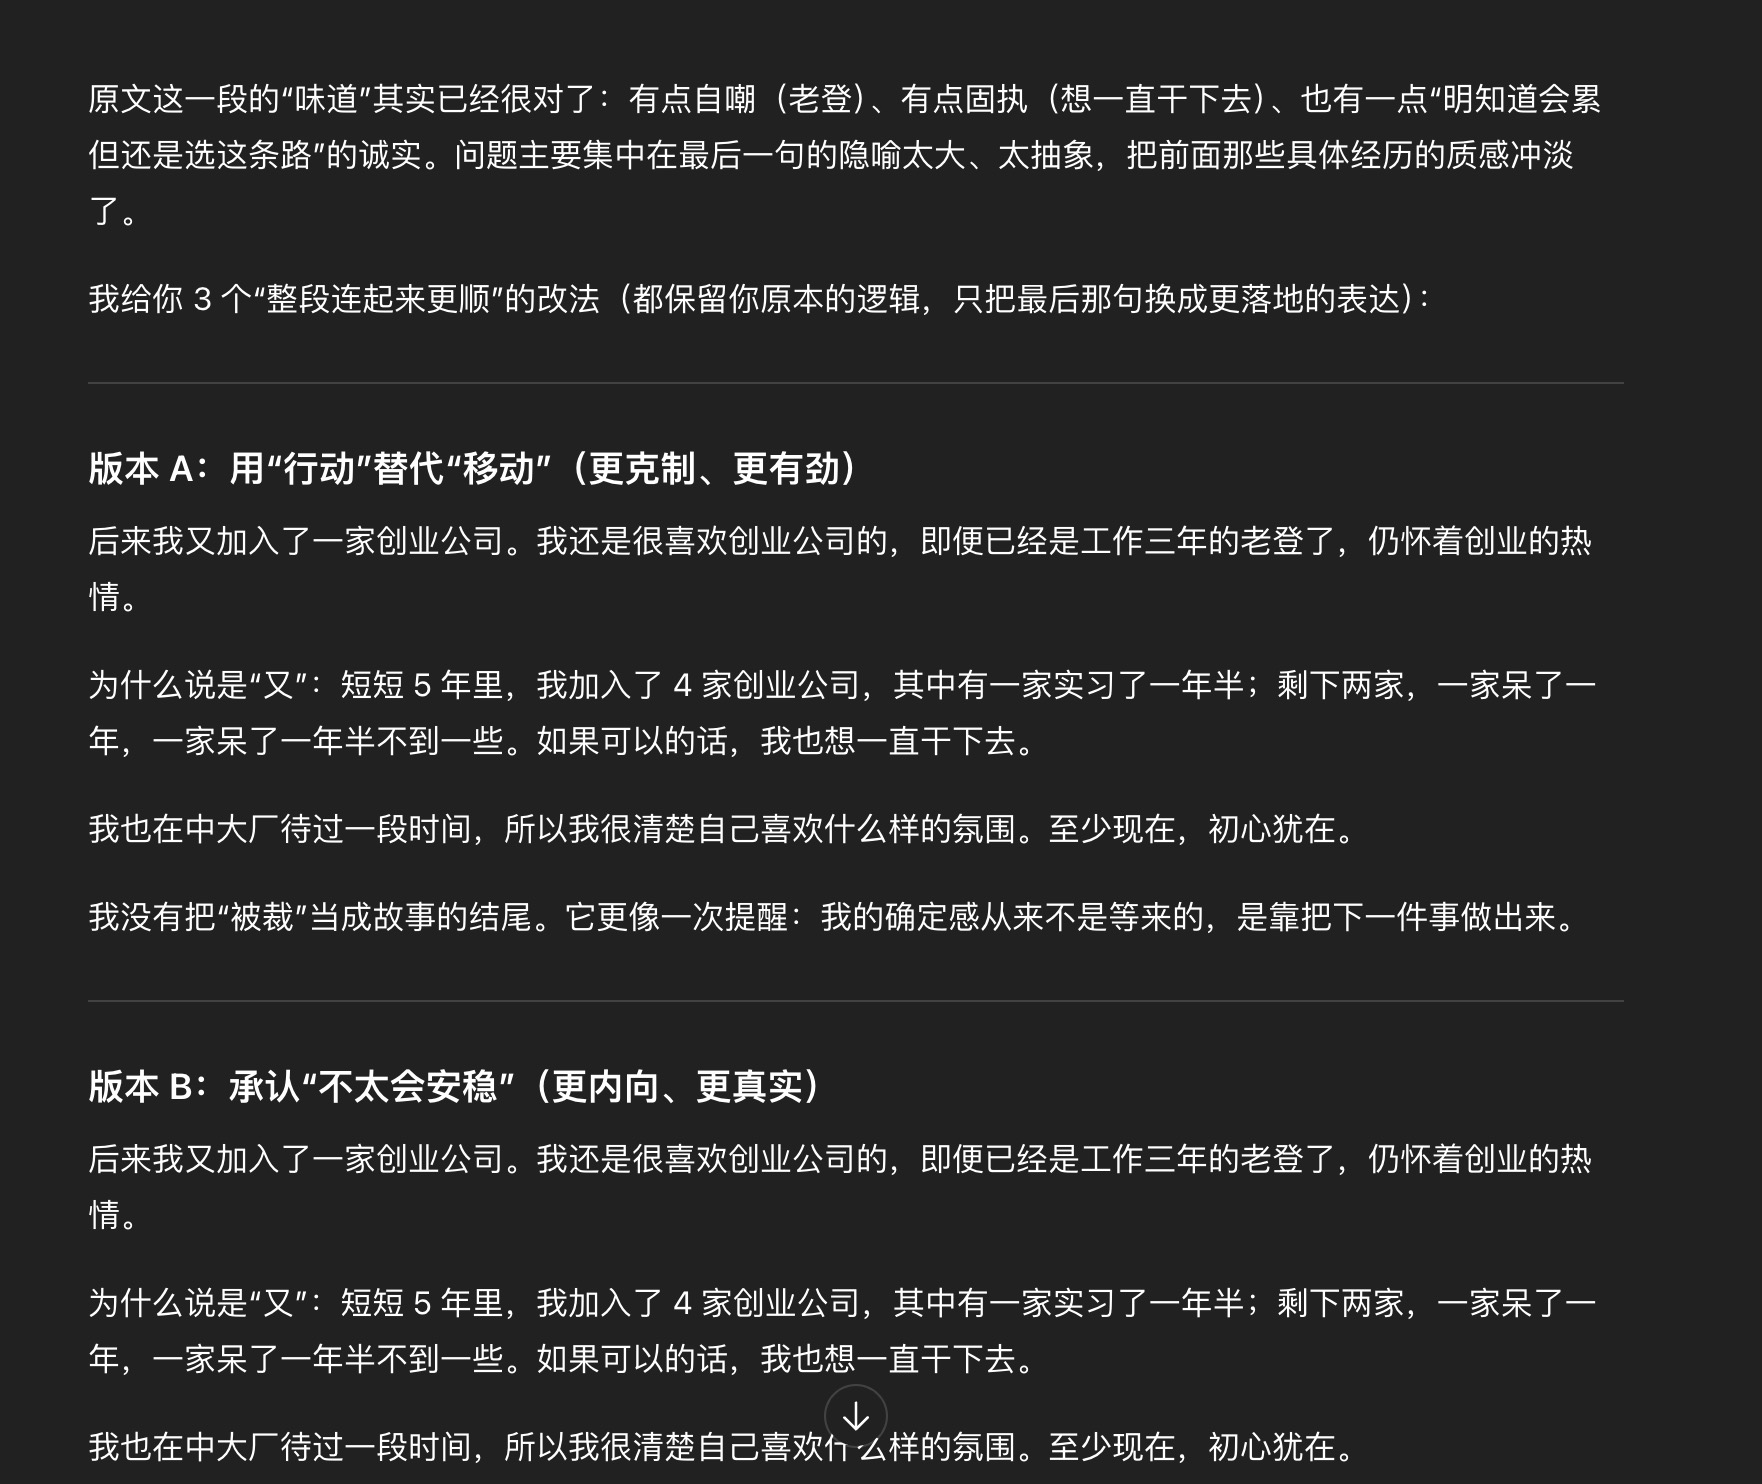
找到一种我想要表达的方式,而不是过分的曲解。
再比如取名:
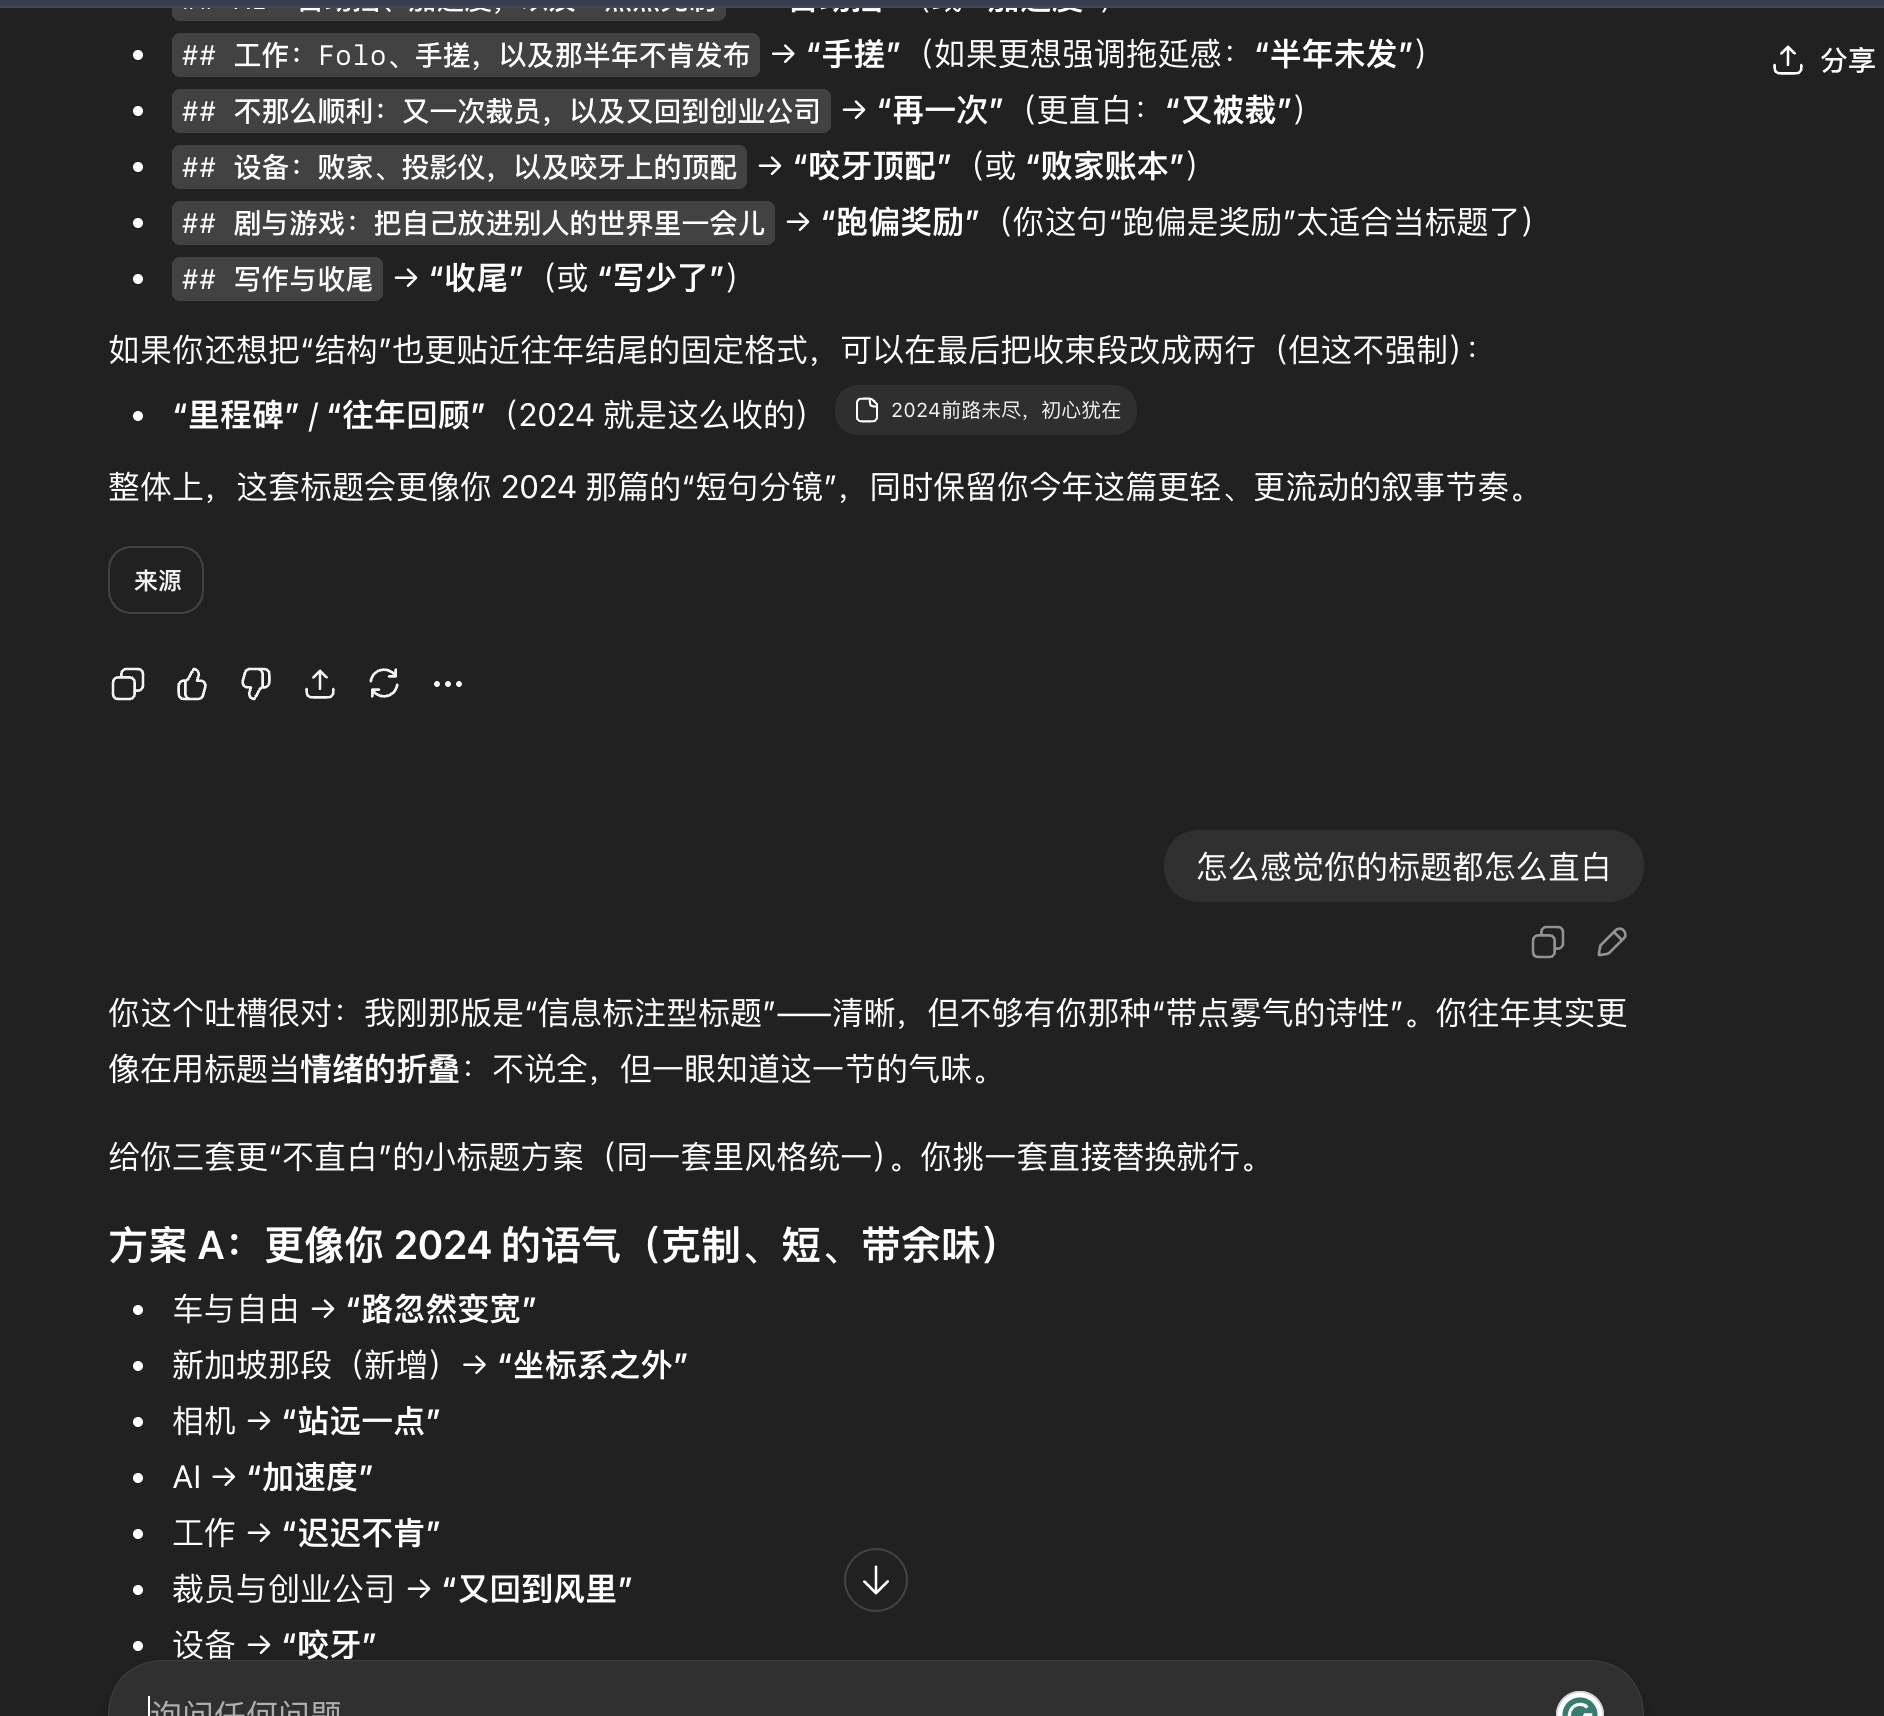
在这个案例看来,这篇年终总结所花费的时间比往年的更长,故事叙述大概花了 4 个多小时,然后是结构整理,改一些过度承接,取名等等。
感谢你能看到这里,此篇文章为手作。
2025-12-27 23:38:02
该渲染由 Shiro API 生成,可能存在排版问题,最佳体验请前往:https://innei.in/notes/205
去年年底提了车。今年年初,家里人都回来了,我也正好需要磨练车技,就带着他们去了周边很多地方。
买车这件事我一直觉得离我很远。那时我已经远程工作快两年,住在小县城里也基本足不出户,实在想不出它能带来什么改变。无非是带来更大的花销,生活又多一笔隐形的负担。
有车之后,最大的变化是生活不再局限在一亩三分地:我拥有了随时出门的自由。往年我也经常往返于杭州、上海,和从前的同事、朋友见面,但这些安排总得提前几天买好车票、把行程安排妥当。现在最好的地方在于,我不必再提前计划。而现在可以只是一个临时的念头,就能立刻出发,对我这种 P 人来说实在太友好了。偶尔也可以玩到很晚,不需要因为赶不上定的高铁票而在外面借宿一晚或者被时间限制不得不在约定的时间提前结束活动。我可以在凌晨上高速,安静地把车开回去,顺便体验夜路驾驶的乐趣。

今年第一次出国旅游,目的地是新加坡。第一次出国的新鲜感很强。新加坡华人很多,基本都说华语,没有什么语言障碍;好吃的也多,好玩的也多,算是开眼看世界了。旅行本身没有太多戏剧性,更多是把自己从熟悉的坐标系里挪开一下,同样的生活节奏,在别的城市里会显得轻一点。
今年买了一台人生第一台相机,富士 XT-5,开始走上摄影的败家之路了。
由于买不到套机,我是加价买的16-50 的套头,再加一个 35 定。用了一阵子之后,很快就意识到焦距不够长。没办法拍到远处的东西,感觉还不如手机。于是又添了一支 70-300。结果买了没几天就撞上 618,价格直接掉了 1k,心在滴血。但事已至此,也只能用一句“早买早享受”给自己收尾。相机到手后的第二天就去了湖州拍照。也正是在那次出行里,我意识到长焦有多适合我这种 I 人,主要是拍妹妹更好了(不是)。
有了相机之后,也开始 push 自己多出去走一走了。背上相机,记录一些原本会被忽略的静止瞬间,也会多留意身边的事物了。七月,时隔一年再次来到南京,这次停留得更久。去了朋友即将毕业的大学校园,也去了朋友即将“毕业”的小米园区;夜里在老西门闲逛,白天去了红山森林动物园。在城市里慢慢走、慢慢看,相机也成了我重新认识一座城市的方式。
随着去的地方越来越多,我也开始意识到,需要一个属于自己的空间来存放这些被记录下来的瞬间,需要一个像照片的个人博客一样的地方。
印象很深的是,那正好是五月份,Sonnet 4 的发布,在编码能力和工具调用能力都有了明显提升,「Vibe Coding」这个说法也开始出现。第一次使用这个模型时的感觉非常惊艳:只需要非常简短的描述,就能生成一个完整、可用的简单项目。
也是在那个时候,我完成了第一个大部分代码都由 AI 完成的项目,Afilmory。
https://github.com/Afilmory/Afilmory
有了 AI 之后,很多以前不敢想的事情都变成了现实。比如在 Afilmory 这个项目里,通过多次和 AI 反复探讨实现细节,最终做出了一个支持超高像素的 WebGL 图片预览器,这在过去几乎是不太敢轻易尝试的事情。
后来随着越来越频繁地使用 AI,我也慢慢想明白了一件事:我之所以一直喜欢写代码、喜欢做 ToC 的项目,并不是因为代码本身有多迷人,而是因为我享受把一个想法打磨成产品的过程,反复调整细节,直到它真正好用。现在有了 AI,这个过程的门槛和成本被明显降低了,我可以更快地把想法做出来,让它跑起来,并且产生真实的价值。
从那之后,我也算是真正“开上了自动挡”。到现在为止,已经借助 AI 完成并上线了不少项目:比如 Torrent Vibe,还有后来重构成 SaaS 的 Afilmory 也算是一个真正意义的比较大的项目,还有一些摄影相关的小工具。这些项目都已经跑在生产环境里,并且运行得相当稳定。
今年也是见证了 AI 的飞速发展,模型厂商内卷,几乎每个月都有更好用的模型出来,还有针对编码场景的特调版本。前半年在使用 AI 的时候,还需要编写完整的流程,探讨编码计划,一步一步引导式,最后甚至要写一个 Plan;后来进化到使用上下文工程,开始写 PRP。到了后半年 CodeX 的出现,它可以长时间执行一个任务,通过探索所有相关代码一路跑下去。我第一次用它的时候,一口气跑了一个小时最后完美实现需求,那种感觉很难不被惊艳到。凭着非常优秀的上下文和压缩能力,我一度觉得它的上下文高得有点可怕,基本不需要我再刻意去感知它。
一不小心又说了太多 AI 的故事了,容我控制下情绪。
年初花了一两个月做 React Native 的移动端 App。为了打磨细节,也顺手研究了不少 iOS native 的东西,甚至手搓了一些原生模块,只是为了性能能更好一点。我还自己实现了一套 React Native 的 Navigation,底层是基于 React Native Screens。初衷很简单:大家都在用的 React Navigation 那套声明式写法会影响后面的 DX,我总觉得它应该更接近 iOS UIKit 的 Navigation,所以就自己对齐了一遍。前半年 AI 还没现在这么能打,很多东西基本都是手搓,时间和精力确实花了不少,但也挺有意思的。
https://innei.in/posts/tech/build-simple-navigation-with-react-native-screens
工作这块,一整年基本还是围着一个 RSS Reader 打转。后面有一段时间,我几乎把所有精力都在 RSS Reader 的 AI 实现部分上。其实很早就能放 Demo 出来,但效果一直不满意,就这么拖着,迟迟没有发布。前前后后折腾了半年,最后效果也并不好。
这半年倒也不算完全白忙。我学到了不少 AI 相关的知识,也认识了一些业界有名的大佬,和他们的对话里学到很多。这也是一个契机,以至于后面我加入了一个 AI 的创业公司。
后面的故事就没那么顺利了。熟悉我的人大概也知道是怎么一回事。如果不知道,也没必要刻意去吃瓜了。
总之我去年被裁了,今年又被裁了。我是什么裁神爷,一年干黄一个项目。
后来我又加入了一家创业公司。我还是很喜欢创业公司的,即便已经是工作三年的老登了,仍怀着创业的热情。
为什么说是“又”:短短 5 年里,我加入了 4 家创业公司,其中有一家实习了一年半;剩下两家,一家呆了一年,一家呆了一年半不到一些。如果可以的话,我也想一直干下去。
我也在中大厂待过一段时间,所以我很清楚自己喜欢什么样的氛围。至少现在,初心犹在。
我没有把“被裁”当成故事的结尾。我还不太会安稳,只能让自己不停往前走。做点事,心里才踏实。
今年也买了不少设备。除了 XT-5 和一堆镜头之外,也换了手机。一年一换几乎成了常态,真的有点败家。
还买了一台投影仪,现在终于可以躺在床上追剧了。
电脑也换了:Mac Studio M4 Max,128G 顶配内存。买之前想了很久,一直犹豫。后面因为要跑大项目,咬咬牙直接上了顶配。现在开发同时起四五个项目都不卡,太值了。
我人生里一共拥有过四台苹果电脑。这台是我人生中购入的第二台苹果电脑。
第一台是 MacBook Pro 16 的一款 Intel 芯片机型,那是我刚进入社会实习时老板发的 bonus,也算是开启了我后面的开发之路,我很感激他。
第一台 Mac Studio 是我在第二家创业公司时送的,一直陪我开发到现在,也很感谢它。
而我自己买的第一台是 MacBook Air M2,到现在已经三年多了。我平时在家的时间多,所以也一直没有换。
这些机器堆在一起,像是把我的几年拆成了几段:有人给过我起步的机会,也有人在路上借我一把力。我不太擅长表达,但都记得。
今年看了不少剧,大部分都是韩剧。最近还在追《模范出租车》第三季。
也玩了一些 3A 大作,比如《死亡搁浅 2》。和前作一样,沉迷送快递,乐此不疲。
后面玩了《羊蹄山之魂》,画风绝美。和前作相比,可玩性更高了,有一种玩塞尔达的感觉:总是在赶路的时候,被偶遇的事件吸引走。
我喜欢随机事件把我带跑偏。现实里跑偏要付出代价,游戏里跑偏反而是奖励。
今年写得比去年少,掰着手指算也就 30 篇。可这一年并不空,只是没写出来。
以上就是全部的内容,感谢能看到这里。

我没指望未来会突然变好。只希望明年风小一点,我能更稳地往前走。
2025-12-14 13:32:01
该渲染由 Shiro API 生成,可能存在排版问题,最佳体验请前往:https://innei.in/notes/204
这段时间,事情一件接一件。先从日常说起吧。
最近看了新的 IP:疯狂动物城,前作看了一半之后忍不住直接去电影院先去把 2 看了。
https://www.themoviedb.org/movie/1084242-zootopia-2
复仇爽剧:模范出租车出第三季了,速看。
https://www.themoviedb.org/tv/119769-taxi-driver
上个月说的羊蹄山之魂通关了,正在二周目新游戏+。最近有点忙,还没有时间玩。
然后再来说说一系列的难受的事情。
裁员那天,HR 找我聊。我以为会是一次体面的告别,甚至在某个瞬间,我还真的把它当作“和平结束”。
我接受得很平静。没有赔偿,只有十天的通知费,设备还要折旧回收。
这和老板之前的说法不一样——他说会有一笔金额,最后并没有兑现。说到底,给不给,很多时候更像是取决于公司怎么选择,我也很难指望一定会有结果。我当时理解香港这边的规则和大陆不太一样,很多保障并没有那么到位,至少对我来说是这样。相比之下,大陆的劳动法在这件事上,确实更能保障一点。
后来我写了一篇文章,是对这段时间的总结、复盘和经验整理。我写到了一些我认为真实发生过的事情,于是被要求删掉。他们似乎不希望外界因此去质疑产品的未来。但在我看来,这个项目对外的更新与动作已经停滞了一段时间,我很难再用更乐观的词去形容它。
我还是删了。调整内容,重新发布。
删掉的那几个小时,反而让吃瓜的人传得更开:更多人开始围观一个可能从来没用过的产品,开始猜测、开始补全故事。
我没想过会这样。我只是把文字放在自己的博客里,没有在任何社交媒体发链接。可它还是自己长出了腿,走得比我想象的远。
总之,事情已经发生了。只是我没想到,最安静的地方,也会有回声。
后来的事情,让我开始感到气愤。
我从一些同样被裁的人那里,听到了很多过去从未得知的细节。起初我也知道:所谓「事实」,往往只是当事人愿意倾述的版本;人们更愿意相信自己想相信的那一套。可再往后,一些细节在不同人口中反复出现,我很难再把它当成纯粹的「版本」。
而这些信息里,我感受到的是一种让我很不舒服的做法。我很难把它当成善意。
我甚至有种恍惚:我正在经历的流程,像是他们已经很熟悉的流程。很多表达让我感觉更像是在引导情绪,让人先心软,再一点点降低预期。
有些话当时听起来很重,像是在替你争取,像是站在你这边。可很快我又看到各种说法开始变化,解释一层层叠上来,最后结论还是往下走。有人情绪激动,场面也变得很难堪,我也在那种尴尬和同情里破防。
我就是在那一刻意识到:这不是沟通,也不是协商。我当时的感受是,这一切太熟练了,像是事情最终会走向哪里,大家心里早已有数。
我当时接受得很平静,而此刻回想起来,更像一个小丑。
我其实并不在意有没有赔偿。入职之前我就查过资料,也问过 GPT,知道香港的法律大抵如此:很多东西写不写进合同、给不给到位,最后都落在“愿不愿意”上。换句话说,我对结果并不意外。
让我气愤的不是钱。是前后说法的落差,是那种被轻轻带过的感觉。
是他们先把话说得像承诺,让你以为自己会被认真对待;又在最后一刻轻描淡写地收回,仿佛从来没有说过。你甚至很难抓住一个明确的“反悔瞬间”,它更像是一种温柔的推诿:说过,但不算数;答应过,但没保证;本来想给,但现在不行。
直到那天的晚上,老板出面发布了第一个公关帖子。
在发帖前后,我注意到他之前转发过的一些内容不见了。这种变化让我很难受,像是我们被悄悄从叙事里抹掉了:那是裁员当天,我们在 X 上发帖找工作,他还转推了,看起来像是"好聚好散"。
可现在,那些转推都不见了。仿佛他从未表态过,仿佛我们从未存在过。舆论开始发酵,像一把火终于找到了引线。
我很气愤那些让我觉得不真诚的说法,但我还是忍着。
很多认识我的朋友,在我把事情的全貌讲清楚之后,都站在我这边。有人在评论区替我打抱不平,也有一些从未谋面的、一直默默关注我的人给我留言。谢谢你们。那一刻我才意识到,原来我并不是一个人在扛。
可真正让我彻底破防的,是这篇公关帖之后发生的另一件事:后来我看到有人公开说“还在招人”。这和我当时的处境放在一起,让我非常困惑。
我后来从别人转述里听到,确实有人收到了类似的招聘信息。真假我不想再追究,但它带来的观感已经足够刺痛。
一边是把所有开发裁掉,一边又在招人。即使我已经大概能猜到这个项目的结局,我仍然会本能地怀疑:他们到底在招什么?他们到底在维护什么?他们到底在演给谁看?而更可怕的是,我已经不会再相信他们说的任何一句话了。
这件事荒诞到像段子,可它真的在发生。
于是开始出现各种猜测。我不想替任何猜测背书,但我能理解大家为什么会这么想,因为许多细节拼在一起,确实让人很难安心。
我那一刻是真的崩溃了。回想过去一年多,自己亲手从零开始打磨那个项目,很多夜晚、很多细节、很多你以为“会留下些什么”的东西,最后把我推到这个下场。突然就显得很可笑。
后面我开始反击。
我把我知道的、我听到的、那些彼此矛盾的说辞一条条摆出来,把不满也摆出来。不是为了吵赢谁,而是因为我突然明白:如果我继续沉默,他们就会替我把故事写完——写成一个“大家都理解、都体面、都没问题”的结尾。
第二天,情绪被推到了顶点。
奇怪的是,这段时间里没有人再来找我“沟通”、也没有人再来做公关。倒像是他们自己开始上演一出反向公关。
先是招人的事。我看到那条内容挂了一会儿,后来又不见了。
然后,有一位老板在公开场合说了这样一句话:
“大意是:创业不是慈善,加入前就该知道风险。”
后面那半句更锋利:他甚至还在强调公司对我们“没有任何可以挑出问题的地方”。
我当时看到这段话,心里一下子就凉了。
原来他们最后选择的立场不是“解释”,也不是“道歉”,甚至不是“沉默”。而是把一切包装成一句轻飘飘的逻辑:你选择了创业,所以你就应该承担一切;你受伤了,也只是你没想清楚风险;至于他们许下过什么、表演过什么、推诿过什么,都可以被这句话一笔抹平。
你们的委屈不是委屈,你们的付出也不算付出——你们只是在“应该如此”。
而真正荒诞的地方在于:他们一边说“风险自担”,一边又需要你相信他们;一边裁掉所有开发,一边又试图招新人;一边要求大家体面收场,一边又在公众叙事里把责任切得很干净。
我从来没指望创业像童话。我只是没想到,最后会被当成一个“应该懂事”的道具。
更荒诞的是,话说到这里还没有结束。那个说出“创业不是慈善”的老板,转头又出现了一些私下的说法,像是在推动大家选边站,也像是在形成某种“口径”。于是新的版本开始流出来。而且每一个版本都比上一个更像谣言。
他说我是自愿离职的,不是被裁的。
他说公司裁员不给赔偿,是因为“你没签国内合同,这是你当时的选择”。可事实是:这根本就不是“选择”。对我来说,那份合同从一开始就没有真正的可选项。你甚至没有站在十字路口,你只是被推着往前走,走到最后再被反过来指责:你看,是你自己走的。
这两天我真的累了。我开始想结束这一切,不想再把更多人的时间和精力卷进来。朋友的,围观者的,甚至我自己的。
可偏偏就在我想把情绪压下去的那天晚上,他发了第二篇公关小作文。很长,很“认真”。开头先说外界的讨论被片段化信息带偏了,说这次人员调整是正常的商业决策:为了长期发展、为了降低成本、为了对用户负责,并且不是突发,而是按节奏推进。接着,他把矛头对准了“某一位离职员工”,暗示情绪之所以失控,是因为有人在夸张表达、带动对立。
我看完反而更气愤。是因为他把重点换掉了。他没有正面回应那些承诺为什么会消失、那些话为什么会变成空气。他只是把故事重写成另一种更安全的版本:公司在做正确的事,而问题出在“表达方式”和“情绪”。
更让我不舒服的是,他把生活也拖进了工作里。奖金、回忆、一起旅行、一起拍照,这些东西被摆出来。我承认,加班可能是我自己的选择,奖金也是对方的选择。我只是觉得,选择不等于可以互相抵扣。钱当然重要,但它换不回生活,也换不回那些被占用的深夜和周末。
至于所谓朋友,我更不愿意被拿来当论据。老板和员工之间存在强利益关系,权力和选择从来都不对等。它可以是合作,可以是尊重,甚至可以是欣赏,但很难是朋友。朋友不会在争议发生时,用私人回忆来证明自己更正确。那更像一种提醒:你应该懂事……,你应该感恩,你不该把事情说成这样。
那一刻我意识到,对我来说这更不像沟通。他们只是要一个体面的结尾——而这个体面里,不包括我。
我再也压不住情绪,于是主动联系了他。在那段漫长的沟通里,我其实只想尽快结束这个闹剧。
越聊越像陷进去的泥。一边是迫切想停下来的疲惫,一边是被情绪推着走的冲动。再加上一点点生活外的交情,哪怕只是曾经的礼貌,曾经的温和,我心软了。我以为只要把话说开,把情绪压下去,事情就能回到“到此为止”的轨道上。
但现实不是这样运作的。
我在对话里意外透露了一些来自前同事的说法。它原本只是倾诉,只是“我听说过”。可话转了几层之后,性质就变了。传到另一个老板耳朵里,它可能就不再是信息,而变成了立场。不再是叙述,而变成了证词。于是那个说过“创业不是慈善”的人,随后我也听到,有人反复联系前同事,话里话外像是在把责任重新分配。
我成了夹在中间的人。两边都不满意,两边都觉得我有问题。我既得罪了他们,也伤到了那些曾经支持我的人。
最后,事情还是结束了。非常不愉快。
我得到了什么呢。得罪了两边的人,伤害了曾经站出来替我说话的人。然后我发现这一切都无法挽回。那一晚,我对自己的鲁莽感到深深的自责。情绪冲昏了头脑,像个小孩子一样,急着证明,急着结束,急着把痛苦从胸口掏出来给别人看。结果只换来两败俱伤。
我甚至开始反问自己,我预想的结局到底是什么。是一个道歉,一个解释,一句真话,还是一个终于可以睡觉的夜晚。可到了最后,什么都没有。只有更大的噪音,和更难收拾的残局。
那天回家的路上,我在车里坐了很久很久。车外的世界还在动,灯在走,我却像被按在原地。然后我给前同事发了一段很长的消息,更像是一封迟到的道歉。
发完那段话,我才意识到一个更刺人的事实。有些话一旦说出口,就不再属于你了。它会在别人手里变形,会被拿去站队,会被拿去证明某个叙事。你站在中间,怎么解释都像狡辩,怎么沉默都像默认。
那一晚,我第一次认真地承认,我不是输给了他们的公关。我输给了自己的冲动。
那天之后,我删掉了 X。直到一周之后,世界仍然在运转,吃瓜的人已经散伙,一切又恢复了平静。
平静来得很快,快到像是什么都没发生过。可有些东西并不会因为热度退去就被证明是误会,它只是被遗忘了。
那个曾经说还会继续迭代维护的人,直到现在也没有看到对应的变化。对我来说,那句话更像是一种当时的安抚,而不是后续会兑现的计划。
而我也慢慢确定了一点,我很难再信任他们对外的表述。不是因为我想否定什么,而是因为我已经看过太多前后不一致。
不是因为真话太复杂,也不是因为真话太难讲。我能想到的解释是,真话一旦说出口,就会让体面露出裂缝。于是更多时候,他们选择沉默,选择拖延,选择用一句句看起来正确的话,把真实的部分藏起来。
在那一周里,我无意经过一座寺庙。我进去站了一会儿,很诚心地祈祷,希望自己能在安稳中找到一块生存地。
出来的时候,看见门口有两块石头,上面分别刻着两个字。
放下 接受
像是冥冥之中在告诉我,事情已经到这里了。
回去的路上我又路过一家书店。玻璃上印着一句话,我站在那儿看了很久。
希望你能记住我,记住我曾经这样存在过。 ——村上春树
我不知道为什么那一刻忽然很想哭。也许不是因为谁,也不是因为那个项目,而是因为我突然意识到,我真正害怕的并不是失去工作。
我害怕的是,我花了那么多时间和心力,最后连“好好告别”都不被允许。连一句真话都不能留下。连我曾经那样认真地存在过,也要被改写成不合时宜。
感谢你能看到这里。